FAQ
FAQ
 Questions
Free Download For Win & Mac | 100% Clean & Secure
< Back
 Help
Category
Help
Category
Editing Functions
Annotation is a feature that adds explanations or markers to video content, helping to highlight key points, explain steps, or provide additional context. By adding text, arrows, graphics, or highlights, you can make the key information in the video easier to understand.
FocuSee provides a variety of annotation elements, including text captions, arrows, lines, geometric shapes, spotlight highlights, magnifier effects, and mosaic masks. These tools allow you to easily mark key areas or blur sensitive information, making your video clearer and more effective.
Annotation features are widely used in software tutorials, product demonstrations, online course recordings, training videos, and technical support explanations. Clear visual annotations help viewers quickly grasp complex operations or interface structures.
If you want to add annotations to a video, please refer to the below :
① In the editing interface, please open the annotation panel on the left and select the desired annotation type, such as text, shape, or mask.
② Please click on the element to add it to the current timeline position.
③ Please drag, scale, or rotate it on the canvas, and adjust the style using the properties panel.
If you want to add text captions to a video, please refer to the steps below:
① Please select the text element from the annotation tool.
② Please type your text directly onto the video screen.
③ Please customize the font, size, color, and position as needed.
If you want to use arrows or shapes to highlight key points in a vide, please refer to the below steps:
① Choose an arrow, line, or shape from the annotation tool panel and add it to the video screen.
② Drag and resize to indicate the area you want to emphasize.
No. FocuSee maintains high-quality output when exporting videos. Annotation elements are naturally overlaid onto the video without affecting the original clarity or overall viewing experience.
Yes. Each annotation element appears on the timeline, allowing you to adjust its start time and duration. This lets you control when annotations appear to better match the pacing of your video narration.
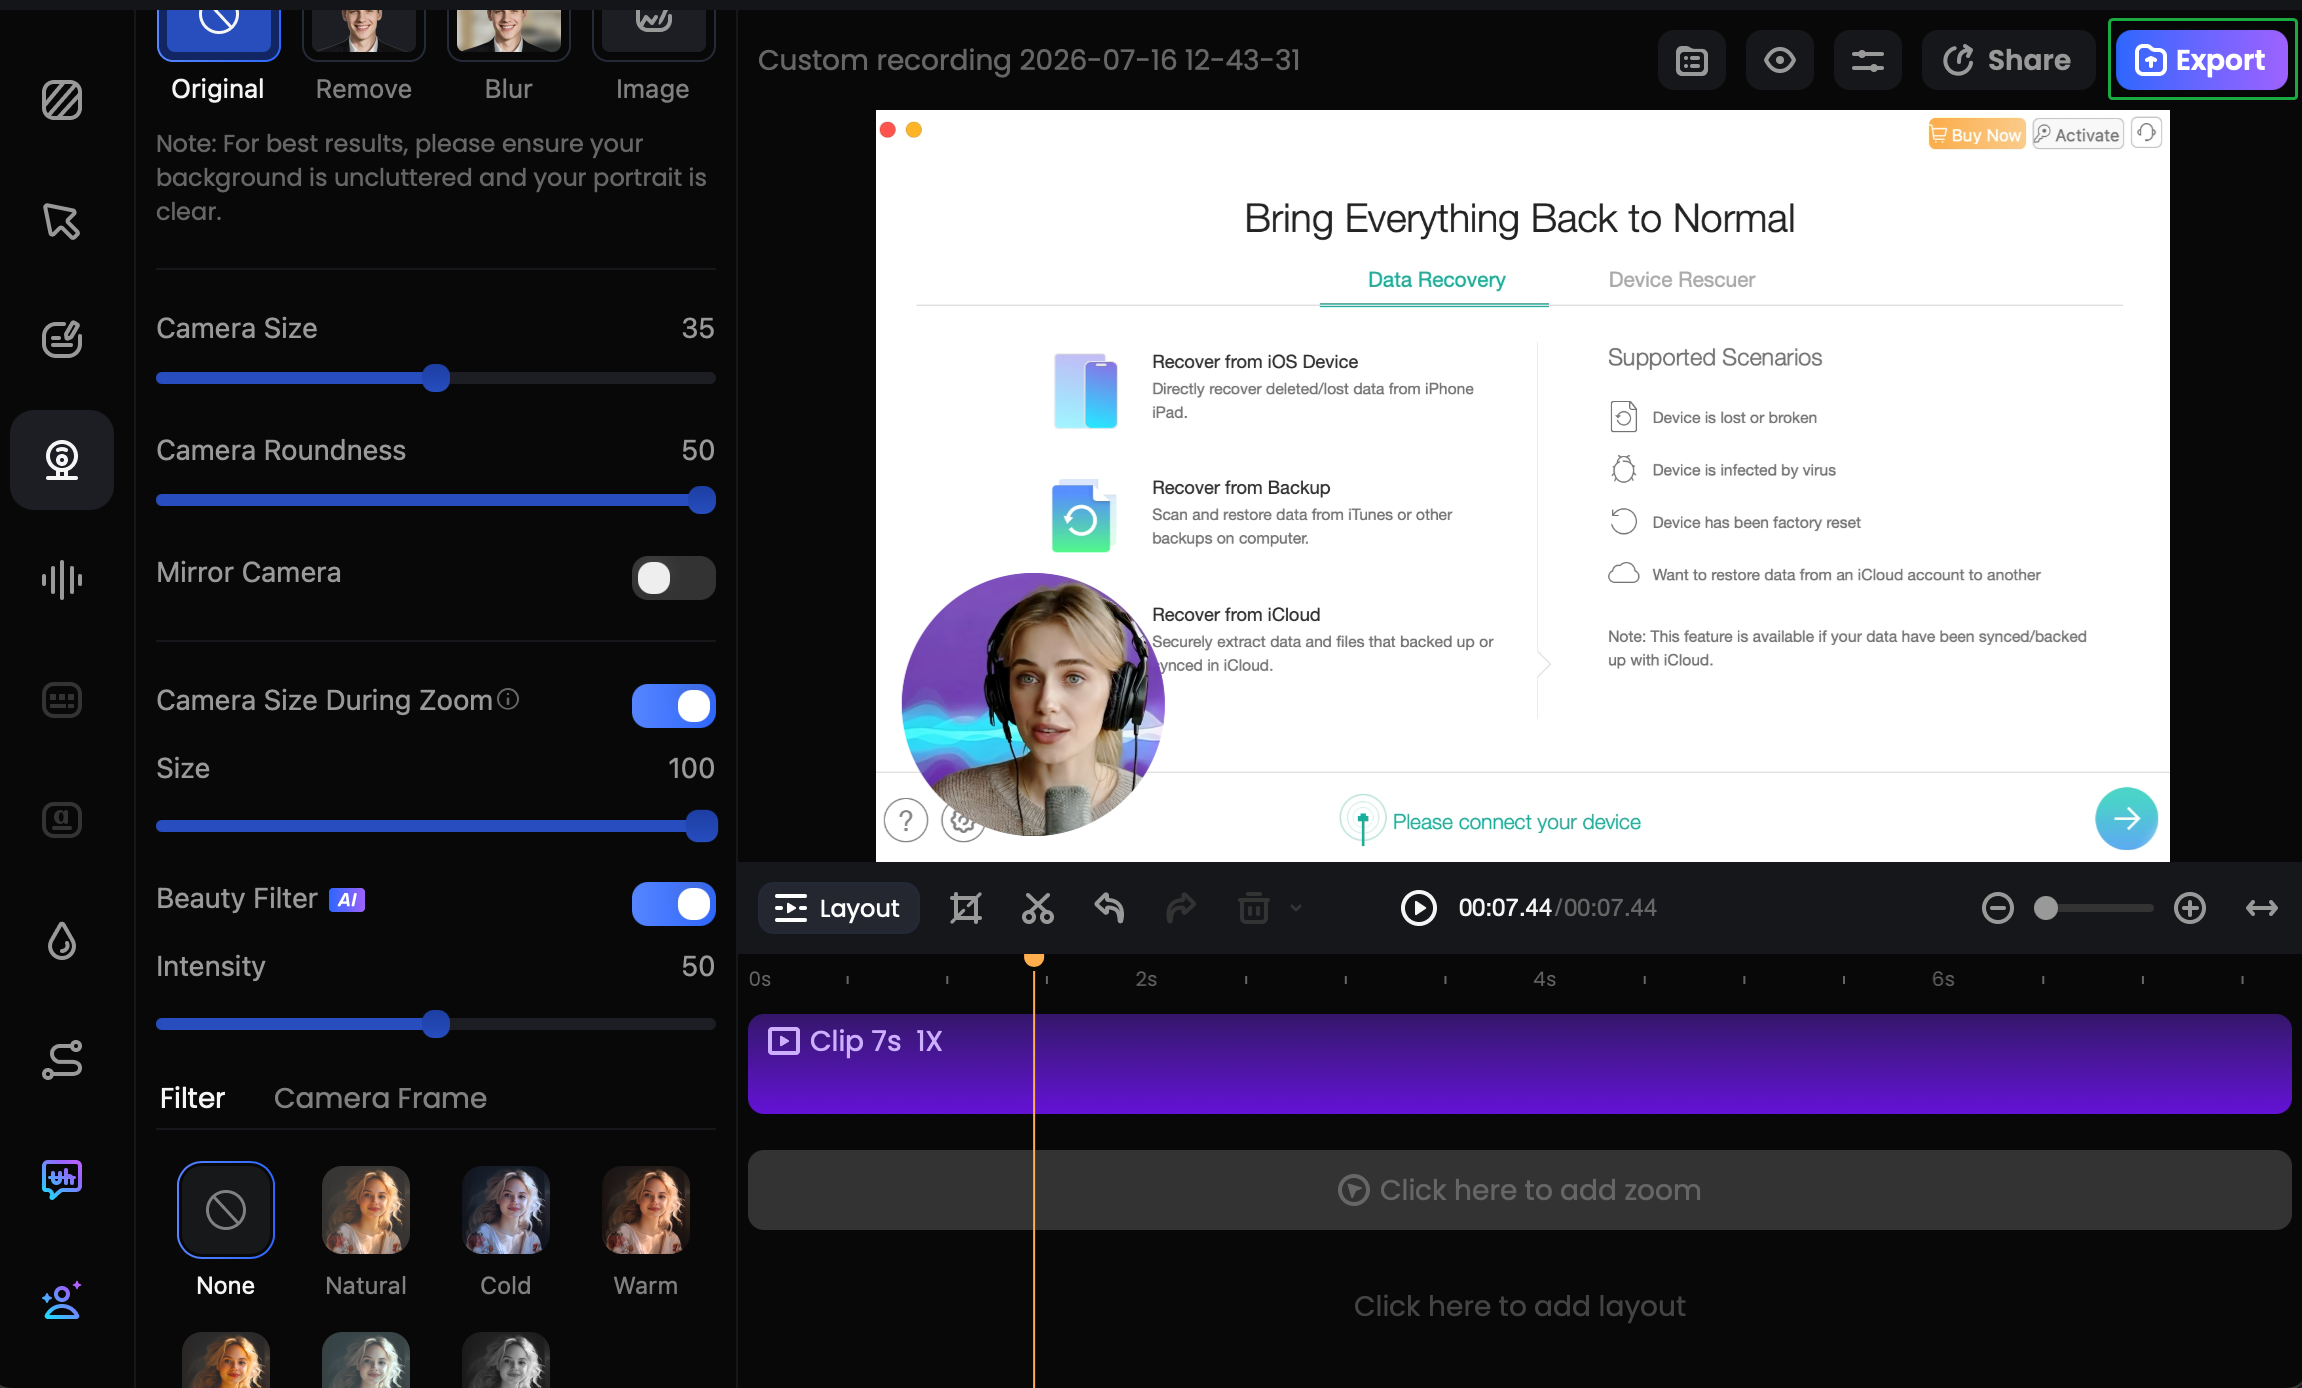
If you want to change the camera recording position with FocuSee, please refer to the steps below:
① Launch FocuSee: Open the FocuSee application on your computer.
② Select Camera Recording Mode: Choose the camera recording mode you prefer.
③ Start Recording: Once positioned, click on the REC button to begin.
④ Customize Camera Settings: After recording is complete, you can click the Camera option and select the Adjust Layout button to customize the camera layout.
⑤ Adjust Camera Size and Position: You can drag the camera bubble to your desired position on the screen. Adjust the size as needed for better visibility during your recording.
For more detailed instructions, you can refer to the FocuSee User Guide.
If you want to share your project files with others using FocuSee. Please refer to the steps below:
① Finish Your Recording: Complete your screen recording.
② Export the Video: After finishing the recording, click on the export button to save your project in your desired format.
③ Choose the Format: Select the format and quality you prefer for sharing.
④ Send the File: Once exported, you can share the file via email, cloud storage, or any file-sharing service to your editor.
For more detailed instructions, you can refer to the FocuSee User Guide.
To share your project from FocuSee to another device, please follow these general steps:
① Export Your Project: After completing your project, look for an option to export or save the project file.
② Choose Export Format: Select the desired format for your project, and then simply choose the resolution and quality settings that suit your needs.
③ Save to a Location: Choose a location on your computer to save the exported file.
④ Transfer to Another Device: Use a USB drive to manually transfer the file to your other device. - Alternatively, you can upload the exported file to a cloud storage service (like Google Drive, Dropbox, or OneDrive) and then access it on your other device.
⑤ Import on Another Device: Once the file is on your other device, you can import or open it in FocuSee or any compatible media software.
For more detailed instructions, you can refer to the FocuSee User Guide.
To remove the camera from a specific clip in FocuSee, please follow these steps:
① Select the Clip: Click on the clip where you want to remove the camera.
② Adjust Layout: Look for the Camera icon in the left panel and select it.
③ Turn Off Camera Display: You can simply turn off the camera display for that specific clip if you don't want your face to be seen during that recording.
For more detailed instructions, you can refer to the FocuSee User Guide.
If you do not want keyboard shortcuts to appear in the final video, please follow these steps to disable them:
① Open FocuSee.
② Record a video or open a video history recording.
③ Enter the editing page
④ Select the Keyboard Shortcuts option
⑤ Turn off the option to display shortcut keys.
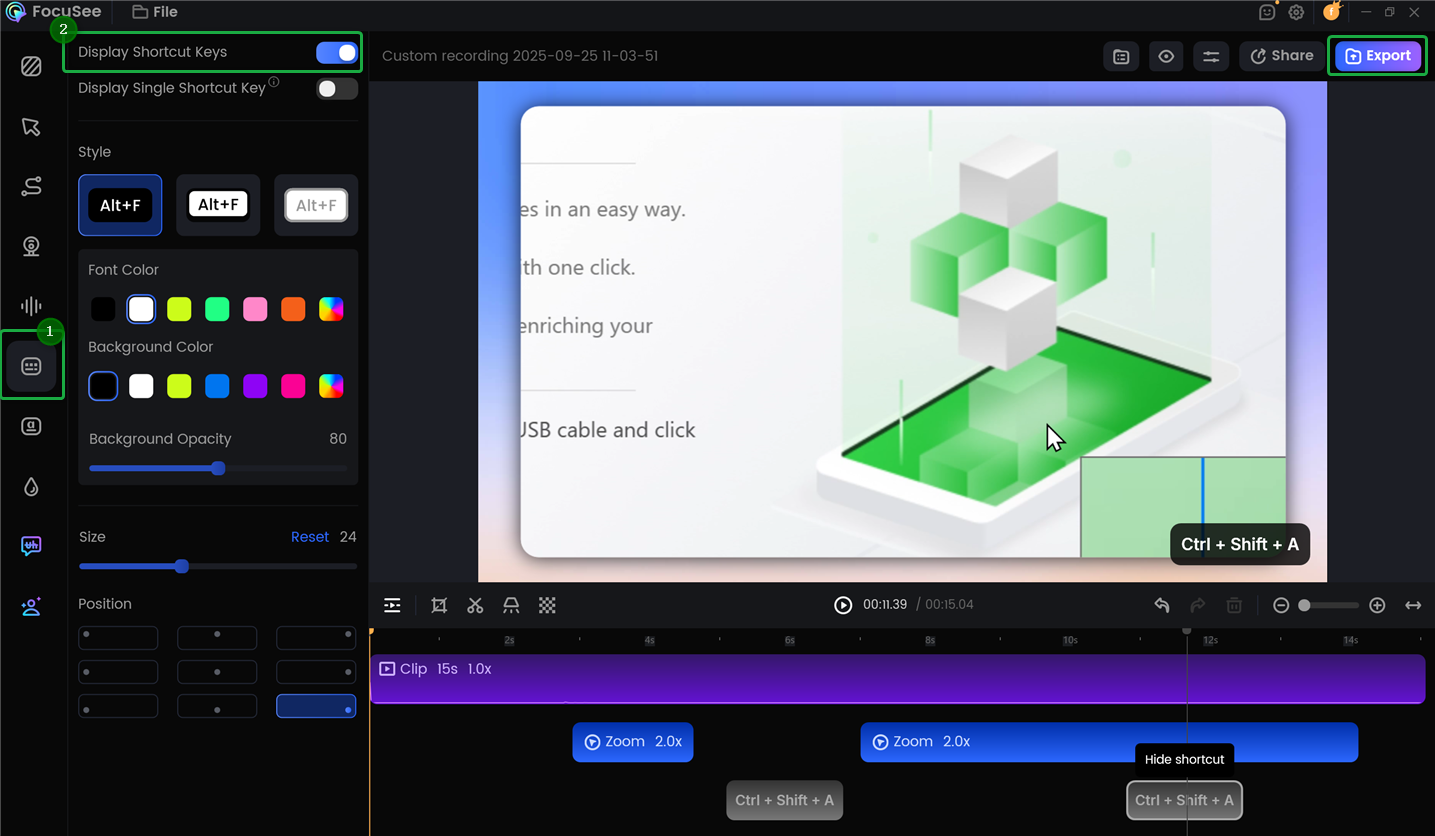
Turn off the Display Shortcut Keys
If you need further assistance, please contact the Customer Support Team.
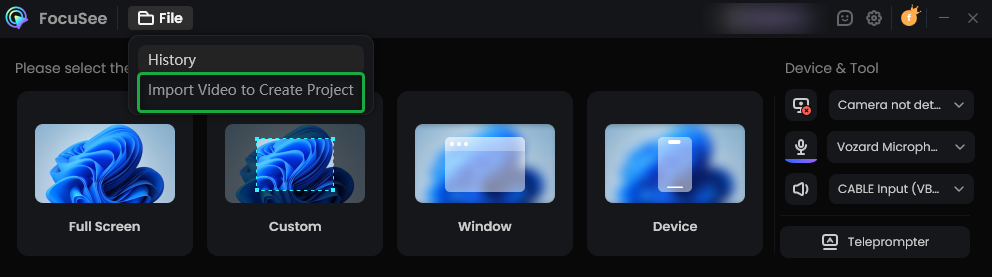
FocuSee allows you to directly use local videos to create editing projects, saving you the trouble of re‑recording. The specific steps are as follows:
① Download and launch FocuSee
② Click the File icon in the toolbar
③ In the pop‑up menu, simply select Import Video to Create Project to import your local video, and then you can start editing.
Windows:
Import video
Mac:

Import video
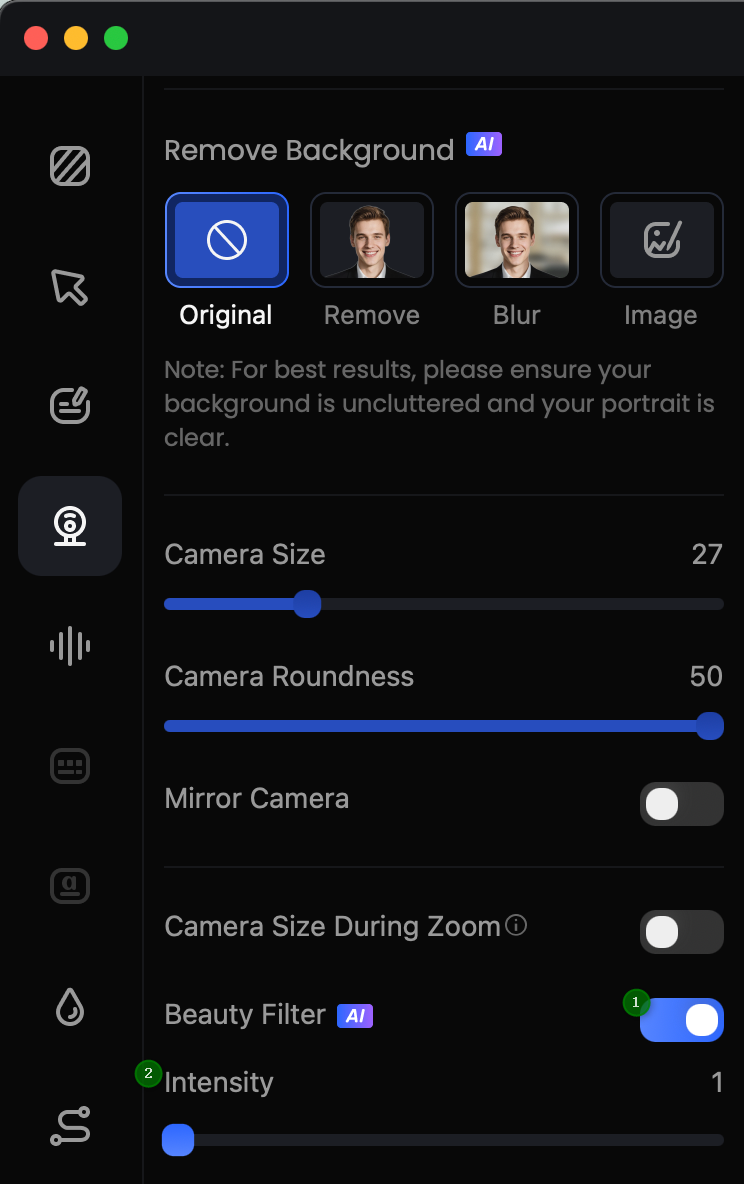
The FocuSee beauty filter helps you quickly enhance your on-camera appearance after recording, making your video look more natural and professional. To enable the camera beauty filter, please follow these steps:
① Download and install FocuSee.
② Enter the editing page.
③ Click on the Camera option and turn on the Beauty Filter.
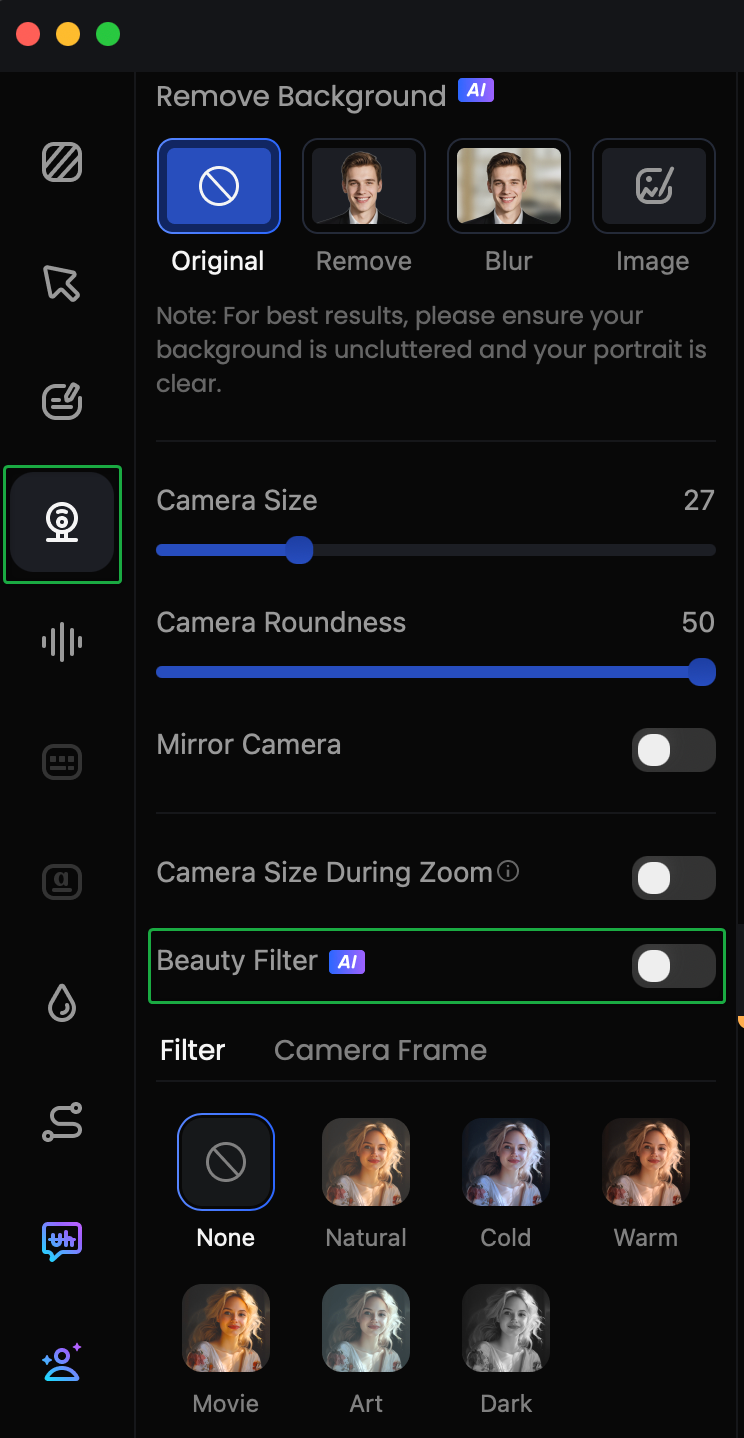
Enable Beauty Filter
④ Drag the Beauty Intensity slider to adjust the effect.
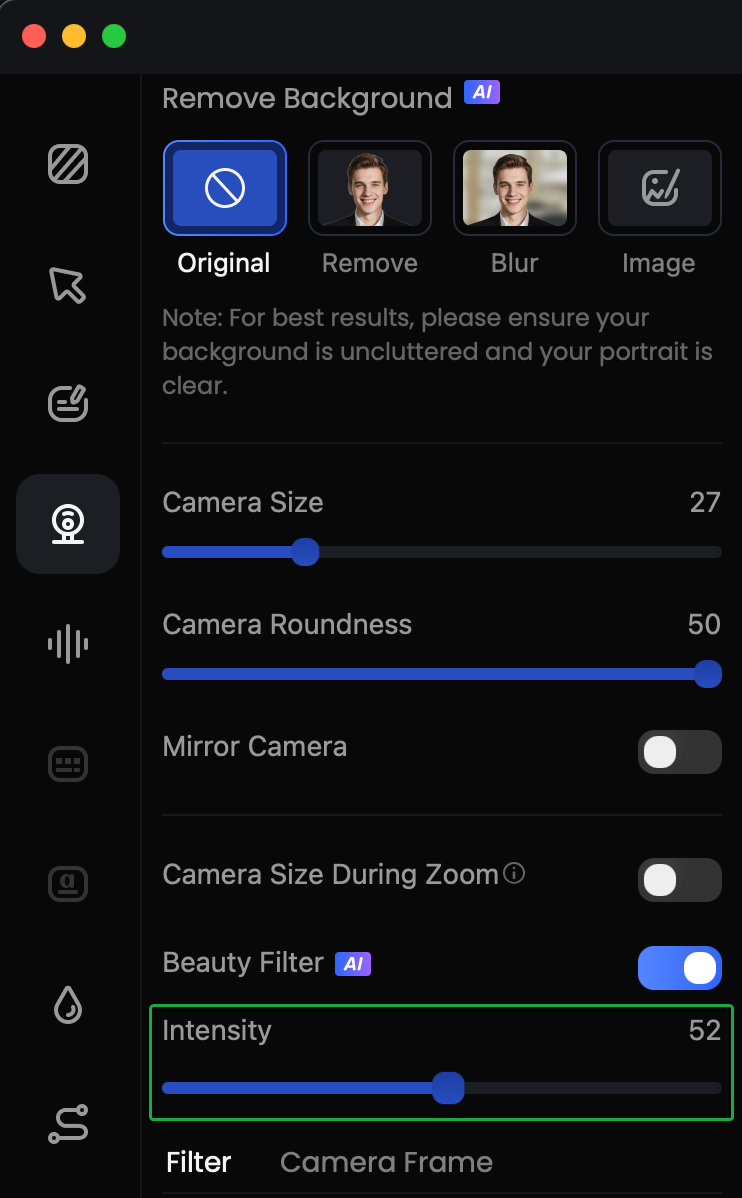
Adjust Beauty Parameters
⑤ Click the Export button in the upper right corner to export your video.
Export Video
To remove the beauty effect, you can choose one of the following two methods:
① Turn off the Beauty Filter switch directly.
② Drag the Beauty Intensity slider all the way to the left (to 1), and the effect will be removed immediately.
Disable Beauty Effect
FocuSee currently supports importing the following audio formats as background music:
· MP3
· M4A
· AAC
· WAV
Background music can effectively enhance the atmosphere and emotional appeal of your video, making your content more dynamic, professional, and rhythmic. FocuSee allows you to choose music from its built-in library or import your own local files. To upload local music, please follow these steps:
① Download and install FocuSee.
② Enter the editing page.
③ Click on the Audio Controls option and scroll down to Background Music.
④ Click the Import Local Music button and select the audio file from your computer to import.
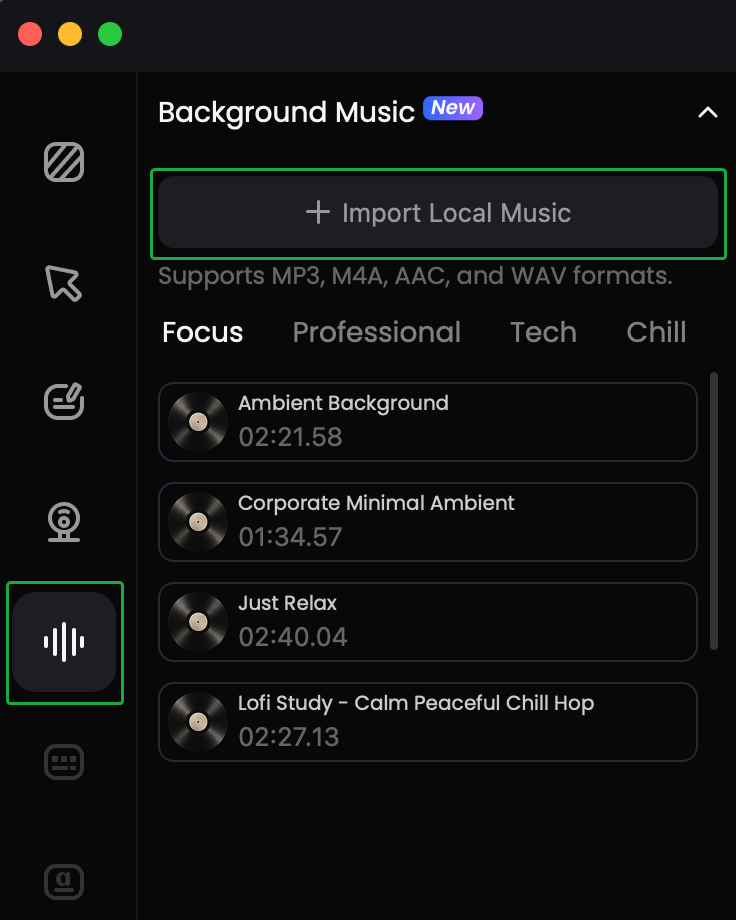
Add Local Audio
No. Currently, FocuSee only supports adding one background music track per project file. If you need to change the music, please first click the Delete button on the right side of the current track to remove it, then add a new audio file.
Yes. You can set a start time and end time to control the background music so that it only plays during the specified segment of your video.
Currently, FocuSee only supports importing subtitles in the SRT format. Other subtitle formats are not supported at this time.
If you need to add subtitles to your video, please follow these steps:
① Download and install FocuSee.
② Enter the editing page.
③ Click on the Captions feature to open the subtitle editing panel.
④ Choose the appropriate method to add subtitles to your video:
a. Use the Advanced Model or Local Model to automatically generate subtitles.
b. Import an existing subtitle file (SRT format) to add subtitles to your video.
After recording, typing segments will be automatically marked on the timeline above your video track. To apply the speed-up effect to all suggested segments uniformly, simply click the speed-up indicator and then check the Apply to All Typing Segments option. This will complete the entire speed-up process in one click, without needing to adjust each segment individually.
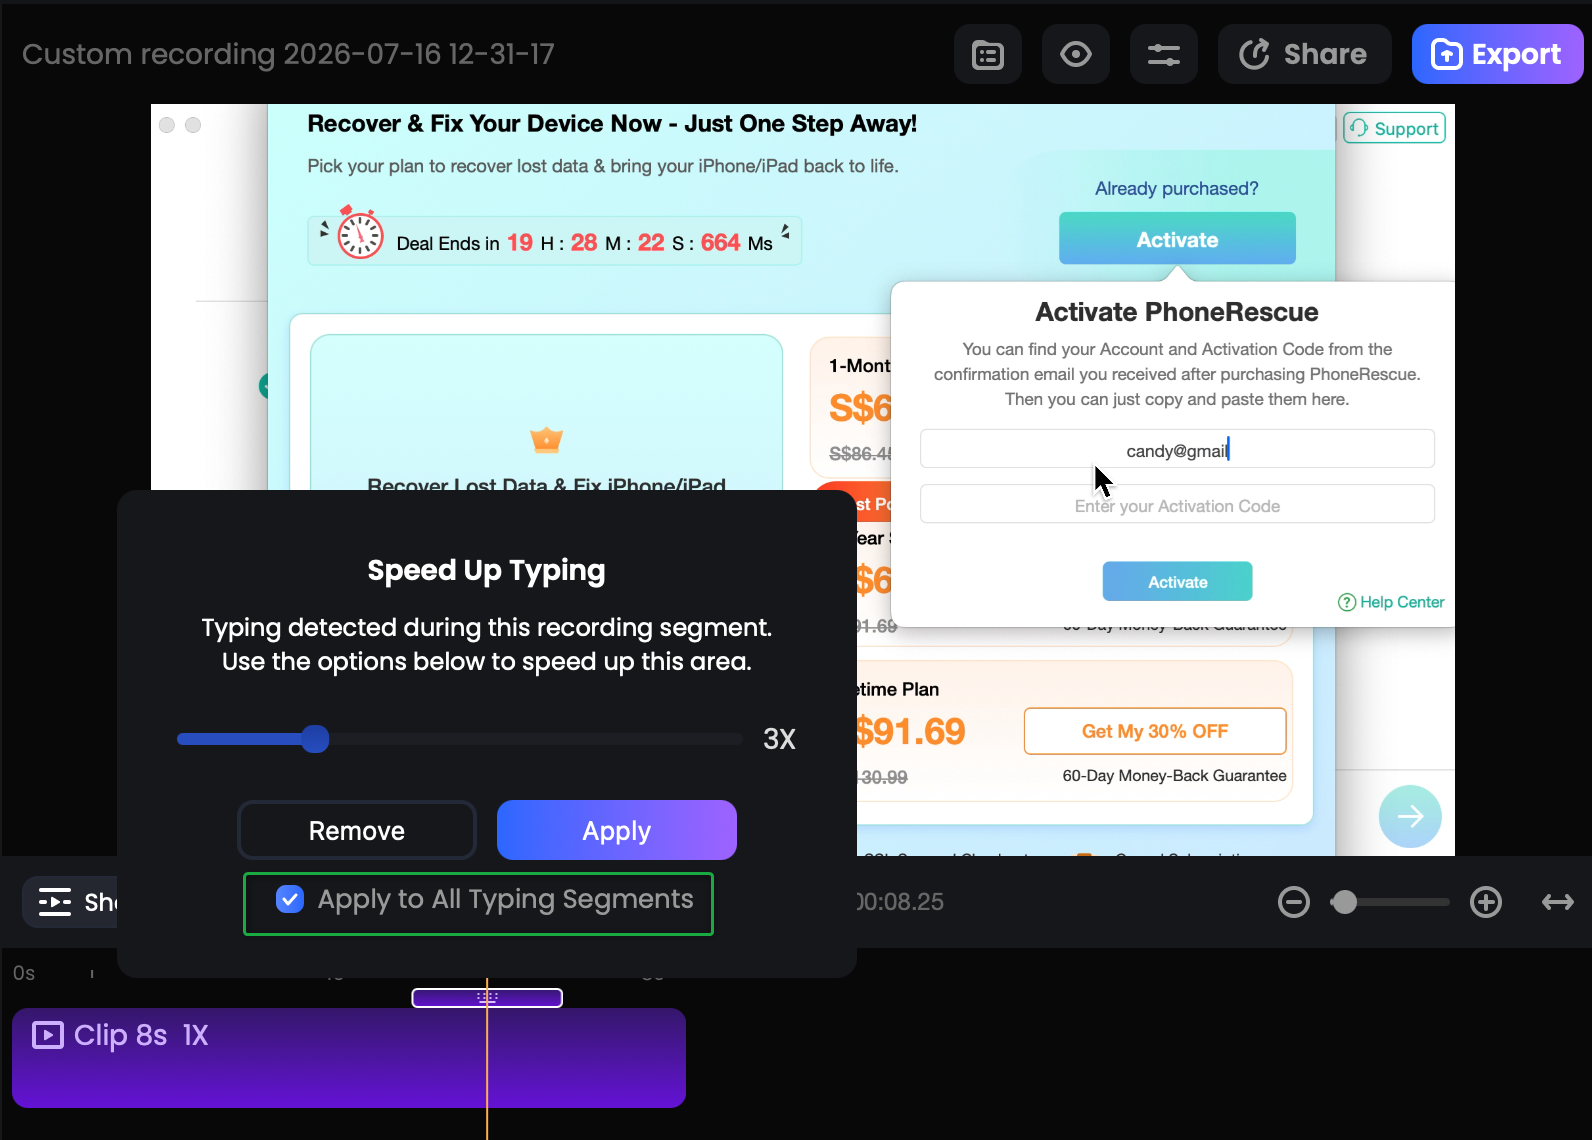
Unified Speed-Up for Typing Detection
This feature is disabled by default. To enable it, you can access the switch through two entry points:
① Enable it on the Settings page.
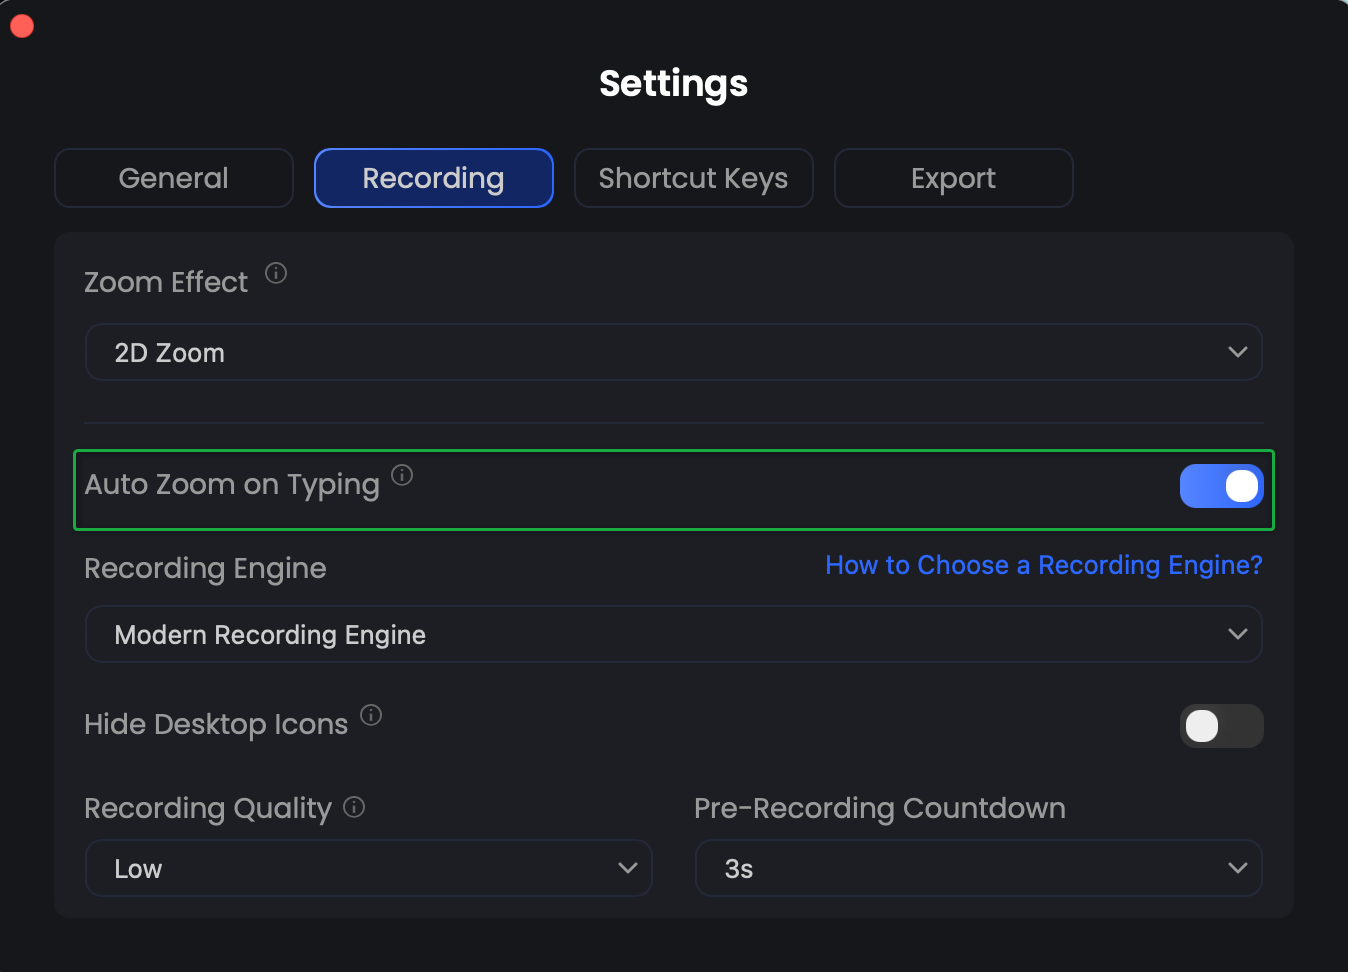
Enable on Settings Page
② Enable it directly from the Recording menu bar.
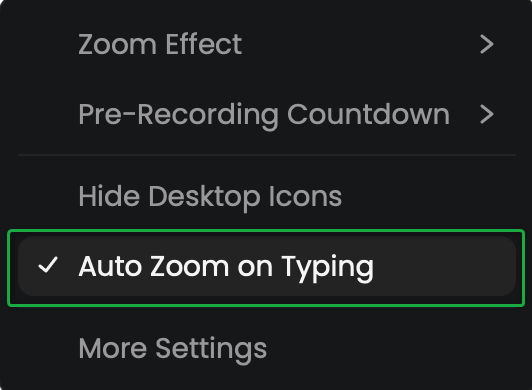
Enable on Recording Page
Once enabled, the system will automatically generate corresponding zoom-in segments for your recording upon completion, without requiring any additional action from you.