How to Make an Instructional Video with Screen Recording (A Smarter Workflow for 2026)

Your support queue is overflowing. You spend hours demonstrating the same tasks to different users, and you know there’s a better way. This guide will show you how to make an instructional video with screen recording by building a clear, repeatable system to solve this exact problem. The goal is to help you create instructional videos with screen recording that are professional, effective, and finally give you back your time.
My first attempts were a genuine point of frustration—raw recordings were confusing, the audio was poor, and the manual video editing took far longer than the live support calls they were meant to replace. I realized the problem wasn’t the recording itself, but the lack of a structured workflow. This guide is the result of finding that system.
How to Make an Instructional Video with Screen Recording
How to Record Tutorial Videos on Screen: The 3-Step Automated Process
For professionals who need to produce training content at scale, an automated workflow is the most effective solution. Here is a repeatable, three-step process using a tool like FocuSee to make software tutorial videos that are clear, concise, and ready in minutes.
Step 1: Plan and Record Your Screen
Before you hit record, have a clear plan. Even a few bullet points will keep you on track. To ensure a smooth delivery, you can use a built-in teleprompter to display your script on-screen, helping you avoid mistakes and maintain a confident pace.
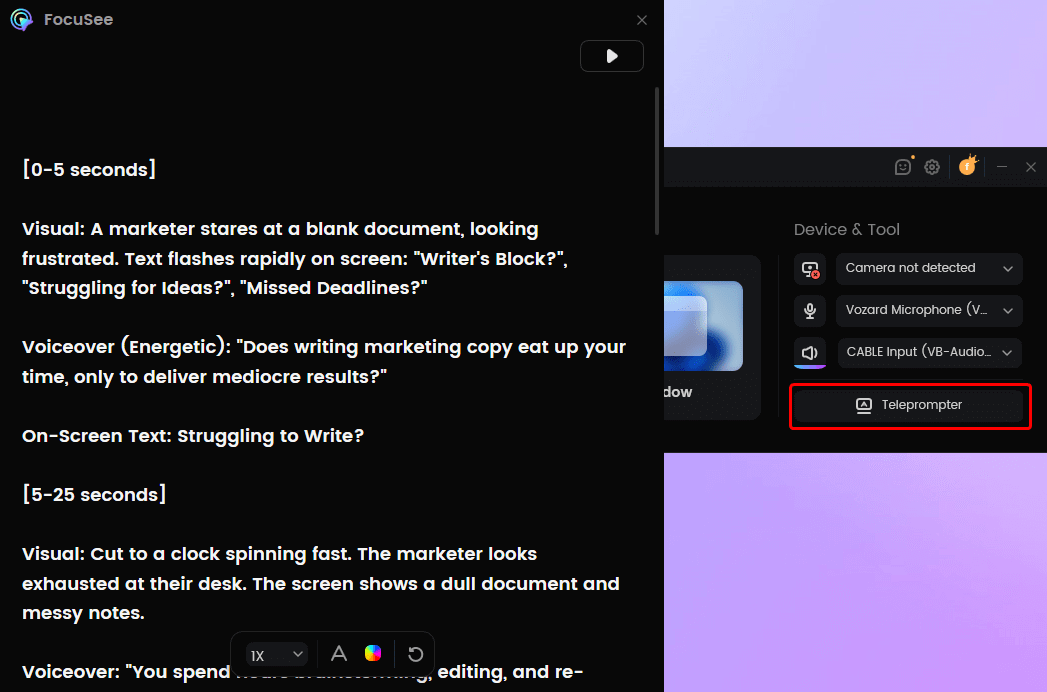
FocuSee Teleprompter
Select your recording area, check your microphone setup, and start the screen capture. Perform the actions on screen as you would for a user, speaking clearly as you go.
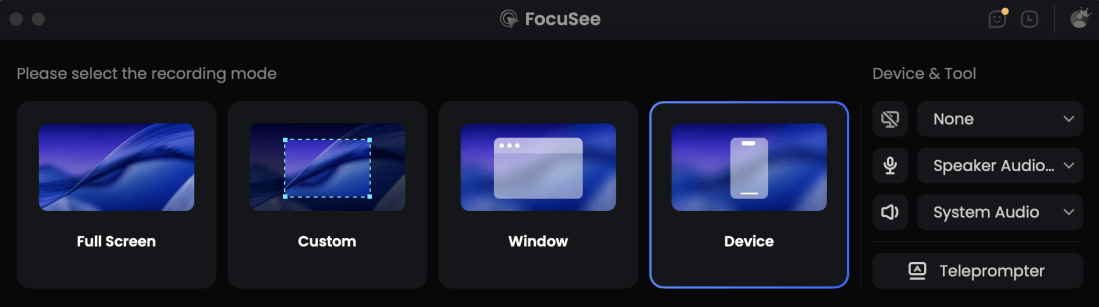
Choose the Recording Model
Step 2: Review the Automatic Edits
Once you stop recording, the software automatically processes the raw footage. This is where you save hours of work. In the editor, you’ll see a timeline where the AI has already:
- Cut Pauses: The AI Smart Cut feature identifies and removes silent pauses and filler words (“ums” and “ahs”). You can easily review and adjust these cuts on the timeline.
- Annotation: Add text, arrows, shapes, and highlights to explain steps clearly and keep viewers focused.
- Added Zooms: The software analyzes your cursor movements and automatically applies smooth pan and zoom effects to highlight clicks and important actions.
- Cleaned Audio: A noise reduction filter is automatically applied to your voiceover recording for professional clarity.
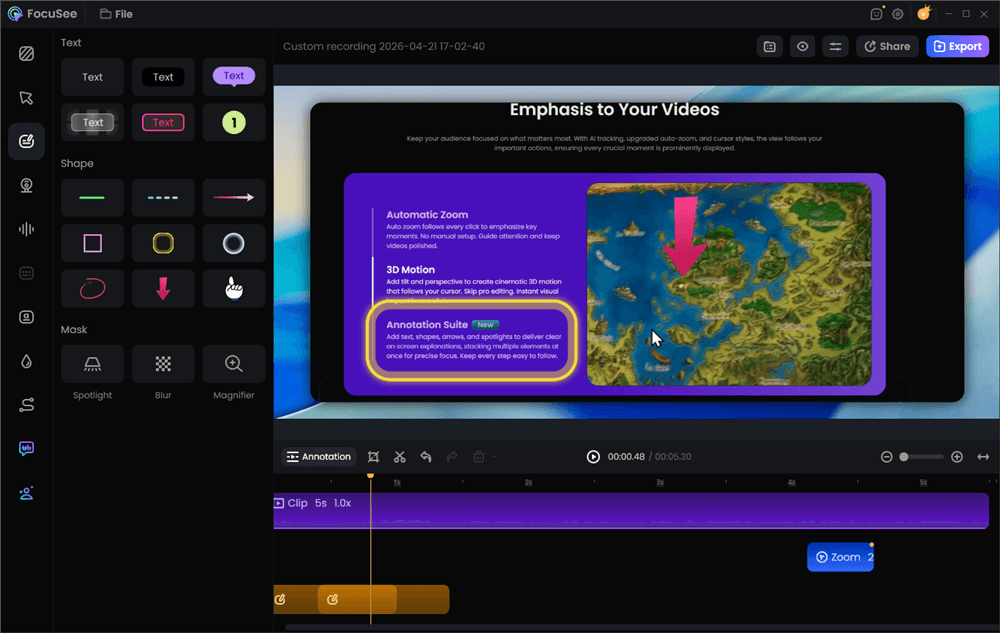
Add Annotations for Clarity
Step 3: Customize and Export
Your video is now 90% complete. In this final step, you can make quick adjustments. Add annotations like text boxes or arrows for extra emphasis, or click the “Subtitles” button to generate and style automatic captions for accessibility.
Finally, select your desired video resolution and export settings. You can export the video as a high-quality MP4 for your Learning Management System (LMS) or as a GIF for a knowledge base article.
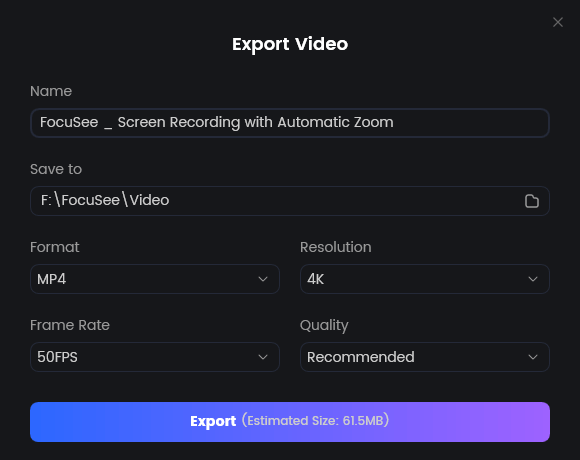
Export Your Video
5 Best Practices for Any Screen Capture Training Video
Whether you choose a manual or automated workflow, these principles will elevate your training content from a simple recording to a powerful teaching tool.
1. Prepare Your Digital Environment
Pro Tip: I learned this the hard way. Before you record, always clean your digital workspace. Close unnecessary tabs, clear stray files from your desktop, and most importantly, turn off notifications. A single email pop-up can ruin a perfect take and force you to start over.
Also, set your screen resolution to a standard aspect ratio like 1920×1080 (1080p). This prevents awkward black bars on the sides of your final video and ensures it looks clean on YouTube or in your help center.
2. Prioritize Crystal-Clear Audio
Here’s a critical insight: viewers will forgive slightly imperfect visuals, but they will not tolerate poor audio. A clear voiceover recording is non-negotiable.
Pro Tip: An external USB microphone is the single best investment you can make for your video quality. It provides a far greater return than a new camera or expensive software. Record in a quiet room with soft furnishings (like carpets or curtains) to reduce echo.
3. Guide Attention with Your Cursor
Your cursor is the star of the show. Move it deliberately, as if you’re pointing to things for a person sitting next to you. Avoid frantic, jerky motions. Use cursor highlighting and zoom effects to draw the eye to the most important part of the screen. This active guidance is what separates a confusing recording from a clear tutorial.
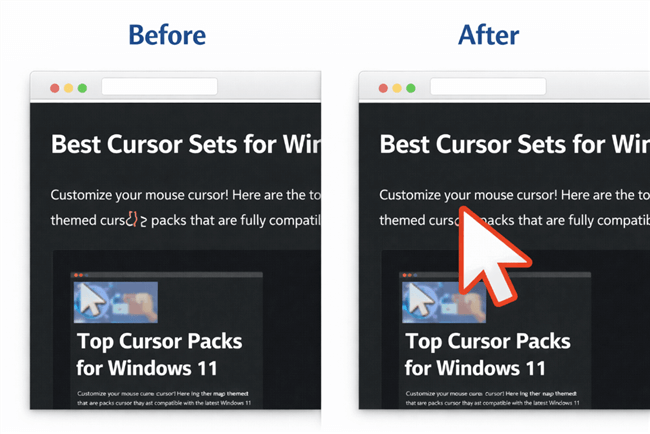
A Cursor Before-and-After Comparison
4. Keep Videos Short and Task-Oriented
Instead of creating one long, monolithic video, break your topic down into a series of shorter, task-specific videos. A 3-5 minute video that solves one specific problem is far more effective than a 20-minute monster. This micro-learning approach is ideal when you need to record step-by-step tutorial videos for different use cases, like brief “how-to” guides for customer support versus more detailed modules for new user onboarding.
5. Design for Accessibility from the Start
Ensure your content is usable by everyone. Always include accurate subtitles or captions for viewers who are deaf, hard of hearing, or watching with the sound off. Use high-contrast visuals and ensure any on-screen text you add is large and easy to read.
Your Workflow Defines Your Results: Manual vs. Automated
An effective screencast isn’t a passive capture; it’s an active teaching tool. Many beginners fall into the trap of just hitting “record” and performing actions, which results in a raw file full of pauses, erratic mouse movements, and unclear audio that requires hours of tedious editing. This is a workflow problem, and you have two primary ways to solve it. The right choice depends on your goals, resources, and how many videos you need to produce.
Method 1: The Manual Workflow (For Maximum Control)
This traditional approach involves using separate tools for each stage: a basic screen recorder (like OBS, macOS’s Screenshot tool, or Windows Game Bar) and then importing that video file into a separate video editor (like CapCut or DaVinci Resolve).
Who it’s for: Creators who need granular control over every edit, have complex editing needs, and have the time to invest in learning video editing software.
The Process:
- Record: Capture your entire screen using a tool like the free and powerful OBS Studio.
- Edit: Import the video file into an editor like CapCut. Manually trim dead air, cut out mistakes, and add zoom effects by keyframing the video’s scale and position.
- Polish: Record a separate voiceover recording, clean up the audio, add background music, and manually create and time your subtitles.
This method offers ultimate flexibility but requires significant time and skill to get a professional result.
Method 2: The Automated Workflow (For Maximum Efficiency)
This modern approach uses a single, integrated tool designed specifically for instructional videos. It records your screen and then automatically applies the most common and time-consuming edits, streamlining the entire process from recording to export.
Who it’s for: Professionals, educators, and support teams who need to create clear, polished tutorials quickly and at scale, without a background in video editing.
The Process:
- Record: Capture your screen and voice using an all-in-one tool.
- Automate: The software automatically removes pauses, enhances audio, adds dynamic zoom effects that follow your cursor, and generates subtitles.
- Polish: Make minor adjustments, add annotations, and export.
Here is a more balanced comparison of these two workflows:
| Manual Workflow (OBS + CapCut) | Automated Workflow (FocuSee) | |
| Time Investment | 🔴 High (hours per video) | 🟢 Low (minutes per video) |
| Required Skill | 🔴 High (editing knowledge needed) | 🟢 Low (beginner-friendly) |
| Creative Control | 🟢 High (full control) | 🟡 Medium (auto-optimized) |
| Consistency | 🟡 Medium (manual effects) | 🟢 High (auto-polished output) |
FAQs on Creating Screencast Tutorials
What is the best screen recording software for beginners?
For beginners focused on making training content efficiently, the best choice is an automated tool like FocuSee. It eliminates the steep learning curve of traditional video editing by handling complex tasks like cursor highlighting and zoom effects for you. For those who want to learn manual editing, OBS Studio (for recording) and CapCut (for editing) are excellent free options.
Should I include my webcam in instructional videos?
Including a webcam can build a personal connection. A good practice is to feature it for introductions and conclusions but hide it during the core technical steps. This allows viewers to focus on your on-screen actions without distraction.
My audio is still bad even with a good mic. What else can I do?
Beyond using a good USB microphone, focus on your recording environment. Move away from hard, flat surfaces that create echo. A closet full of clothes is a surprisingly effective makeshift recording booth. Also, speak clearly and at a consistent distance from the microphone.
How long should an instructional video be?
Aim for 2-7 minutes. Keep videos as short and focused on a single task as possible. If a topic is complex, break it into a logical series of shorter videos. This makes the information easier for viewers to digest and find later.
How can I make my videos more engaging?
Clarity creates engagement. Use a simple script, ensure your audio is perfect, and guide the viewer’s eye with deliberate cursor movements and zoom effects. An automated editor that cuts out long pauses will keep the pace brisk and hold the viewer’s attention.
Stop Editing, Start Teaching
The frustration of spending hours editing a messy screen recording into a usable tutorial doesn’t have to be your reality. An inefficient workflow is the real obstacle, not your ability to teach.
By choosing the right process for your needs—whether it’s a fully manual approach for maximum control or an automated one for speed and efficiency—you can produce a library of clear, professional how-to videos. Creating content that genuinely helps your users will reduce your support load and give you back your most valuable resource: your time.
If an efficient, scalable workflow sounds like the right fit for you, try an automated tool. Experience for yourself how it can transform a raw screen recording into a polished, effective instructional video in minutes, not hours.