How to Create a Instructional Video- 2026 Guide

As a customer success manager, you know the cycle: a new user signs up, and the repetitive support questions begin. You create a quick screen recording to solve a problem, but the final video feels rushed, your cursor is impossible to follow, and the editing consumes hours you don’t have. This guide was written to solve that exact challenge. We will show you how to create instructional videos step by step, transforming your user onboarding and knowledge sharing from a time-consuming task into a scalable asset. The goal is a repeatable system for producing a clear and effective product walkthrough video tutorial every single time, ending the frustration of an inefficient workflow.
A Repeatable Framework for Your Tutorial Video Walkthrough
Before you press record, a structured approach is critical. The effectiveness of a video walkthrough depends less on your software and more on cognitive sequencing—presenting information in the order a beginner needs to learn it, not just the order you perform the actions. This expert insight is the foundation of our 5-step framework, a reliable system for any screen recording.
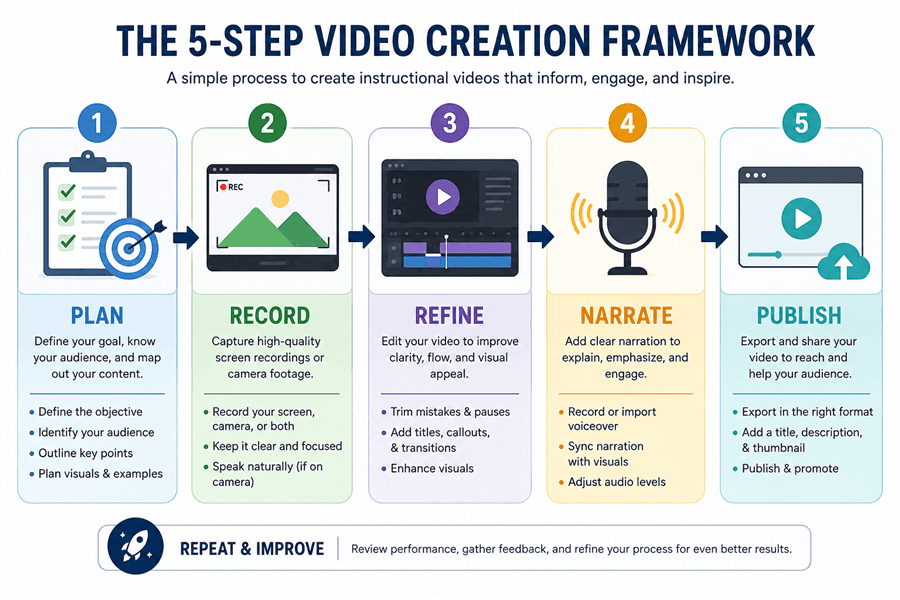
5-Step Video Creation Framework
This framework ensures your final video is logical, clear, and easy to follow:
Step 1. Plan: Begin with a simple outline or storyboard. Define the single objective of your video, identify the key steps, and write a brief script. This planning stage prevents rambling and ensures you cover all necessary points concisely.
Actionable Template: A Simple Storyboard
For a 2-minute software walkthrough, your plan can be as simple as this:
- Objective: Show a new user how to add a teammate to their project.
- Intro (5s): “In this video, I’ll show you how to add a new teammate to your dashboard in under 60 seconds.”
- Step 1 (15s): Action: Navigate to ‘Settings’ and click ‘Users’. Narration: “First, go to the Settings menu in the top right corner and click on the ‘Users’ tab.”
- Step 2 (20s): Action: Click the ‘Invite Teammate’ button and enter an email. Narration: “Next, click the big ‘Invite Teammate’ button. A dialog box will appear where you can enter their email address and set their permissions.”
- Step 3 (10s): Action: Click ‘Send Invite’. Narration: “Once you’re ready, click ‘Send Invite’, and they will receive an email to join your workspace.”
- Outro (10s): “That’s all it takes. For more tips on managing your team, check out our help center.”
Step 2. Record: Capture your screen and, if desired, your webcam. Focus only on performing the on-screen actions smoothly. Do not worry about mistakes or narration at this point; the goal is to get a clean visual recording of the process.
Step 3. Refine: This is where you add crucial visual aids to guide your viewer’s attention. Instead of just listing product features, think about the goal: making every action obvious.
- Trim: Cut any dead air at the beginning and end, and remove any major mistakes or pauses.
- Zoom: Use smooth zoom effects to focus on specific buttons or menus. A good zoom is gentle and centers the most important element, preventing the viewer from getting lost on a complex screen. A jarring zoom is too fast or focuses on the wrong area.
- Highlight: Use a cursor highlighter so the pointer is always visible. This small touch makes a huge difference in clarity.
- Annotate: Add a text box or an arrow to clarify a step that might be confusing. For example, add text that says, “Be sure to click ‘Save’ before closing.”
Step 4. Narrate: With the visual sequence finalized, record your voiceover narration. This technique ensures your audio perfectly matches the on-screen actions, providing clear, step-by-step guidance.
Step 5. Publish: Export your video in the correct format, add captions for accessibility, and share it with your audience.
From the Trenches: A Tip I Wish I’d Known Sooner
Before you hit record, prepare your digital workspace. Close all unnecessary browser tabs, quit applications like Slack or Outlook, and turn off desktop notifications. I once ruined a perfect five-minute take with a single, unexpected calendar pop-up. A clean screen looks more professional and removes any chance of last-minute distractions.
Choosing Your Tools: Manual Methods vs. Automated Software
With a framework in place, you must select your tools. This choice fundamentally impacts the time and quality of your instructional video creation. There are two primary approaches: the manual process, which involves combining several free tools, and the automated process, which uses a single, integrated solution.
The manual method typically involves a basic screen recorder (like QuickTime or Windows Game Bar) and a separate video editor (like DaVinci Resolve or iMovie). Although this approach has a low initial cost, the disjointed editing workflow is often slow and requires technical skill to achieve a professional result.
For professionals who need to create training videos regularly, automated tools are designed for efficiency. Software like FocuSee, Camtasia, or Descript integrates recording, editing, and enhancement features into one application. For this guide, we’ll use FocuSee to demonstrate how these automated features work in practice because its workflow is specifically designed to solve the cursor-tracking and zoom-panning problems that frustrate many creators.
Here’s a direct comparison to help you decide:
| Manual Process | Automated Tool (FocuSee) | |
| Time Cost | High; hours of manual editing | Low; auto zooms & effects |
| Final Quality | Variable; inconsistent polish | High; clean & professional |
| Skill Level | Intermediate–Advanced | Beginner-friendly |
| Scalability | Low; slow production | High; fast batch creation |
How to Make Step-by-Step Walkthroughs the Efficient Way
For the customer success manager struggling with a heavy support load, the manual process is not a scalable solution. The time lost to editing is a major bottleneck. An automated tool handles the most tedious parts of software walkthrough video creation.
Here’s how to record walkthrough videos using FocuSee’s efficient workflow:
Step 1: Select Your Recording Area and Settings
First, open FocuSee and choose what to record: your full screen, a specific window, or a custom area. You can also enable your microphone and webcam. This simple setup ensures you capture exactly what you need from the start.
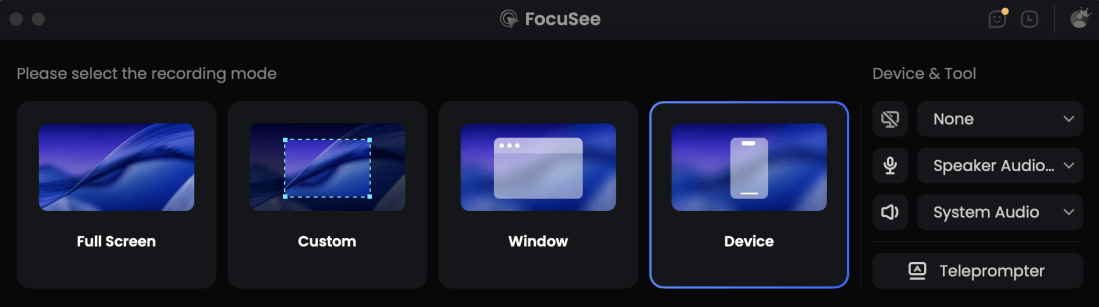
Choose the Recording Model
Step 2: Record Your Process with Smart Focus
Begin your screen recording. As you click and move through the software, FocuSee automatically tracks your cursor movements. It intelligently identifies actions to create automatic zoom effects and cursor highlighting in the final video, directly solving the problem of viewers not knowing where to look.
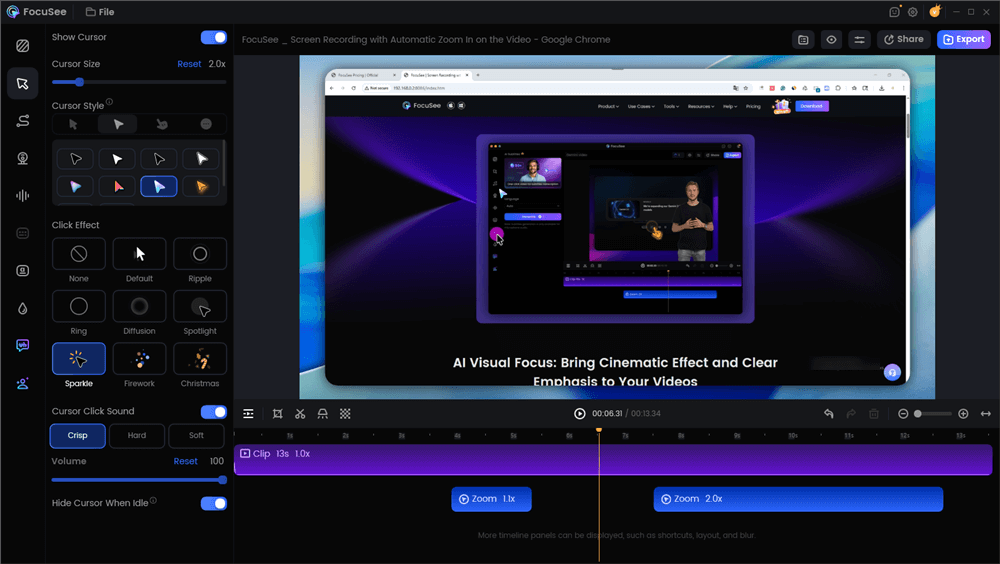
Edit the Tutorial with Auto Zoom Effects
Step 3: Refine and Narrate Your Screencast
Once you stop recording, FocuSee generates a nearly-finished video. You can easily adjust or remove any automated zooms, and use its built-in annotation tools to quickly add callouts such as arrows, text labels, shapes, and click highlights to clarify key steps without switching to another editor. You can also record your voiceover narration directly in the editor.
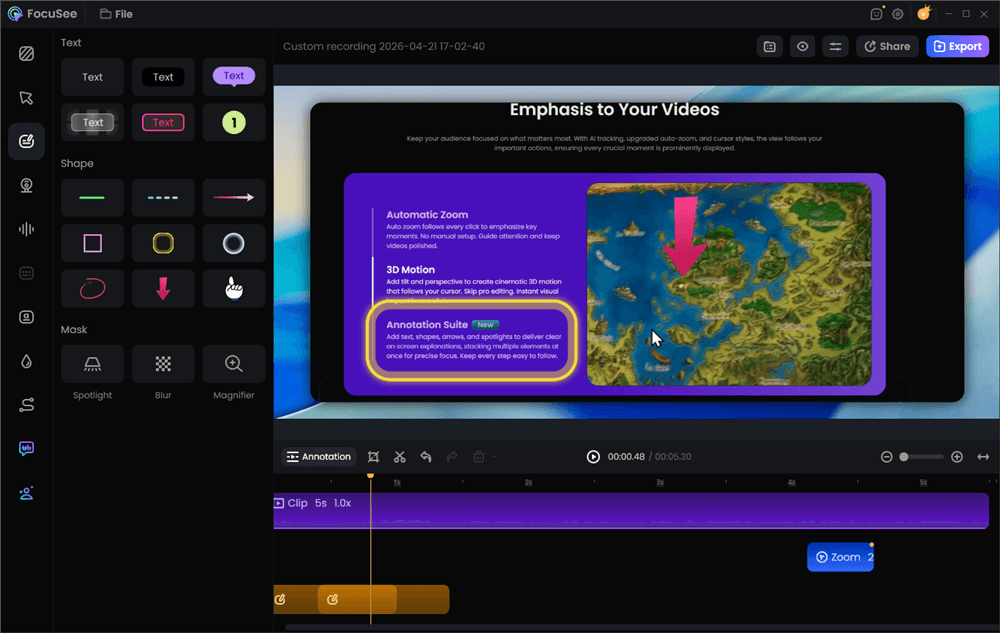
Add Annotations for Clarity
Pro Tip: One-Click Audio Cleanup
Many of us record tutorials from a home office where background noise is unavoidable. To address the common pain point of poor audio, look for an AI Audio Enhancement feature. In FocuSee, this removes background noise and enhances voice clarity with a single click, saving you from having to learn complex audio-editing software.
Step 4: Export and Share Your Walkthrough
Finally, export your polished instructional screencast. FocuSee supports various formats and resolutions, including 4K, and can automatically generate captions to make your content accessible. This completes a scalable process for producing professional onboarding training videos that reduce support tickets and improve user understanding.
Beyond the Tools: Mastering Pacing and Cursor Choreography
Having the right tool is only part of the equation. A critical technique that elevates a good walkthrough to a great one is cursor choreography—the art of moving your mouse with clear intention to guide the viewer’s eye. Many instructional videos feel confusing because the creator’s cursor darts around the screen, reflecting their thought process rather than the viewer’s learning needs.
To master this technique, focus on three key elements:
- Deliberate Pacing: Slow down. When you move your cursor from one element to another, do so at a steady, deliberate pace. This gives the viewer time to follow the action and understand the spatial relationship between buttons and menus.
- Intentional Pauses: Before you click a button or menu item, pause your cursor over it for a full second. This micro-pause acts as a visual cue, signaling to the viewer, “Pay attention to this spot.” It is a simple but highly effective way to highlight an action before it happens.
- Strategic Visual Focus: Use zoom effects to isolate the most important part of the screen. When a viewer sees a zoomed-in section, their brain immediately understands that this is the area requiring their focus. This technique eliminates distractions and reinforces the step-by-step format.
Mastering cursor choreography will dramatically increase the clarity and professionalism of your customer-facing tutorials, regardless of the software you use.
Tailoring Your Walkthrough to Your Audience
Not all walkthrough videos have the same goal. A small adjustment in your tone, pacing, and focus can make your video significantly more effective for its intended audience.
- For New Customer Onboarding: The goal is to build confidence and excitement. Use a friendly, encouraging tone in your narration. Focus on the core “aha!” moments of your product. Keep it concise and celebrate the successful completion of the task at the end.
- For a Support or Troubleshooting Video: The goal is speed and clarity. Your viewer has a problem and wants it solved now. Get straight to the point. Start the video by clearly stating the problem you’re solving. Use annotations and tight zooms to pinpoint the exact setting or button they need to find.
- For an Internal Training Video: The goal is comprehension and compliance. You can afford to be more detailed here. Explain the “why” behind a process, not just the “how.” Reference company standards or best practices where relevant. Pacing can be slower to ensure every detail is absorbed.
Frequently Asked Questions about Instructional Walkthroughs
Here are clear answers to some of the most common questions about creating an instructional video walkthrough.
What is an instructional video?
An instructional video teaches viewers how to complete a task, use a product, or understand a process through clear, step-by-step guidance.
How do you create an instructional video?
Plan your content, record the screen or presentation, add narration and visual highlights, then edit and publish the final video.
Can ChatGPT create instructional videos?
ChatGPT can help write scripts, outlines, and voiceover text, but it cannot record or edit videos by itself.
What is the best AI tool for making instructional videos?
The best tool depends on your needs. For software tutorials and walkthroughs, AI-powered tools like FocuSee can automate screen recording enhancements, zoom effects, and cursor highlighting.
What is the difference between an instructional video and a walkthrough video?
An instructional video teaches a skill or process, while a walkthrough video guides viewers through specific steps to complete a task.
How long should an instructional video be?
Most instructional videos are most effective when they focus on one topic and stay between 2 and 10 minutes long.
Should instructional videos include voiceover?
Yes. Voiceovers help explain actions clearly and make instructional content easier to follow.
How do I make instructional videos more engaging?
Use zoom effects, cursor highlights, annotations, and concise explanations to keep viewers focused on key information.
Your System for Efficient, Professional Walkthroughs
Stop spending hours on tedious video editing that produces unclear results. Creating a polished instructional video walkthrough no longer needs to be a bottleneck in your work. By combining a structured framework, intentional cursor movements, and a tool designed for efficiency, you can produce professional-grade tutorials that reduce support tickets, improve user onboarding, and scale your knowledge-sharing efforts. You now have a clear, repeatable system to solve this problem for good.
Take control of your instructional video creation today. Download FocuSee for free and see how its automated zooms and cursor highlighting can turn a multi-hour task into a few minutes of review.