How to Capture Mouse Cursor in Recording

Imagine you are making a video to show someone how to use a computer program. You click, move your mouse, and explain everything. But later, when you watch the video, the mouse pointer is not clear or missing, making the video hard to follow.
The good news is that you can fix this problem using tools that let the screen recorder follow your mouse cursor. This means people can see every click and movement. It helps to make videos better and easier to understand. In this Screen Recorder Follow Cursor guide, you will learn how to use simple tools to capture the mouse cursor when recording. The procedure is simple, and no special computer skills are required.
What is a Screen Recorder Follow Cursor?
A Screen Recorder Follow Cursor is a screen recording feature that ensures the mouse pointer remains at the center of the video as you move it. Instead of screen capturing the entire screen, this tool tracks the cursor and records the area where it moves. It helps the viewers see where the action is carried out, particularly relevant for tutorials and demos. This feature saves the screen area and makes the videos even more understandable since only important things will be highlighted. It’s perfect for showing how to use software or explaining steps clearly with mouse movements.
Why It Matters for Tutorial Videos
In tutorial and training videos, viewers need to quickly see where you click and what matters on screen. Static recordings often make small UI details hard to follow.
A screen recorder that follows your cursor and auto-zooms on key actions guides attention in real time—so viewers never get lost. It makes videos clearer, more engaging, and more professional, while also reducing the need for manual editing.
This is why follow-cursor recording is essential for software tutorials, product demos, and training videos.
Best Screen Recorders That Follow the Cursor
| FocuSee | Bandicam | ScreenPal (Screencast-O-Matic) | |
| Platform | Windows & macOS | Windows | Windows, macOS, Web |
| Follow Cursor Recording | ✔️ Yes (auto tracks cursor) | ✔️ Yes | ✔️ Yes |
| Highlights Mouse Clicks | ✔️ Yes (cursor highlight + click effects) | ✔️ Yes | ⚠️ Basic |
| Auto Zoom / Smart Focus | ✔️ Yes (AI auto zoom on actions) | ❌ No | ❌ No |
| Built-in Video Editing | ✔️ Yes (trim, cut, speed, zoom) | ⚠️ Limited | ✔️ Yes |
| Automatic Subtitles / Captions | ✔️ Yes (50+ languages) | ❌ No | ⚠️ Manual |
| Best For | Professional tutorials & product demos | Basic screen capture | Online lessons & presentations |
How to Capture Mouse Cursor in Recording [3 Ways]
Now, let’s have a detailed look at the three best ways to capture the mouse cursor in recording:
FocuSee
If you want to make screen recordings that are clear, smooth, and easy to understand, FocuSee is a great tool to try. It helps you capture your mouse cursor while recording and does much more. With FocuSee, you don’t need to spend hours editing. It has automatic editing, so once you finish recording, your video is ready. It can track and highlight your cursor, zoom in and focus on the key areas, and even add backgrounds to make the video look better.
FocuSee Official Website
You can simultaneously record your screen, voice, and face, and use a teleprompter to remain focused. It is also easy to add captions, change the speed, and trim some parts of the video. FocuSee will allow you to select various cursor styles, click effects, and display keyboard shortcuts. It is compatible with both Windows and Mac. You also have the option to export your videos as GIFs or of high quality, which includes up to 4K quality, and add your logo as a watermark. With FocuSee, you save time and quickly have professional videos without additional tools or skills.
Key Features:
- FocuSee shows your mouse and clicks clearly for better video understanding.
- It zooms in on your screen where needed for easy viewer focus.
- You can add your voice and face while recording the screen.
- Captions and cursor effects help make tutorials more useful.
- It supports clear, sharp 4K resolution for high-quality videos.
Here are the simple steps to use FocuSee:
Step 1. Free download FocuSee from the official website. Make sure your internet is working. After downloading the file, open and install it by following the instructions.
Step 2. Launch the app. On the home screen, select your camera, microphone, and speaker from the list. Decide what part of your screen to record. You can record the whole screen, a selected part, or just one window.
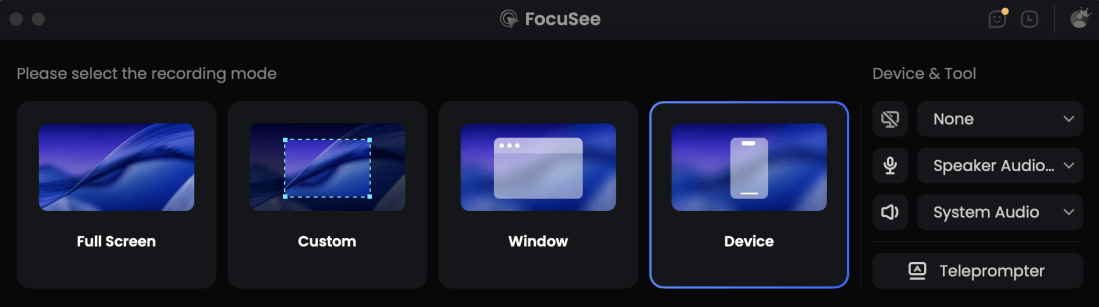
Choose the Recording Model
Step 3. Double-check your camera and audio settings. When everything looks good, click the red “Record” button to start. You’ll see a 3-second countdown. Use this time to prepare. Recording will begin right after.
Step 4. To stop recording, click the red “Stop” button when you’re done.
Step 5. Your video will appear with automatic effects. You can edit it by cutting parts, changing speed, or adding highlights.

Show Mouse Cursor
Step 7. Once finished, hit “Export” and save your video as an MP4 or GIF.
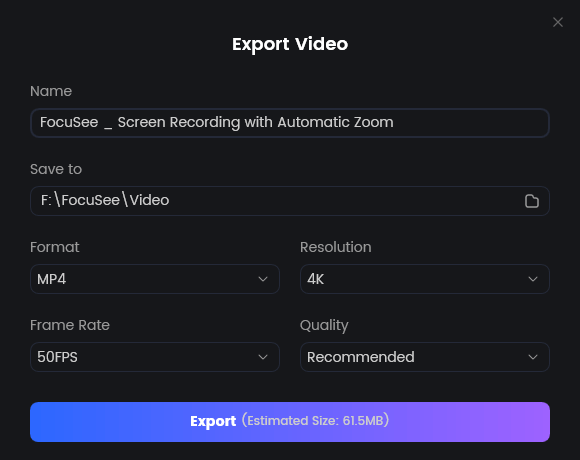
Export Your Video
Bandicam
Bandicam is a comprehensive, free Windows screen recorder that allows recording all processes on your screen, including mouse cursor movements. For both tutorials, video lectures, or gameplay records, Bandicam has you covered. You can easily capture any area using Full Screen, Specific Area, or Around Mouse Cursor modes. Enhance your videos with features such as Webcam Overlay, Audio Input/Output Recording, and Real-time Drawing.
Schedule your tasks with the Scheduled Recording option and enjoy uninterrupted 24-hour long-term recording. You can even record in stunning 4K Ultra HD resolution up to 3840×2160. Add a professional touch with Text/Image Overlays, Mouse Click Effects, and record across Dual Monitors for maximum flexibility. To use this tool:
Step 1. Download and install Bandicam from its official website. After installation, open the program.
Step 2. Click the “mouse cursor icon” next to the microphone on the top toolbar.
Step 3. In the pop-up window, go to the “Mouse” tab. Check “Add mouse click effect” to show clicks, and choose colors for left and right clicks. Check “Add mouse highlight effect” if you want the pointer highlighted. Adjust the color and size as needed. Click “OK” to apply.
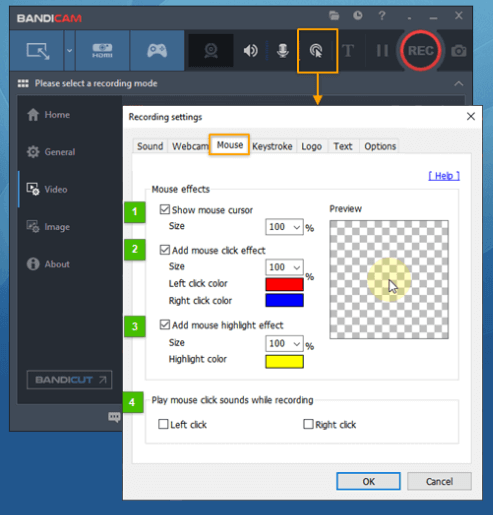
Adjust Mouse Settings
Step 4. Click the “down arrow” next to the recording icon and select a recording mode, such as full screen or custom area.
Step 5. Click “REC” to start recording. Press “F12” to stop. To view your video, go to the “General” tab and click “Open”.

Click Rec
Screencast-O-Matic (ScreenPal)
Screencast-O-Matic (ScreenPal) is a free and easy-to-use screen recording software which is intended to make your video tutorials having high quality not a hassle. Its ability to capture the mouse cursor sets it apart and makes it ideal for software demonstrations or even online tutorials. This lets your viewers clearly follow your actions on screen.
You can choose to record your entire screen or just a specific region and enable voiceover recording to add explanations. It also supports keyboard shortcuts and macros to control start and stop actions quickly. For best clarity, set your capture resolution to from 720p to 4K – this will ensure output clarity, as well as compatibility with a widescreen display. For this:
Step 1. Visit Screencast-O-Matic’s official website, download, and install the program. Once installed, open the program.
Step 2. Set your preferred options, such as “Screen recording mode” and “Video quality.” Then click “Rec” to begin capturing your screen.
Step 3. When you’re finished, press “Stop” and select “Done” to move forward.
Step 4. In the new window, click “Edit.” Under the “Show” section, check “Cursor” so your mouse appears in the recording.
Step 5. Click the small icon next to “Cursor” to open the cursor settings. Here, you can pick custom colors for “Halo”, “Left Click”, and “Right Click” highlights. Press “Done” when you’re ready.

Choose Halo
Step 6. Choose “Save as Video File” to save it on your device.
FAQs on Screen Recorder Follow Cursor
Which screen recorder best highlights mouse movements and cursor clicks for tutorials?
FocuSee is one of the best options because it highlights cursor movements, shows click effects, and automatically zooms on key actions. This helps viewers clearly follow every step in software tutorials.
Do follow cursor recorders also provide auto zoom or focus features?
Yes. Some advanced follow-cursor screen recorders, such as FocuSee, include smart auto zoom or focus features that automatically enlarge the area around your cursor or clicks during recording.
How does follow cursor recording improve training videos?
Follow cursor recording keeps the viewer’s attention on the exact part of the screen being used. By highlighting cursor movements and zooming in on key actions, it makes training videos easier to understand and more engaging.
Why should I use the follow cursor feature?
This feature is helpful for tutorials or guides, as it highlights only the important area around the cursor. It reduces distractions and makes your video easier to understand.
Which screen recorder has a good follow cursor option?
FocuSee is highly recommended for follow cursor recording. It automatically tracks the pointer, zooms in on actions, and effortlessly provides clean, professional-looking tutorial videos.
Does following the cursor recording affect video quality?
No, it usually doesn’t affect quality. Focusing on important tasks and avoiding unnecessary background content can improve the viewing experience.
Final Words
In summary, the follow cursor feature on screen recorders is an amazing tool for ensuring that your viewers’ attention remains on the most important events that occur on the screen. It allows you to make tutorial videos more understandable, engaging, and easy to follow, especially if you need to explain a program or a list of sequential actions. For the best experience, give FocuSee a shot; it supports automatic cursor tracking, smart zooming, and fine editing tools, making creating high-quality videos easy and fast.