When you capture a tutorial or share your screen, the mouse pointer is essential for directing visitors. However, your viewers may become confused if the cursor is too small or difficult to see.
Learning how to highlight the mouse cursor is an easy fix for this. Making your pointer visible can help someone follow along with you more easily while you’re teaching, presenting, or helping them with an online task.

How to Highlight Mouse Cursor
How to Highlight Mouse Pointer in Windows 10 & 11
When you share your screen, video a tutorial, or give a presentation, it’s simple for someone else to lose sight of your mouse cursor. It’s little and occasionally disappears into the background. It’s simpler for others to follow along with you when you highlight your mouse.
There are free tools that let you add click effects or colourful highlights in addition to Windows’ default choice to show the location of your cursor. In Windows 10 and 11, here are some simple ways to make your mouse cursor stand out.
Built-in Methods to Highlight Mouse Cursor
Windows 10 and 11 both include some built-in options that make the mouse pointer easier to see. These aren’t as fancy as third-party tools, but they’re simple, quick, and work without extra software.
Method: How to highlight the mouse pointer in Windows 10 using the Control Panel
Step 1: Type Control Panel into the Windows key and press Enter.

Type Control Panel
Step 2: Select Mouse from the Devices and Printers menu.

Devices and Printers
Step 3: In the Mouse Properties window, switch to the Pointer Options tab.
Step 4: Tick the box labeled ‘Show location of pointer when I press the Ctrl key.
Step 5: Click Apply, then OK.

Click OK
Now, whenever you press the Ctrl key, a circle animation will appear around your mouse pointer.
Limitations of Built-in Highlighting
The mouse does not remain visible when you hit Ctrl; Windows displays a circle around the mouse. Tutorials and presentations can’t make much use of it because you can’t alter its colour, style, or add click effects.
How to Highlight Mouse Cursor on Mac
Finding the mouse cursor on a Mac might be difficult while working on a large screen or presenting a presentation. Fortunately, Mac has built-in capabilities that avoid the need for additional tools and make it easy to locate the cursor. You may adjust its size straight from your accessibility settings anytime you need it to be visible.
Third-party apps might be useful for people who desire elements like highlights or animations that are even more obvious. However, the built in mac settings are quick, easy, and efficient if your primary objective is just to make the cursor larger and simpler to follow.
Steps on how to highlight the mouse cursor on Mac (Built-in Method)
Step 1: Select the Apple menu by clicking in the top left corner of your display.
Step 2: Select System Preferences or System Settings on newer Mac models.
Step 3: Find the section on accessibility.
Step 4: From the left panel, choose Display.

Choose Display
Step 5: Find the settings for the cursor.
Step 6: Drag the Cursor Size slider to change the pointer’s size till it’s suitable.

Change the Pointer
You will then immediately see that your cursor has grown and become considerably more visible. Your Mac comes with a fast solution that doesn’t require any additional software or complex setup.
How to Highlight Mouse Cursor on Windows & Mac Using FocuSee
Finding a small pointer that vanishes on a crowded screen often involves moving the mouse in circles. It might be annoying when you’re working, teaching, or giving a presentation.
For such, a mouse highlighter might be useful. You can use FocuSee to make your cursor shine on both Mac and Windows computers. When your audience wants to follow along during online meetings, demos, or tutorials, this is helpful in addition to improving visibility.
Step on how to highlight the mouse pointer in Windows 10/Mac with FocuSee
Step 1. Download FocuSee for your Windows or Mac and install it. Launch the app once installed.
Step 2. Choose a recording option (such as Full Screen or Custom) based on your needs. Or you can upload a file to add the mouse highlight.
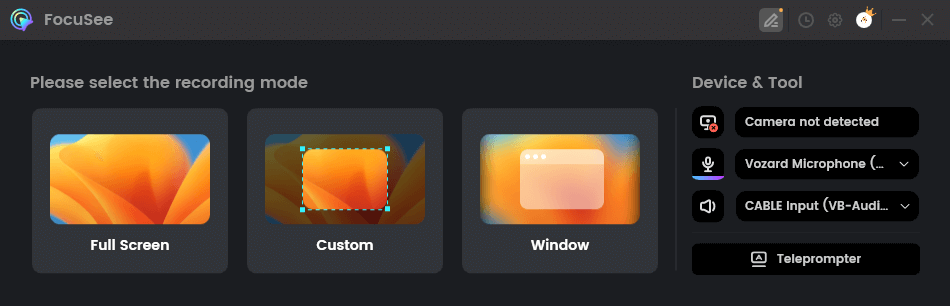
Choose the Recording Mode
Step 3. Go to the Mouse Highlighter Settings inside FocuSee. Here, you’ll find options to adjust the style and effect.
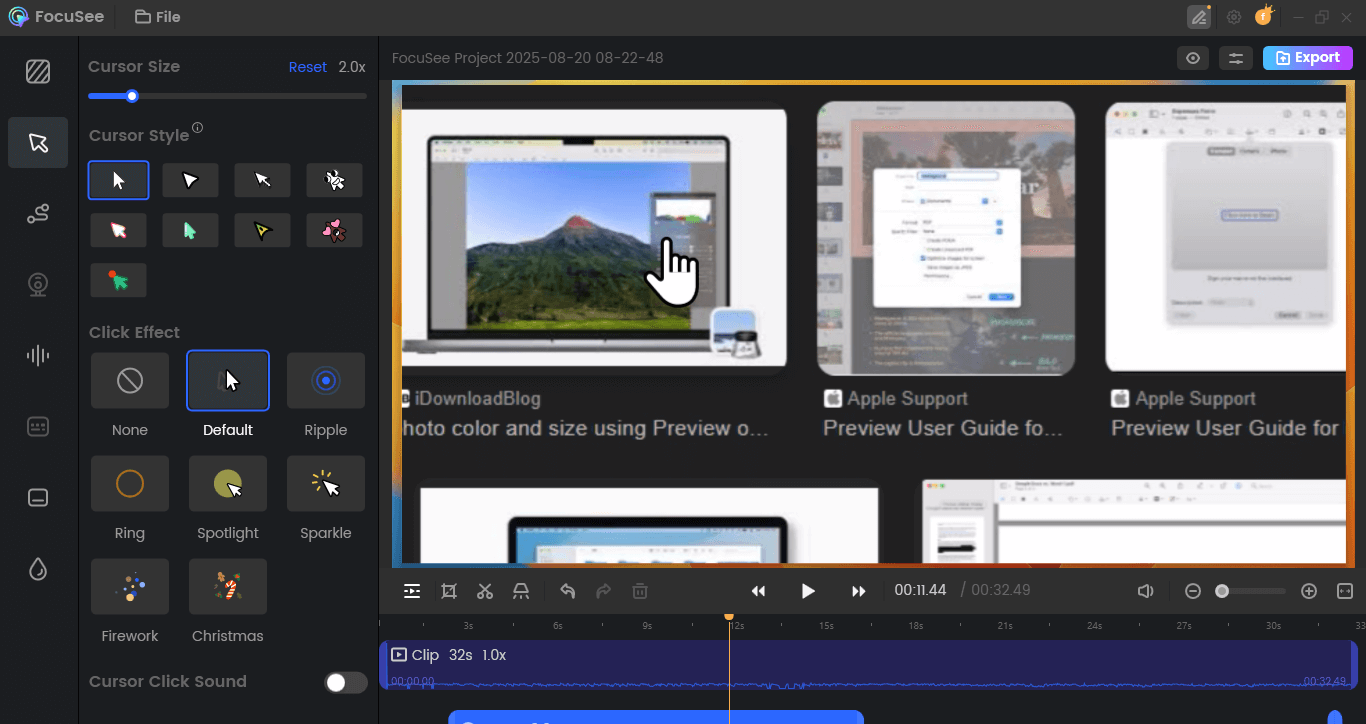
Open Mouse Highlighter Settings
Step 4. Choose the highlighter’s colour, size, and form. Try applying the spotlight effect on the cursor. You can also enable keystroke display for tutorials or demos.

Add Click Effects and Sound Effects
Step 5. Switch on the mouse highlighter. Now, while you work or record, your pointer will always be visible and prominent.
How to Make Chrome and Edge’s Cursor Visible Using the Cursor Highlighting Extension
When surfing, it might be challenging to see the mouse pointer, especially if the little white arrow blends in with the background of the page. To find it again, you pause, use your mouse to search, and then focus your eyes. It’s a little annoying, but you may slow down if it occurs frequently.
For that, the Cursor Highlighter extension might be useful. With a few clicks in Chrome or Edge, you can create a coloured circle around your pointer. Because it instantly highlights the pointer and has a polished look due to its smooth movement effect, it is perfect for both casual surfing and screen sharing.
Methods for Highlighting Your Cursor
Step 1: Go to the Cursor Highlighter page in Chrome or Edge. To install it, click Add.

Add Cursor Highlighter Extension
Step 2: In your browser’s toolbar, choose the Extensions button. Select Cursor Highlighter from the list.
Step 3: Turn on the Enable/Disable switch in the menu.
Step 4: To select your highlight colour, click the colour box. To save the modification, click Save.

Choose your Highlight Colour
Step 5: The highlight you choose will now make your cursor stand out when you open any webpage.
For users of Edge: Allow extensions from other shops if it doesn’t install immediately. To enable extensions from other retailers, just press Alt + F, select Extensions > Manage Extensions, and activate the feature.
Why Highlighting the Mouse Cursor Matters
The mouse pointer sometimes vanishes into the screen, making you look around to find it again.
This can be annoying and slows you down when working with many windows or on a crowded desktop.
A highlighted cursor solves this problem by making the pointer immediately noticeable.
It is helpful not only for daily tasks but also for:
- Presentations
- Screen grabs
- Online classes
A simple highlight makes the cursor easier to follow and the overall experience smoother.
FAQs on Highlight Mouse Cursor
How can I highlight my mouse cursor?
You may adjust its colour or size in your computer’s settings, or you can create a bright circle around it using browser extensions or programs like FocuSee.
How does a cursor highlighter work?
This helpful function makes the mouse pointer easier to see by encircling it with a ring, glow, or spotlight.
Why is a mouse cursor required?
The cursor makes it easier to use and control your computer by indicating where you are clicking and aiming.
Final Words
It may be quite helpful to have a good view of your cursor while working, teaching, or giving a presentation. It helps you maintain control without interruptions and maintains your audience’s attention.
FocuSee is an outstanding choice if you’re looking for a straightforward and dependable method to highlight the mouse cursor. It streamlines your process and makes your presentations simpler to follow with its integrated highlighter and screen recording functions.
