How to Create Software Tutorial Content That Reduces Support Tickets

Launching a new feature often doesn’t create excitement—it creates confusion and a spike in support tickets. The problem isn’t your product. It’s how users are forced to learn it.
Most tutorials fail because they simply record screens instead of guiding actions. They dump features instead of leading users to outcomes. If users can’t complete key tasks without asking for help, your product doesn’t have a usability issue—it has a teaching problem.
Great tutorials aren’t recordings. They are structured experiences designed to make users succeed without support.
What Makes a Tutorial Reduce Support Tickets

The Tutorial Arc
Before you even open a recording tool, you must have a plan. A high-quality recording will not save a poorly structured tutorial. Many creators struggle with the fear that their content is either too technical for beginners or too shallow for pros. The solution lies in how you organize the information.
One of the most common mistakes in software tutorials is organizing content around product features instead of user goals. High-performing tutorials start with a specific user outcome (for example, “export your first report in under 5 minutes”) and only introduce interface elements when they are needed. This task-based structure consistently outperforms feature-based tutorials in completion rate and reduces cognitive overload for new users.
How to Plan a Task-Based Tutorial:
- Define the Win: Start the video or article by stating exactly what the problem is and what the solution looks like. “In this guide, you will learn how to automate your weekly invoice.”
- Just-in-Time Learning: Do not explain every button on the toolbar. Only explain the buttons required to complete the specific task at hand. This keeps the cognitive load manageable and solves the problem of how to create app tutorials for users without overwhelming them.
- Chronological Flow: Ensure your steps follow the exact linear progression of the user’s workflow, avoiding tangents about unrelated settings.
By focusing on the “Job to Be Done” rather than the interface itself, you ensure users actually finish the guide.
How to Create a Software Tutorial Efficiently
The bottleneck often isn’t just creating the tutorial—it is creating assets for the blog, the help center, and social media all at once. This is where using a specialized tool like FocuSee transforms the workflow. It addresses the common anxiety: “I don’t know whether to create a video tutorial, written guide, or interactive walkthrough.” With the right tool, you generate the source material for all three in one take.
Here is the efficient workflow to create a software tutorial step by step:
1. Pre-Production: Prepare Your Environment
Before hitting record, you must “sanitize” your screen. A common mistake that ruins tutorials is accidentally exposing PII (Personally Identifiable Information) or distracting desktop clutter.
- Clean the Stage: Close unnecessary browser tabs and turn off desktop notifications.
- Protect Privacy: Use a “Demo” account with dummy data. Ensure no real user emails, API keys, or internal admin URLs are visible. This builds trust and prevents security risks.
- Dry Run: Click through the workflow once without recording. This muscle memory helps you avoid mouse hesitation during the real take.
2. Record the Workflow
Instead of worrying about camera angles or perfectly timing your zoom manually, simply navigate through your software, performing the task naturally. FocuSee captures the screen, microphone, and system audio on separate tracks.
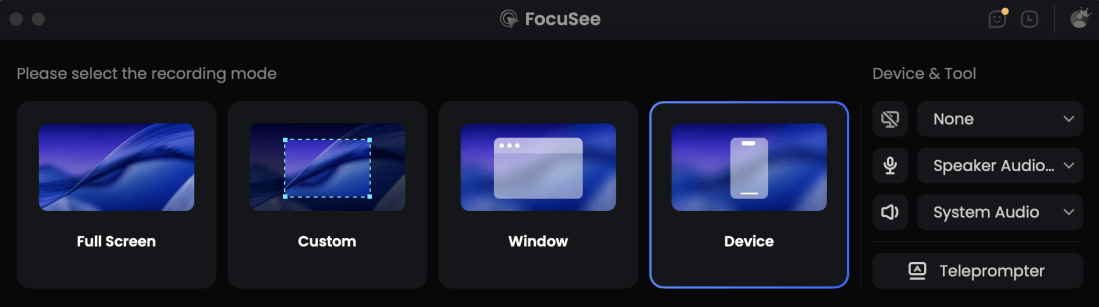
Choose the Recording Model
Pro Tip: Act slightly slower than you normally would. This gives the viewer time to process the movement.
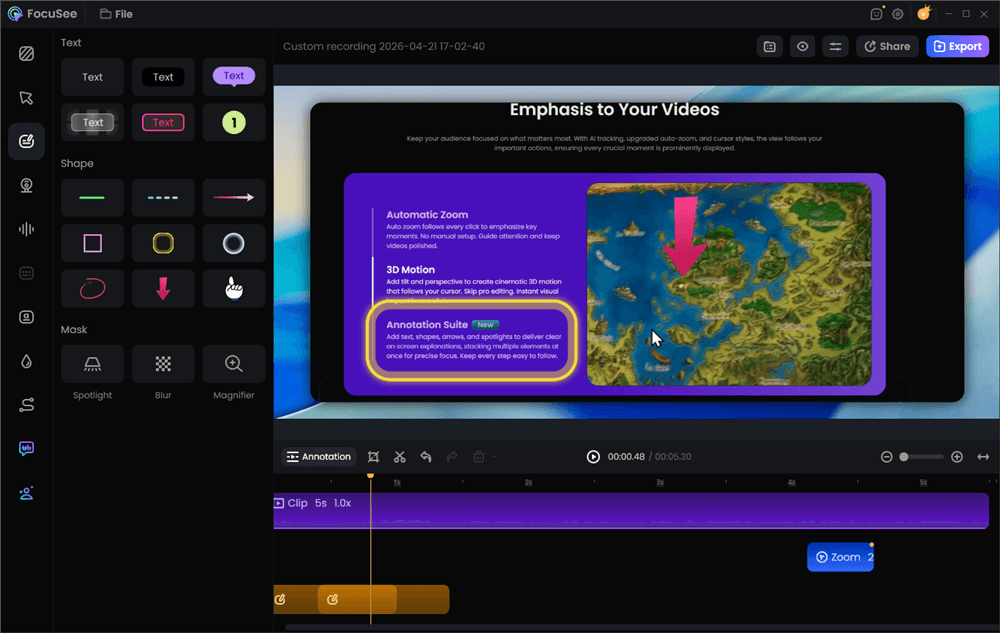
2. Add Annotations for Clarity
This is the step where raw recordings become instructional content. Annotations help guide user attention and explain what matters at each step, especially in complex SaaS workflows where users may otherwise miss key actions.
With FocuSee, you can add:
- Text callouts to explain what each step does
- Arrows to point directly at buttons or UI elements
- Highlight boxes to emphasize important areas
- Spotlights to focus attention on a specific region of the screen
This layer of guidance reduces cognitive load and helps users follow along without confusion—especially when they are new to the product.
Add Annotations for Clarity
3. Automate the Polish (Smart Focus)
This is where automated tools solve the “too static” problem. FocuSee’s Smart Focus & Auto-Zoom automatically detects where you click and zooms in. This ensures the viewer follows the action on smaller screens without you needing to manually edit keyframes. This is crucial for user onboarding, where clarity is paramount.
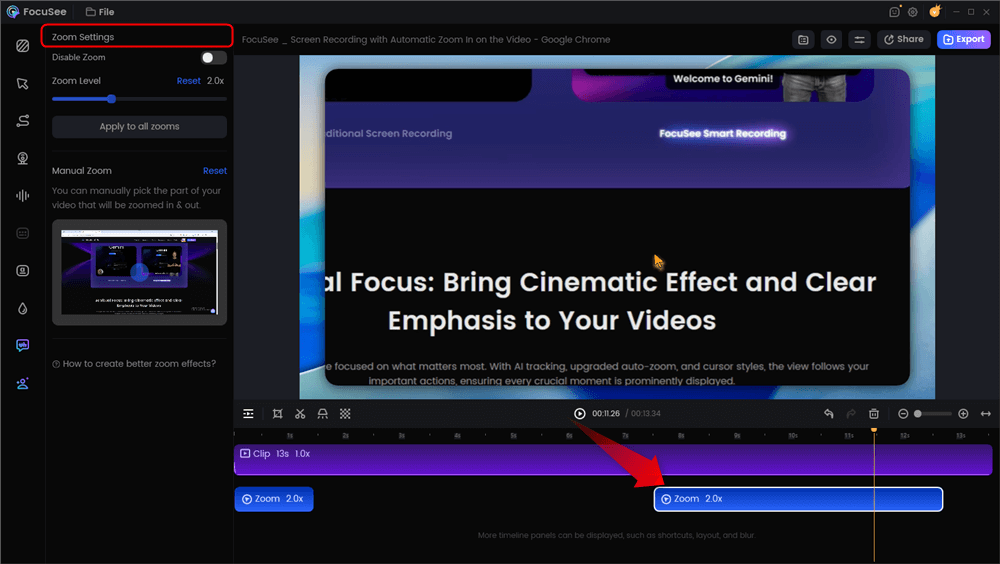
Automatic Zoom Effects
4. Enhance Clarity with Cursor Effects
To prevent users from getting lost—a major cause of support tickets—apply Cursor Effects. These highlight your mouse movements, making the navigation unmistakable.
A common user complaint is “I can’t see where you clicked.” Highlighting the cursor eliminates this friction point.

Show Mouse Cursor
5. Export and Host Strategically
Once recording is complete, you need to decide where this content lives.
Public Search (YouTube): Best for brand awareness and top-of-funnel SEO.
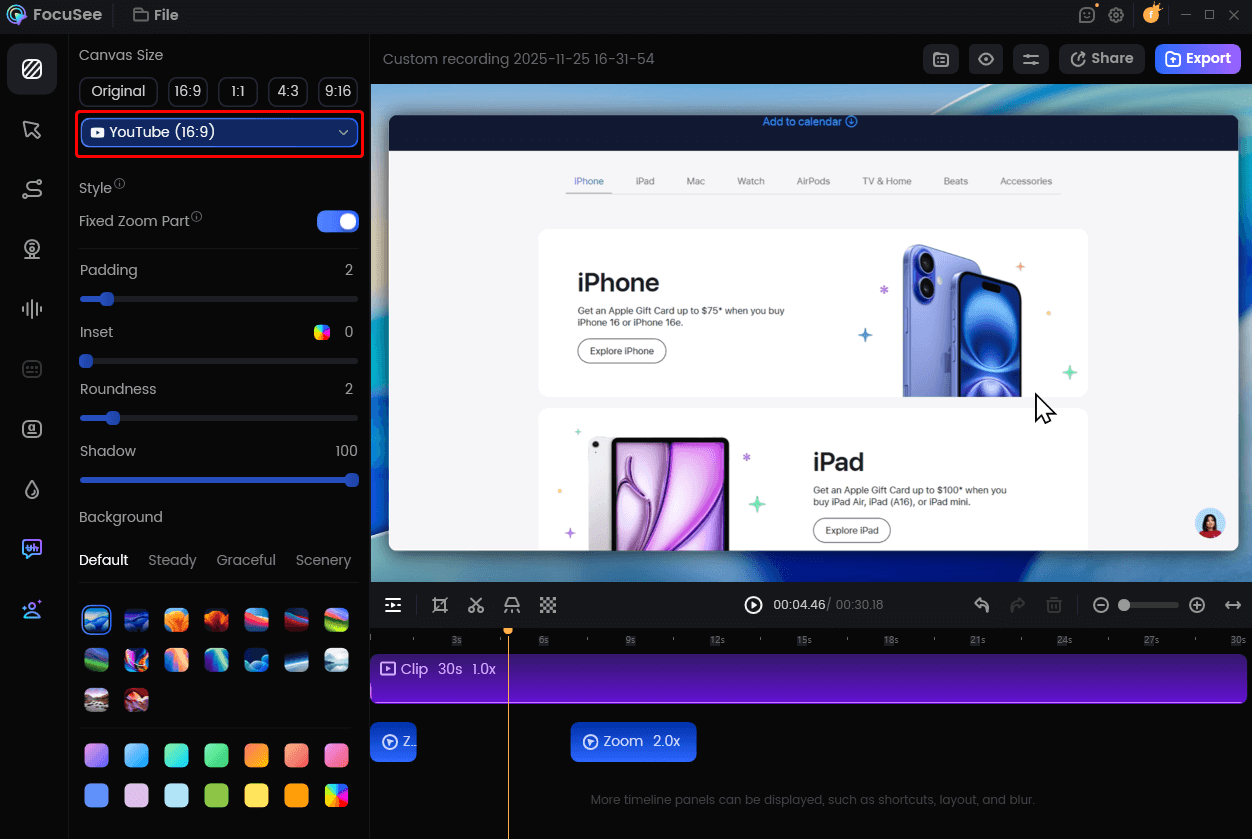
Change Video Size for YouTube
- In-Product (LMS/Wistia/Vimeo): Best for specific feature support. Hosting on a private platform prevents competitors from seeing your support volume and keeps the user focused on your help center without ad distractions.
- Multi-Format Export: FocuSee allows you to export a landscape video for your knowledge base and a vertical version for social media from the same recording session, significantly cutting down production time.
Please watch an example tutorial video created with FocuSee.
Software Tutorial Examples: Balancing Video and Written Content
A frequent internal debate for support teams is onboarding tutorial video vs. a written guide. Which one should you prioritize? The data suggests you should not choose one over the other. Different users have different learning preferences, and a robust knowledge base requires both.
To address the fear of spending time creating tutorials that users never read or watch, use a hybrid strategy. Start by creating the video. Once the video is polished, it becomes the source material for your written content.
The Hybrid Production Workflow:
- Create the Video First: Use FocuSee to record the procedure. The Auto Subtitles feature will generate a script for you.
- Extract the Text: Use the generated subtitles as the foundation for your written article. This ensures your terminology is consistent across formats.
- Capture Visuals: Instead of taking manual screenshots, export high-quality frames or GIFs directly from your video project to illustrate the written steps.
This approach ensures you have software tutorial examples that cater to visual learners (who watch the video) and readers (who scan the text), without doubling your production time.
Measuring Impact: Did Your Tutorial Work?
Ultimately, the success of user education is not measured in views, but in behavior change. The turning point comes when you stop reporting on “video plays” and start reporting on “ticket deflection.”
To prove the ROI of your how to make a software tutorial efforts, you must track the right metrics:
- Support Ticket Deflection: Monitor the volume of tickets related to a specific topic before and after publishing the tutorial. A successful guide should result in a measurable drop in inquiries.
- Time to Value: How long does it take a new user to complete a key action? Good documentation shortens this timeline.
- Search Failure Rate: If users are searching your help center and then submitting a ticket, your existing content is likely missing the mark or using the wrong keywords.
By correlating tutorial engagement with a reduction in support requests, you can demonstrate that your instructional design work is a revenue-saving activity, not just a marketing expense. This data-driven approach transforms documentation from a chore into a strategic asset.
What Actually Reduces Support Tickets
- Clear, task-based tutorials
- Short, focused videos (under 2 minutes)
- Visual guidance (zoom, cursor highlights)
- Easy-to-find help center content
Conclusion
You do not need a background in video production to solve the support ticket crisis. The anxiety regarding technical skills, time constraints, or user engagement is natural, but solvable. By adopting a task-based structure and using automated tools to handle the heavy lifting of editing, you can produce professional-grade UX writing and video assets in minutes, not days.
Regain control of your support queue. Start by outlining your most requested workflow today—focusing on the user’s goal—and watch how quickly a clear, well-structured tutorial can turn confused users into confident power users.
Frequently Asked Questions on Creating User Guides
How do I create a software tutorial that users actually finish?
To ensure completion, use a task-based structure. Start with the solution immediately and remove any introductory fluff. Use tools like FocuSee to automatically remove silences and speed up the pacing. Users drop off when they feel the content is wasting their time.
How long should a software tutorial be?
Ideally, a video tutorial should be under 2 minutes for a specific feature. If the topic is complex, break it down into a series of shorter videos (a playlist) rather than one long 20-minute video. This “micro-learning” approach improves retention.
How do I make a tutorial for software users who are not tech-savvy?
Focus on the “why” and “what,” not just the “how.” Avoid jargon. Use Cursor Effects to make navigation obvious, and ensure your voiceover explains why a user is clicking a button, not just telling them to click it.
What is the best software to create tutorials?
The “best” tool depends on your team’s bandwidth.
- For Speed & Scale: Tools like FocuSee are ideal for product managers who need to produce high-quality, zoomed-in tutorials automatically without spending hours editing.
- For Cinematic Control: If you require complex layering or Hollywood-style effects, heavy editors like Premiere Pro are powerful, though they have a much steeper learning curve and higher time cost.
For most SaaS documentation, the automated approach yields the best ROI.
How do I update tutorials when my software UI changes?
Using a tool that allows for modular editing is key. With FocuSee, you can import existing project files, record just the new steps, and splice them into the existing video. This avoids the need to re-record the entire tutorial from scratch.