How to Record Video Tutorial on PC [Windows & Mac]

Imagine having to demonstrate a software trick to your colleague or guide students through a lesson, but typing out detailed instructions is cumbersome and boring. Screenshots may not clearly show every step, and errors become the standard. The solution is simple: creating a video tutorial.
A video tutorial records your screen and mouse movements, allowing others to see and track along, and learn visually at a faster pace. A single minute of video is often said to be worth over a million words, according to Idea Rocket; at the same time, viewers retain 95% of a video’s message compared to just 10% from text, making a tutorial video far more powerful and memorable.
In this tutorial, we will show you how to record a video tutorial on a PC with built-in tools and professional software, so you can readily share knowledge for work, studies, or personal use.
Record Video Tutorial on PC by Using Built-in Tools
Now, let’s proceed to the easy and simple ways to record a video tutorial on a PC using native tools:
Windows Game Bar (Xbox Game Bar)
Xbox Game Bar or Windows Game Bar is a built-in screen recording on Windows that allows recording of high-quality videos on PC instantly. It supports a maximum resolution of 1080p Full HD at 30 or 60 frames per second, which is also best when it comes to tutorials, gaming, or presentations. Users may capture system sound or microphone sound or both, thus offering clear voice-overs of the screen action.
It also features performance tracking widgets, GPU and CPU load, and direct shortcut access to personalize recording settings. With background capture on auto and normal or high video quality settings, the Game Bar achieves a balance between quality and performance, providing users with an uninterrupted recording experience without having to resort to third-party software.
Key Features:
- Supports background recording to record gameplay or activity even before you press record.
- Provides an overlay panel to access widgets instantly without ever leaving your screen.
- Enables instant sharing of captured clips on Xbox Live and social media.
To implement this video recording tutorial technique:
Step 1. On your computer, press the Windows + G keys simultaneously or type “Xbox Game Bar” in the Windows search box to open it.
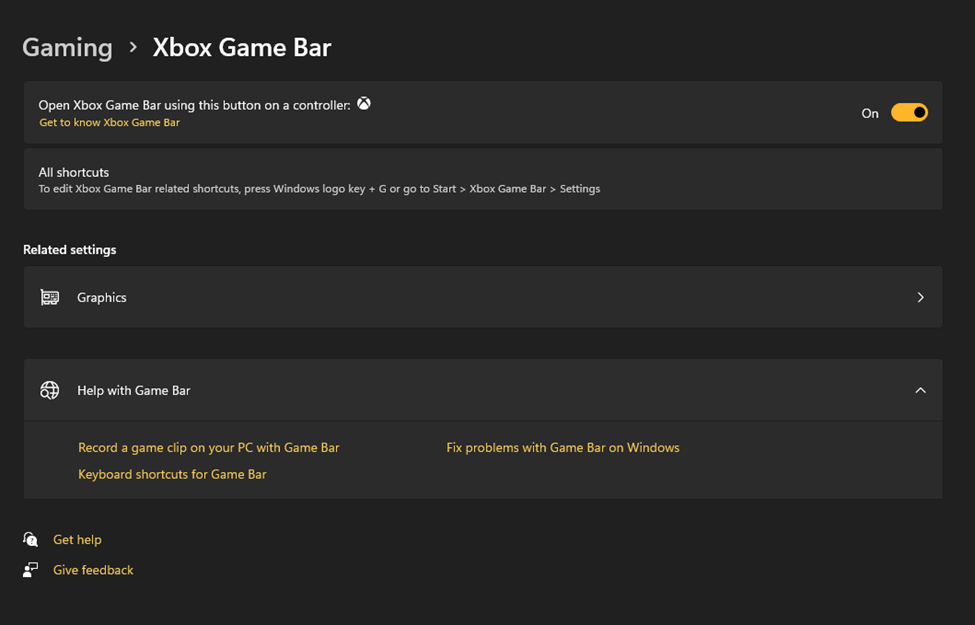
Open Xbox Game Bar
Step 2. On the top toolbar, tap on the “Settings” icon to open recording settings and configure them according to your needs.
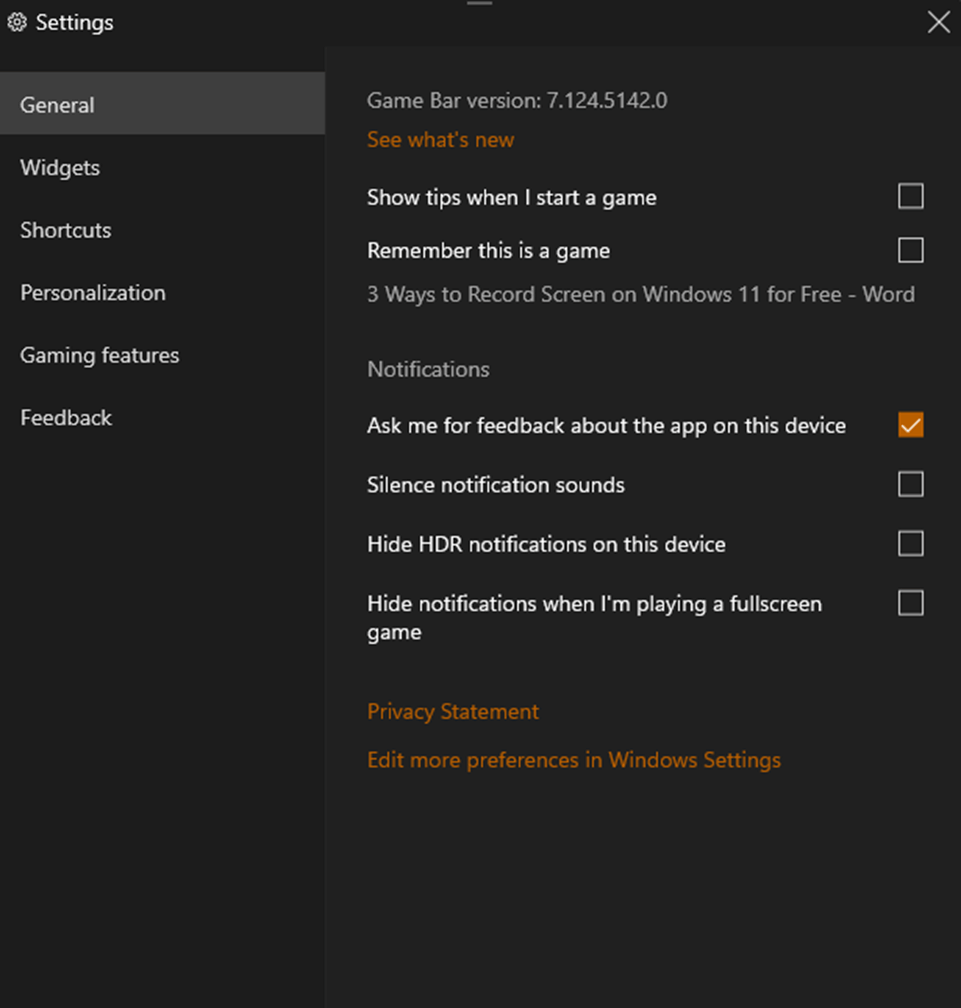
Modify Settings
Step 3. You can adjust recording time (up to 4 hours), “Frame Rate” (30 or 60 FPS), and “Video Quality“.
Step 4. Navigate to “Settings” > “Gaming” > “Captures” to ensure that recording settings are enabled and available to use.
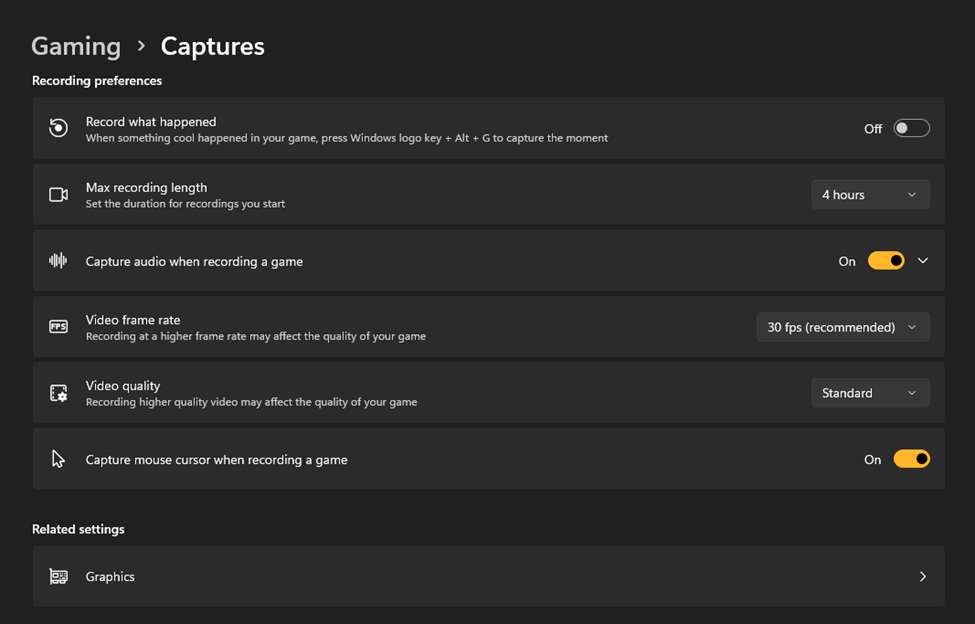
Access Captures
Step 5. Select to capture “System Audio“, “Microphone“, or both. Use “Volume Sliders” to manage volumes.
Step 6. With everything in place, click “Start Recording” to begin recording your screen activity.
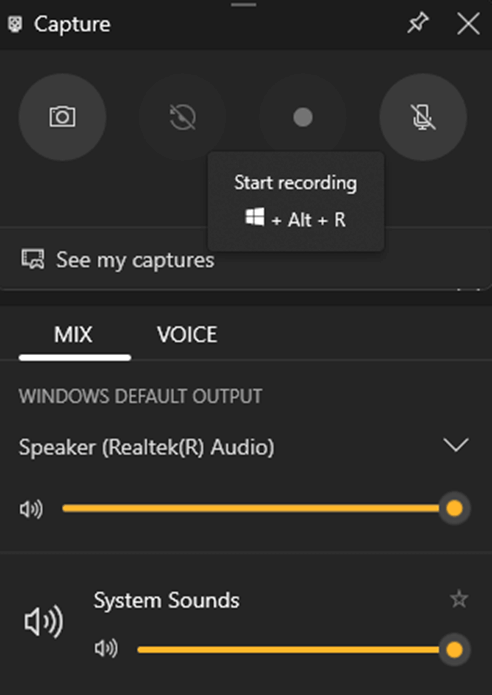
Begin Recording
macOS QuickTime
The built-in QuickTime Player on macOS is a fantastic tool that goes beyond just playing media files since it is also able to create a very smooth screen recording experience. It is set to record 480p to 4K Ultra HD, and its frame rate can go up to 60 fps, which is ideal if you want to create quality tutorials using high definition.
QuickTime is capable of capturing a video of the whole computer screen as well as a certain area with audio output from an internal or external microphone. In addition, it has a few editing options, just like trimming, cutting, and splicing the clips after the recording. One can export the video in any resolution, depending on the needs of the device that will be used for sharing, from very light files to 4K UHD videos. There are also some visual aids, such as on-screen clicks, that make it easy for users of the recorded tutorials to follow along.
Key Features:
- Offers simple screen mirroring from iPad or iPhone, convenient when developing tutorials of mobile apps.
- Provides basic editing capabilities like breaking, rotation, and combining clips after recording.
- Saves videos in .MOV format with efficient compression for smoother playback and smaller file sizes.
- Enables voice narration synchronization, in which users can record commentary seamlessly while capturing the screen.
For using QuickTime Player:
Step 1. Go to your applications and start “QuickTime Player”. From the menu bar, choose “File” and then select “New Screen Recording”.
Step 2. Click the small arrow beside the record button and choose an input like “Internal Microphone” to include voice.
Click the Down Arrow
Further Reading: How to Stop Recording with QuickTime Player >
Step 3. Press the “Record” button to start capturing your Mac screen along with the selected audio.
How to Record Video Tutorial on PC via FocuSee [Automation Solutions]
Creating video tutorials becomes simple with FocuSee, a powerful tool for video tutorials making that lets you record and edit videos for PC and Mac. It saves time with smart cropping, automatically removing unwanted areas, while the auto-zoom effect keeps your attention focused on your mouse movements. You can highlight actions using 8 mouse styles and 3 click effects, making instructions clear. The in-built teleprompter enables you to follow the script easily, and accessibility is further enhanced by automatic captions.
FocuSee Official Website
You can use layouts, draw attention with light effects, trim, and modify speed and watermark, so your videos are professional and branded. Plus, 4K video quality ensures every detail appears sharp, polished, and perfect for tutorials.
Key Features:
- FocuSee auto-zooms on mouse actions, making tutorial videos engaging and easy to understand.
- Add annotations such as arrows, shapes, text, highlights, and numbered steps to clearly explain workflows and guide viewers through each action.
- Built-in teleprompter helps record smooth tutorial scripts without missing any steps.
- Automatic captions in more than 50 languages make tutorials more accessible and simpler for every viewer.
- AI avatars, one-click background removal, and multilingual subtitles make tutorials more engaging, professional, and accessible to global audiences.
- Clearer speech, removal of filler words, and noise reduction ensure tutorials sound polished and keep viewers focused on the content.
- Simple one-click editing and smooth workflows let you create tutorials faster, so you can focus on teaching, not the tools.
- Custom mouse styles and spotlight tools highlight key actions in tutorial videos.
- Adding a custom watermark and 4K export ensures tutorials look professional and branded.
To use FocuSee for recording video tutorials:
Step 1. Free download FocuSee and install, and launch the FocuSee tool on your PC.
Step 2. Use the “Camera” icon to switch your webcam on or off, and select the right one. Click the “Microphone” icon to pick your audio source and adjust the sound. If you want a script while recording, press the “Teleprompter” icon.
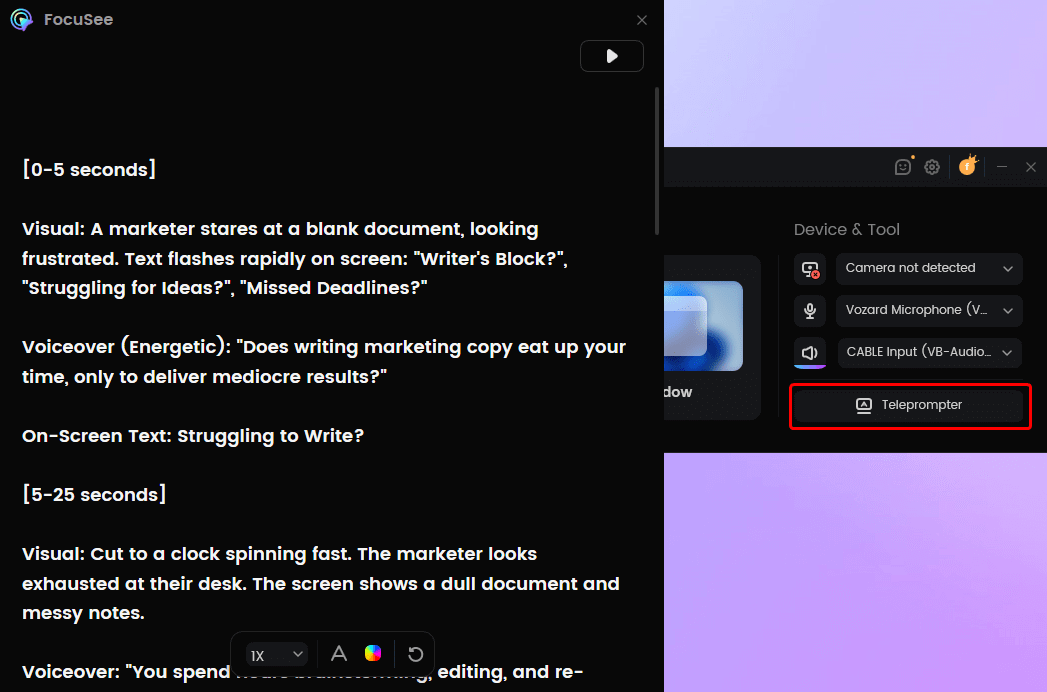
FocuSee Teleprompter
Step 3. Choose how you want to capture the screen: Full Screen, Custom Area, Window, or Device. Just click the option that suits your needs.
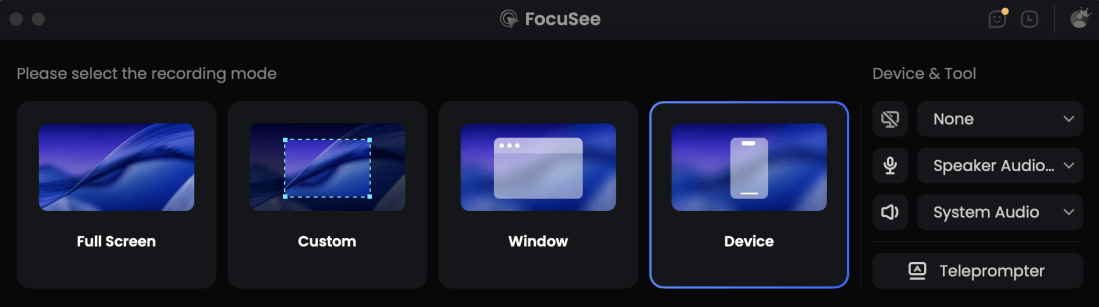
Choose the Recording Model
Step 4. Once everything is ready, press the red “REC” button. Make sure your mic and camera are working correctly. A short 3-second countdown will play before recording begins. Use this moment to get ready. To stop recording, press the red stop button.
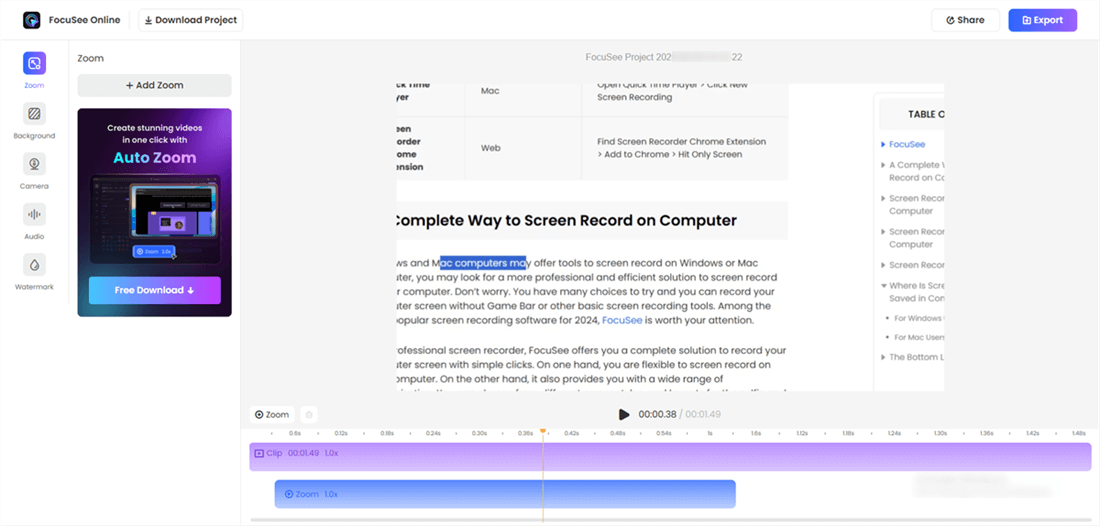
Step 5. FocuSee automatically adds zoom effects to highlight your actions. You can also add annotations such as arrows, shapes, text, highlights, and numbered steps to clearly explain workflows and guide viewers through each action.
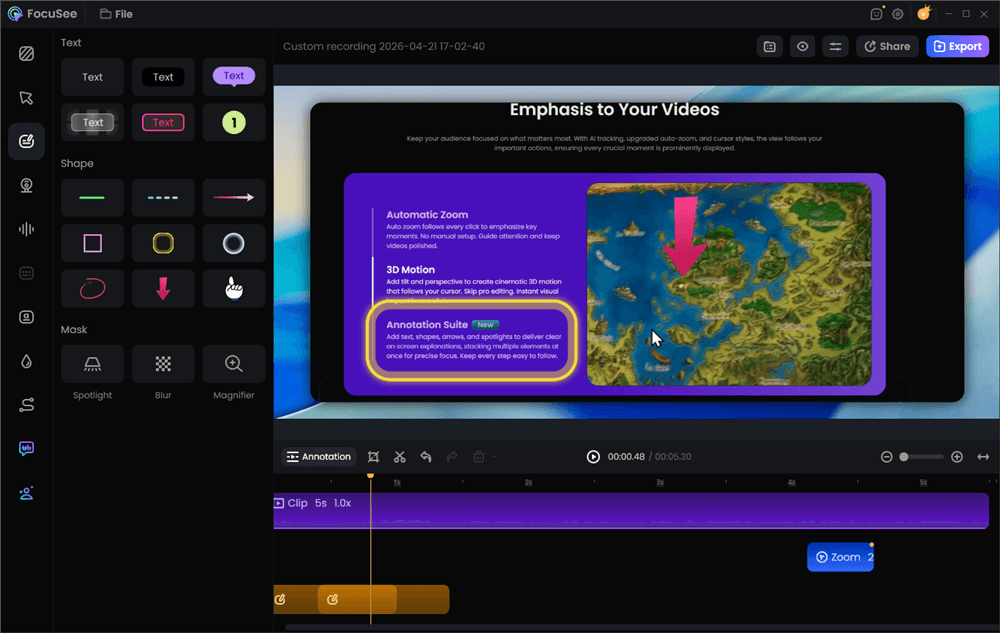
Add Annotations for Clarity
Step 6. When you’re happy with the video, hit “Export” to save it as MP4 or GIF.
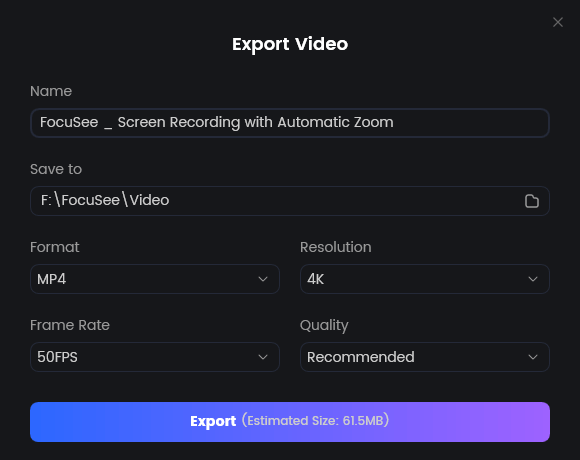
Export Your Video
To share, click “Share”, set the resolution and frame rate, then choose “Upload and Share”. Then you can get a shareable link.
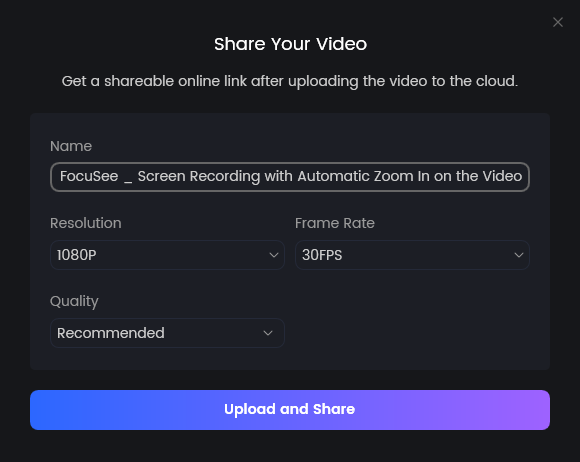
Share Video
Record Video Tutorial on PC via FocuSee Online (No Download Needed)
Recording tutorials is even easier with FocuSee Online Screen Recorder, a free web-based tool that works directly in your browser, no installation required. It allows you to capture your screen smoothly while adding helpful effects that make tutorials engaging and professional. You can keep the focus on important actions, personalize recordings with webcam placement, and protect sensitive details instantly. Best of all, it delivers high-quality results ready to share across platforms without complex editing or software downloads.
Key Features:
- Auto zoom highlights cursor movements for clearer step-by-step demonstrations.
- The webcam window can be resized or moved freely during recording.
- Automatic captions appear while recording, saving post-editing time.
- Blur tools hide private information instantly with one click.
Step 1. Go to the FocuSee Online Recorder website. Choose the recording layout such as Camera Only, Camera + Screen, Screen Only, etc.
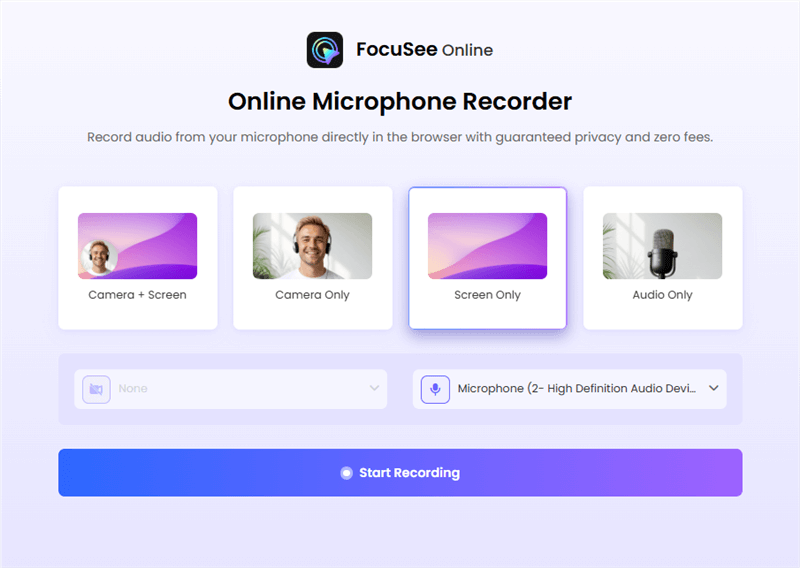
Choose The Recording Model
Step 2. Choose the Camera and Audio input devices.
Step 3. Click on “Start Recording” to capture your screen, webcam, or both. Once done, click the “Download & Edit” button.
Preview & Export
Which Recording Method Is Best for Different Types of Tutorials?
There isn’t a single recording method that works for every tutorial. The best approach depends on your content, audience, and learning objectives.
| Recommended Recording Method | Best For | |
| Software tutorials | Screen recording | Teaching apps, websites, and workflows |
| Online courses | Screen recording + webcam | Building trust and learner engagement |
| Product demos | Screen recording + automatic zoom effects | Showcasing features and user interactions |
| Business presentations | Slides + webcam | Presenting with a personal presence |
| Technical walkthroughs | Screen recording + voiceover | Explaining complex processes clearly |
Tip: For software tutorials and product demos, highlighting cursor movements and zooming into important interface elements helps viewers follow each step more easily. Automated tools like FocuSee can apply these effects automatically, reducing the amount of manual editing required.
FAQs on How to Record a Video Tutorial on PC
Does screen recording capture both system audio and microphone?
Yes. Most modern screen recorders allow you to capture system audio and microphone input at the same time. This lets you record software sounds while explaining each step with your own narration. Before recording, it’s a good idea to test your microphone levels to ensure your voice is clear and balanced.
What is the best resolution for recording tutorial videos?
For most tutorials, 1080p (Full HD) offers the best balance between image quality and file size. If you’re demonstrating software with small interface elements or creating professional training videos, recording in 1440p or 4K can make text and details easier to read.
How long should a tutorial video be?
The ideal length depends on the topic, but most effective tutorial videos focus on solving one problem at a time. Aim for 5–15 minutes whenever possible. If you’re covering a complex workflow, consider breaking it into multiple shorter videos instead of one long recording.
Should I use a webcam in my tutorial videos?
It depends on your content. For software tutorials and product demos, screen recording alone is usually enough. Adding a webcam can help build trust and engagement in online courses, presentations, or educational content where viewers benefit from seeing the instructor.
How can I make my tutorial videos more engaging?
Focus on clarity rather than flashy editing. Use clear voice narration, highlight important cursor movements, zoom in on key interface elements, and remove unnecessary pauses. Adding captions can also improve accessibility and help viewers follow along more easily.
Do I need to edit my tutorial after recording?
Basic editing is recommended to remove mistakes, shorten waiting times, and emphasize important actions. Some screen recorders, such as FocuSee, automate tasks like cursor highlighting, smart zoom effects, background cleanup, and caption generation, making post-production much faster.
What is the best screen recorder for creating tutorial videos?
The best screen recorder depends on your workflow. If you only need basic screen capture, many free tools are sufficient. If you want to create polished tutorials quickly with automatic zoom effects, cursor tracking, captions, and minimal manual editing, FocuSee is a strong option for software tutorials and product demos.
Can I record a professional tutorial video without expensive equipment?
Absolutely. A modern computer, a decent USB or built-in microphone, and a reliable screen recorder are enough to create high-quality tutorials. Good audio quality, clear visuals, and a well-structured explanation usually have a greater impact on viewer experience than expensive recording equipment.
Final Words
Capturing tutorial videos on your computer has never been simpler, thanks to integrated capabilities such as Xbox Game Bar for Windows and QuickTime for Mac. They contain sufficient recording capabilities, but if you need advanced capabilities, smarter editing, and a professional look, new offerings have even more to offer. This tutorial explained various ways of recording tutorials so that you can select the one that best suits your needs. For a professional look, FocuSee is a top recommendation. It provides smart auto-zoom, integrated teleprompter, auto-captioning, and 4K recording quality, making tutorial creation easy, interactive, and effective.