What Is a Watermark on a Video? Definition, Importance & 2026 Creation Guide

Imagine pouring hours into scripting, recording, and editing a detailed tech tutorial, only to find it a week later on a stranger’s social media channel—with no credit given to you. For a creator building a personal brand, this scenario isn’t just frustrating; it is a direct threat to your livelihood. If you are struggling with video protection or are confused about what a watermark on a video is, you are not alone. Many creators worry that adding security measures might ruin the aesthetic of their content or annoy viewers.
This guide eliminates that confusion. We will define exactly how a watermark works on a video, explore the difference between visible and invisible solutions, and provide a tested, step-by-step method to secure your content. Whether you want to use professional software, free online tools, or automated solutions, we have mapped out the workflows so you don’t have to guess.
By the end, you will have a clear strategy to protect your intellectual property while building a recognizable brand.
What Is a Watermark on a Video? Defining the Concept
At its core, what is a watermark on a video? It is a visible overlay—typically text, a logo, or a digital signature—superimposed onto video content to identify ownership and copyright. Whether you are searching for the specific video watermark meaning or its practical applications, the function remains consistent: it acts as a digital stamp that claims the work as your intellectual property.
While often used primarily for video protection, watermarks also serve a critical role in video branding. They ensure that viewers recall the creator’s identity even if the content is stripped of its description and shared on different platforms like TikTok or Instagram.
Why Context Matters
Consider the lifecycle of a video online. Once your content leaves your channel, it loses its context. A watermark bridges that gap. It is a persistent link back to the source.
- Visible Watermarks: These are logos or text (e.g., “@YourChannelName”) placed in a corner. They are designed to be seen but not to obstruct.
- Invisible Watermarks: Often called a digital watermark, these are embedded data patterns used by enterprise companies to track piracy, invisible to the human eye but readable by software.
JPG Logo vs Transparent PNG Logo
How to Add a Watermark to Video: Manual Editing vs. Automated Tools
The biggest obstacle for most creators is deciding how to apply the branding. Generally, you have three primary methods: manual editing using professional software, using free lightweight tools, or utilizing specialized video watermark tools for automation.
Method 1: Manual Video Editing Software (Premiere Pro)
Using professional Non-Linear Editors (NLEs) offers the most granular control. This method is best if you are already editing a complex video and want to add the watermark on video as the final step.
How to do it (General Workflow):
Step 1. Load your logo (ensure it is a PNG with a transparent background) into your project bin.
Step 2. Drag the logo onto the video track above your main footage. Extend the clip duration to match the entire length of the video.
Step 3. Use the “Effect Controls” on Premiere to scale the logo down and position it in a corner.
Step 4. Lower the opacity to 40-50% to ensure it doesn’t distract from the content.
- Pros: Total creative freedom; ability to animate the watermark.
- Cons: High time cost. You must manually import, scale, align, and render the entire timeline. For a creator focused on volume, this adds significant overhead.
Method 2: Free & Lightweight Tools (CapCut)
If you don’t have the budget for professional software, free tools are a viable entry point. Tools like CapCut (Desktop/Mobile) allow for quick overlays.
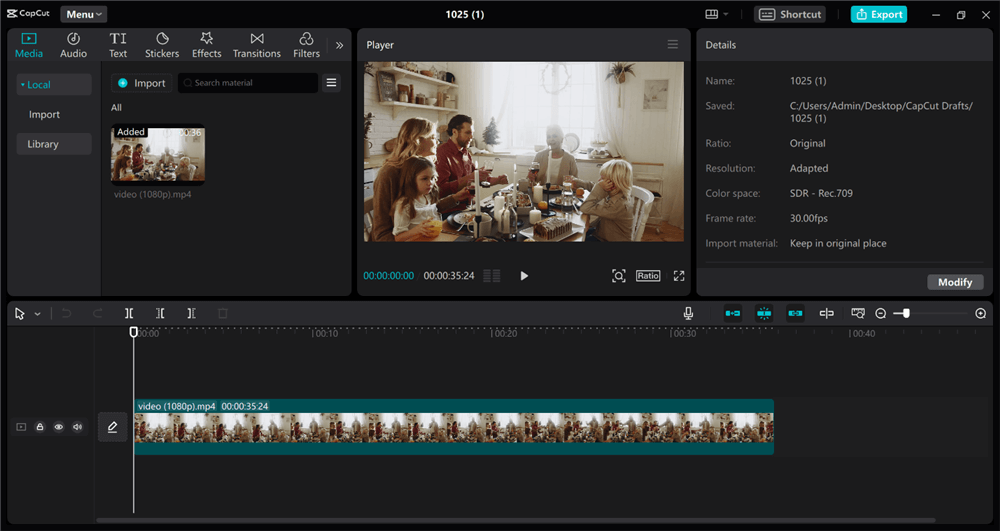
Add a watermark on Capcut
- Pros: Free or low cost; very user-friendly interfaces.
- Cons: Workflow can be clunky for bulk videos. Some free versions may limit export resolution (e.g., 720p) or, ironically, add their own watermark to your video unless you upgrade.
Method 3: Automated Watermark Tools
In contrast, automated tools allow for “set-and-forget” functionality. These solutions are designed to apply video branding automatically during the recording or export phase.
If your goal is video protection without the heavy lifting of video editing, specialized tools are generally the superior choice. They reduce the technical skill required and ensure consistency across all your uploads.
Comparison: Which Path Should You Choose?
| Feature | Manual Professional NLE | Free / Lightweight Tools | Automated Workflow |
| Examples | Adobe Premiere, DaVinci Resolve | CapCut, Canva | FocuSee, OBS |
| Primary Goal | Complex editing & compositing | Quick social posts | Efficiency & consistency |
| Time Investment | High — manual placement | Medium — manual uploads | Low — set once, auto-apply |
| Skill Level | Moderate to advanced | Beginner friendly | Beginner friendly |
| Consistency | Varies — human error | Varies | 100% consistent placement |
| Best For | Films, intricate ads | TikToks, Reels, memes | Tutorials, demos, courses |
If you prioritize speed and consistency over complex creative control, automating this process is the recommended technique.
How to Create a Video Watermark Efficiently with FocuSee
For creators focusing on tutorials, demos, or presentation videos, manual editing can be a bottleneck. This is where FocuSee, a specialized screen recording and video creation tool, offers a significant advantage. It addresses the common pain point of “editing fatigue” by automating post-production workflow, including video branding.
Unlike traditional editors, where you must manually overlay assets every single time, or free tools that might degrade quality, FocuSee allows you to bake your watermark text or logo directly into the final output with minimal effort. While FocuSee is a paid tool for Windows and macOS, its efficiency justifies the investment for anyone producing content at scale who needs video security without the hassle.
Step 1. Record Your Screen: Start your recording session. FocuSee handles zoom effects and cursor highlights automatically, so you can focus on the content.
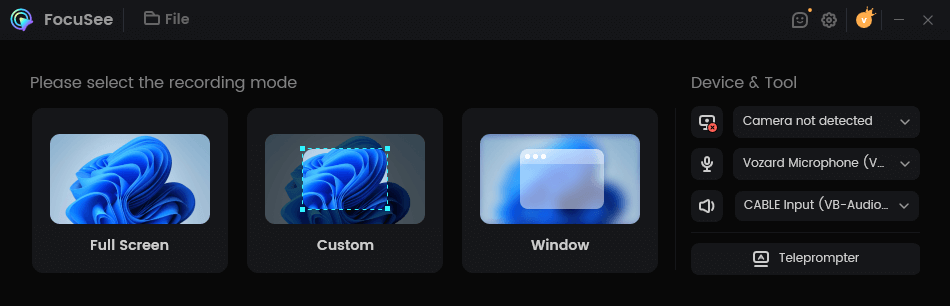
Choose a Recording Mode
Step 2. Access Canvas Settings: In the post-recording editing interface, navigate to the background and layout settings.
Step 3. Add Your Brand: Upload your logo or type your brand name. You can position this element in the corner of the video frame.
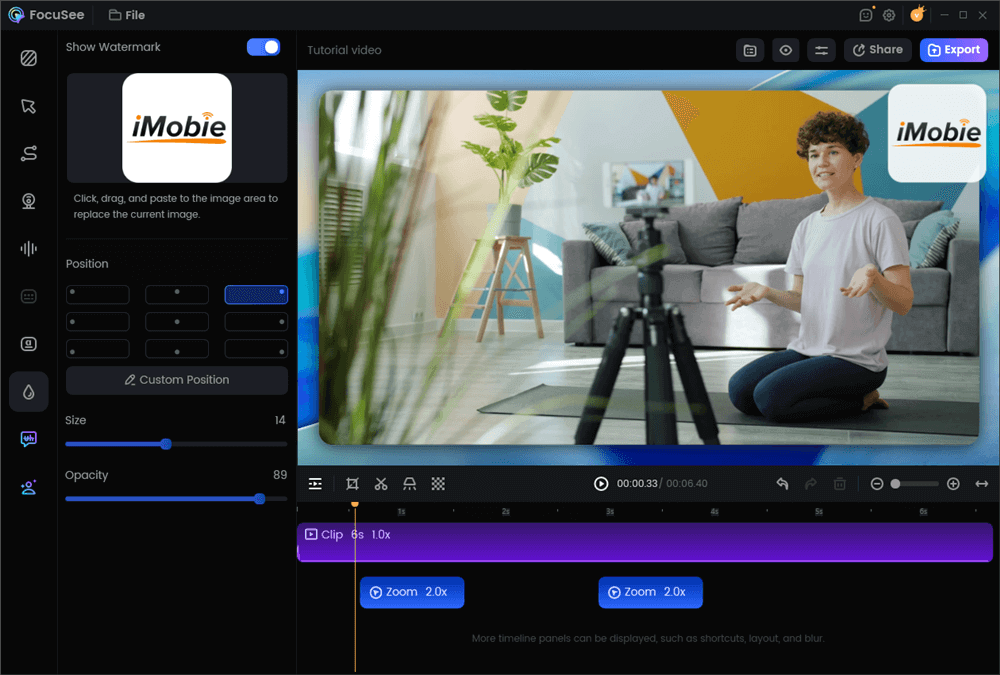
Add a Watermark on a Video
Step 4. Export: When you export, FocuSee processes the transparent watermark along with the video, ensuring it is a permanent part of the file.
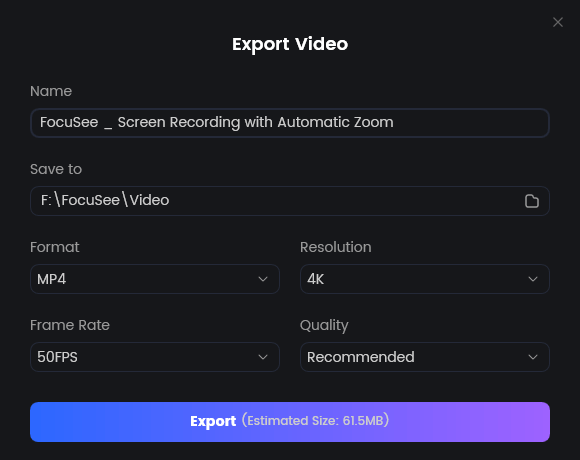
Export Your Video
This feature allows you to produce protected, professional-looking tutorials, ensuring your brand is visible on every frame without manual timeline adjustments.
Types of Video Watermarks: Text, Logo, and Digital
When deciding on a video watermark example for your project, it is essential to understand the three main categories: text, logo, and digital. Each serves a specific purpose in the realm of intellectual property protection.
1. Text Watermark
This is the simplest form, often just a URL or channel name (e.g., “@MichaelsTechReviews”). It is highly effective for driving traffic back to your source profile if the video is reposted. It is lightweight and requires no graphic design skills.
2. Logo Watermark
A visual icon or graphic representing your brand. Ideally, this should be a transparent watermark (PNG format) to avoid a boxy, unprofessional look. This builds visual brand association more effectively than text alone.
3. Digital Watermark
Unlike the previous two, a digital watermark is often invisible to the naked eye. It embeds data into the video file’s code, allowing automated systems to detect copyright infringement. This is common in enterprise video security, but it is less useful for creators who want visual attribution.
The Rule of Subtlety
Here is a critical tip that many creators miss: while watermarks are a deterrent, they can ruin user experience if overdone. A poorly placed watermark—too large or opaque—distracts the viewer.
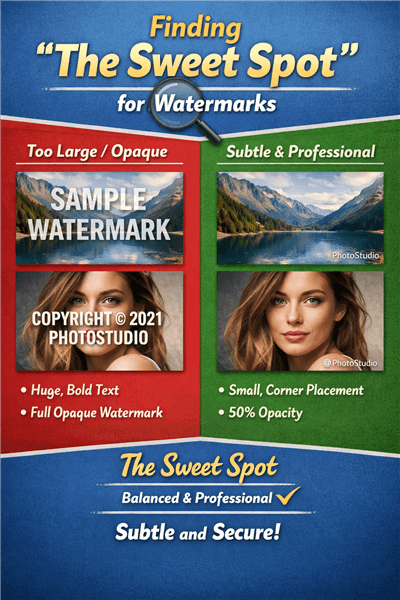
The “Sweet Spot” Formula for Video Watermark
The “Sweet Spot” Formula:
- Position: Bottom-right corner (standard convention).
- Opacity: 30% to 50%.
- Size: Small enough to be ignored, large enough to be read.
The key to an effective watermark is subtlety. It should reinforce brand identity without overpowering the content.
Why Add a Watermark to a Video? Branding & Protection
So, why add a watermark to a video? The realization usually hits when you see your hard work generating views for someone else’s channel. There are two primary drivers for this practice: video branding and video protection.
Brand Recall and Authority
In the age of viral social media, content is shared rapidly, often losing its original context. A watermark on a video acts as a permanent signature. If a viewer sees a snippet of your tutorial on TikTok, the watermark tells them exactly where to find the full version. It converts passive viewers into active followers by constantly displaying your channel identity.
Theft Deterrence
While a watermark is not a legal substitute for formal copyright registration, it is a powerful practical deterrent. Most casual content scrapers will avoid videos with prominent watermarks because removing them requires effort and technical skill. It signals that the content is monitored and owned.
However, it is important to manage expectations. A visible watermark prevents casual theft, but determined pirates can crop or blur it. For maximum security, media companies often combine visible branding with invisible digital watermarks to prove ownership legally if a dispute arises.
Removing Watermarks: Legal Risks and Technical Reality
Many users search for ways to remove watermarks from videos. While AI tools can blur, crop, or inpaint watermark areas, the results are rarely clean. Because the original pixels are gone, the software must guess what’s underneath—almost always leaving visible artifacts such as faint ghosting, distorted “wobbly” backgrounds, or blurry patches that draw more attention than the watermark itself.
Legal Considerations
Removing a watermark from content you don’t own is typically a copyright violation and signals intent to hide the original creator’s ownership.
The Professional Solution
In most cases, watermark removal is a file-management issue—caused by losing the original, unbranded project and being left with a flattened export. The correct approach is prevention: always archive raw recordings or clean exports before branding.
This is where non-destructive editors like FocuSee or Premiere Pro excel. Because branding sits on a timeline, you can simply re-export a clean version whenever needed. Proper asset management is the only truly professional way to “remove” a watermark—by ensuring you never need to remove one at all.
Frequently Asked Questions About Video Watermarking
Can I add a watermark to my video using free software?
Yes, absolutely.
- DaVinci Resolve (Free Version): A professional-grade editor that allows fully customizable watermarks, though it has a steeper learning curve.
- CapCut: Great for social media, allows image overlays easily.
- OBS Studio: If you are streaming or recording, you can add an “Image Source” to your scene to watermark footage live for free.
How does a watermark work on a video?
Technically, a visible watermark is a secondary image layer superimposed over the primary video track. During the rendering process, the software flattens these layers into a single file, making the overlay a permanent part of the image data. An invisible digital watermark works differently, embedding noise or metadata patterns into the file structure that survive compression and format changes.
Does adding a watermark affect my video quality?
Adding a transparent watermark (like a PNG) does not inherently lower video quality. However, if the watermark is saved in a low resolution or if the video is re-encoded multiple times to apply the watermark, you may see some generation loss. Always use high-resolution assets for your logos.
How do I make a watermark that doesn’t distract from the content?
To ensure your watermark video definition remains professional, lower the opacity to between 30% and 50%. Place it in the bottom-right or top-right corner, ensuring it does not cover any essential on-screen text or action.
Conclusion
Understanding what a watermark on a video is only the first step; applying it consistently is what protects your brand. The fear of unauthorized use shouldn’t stop you from creating, but it should encourage you to be smart about your workflow. You no longer have to choose between spending hours in a complex editor or leaving your content vulnerable.
Whether you choose a manual workflow in Premiere, a quick overlay in CapCut, or the automated efficiency of FocuSee, the goal is the same: bake your identity into your work. Start protecting your intellectual property today, and ensure that every view counts toward building your authority.