How to Add a Watermark on Video: The Complete Guide for 2026

The moment you see your hard work reposted without credit is a turning point. For marketers like Jordan, whose fitness studio’s video was stolen by a competitor, the task of figuring out how to put a logo on a video instantly went from a “someday” task to a critical daily need. The real challenge isn’t just adding a watermark; it’s doing it quickly, consistently, and without sacrificing video quality or having the logo get cut off on Instagram or TikTok. This guide provides a clear, tested procedure to solve that problem. We’ll cover the best methods for every need, from one-off tasks to branding hundreds of clips at once.

How to Add a Watermark on Video
Each technique has been validated across multiple platforms and software versions to guarantee the steps are reliable, whether you’re working on a personal MacBook or a corporate Windows PC.
How to Add a Professional Watermark with FocuSee (The Fastest Method)
When time is critical and brand consistency is non-negotiable, a purpose-built tool is the most effective solution. FocuSee is designed to automate repetitive video tasks, making it the ideal choice to add a transparent watermark to a video without quality loss. This guide shows you both the single-video process and the game-changing batch workflow.
This procedure prevents the common fear of quality degradation, as FocuSee’s export settings are optimized to handle high-resolution (1080p/4K) video without introducing blurriness or compression artifacts.
For a Single Video
Here is the simple, four-step process for a one-off task:
Step 1. Import Your Video: Open FocuSee and drag your MP4 video file directly into the editor. Your video appears on the timeline instantly, ready to go.

Upload Your Footage
Step 2. Add Your Logo Overlay: Navigate to the overlay options and select ‘Add Image Overlay’. Choose your logo file. For a professional result without a background box, you must use a PNG with a transparent background.
Step 3. Adjust Placement, Duration, and Opacity: Drag the logo to your desired corner (e.g., bottom-right). Use the opacity slider to make the logo subtle, typically setting it between 20-40%.
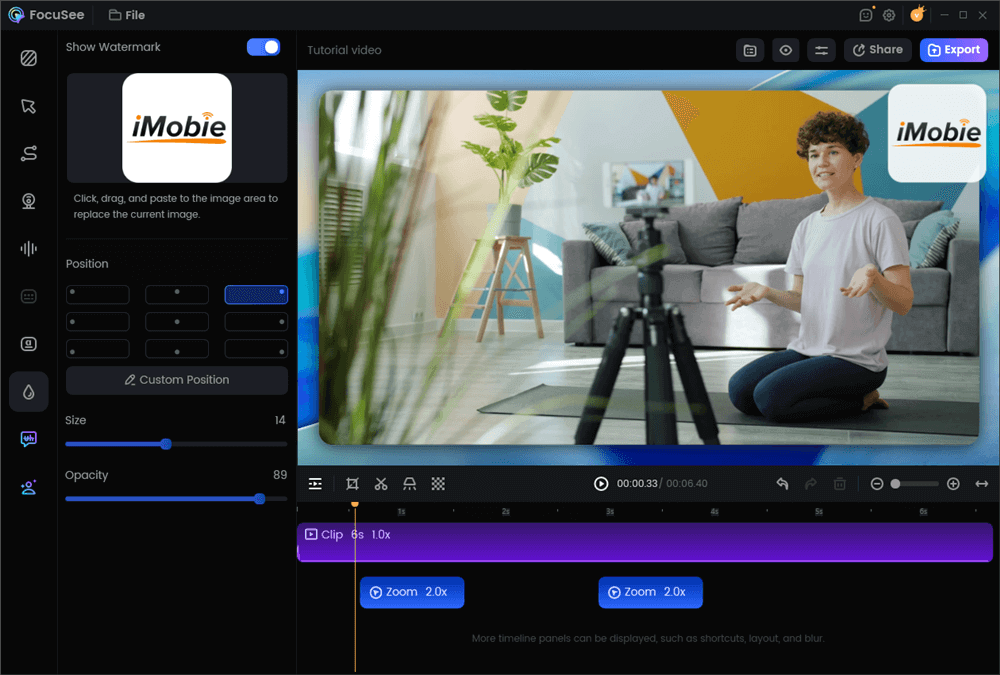
Add a Watermark to a Video
Step 4. Export in High Quality: Click the ‘Export’ button. Select your desired resolution (e.g., 4K) and bitrate. FocuSee will process the video, cleanly embedding your watermark without adding any of its own branding.
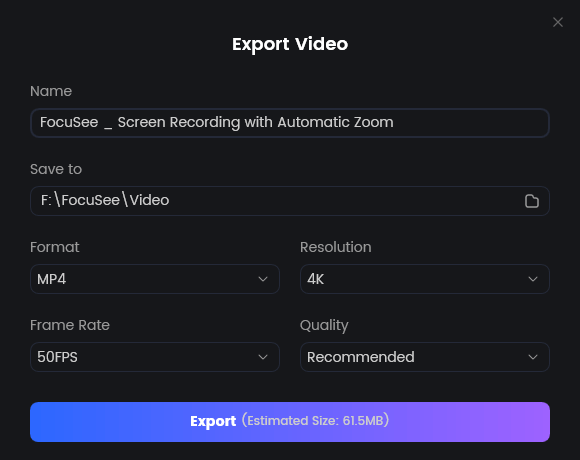
Export Your Video
The Real Time-Saver: Batch Watermark Videos with a Reusable Template
FocuSee does not support batch processing multiple videos at once. However, it does solve the most time-consuming part of watermarking: repeatedly setting up the same logo, position, size, opacity, and timing for every video.
The real “I wish I’d known this earlier” moment for many creators is realizing that you only need to design your watermark once—then reuse it consistently across all future videos.
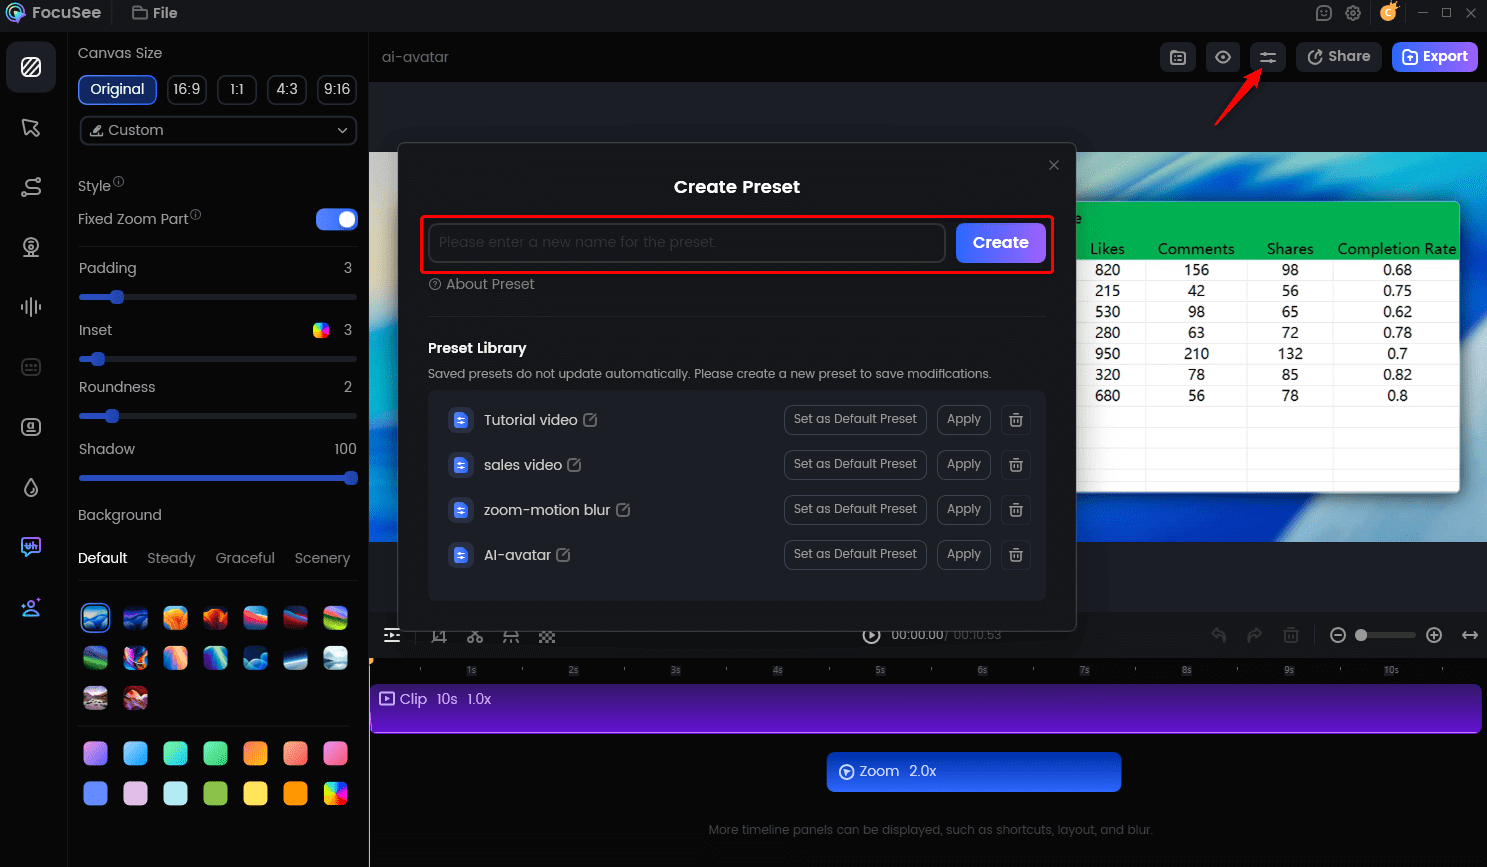
Create Your Presets
Time Saved: A Real-World Comparison
In a traditional video editor, watermarking multiple clips means repeating the same setup steps over and over again.
For example:
- Watermarking 20 short clips manually often involves 20× placing, resizing, positioning, and adjusting opacity, which can easily take 20–25 minutes of repetitive work.
- With a saved template in FocuSee, each new video starts with the watermark already configured. You still export videos one by one, but the setup time per clip drops to just a few seconds.
Why This Still Matters
Even without batch processing, templates deliver three key benefits:
- Consistency – Every video uses the same branding
- Speed – No repeated setup work
- Lower mental load – You focus on content, not configuration
For creators producing content regularly, this template-based workflow is the most reliable way to scale branding without frustration.
How to Add a Watermark on Video on Windows 11 & Mac
If you only need to add a watermark to an occasional video, the free editors built into your operating system are capable solutions. They are more limited than professional software, especially for batch work, but are ideal for one-off tasks that do not require any new downloads.
How to Add a Watermark on Windows 11 with Clipchamp
Microsoft Clipchamp comes pre-installed on Windows 11 and provides a straightforward timeline editor that supports image overlays.
Step 1. Create a New Project: Open Clipchamp and click ‘Create a new video’.
Step 2. Import Media: Drag both your video file and your transparent PNG logo into the ‘Your media’ tab.
Step 3. Build the Timeline: Drag your main video onto the timeline. Next, drag your logo file onto the track directly above the video track.
Step 4. Adjust Duration and Appearance: Click the logo clip on the timeline. Drag its right edge to stretch its duration to match the end of the video clip. Select the logo on the video preview to resize and reposition it. In the right-hand panel, use the ‘Adjust colors’ tab to find and lower the opacity.

How to Add a Watermark on Windows 11 with Clipchamp
How to Add a Watermark on Mac with iMovie
iMovie on macOS uses a feature called picture-in-picture overlay to achieve this. The process is effective, though slightly less direct.
Step 1. Import Media: Add your main video clip and your logo image file to your iMovie project’s media bin.
Step 2. Create the Overlay: Drag your video to the timeline first. Then, drag your logo image from the media bin and drop it directly on top of the video clip in the timeline.
Step 3. Set Overlay Style: Select the logo clip. Above the video preview window, click the ‘Video Overlay Settings’ icon (it looks like two overlapping squares) and choose ‘Picture in Picture’ from the dropdown menu.
Step 4. Position and Extend: In the preview window, resize and move the logo to your preferred corner. In the timeline, drag the edge of the logo clip to extend its duration to the entire video.

How to Add a Watermark on Mac with iMovie
Which Watermark Method Is Right for You?
Before you begin, choosing the right tool makes all the difference. Your decision impacts the final quality, the time you spend, and your frustration level. Let’s figure out what you need.
If you only need to watermark a single video right now…
The free editors already on your computer—Microsoft Clipchamp on Windows and Apple iMovie on Mac—are perfect. They are reliable, safe, and won’t add a second, unwanted watermark to your export. We’ll show you how to use them below.
If you need to watermark videos regularly (e.g., weekly social media clips)…
This is where free tools become a major time-sink. Opening each file, adding the logo, adjusting the size, position, and opacity, and then exporting one by one is slow and repetitive. For this, you need a workflow built on templates and batch processing. A dedicated tool like FocuSee is designed for this exact scenario, allowing you to brand an entire folder of clips with a few clicks.
If you are a developer or need to automate watermarking in a server environment…
Manual tools won’t work for you. The command-line tool FFmpeg is the industry standard for this. It’s powerful and scriptable but requires technical skill to set up and use effectively.
For most creators and businesses like Jordan’s, who need a reliable balance of speed, professional quality, and ease of use, a dedicated tool offers the most direct and efficient solution for recurring branding needs.
Pro Checklist: 4 Steps to Avoid Blurry Logos and Bad Placement
Adding a watermark is easy; adding one that looks professional requires attention to detail. Blurry watermarks are rarely caused by a poor logo file—they result from incorrect asset preparation and low export settings. Follow this checklist to solve the most common quality issues.
- Asset Prep: Use a Transparent PNG. This is the most critical step. A JPG file does not support transparency and will leave an unprofessional white or black box around your logo. To add a transparent watermark to a video, you must start with a high-quality PNG file.
- Quality Preservation: Start Big, Scale Down. To ensure your logo is tack-sharp, create the source PNG at roughly double its intended display size. For a 1080p video, a PNG file that is 600-800 pixels wide is perfect. For 4K video, aim for 1200-1600 pixels. When you scale it down in the editor, the image retains its crisp edges and avoids pixelation.
- Placement: Respect the Safe Margins. Never place your logo at the absolute edge of the frame. Social media platforms crop videos and overlay their own UI (usernames, captions, like buttons). To avoid your logo being cut off, keep it within the safe margins, which is typically about 10% in from all edges.
- Polish: Set Opacity for Subtlety. A full-color, 100% opacity logo can distract from your content. The goal is to brand your video, not obstruct it. A good practice is to set the opacity between 20% and 40%. This makes the watermark visible enough for brand recognition but subtle enough that it doesn’t disrupt the viewing experience.
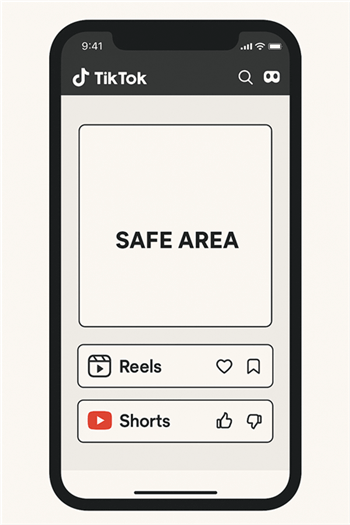
Social Media Safe Zones
Actionable Tip: In practice, this means when you drag your logo in any editor, never let its edges touch the video’s border. Leave a visible gap—about the width of your thumb on a phone screen—to be safe.
Your Video Watermarking Questions, Answered
How can I make my logo stay on-screen for the entire video?
In timeline-based editors (like FocuSee, Clipchamp, or iMovie), your logo is an independent clip on a track above your main video. You must click on that logo clip and drag its right edge to extend its duration to match the full length of the video clip beneath it.
How do I add a text watermark and make it semi-transparent?
Most video editors have a ‘Text’ or ‘Title’ tool. Add a text box, type your content, and position it. Then, look for an opacity slider in the text settings panel. Lowering this to 30-50% will create the desired effect. For automation, the FFmpeg drawtext filter lets you set opacity with code.
Will adding a watermark reduce my video quality?
A watermark itself does not reduce quality. Quality loss occurs during the export process if the export settings (bitrate and resolution) are too low. To prevent this, always export at your source video’s native resolution (1080p/4K) and choose a high bitrate. Using a high-resolution PNG for your logo also prevents the watermark itself from looking blurry.
How do I avoid the editor adding its own watermark?
This is a common limitation of free online tools or the free tiers of paid software. The most reliable way to avoid this is to use your computer’s built-in editors (Microsoft Clipchamp, Apple iMovie) or a professional commercial tool like FocuSee, which guarantees clean exports.
What file format should my logo be in to avoid a white background box?
You must use a PNG with a transparent background. A JPG file does not support transparency and will always appear with a solid-colored box around it, which looks unprofessional.
Conclusion
Stop letting content theft undermine your work and brand recognition. The frustration of seeing your videos used without credit or spending hours on a tedious, repetitive task can be solved with the right procedure. Instead of wrestling with clumsy tools that deliver blurry results, you can implement a professional, consistent watermarking workflow in minutes. A dedicated tool like FocuSee removes the guesswork, protects your assets, and frees you up to focus on creating great content.
Take control of your video branding today. Download FocuSee to see how quickly you can secure your entire video library with a polished, professional watermark.