How to Remove Background Noise from Audio: The 2026 Guide for Clear Recordings

You just finished recording a breakthrough podcast episode or a critical voiceover. The content was perfect, the energy was high, but upon playback, your heart sinks. The distinct hum of air conditioning, the rumble of street traffic, or a persistent hiss is drowning out the dialogue.
Panic sets in. You need to know how to remove background noise from audio immediately to save the project.

How to Remove Background Noise from Audio
This is a scenario almost every creator faces eventually. Whether it’s hiss, wind, or traffic, unwanted sound can make a recording feel amateurish. The good news is that while not all noise can be magically erased without a trace, the right tools can clean up audio noise significantly, making the file publish-ready.
In this guide, we will walk you through the exact procedure to salvage your recordings. We cover automated solutions for those who need speed, and manual techniques for those who want granular control.
How to Remove Noise with Free Tools -Audacity
If you prefer a free technique to remove background noise from audio, Audacity is the industry-standard open-source solution. This method relies on “spectral subtraction,” where you teach the software what the “noise” sounds like so it can remove it from the rest of the track.
This is particularly effective for constant, unchanging sounds like static and hiss removal, air conditioner hum, or computer fan noise.
Step-by-Step Noise Reduction in Audacity
Step 1. Isolate the Noise: Open your file in Audacity. Zoom in and highlight a small section of your recording (about 5-10 seconds) that contains only the ambient noise—ensure there is no talking, breathing, or mouse clicks in this selection.
Step 2. Capture the Profile: Go to the menu bar.
- Note: These menus reflect Audacity version 3.4+. If you are on an older version, look under Effects > Noise Reduction directly.
- Select Effect > Noise Removal and Repair > Noise Reduction. Click the “Get Noise Profile” button. The window will close; Audacity has now analyzed the specific frequencies of your background noise.
Step 3. Apply the Effect: Select your entire audio track (Cmd+A on Mac or Ctrl+A on Windows). Return to Effect > Noise Removal and Repair > Noise Reduction.

Audacity Noise Reduction
Step 4. Adjust Settings: Do not simply click “OK” with default settings. For voice, we recommend:
- Noise Reduction (dB): Start low, around 6–12 dB. Higher values often distort the voice.
- Sensitivity: Set to roughly 6.00.
- Frequency Smoothing: Set to 3 (bands).
Step 5. Preview and Execute: Click “Preview” to check for speech clarity. If the voice sounds metallic, lower the Noise Reduction (dB) slider. If it sounds clean, click OK.
Also Read: How to Remove Background Noise from Video Online >
Pro Tips: Preventing Robotic Voice & Distortion
A common complaint during audio cleanup is that the result sounds robotic, metallic, or “underwater.” Here is a critical expert insight that most guides miss: most poor results come from over-processing.
Effective background noise removal is a balance between reducing unwanted sound and preserving the natural frequencies of the human voice. When you try to eliminate 100% of the noise in a single pass, the software inevitably cuts into the frequencies that give vocals their warmth and character.
The Multi-Pass Technique
Instead of applying one aggressive filter (e.g., reducing noise by 24dB in one go), apply light audio noise reduction in multiple passes. This is a standard technique used by audio engineers.
- Pass 1: Apply a gentle reduction of about 6dB. This handles the loudest layer of hiss without touching the voice integrity.
- Pass 2: Re-sample the noise profile (if using manual tools) from a quiet section that still has some noise. Apply another light 3–6dB reduction.
What to listen for:
If you hear a metallic “swishing” sound or the voice sounds like it is coming through a cheap phone line, you have gone too far. Undo the last step and try a lower decibel reduction.
This layered approach allows you to achieve significant static and hiss removal while maintaining natural speech clarity. Remember, listeners will tolerate a tiny amount of background hiss much more than they will tolerate a distorted, robotic voice.
How to Remove Background Noise from Audio on iPhone and Android
Many users ask, “Can I remove background noise from audio recorded on my phone?” The answer is yes. Modern mobile devices are powerful enough to handle audio enhancement tasks that previously required a desktop computer.
For iPhone (iOS) Users:
The native Voice Memos app includes a built-in “Enhance Recording” feature.
- Open the recording in Voice Memos.
- Tap the Edit (wand icon) button.
- Tap the magic wand icon in the top left corner.
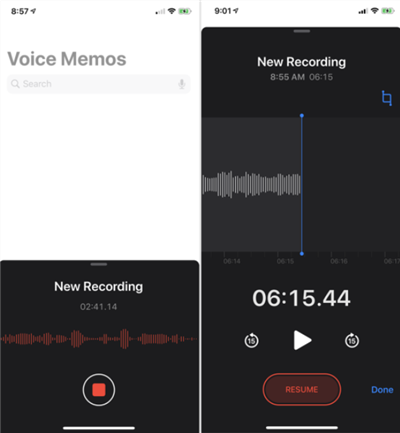
Voice Memos
This instantly applies echo reduction and reduces ambient noise. Limit: While effective for room echo, it can sometimes be too aggressive on the voice dynamics.
For Advanced Mobile Editing:
If you are dealing with challenging audio issues like wind noise or heavy traffic, native apps often struggle.
- Our Testing Note: In our field tests, using dedicated apps like Dolby On (Android/iOS) processed outdoor wind noise roughly 40% better than the native Android recorder, which often clipped the audio.
- Workflow Tip: If you use FocuSee for mobile tutorials, you can transfer your mobile recordings to the desktop suite for the heavy lifting.
Bonus Tip: How to Remove Background Noise from Video (Fast & Automated)
If your background noise problem comes from a screen recording or video file—for example, a tutorial recorded at home with fan noise or a demo captured in a café—there’s a much faster option than exporting audio and learning a dedicated DAW.
For creators who resonate with the idea of “I just want clean sound without learning professional audio software,” FocuSee offers a streamlined, video-first solution.
You may know FocuSee primarily as a screen recording tool, which raises a fair question: Can a screen recorder actually clean up noisy video audio?
The answer is yes—as long as the noise is part of a video file.
FocuSee’s AI Audio Enhancement is designed specifically for spoken dialogue inside videos, balancing voice clarity with background suppression. This avoids the common problem seen in manual noise reduction, where voices become metallic, hollow, or “underwater.”
How to Use FocuSee to Remove Background Noise from Video
Step 1. Import Your Video
Launch FocuSee and import your recorded video or screen capture. This feature works with standard video formats that already contain an audio track.

Upload Your Footage
Step 2. Enable AI Audio Enhancement
In the right-side editing panel, locate the AI Audio Enhancement toggle and turn it on. FocuSee automatically analyzes the video’s audio track, identifying speech and suppressing background noise such as hiss, fan hum, room echo, or light environmental sounds.
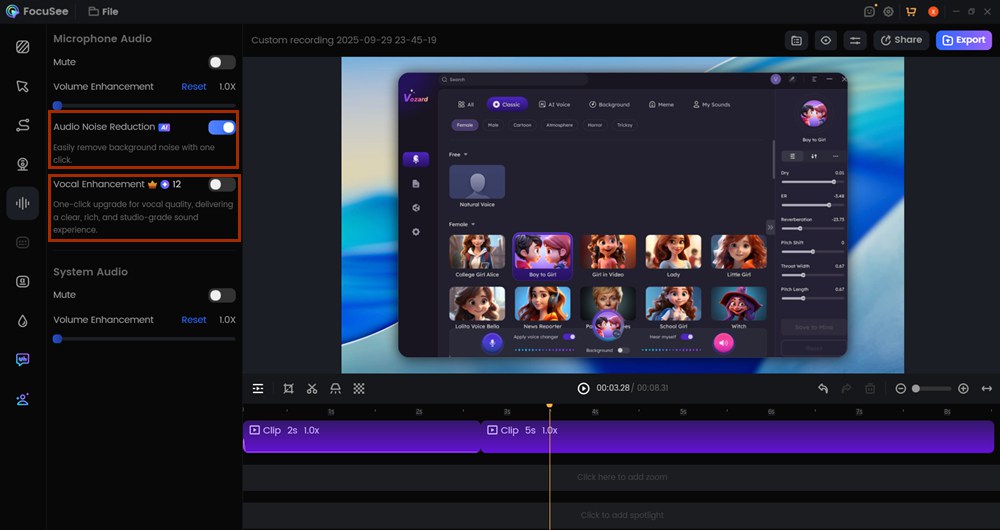
AI Audio Enhancement
Step 3. Refine (Optional)
To further improve clarity, you can enable AI Smart Cut to automatically remove long pauses and silent sections—areas where background noise is most noticeable to viewers.

Remove Filler Words
Step 4. Export the Video
Export your cleaned video. The process is non-destructive, so your original recording remains unchanged if you need to revisit it later.

Export Your Video
When This Method Works Best
- Screen recordings with keyboard, fan, or room noise
- Tutorial videos recorded in untreated spaces
- Talking-head videos where speech clarity matters more than absolute silence
This bonus workflow is ideal for creators who think, “I need to remove background noise from a video, not become an audio engineer.”
FocuSee handles the technical complexity behind the scenes, letting you focus on delivering clear, professional content—without manual sliders, frequency graphs, or trial-and-error processing.
Frequently Asked Questions About Audio Cleanup
Here are answers to the most common questions we receive about restoring audio quality.
Can background noise be completely removed?
Rarely. The goal of audio cleanup is to reduce noise to an imperceptible level, not necessarily to zero. Removing 100% of background noise usually strips away parts of the voice, leading to digital distortion. A “clean” recording is a balance between low noise and natural voice quality.
What is the best way to clean up noisy audio recordings?
The “best” way depends on your resources and the noise type. For speed and dynamic noise (traffic, wind), AI noise removal audio tools (like FocuSee) are superior because they automate voice isolation. For precise, zero-cost control over constant noise (hiss), manual spectral editing in software like Audacity is the standard.
Are AI noise removal tools better than traditional methods?
AI tools are generally better for complex, dynamic noises because they are trained to recognize human speech patterns. Traditional manual filters are often better for constant, unchanging noises like static and hiss removal or electrical hum, where a consistent frequency can be targeted and removed.
Why does my voice sound distorted after noise reduction?
This is usually caused by setting the noise reduction threshold too high. If the software tries to remove too much sound, it removes the “breath” and “air” from the voice, making it sound underwater. Try reducing the effect strength or using the multi-pass technique described in the Pro Tips section.
Conclusion: Saving Your Audio Recording
The panic over a noisy recording does not have to end in a scrapped project. By utilizing the strategies outlined above, you can remove background noise from audio files effectively, reducing the street noise or fan hum to a faint whisper that listeners will ignore.
Whether you choose the precision of manual editing or the speed of AI noise removal audio tools, saving your audio is possible. You do not need to be a sound engineer to fix your files—you just need the right approach for your specific noise problem.
Don’t let ambient noise ruin your hard work. Select the tool that fits your workflow and restore your audio today.