How to Remove Background Noise from Video: The Creator’s Guide to Clear Audio

There are few things more frustrating for a content creator than reviewing a video tutorial you just recorded, only to realize the audio is compromised. You spent hours on the script and visual delivery, but the persistent hum of a computer fan or the sudden roar of street traffic disrupts the clarity of your message. This background interference immediately makes content feel less professional, potentially causing viewers to click away.
If you are struggling to get clear audio in videos without a professional studio, you are not alone. Many creators face the “post-production panic” of trying to salvage a recording. The good news is that you do not need an engineering degree to fix this. Whether you use Windows 11, macOS Sonoma, or iOS 17, effective solutions exist.
This guide details tested methods—both manual and automated—to help you remove background noise from video and restore the quality your audience expects.
Manual Editing vs. Automated AI Solutions: Which Method Fits Your Workflow?
Before diving into the specific steps to remove unwanted sounds from video, it is vital to analyze the trade-offs between manual editing and automated solutions. Your choice depends largely on your technical expertise and the time you can allocate to post-production.
Manual video audio editing software (like Audacity or DaVinci Resolve) offers granular control. You can target specific frequencies and create custom noise profiles. However, this method requires a significant time investment to learn the interface. The risk of error is high; incorrect settings can easily degrade voice quality, leaving it sounding robotic or metallic.
Conversely, automated AI solutions prioritize speed and ease of use. These video noise removal tools analyze the audio track and identify noise patterns automatically. While this approach often involves a paid subscription, it drastically reduces the time cost and technical skill required.
Decision Matrix: What Will It Cost You?
| Feature | Manual Editing (e.g., Audacity) | Automated AI (e.g., FocuSee) |
| Cost | Free (usually) | Paid / subscription |
| Time Investment | High — learning curve + export steps | Low — instant, one-click |
| Skill Level Required | Intermediate to advanced | Beginner |
| Risk of Distortion | High if settings are wrong | Low — AI-optimized |
| Best For | Audio engineers, zero budget | Creators, educators, professionals |
The Fastest Way to Remove Background Noise from Video
For creators who need to publish content quickly without mastering audio engineering, automated tools are often the most efficient method. I recently tested FocuSee specifically to address the pain point where users struggle to find accessible software that removes background noise without compromising the quality of the original audio.
Real-World Test: AI Audio Enhancement
To verify if this tool lives up to the hype, I ran a practical test. I recorded a tutorial intro with a heavy laptop fan whirring directly next to the microphone—a common scenario for home office creators. In manual editing, filtering this out often takes 15 to 20 minutes of tweaking to ensure the voice doesn’t sound synthesized.
With FocuSee, the process was distinct because it automates the “listen and subtract” phase. I enabled the dedicated AI Audio Enhancement toggle. The software targeted the steady background fan drone and suppressed it instantly.
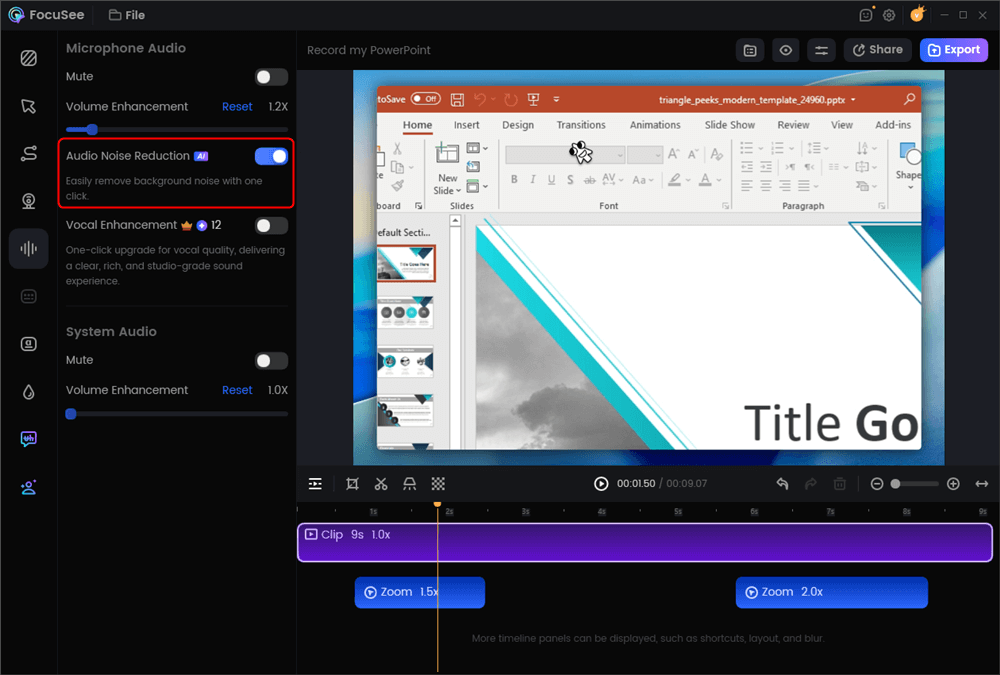
AI Audio Enhancement
The result was surprising: the fan noise was gone, but my voice retained its natural low-end resonance. It didn’t sound “thin” or clipped. Instead of spending my evening adjusting threshold sliders, the software handled the processing in the background. While this is a paid tool, the investment directly counters the high time cost of manual editing. It ensures that even beginners can produce results that meet professional standards.
How to Reduce Background Noise in Video Editing for Free (Manual Method)
If you are working with a zero-dollar budget and have the patience to learn a technical workflow, you can reduce background noise in video editing using free software. Audacity is the industry standard for this approach, but because it is an audio-only tool, there are extra logistical steps involved.
Phase 1: The “Detaching Audio” Workflow
Before you can fix the noise, you need to get the audio out of your video file. This is the step most tutorials skip, leaving beginners stranded.
- Export Audio: Open your video editor (e.g., Premiere, Davinci, or CapCut desktop). Export only the audio of your project as a WAV file (do not use MP3, as the compression makes noise removal harder).
- Import to Audacity: Drag this WAV file into Audacity.
- The “Clap” Sync Tip: Pro-tip: If you haven’t recorded yet, clap loudly at the start of your video. When you bring the cleaned audio back later, you can visually line up the spike of the clap waveform to ensure your lips match the sound.
Phase 2: Step-by-Step Noise Reduction (The Recipe)
Here is the exact workflow to remove background noise from video audio in Audacity without making your voice sound like a robot.
Step 1. Isolate the Noise: Zoom into your waveform. Select a section of the timeline (about 1–2 seconds) that contains only the background noise (e.g., the silence before you start speaking). This is known as the “Noise Profile.”
Step 2. Capture the Profile: Go to Effect > Noise Removal and Repair > Noise Reduction.

Audacity Noise Reduction
Click the button labeled “Get Noise Profile”. The window will close—this is normal. Audacity has now “memorized” what the fan or hiss sounds like.
Step 3. Apply Reduction: Press Ctrl + A (Windows) or Cmd + A (Mac) to select your entire track. Go back to Effect > Noise Removal and Repair > Noise Reduction.
Step 4. The “Safe Start” Settings: Do not use the default settings, as they can be too aggressive. Enter these values to start:
- Noise Reduction (dB): 12 (Controls how much volume is taken out of the noise).
- Sensitivity: 6.00 (Controls how aggressively it hunts for the noise).
- Frequency Smoothing (bands): 3 (Helps blend the audio so it doesn’t sound digital).
Step 5. Execute: Click OK. Listen to the result. If you hear a “chirping” sound, undo (Ctrl+Z) and increase Frequency Smoothing to 6. If the noise is still there, increase Noise Reduction to 18, but be careful—going higher often degrades the voice.
Phase 3: Re-Syncing
Once cleaned, export the track from Audacity as a WAV file. Import it back into your video editor, place it on a new audio track, align it with your original audio (using the clap or waveform peaks), and then mute the original noisy track.
Why Noise Removal Can Make Audio Sound Worse
Over-aggressive noise reduction is the main cause of “underwater” or garbled audio. Noise reduction works by subtracting frequencies—if those overlap with your voice, speech quality degrades. More reduction does not mean better results.
How Distortion Happens (and How to Avoid It)
- Sensitivity / Threshold: Controls what the software removes. Set too high, it cuts into quiet parts of speech (word endings, breaths), making audio sound choppy.
- Smoothing: A safety buffer that reduces digital “chirping.” Higher smoothing sounds more natural but may slightly soften vocal clarity.
The key is balance: remove noise without damaging the voice.
The Hidden Trap: Source Quality
Low-bitrate or heavily compressed video already blends noise and voice together, making clean removal nearly impossible.
Best practice: Record at the highest quality possible (WAV audio or high-bitrate MP4). High-quality files are far easier to clean than compressed ones.

The Sweet Spot
How to Remove Background Noise from Video on Mobile
For creators who shoot and edit directly on their phones, the desktop workflows above may not be accessible. Fortunately, mobile video noise removal tools exist, though they come with limitations.
iOS and Android Solutions
If you are editing on an iPhone (iOS 17) or Android, dedicated apps are your best bet.
- iOS: The native “Voice Isolation” feature works superbly for calls, but for recorded video, apps like CapCut or InShot have “Denoise” features.
- Workflow: Import your video, tap on the audio track, scroll to “Reduce Noise,” and toggle it on.
Limitations of Mobile Apps
Be aware: Mobile apps typically apply a “blanket” filter. They lack the “Noise Profile” step found in Audacity. This means they cannot distinguish between a constant fan hum and a sudden car horn. They are effective for simple vlogs, but if you are recording a professional presentation, the lack of fine-tuning can make your audio sound over-processed.
FAQ: Common Questions About Video Noise Removal
How can I remove background noise from a video without professional software?
You can use user-friendly tools like FocuSee, which are designed for non-experts. These tools use AI to handle the technical heavy lifting, allowing you to achieve clear audio without needing to understand audio engineering. Alternatively, free tools like Audacity offer manual removal options if you follow the “Safe Start” settings (12dB / 6 Sensitivity) listed in the guide above.
What is the best software to reduce background noise in videos?
The “best” tool depends on your needs. For professionals requiring granular control, Adobe Audition or DaVinci Resolve are industry standards. For creators seeking speed and ease of use without technical training, FocuSee is highly recommended for its one-click AI enhancement and screen recording capabilities.
How do I remove static noise from video audio?
Static is often a consistent frequency. To remove it manually in Audacity, capture a “Noise Profile” of just the static hiss. Then, apply reduction with a higher “Frequency Smoothing” setting (try 6 instead of 3). For automated results, tools like FocuSee identify static as a constant background pattern and suppress it automatically.
Why does noise removal sometimes make my audio sound worse?
This usually happens because the noise reduction settings are too aggressive. If the software removes too many frequencies, it begins to cut into the human voice range, resulting in a hollow, metallic, or “underwater” sound. Always apply reduction in small increments (start at 6dB or 12dB, never jump straight to 30dB).
Can I remove background noise completely?
In many cases, total silence is impossible without making the voice sound unnatural. The goal is to reduce background sound in video to a level where it is imperceptible to the audience, rather than achieving mathematical silence.
[Internal Link Suggestion: Link ‘recording capabilities’ to ‘/best-screen-recorders-for-tutorials’]
Conclusion
Letting background noise disrupt your video content is a solvable problem, not a permanent roadblock. You do not need to accept unprofessional audio, nor do you need to spend days learning complex engineering software to fix it. Whether you choose to invest time in the manual Audacity workflow—carefully exporting, treating, and syncing your audio—or utilize the speed of AI automation, the result is within reach.
If you are looking for the most direct solution to remove background noise from video and regain control over your production quality, FocuSee offers a verified, low-risk path. By automating the technical cleanup, you can focus entirely on your message. Download FocuSee today to experience how effortless professional audio can be, and stop letting fan noise or street traffic compromise your hard work.