How to Make a Tutorial Video for YouTube [6 Steps]

Imagine struggling to grasp new software or solve a problem solely by reading lengthy guidelines. It is confusing, right? This is where tutorial videos come in handy. They can break down complex processes into simple illustrations, which can accelerate the learning process. That is one of the reasons why people are seeking ways to create a tutorial video on YouTube, as such videos perform incredibly well.
Studies have shown that viewers recall 95 percent of everything they watch on video compared to reading. This is why employees who work with video instructions perform tasks faster than they do when they have only text instructions.
Why Create Tutorial Videos for YouTube?
Tutorial videos are the most effective method for sharing knowledge and engaging the audience. They simplify learning, provide value, and create long-term YouTube viewership. They are utilized for the following reasons:
Create Tutorial Videos for YouTube
Discuss Real Issues
Tutorial videos provide straightforward answers to common issues, which are frustration- and time-savers for your viewers. With straightforward solutions, your videos are handy tools that viewers refer to whenever they encounter the same issues.
Building Trust and Credibility
By posting highly quality content, your viewers will have a chance to recognize you as someone dependable in your field. Trustworthiness not only promotes loyalty but also authority and influence, both on YouTube and in the real world.
Access a Larger Audience
Tutorials are one of the most requested types of videos, as many users watch them every day. When you produce them, you attract a huge number of people who want to learn and develop their skills, thereby increasing your visibility and viability for growth.
Promote Engagement and Growth
Open-minded and engaged audiences often seek out tutorials to connect with such channels, to leave comments, share, and subscribe. Such organic engagement can spread your fan base on your channel and up your chances of long-term success and YouTube algorithm recommendations.
How to Make a Tutorial Video for YouTube (Step-by-Step)
Now, let’s have a detailed look at how to make a tutorial video for YouTube:
Step 1. Plan Your Tutorial
To organize your tutorial:
- Brainstorm Topic: Choose a concise subject your audience wishes to know. Record their typical questions and lay out the steps in a straightforward list to remain organized.
- Make a Storyboard: Put your points in order with sketches or notes. A storyboard is a map, so your tutorial will be easy to follow and make sense.
- Write a Story: Organize your tutorial into a start, middle, and conclusion. Add notes for visuals or demos and end with a summary for brevity.
- Prepare Script: Write a script step-by-step. Keep it concise, practice it, and read it naturally to get a smooth recording.
Step 2. Set Up Your Recording Environment
If you want to create a studio for your recording, the first detail to take care of is the choice of a microphone and a camera that will be used for the video and audio recording. You should also determine whether you will be recording inside or outside and what the acceptable level of background noise in your recording is.
You may also want to use simple devices, such as a tripod, to stabilize the camera and give your video a smooth movement. Additionally, keeping the camera off-center can help keep your text or graphic information from occupying the entire screen. Adjust your camera angle accordingly to match the nature of the tutorial, such as a top view for table demonstrations. A neat setup gives a professional and easy-to-understand tutorial.
Step 3. Configure the Recording Software
Before recording, you will need to have the appropriate software to record your screen effectively and without glitches. Good-quality recording software makes it easy, saves time, and your tutorial, from start to finish, looks professional.
1. FocuSee (Highly Recommended)
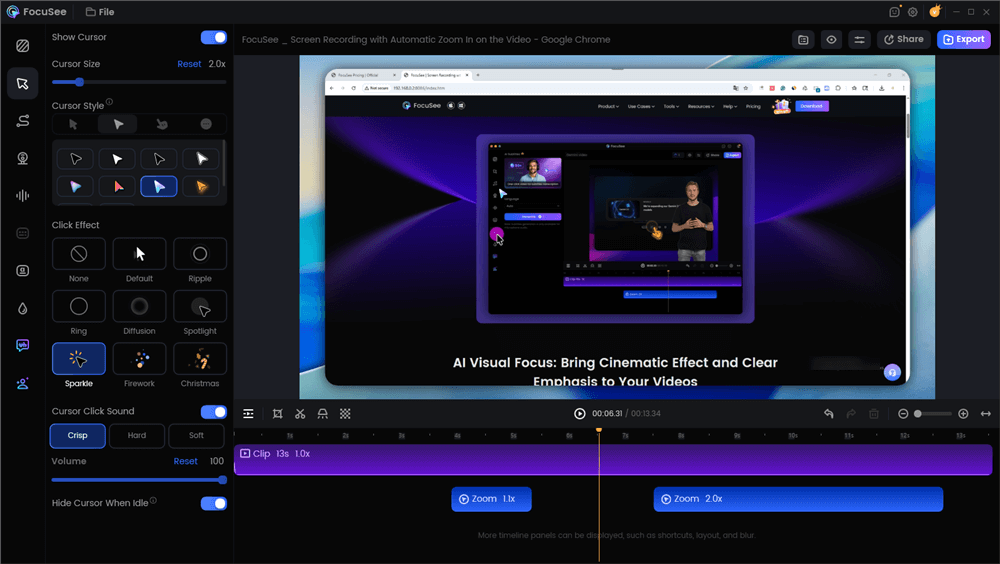
Tutorial Video for YouTube – FocuSee
FocuSee is a robust yet easy-to-use tool intended to make screen recording easy and professional. You can crop records to eliminate unwanted parts and retain focus only on what is necessary. The dynamic zoom automatically tracks your mouse movements, making tutorial videos more engaging and interactive. You can also switch between 8 mouse types and 3 click effects to accentuate key actions. With an in-built teleprompter, you can read scripts flawlessly while recording, so that there is a natural flow.
FocuSee also enables you to insert automatic captions, insert spotlight effects, and employ various layout options to achieve a clean look. You can even insert your watermark to safeguard your content, control playback speed, trim clips, and export in 4K quality for crisp results. All these make it ideal for the quick and easy creation of professional tutorial videos.
Key Features:
- FocuSee keeps your tutorial on track with the introduction of advanced auto-zoom and highlight mouse cursor to significant screen activities.
- AI avatars, instant background removal, and subtitles in 50+ languages make tutorials visually engaging, professional, and easy to share worldwide.
- Crystal-clear speech, automatic filler-word cleanup, and background noise removal keep tutorials polished and help viewers stay focused on learning.
- One-click editing and streamlined workflows speed up tutorial creation, so you spend more time teaching and less time on tools.
- You may customize mouse effects and click effects such that the audience clearly perceives each significant step.
- The built-in teleprompter never allows you to lose your lines, and the video appears natural.
- Subtitles provided automatically make tutorials easier to understand and enable more individuals to use them.
- Having a personal watermark makes your tutorial stand out and protects your work.
2. OBS Studio
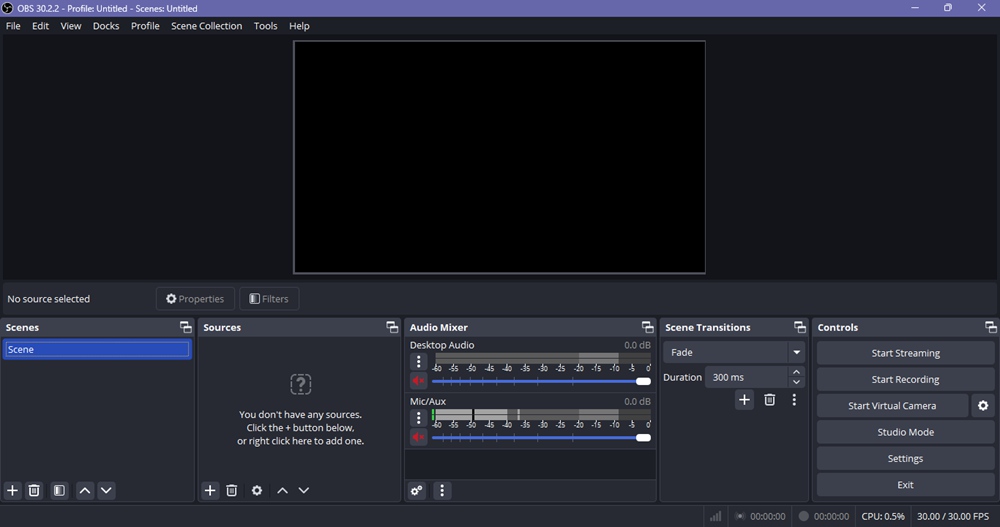
OBS Stuido
OBS Studio is a free and open-source screen recording and streaming software for Windows, macOS, and Linux. It offers real-time video and audio recording of high-performance mixing sources, such as webcams, screens, pictures, and text. You have control over the recording resolution and frame rate, such as 1080p and 60 FPS, to ensure high-quality and smooth output.
OBS supports various encoders, including x264, NVENC, Intel Quick Sync, and AV1, and allows users to tune performance according to their hardware. Its lightweight, modular nature will enable you to handle scenes, sources, and layouts in the native state. OBS also supports plugins and customizable hotkeys, and makes your workflow efficient and powerful.
Key Features:
- You can record in high definition, and you can set frames per second to have a smoother video.
- It enables you to merge various sources, such as your screen, webcam, or images, into a single video.
- You choose the encoder to match the ability of your machine.
- OBS supports an unlimited number of scenes and customizable layouts, allowing you to have full control over how your tutorial appears.
3. QuickTime Player
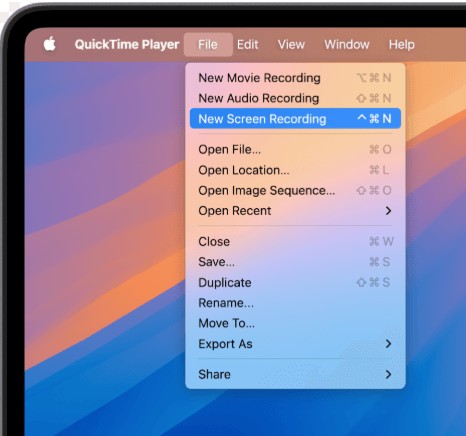
Screen Record on Your Mac Computer
QuickTime Player is Apple’s own free Mac software, where you can record and create how-to tutorial videos with ease. You can record your entire screen or a specific region, along with the microphone audio, for ease of explanation. The video is captured in MOV format and exportable up to 4K. The software features basic editing tools, including Trim, Split Clip, Rotate, and Flip, to help you cut your video. With device export presets, a minimalist user interface, and smooth performance, QuickTime Player is ideal for beginners who need to create simple tutorial videos.
Key Features:
- Facilitates time-stamped playback in which you can easily navigate through parts of your tutorial.
- Facilitates external webcam recording for face-cam tutorials.
- Provides video playback features like slow motion and fast forward for review playback.
- Natively runs on macOS, making it easy to save and share files.
Step 4. Record Your Tutorial
Step 1. Visit the FocuSee official website, download the app, and follow the on-screen installation instructions. Make sure your internet connection is stable.
Step 2. Open the FocuSee app. Click the “Camera” icon to turn your webcam on or off. Use the “Microphone” icon to select or mute your audio. If you want to use a script, click the “Teleprompter” icon.
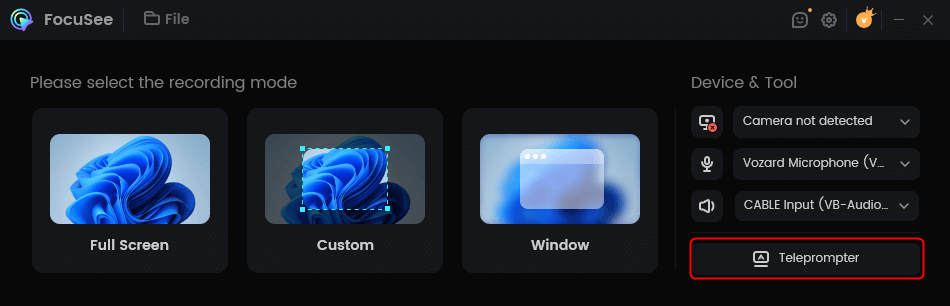
Step 3. Choose your recording area. Select “Full Screen”, “Custom”, or “Window” based on your needs.
Step 4. Once ready, press the “REC” button to start recording. Make sure both your audio and camera work correctly. A 3-second countdown will appear before recording begins. Use this time to get ready. To stop, press the “Stop” button.
Step 5. Edit Your Video
After recording, FocuSee adds smart zoom effects to highlight actions. You can also trim clips, change speed, or adjust mouse cursor size and animations. Also, you can add an AI avatar as your digital person to make your tutorial video more professional.
Edit Your Video
Step 6. Export in YouTube-Ready Format
When done, click “Export” to save your video in MP4 or GIF.
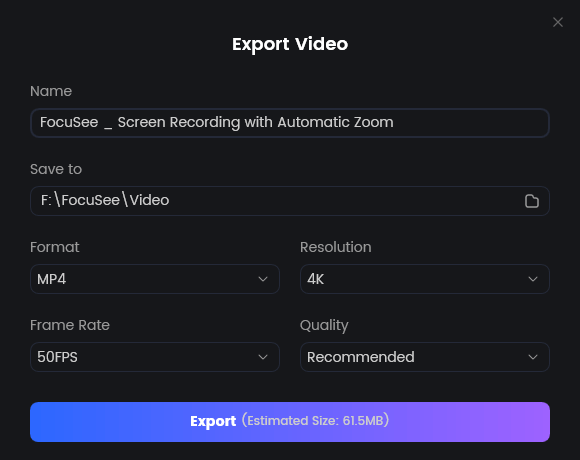
Export Your Video
Then use the “Share” button to set resolution, frame rate, and upload or share.
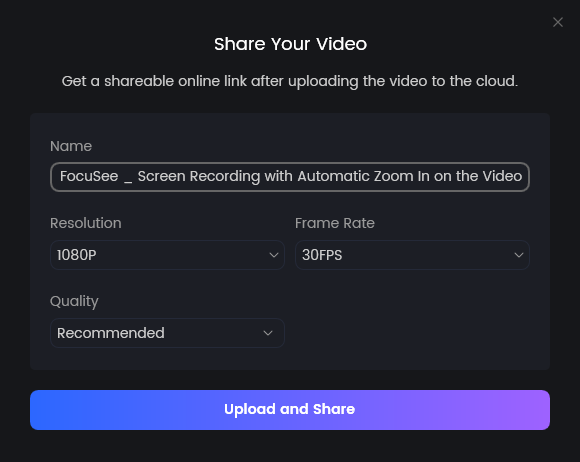
Share Video
FAQs on Tutorial Video YouTube
1. What are the optimal kinds of tutorial videos for YouTube?
Concise, short, and one-pointed tutorials are effective. Audiences prefer short, engaging videos with step-by-step instructions, images, and illustrations that allow them to grasp ideas as they unfold, rather than requiring lengthy descriptions.
2. How much would a YouTube tutorial last?
Tutorials should have an optimum length of 5-15 minutes. The briefers are more interesting, but they can be lengthy in cases of complex issues. Focus on quality, not quantity, and make every segment count.
3. Do I need costly equipment to create tutorial videos?
No, you do not. Low-cost or free resources can be used to design professional tutorials. Primarily, FocuSee provides a teleprompter, auto-shift effects, and easy-to-use editing capabilities to enhance your videos at no cost.
Final Words
One of the most effective methods for disseminating information, building an audience, and establishing authority in your subject is to create tutorial videos on YouTube. A good tutorial enables people to solve problems and motivates them to return. Concentrate always on easy-to-understand explanations, step-by-step instructions, and appealing visuals to bring value to your content. The trick to success within YouTube is quality and consistency. To make recording and editing easy, FocuSee is a top recommendation. With its built-in teleprompter, smart zoom effects, and blur/highlight features, you can easily create professional-quality tutorials.