Creating iOS App Marketing Videos That Convert

You’ve spent months building a great iOS app, only to see its product page conversion rate stall. The frustration is real. You’re not just wrestling with creating an engaging video; you’re facing a minefield of strict technical specs, the headache of producing assets for different iPhone and iPad sizes, and the uncertainty of knowing if your changes actually increase installs. A non-compliant or uninspired App Preview video can lead to low installs or even a rejection from App Store Review, wasting valuable time.
This guide is different. It’s a clear, tested blueprint for creating iOS app marketing videos that addresses these real-world challenges head-on. We’ll show you exactly how to make iOS app promo videos that meet every requirement, drive tangible results, and can be efficiently repurposed for all your marketing channels.
To ensure complete accuracy, this guide is based on hands-on testing with an iPhone 15 Pro on iOS 18, editing on macOS Sequoia, and follows Apple’s latest App Store Connect requirements.
5-Phase Production Blueprint on Creating iOS App Marketing Videos
Successful App Preview production isn’t about expensive software; it’s about a structured process. This App Store marketing video guide is built around a five-phase blueprint that turns a complex project into manageable, repeatable steps.

Stages of Creating iOS App Marketing Videos
Phase 1: Strategy & Scripting (The First 5 Seconds Are Everything)
Before you even think about recording, define your goal. Your video’s first five seconds must answer one question for the user: “What problem does this app solve for me?” This phase is about creating a clear, conversion-focused plan.
Instead of just a list of features, create a simple three-column script. This maps out exactly what happens, when it happens, and what text supports the action.
Example Script: “Devon’s Budgeting App”
| Time (0–30s) | Visual (What the user sees) | Audio / Text Overlay |
| 0–5s | Hook: A user is shown a chaotic screen of expenses. They tap a “Magic Sort” button. | Text: Stop guessing where your money goes. |
| 6–15s | Core Value 1: The app instantly categorizes transactions into “Groceries,” “Bills,” “Fun.” | Text: Instantly categorize every purchase. |
| 16–25s | Core Value 2: The user taps a “Reports” tab, revealing a simple, clear spending graph. | Text: See your spending at a glance. |
| 26–29s | Call to Action: Final shot of the clean, organized dashboard. | Text: Get your budget in order. Download now. |
Phase 2: Pre-Production & Device Prep
A clean recording is non-negotiable. Prepare your device and assets for a flawless session to avoid re-recording.
Set up a clean device state: Enable Do Not Disturb, turn off Auto-Lock, and preload any data to avoid showing loading spinners.
Gather assets: Prepare any logos, background music (royalty-free), or custom fonts you plan to use for text overlays.
Phase 3: Screen Capture
Execute your shot list. Record each scene as a separate clip. This makes editing much easier than trying to get a perfect 30-second take. Use your iPhone’s built-in screen recorder, which captures high-quality footage.
Phase 4: Editing & Post-Production
This is where you assemble the story.
- Import your clips into a video editor like Final Cut Pro or iMovie.
- Trim the clips to fit your script’s timing.
- Add simple, clean text overlays and feature callouts.
- Add your royalty-free music track and adjust the audio levels.
Phase 5: Submission & Optimization
Export the video with the correct technical specs (more on that below) and upload it to App Store Connect. The work doesn’t stop here; now you can begin A/B testing your video using Product Page Optimization to analyze its performance.
The Multi-Device Headache: A Workflow for Every Screen Size
One of the biggest time sinks is creating videos for all required device sizes. Apple requires different resolutions for various iPhones and iPads, and a universal app needs both portrait and landscape previews. Here is a practical workflow to manage this without re-recording every shot.
The Strategy: Record Highest, Crop for Others
Record all your footage on the largest device you need to support (e.g., a 6.7″ iPhone or a 12.9″ iPad Pro). This gives you a high-resolution master file that you can crop and reframe for smaller sizes.
iOS App Preview Resolution Cheatsheet
| Device Display | Required Resolution (Portrait) | Required Resolution (Landscape) | Notes |
| 6.7″ iPhone (Pro Max) | 1290 x 2796 | 2796 x 1290 | Record on this device. This is your master. |
| 6.5″ iPhone (Older Max) | 1242 x 2688 | 2688 x 1242 | Crop and scale down from the 6.7″ master. |
| 5.5″ iPhone (Plus models) | 1080 x 1920 | 1920 x 1080 | Crop and scale down from the 6.7″ master. |
| 12.9″ iPad Pro | 2048 x 2732 | 2732 x 2048 | Requires a separate landscape recording. |
Workflow Steps:
- Record Master: Capture all your scenes on the 6.7″ iPhone (for portrait) and 12.9″ iPad (for landscape).
- Edit Master: Create your primary App Preview video in a timeline matching the master resolution (e.g., 1290×2796).
- Duplicate & Reframe: Duplicate the finished project. Change the project’s resolution to the next required size (e.g., 1242×2688).
- Adjust Framing: Go through the timeline and adjust the scale and position of your clips to ensure important UI elements are centered and text overlays are in safe zones.
- Export: Export each version separately. This process is far faster than re-recording.
Getting the Technical Details Right: The Manual Method
For developers on a strict budget or those who require complete creative control, this procedure for iPhone screen recording for app promo videos relies on built-in iOS tools and standard video editing software. Success depends on meticulous preparation and precise export settings.
Step 1: Record and Export with Precision
Apple’s App Preview encoder is unforgiving. To avoid quality loss or rejection, follow these settings exactly.
Capture: Record natively on your device at 30 frames per second (fps).
Edit: Place your 30 fps footage into a matching 30 fps editing timeline. Do not mix frame rates.
Export: Use an H.264 codec with a constant bitrate between 16–24 Mbps for a 1080p-class portrait video. This ensures crisp UI elements and text.
Never add iPhone device framing or mockups to your App Preview. Apple’s guidelines require showing only the full-screen UI.
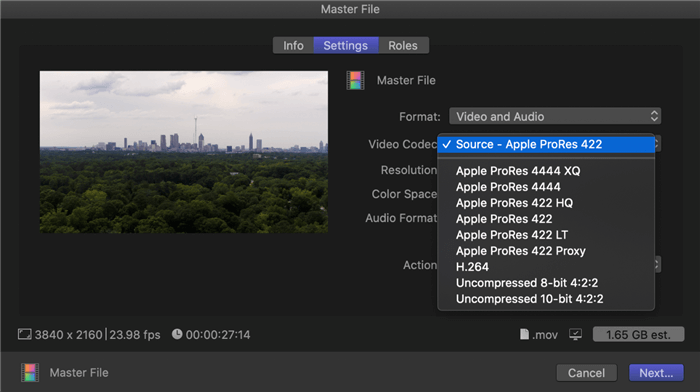
Final Cut Pro Export Settings
Step 2: Streamline Your Editing Workflow
Manually adding zoom effects to highlight every tap and swipe is one of the most tedious parts of editing. You can create these effects using keyframes in Final Cut Pro or Premiere Pro, which offer precise control but are very time-consuming.
For teams looking to speed up this specific step, specialized tools can help. For instance, software like FocuSee is designed to automate the zoom-and-follow effect through Smart Focus & Auto-Zoom, which automatically tracks your cursor or taps and emphasizes key actions—eliminating hours of manual keyframing work.
- Beyond cursor tracking, FocuSee addresses other common editing bottlenecks for app demos:
- AI Smart Cut removes filler words and pauses automatically, producing smooth narration without manual trimming
- Keyboard Shortcut Display captures and shows shortcuts used during your demo, enhancing the learning experience for viewers
- Background Removal creates a professional look even when recording in ordinary spaces—no green screen required
- Automatic Subtitles (50+ languages, 98%+ accuracy) save hours on manual captioning while improving accessibility
The combination of these features can reduce a typical app demo editing workflow from 6-8 hours down to under an hour, allowing indie developers to focus on building features rather than wrestling with video editing software.
Beyond Production: Measuring What Matters
Creating a video is the first step. True growth comes from ASO video optimization for iOS—testing your creative and measuring its impact on installs.
A/B Testing with Product Page Optimization (PPO)
Don’t guess which video works best. Test it. App Store Connect’s Product Page Optimization (PPO) lets you test different App Previews against each other.
Here’s a simplified workflow for measuring your video’s impact:
- Create a Variant: In App Store Connect, navigate to your app’s Product Page Optimization section and create a new treatment. Upload your new App Preview video as the variant.
- Isolate the Change: For your first test, change only one thing. A great starting point is the first five seconds—the hook. Create one version that shows a problem and another that shows a benefit.
- Run the Test: Allocate a percentage of your traffic to the test (e.g., 50% to the original, 50% to the new variant).
- Analyze Results: After a week or two, check the results in App Analytics. You’re looking for the Conversion Rate (CR). If the new video has a statistically significant higher conversion rate, it’s a winner. You can then promote it to be your default App Preview for all users. You can also correlate this data with reports from Apple Search Ads Creative Sets to see which video drove more taps.
Content Repurposing Cheatsheet: One Project, Many Channels
You don’t need to start from scratch for every marketing channel. Use your App Preview project as a master file and create variants for social media and your website.
| Channel | Key Adjustments | What to Change/Add |
| App Store Preview | 15-30s, 100% UI, no branding | Remove any intros/outros. Text must describe UI. No explicit “Download Now” CTA button graphic. |
| Social Ad (TikTok/Reels) | 9-15s, 9:16 aspect ratio | Add trending audio. Cut faster. Add a bold, branded intro and a clear call-to-action end card. |
| Website Hero Video | 30-60s, 16:9 aspect ratio | Can include lifestyle shots or animated branding. Often silent/autoplay with subtitles. Tells a broader brand story. |
Conclusion
You now have a reliable system for creating iOS app marketing videos that not only avoids App Store rejections but actively improves your conversion rates. The uncertainty around technical specs, multi-device workflows, and measuring results is no longer an obstacle. By following this blueprint, you can produce professional, compliant videos efficiently and focus your energy on what matters most: building a great app.
Ready to create your next App Preview with confidence? This blueprint is your starting point for turning views into installs.