What is the best Screen Studio Alternative for Windows to Create Cinematic Videos?

If you’re looking for the best Screen Studio alternative for Windows to Create Cinematic Videos, you’ve probably run into the same problem: Screen Studio is macOS-only.
For Windows users, creating cinematic videos, like product demos and tutorials, often means choosing between basic screen recorders with outdated visuals or spending hours adding zooms, cursor animations, and other effects manually in a video editor.
Fortunately, that’s no longer the case. Several Windows screen recording tools now offer automatic zoom effects, cursor highlights, smooth camera layouts, and built-in editing features that make it easy to create cinematic product demos without a complex editing workflow.
In this guide, we’ll compare the best Screen Studio alternatives for Windows, looking at their recording quality, cinematic features, ease of use, pricing, and overall value, so you can find the right tool for your workflow.
Comparing Windows Software: Moving Beyond the “Strawman” Tools
When evaluating screen capture software for SaaS marketing, we need to consider realistic alternatives. In the past, marketers were told to use open-source broadcasting tools like OBS Studio or legacy software like Camtasia. Let’s be honest: no fast-moving SaaS marketing team is using OBS to make quick cinematic product updates. It is a fantastic tool for Twitch streamers, but it is a massive, highly technical time sink for a product marketer.
Instead, the real choice for modern Windows users usually comes down to web-based quick-capture tools versus native AI cinematic recorders.
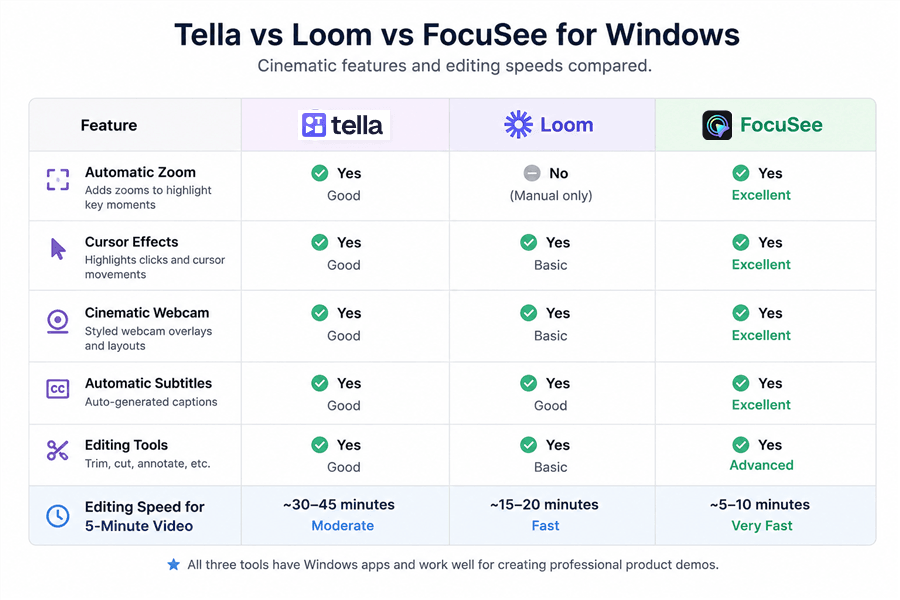
Tella vs Loom vs FocuSee
The Web-Based Approach: Tella and Loom
Many teams rely on Tella or Loom for asynchronous communication. These tools are fantastic because they run right in your browser. Loom’s recent AI editing features are great for trimming filler words, and Tella offers beautiful custom backgrounds. However, when it comes to true cinematic product demos, they fall short on Windows. They lack the automated, dynamic 3D zoom and intelligent cursor smoothing that makes Screen Studio so popular. You are mostly left with a static screen and a webcam bubble.
The Native AI Solution: FocuSee
Conversely, FocuSee is a dedicated, downloadable app that natively captures your screen and applies cinematic effects automatically based on your click data. Because it installs directly on your Windows 11 environment, it leverages your local GPU to compute motion blur and pan-and-zoom effects in real time. For teams wanting the exact “Screen Studio aesthetic” on a PC, FocuSee is currently the closest direct replacement on the market.
FocuSee: The Best Screen Recording Software for Startup Demos on Windows
FocuSee was built specifically to automate the tedious parts of post-production. It solves the core user frustration—that Screen Studio is Mac-only—by offering seamless support for Windows users.
The Production Speed: When you are scaling sales enablement videos, speed is everything. In my tests on a standard Windows 11 ThinkPad, recording a 2-minute feature demo took exactly 2 minutes. The AI processing, adjusting the auto-zooms, and exporting in 4K took roughly 4 minutes. You are looking at a 6-minute end-to-end workflow for a highly polished, ready-to-publish asset.
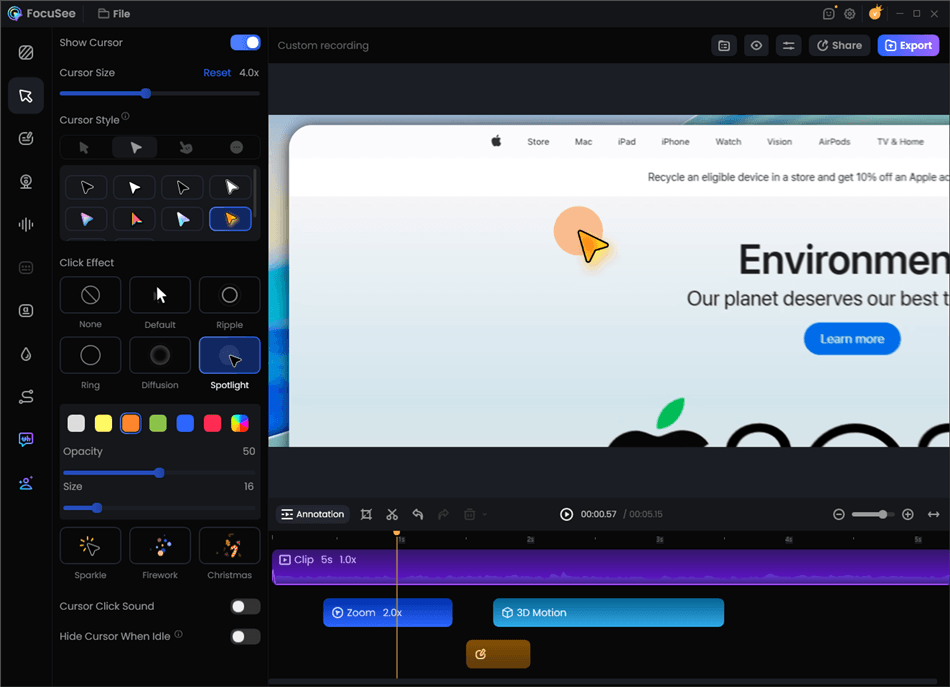
Record Screen with Cursor Following
FocuSee provides several automated features that directly speed up SaaS marketing workflows:
- Smart Focus & Auto-Zoom: FocuSee automatically zooms in or highlights clicked areas, keeping viewers focused on important steps without manual keyframing.
- Smart Cursor Tracking & 3D Motion: It applies cinematic cursor effects, click animations, and 3D screen perspective with a single toggle.
- AI Smart Cut: The software instantly trims filler words (“um”, “uh”) and dead air from your audio track.
- Automatic Subtitles: It generates highly accurate captions, saving hours of transcript editing.
The Reality Check: FocuSee Limitations and “Gotchas” on Windows
To be fully transparent, FocuSee is not magic, and you need to know its quirks before building a workflow around it. Here are the biggest “gotchas” I discovered during real-world testing:
- The Secondary Monitor Bug: FocuSee occasionally struggles to calculate accurate auto-zoom coordinates if you record on a secondary external monitor with a different scaling resolution than your main laptop screen. The fix: Always keep your SaaS dashboard on your primary display when recording, or ensure both displays are set to the exact same scaling percentage in Windows settings.
- Hover States vs. Clicks: The AI is trained to zoom in when you click. If your software relies heavily on complex hover-states or tooltips where no clicking occurs, the AI won’t automatically know to zoom there. You will have to manually add a zoom block in the post-recording timeline.
- Heavy Resource Usage: While not as demanding as Adobe Premiere, rendering a 4K 60fps video with 3D motion blur will make your laptop fans spin. Make sure your laptop is plugged into a power source to prevent Windows from throttling your GPU during the export phase.
Why Cinematic Effects Matter for SaaS Onboarding
Here is a critical expert insight that most marketing guides miss: the biggest misconception is that cinematic product demos are created mainly to look pretty. In reality, the strongest SaaS demos succeed because they actively reduce viewer cognitive load.
When a viewer watches a complex feature walkthrough on a static, unmoving screen, their eyes simply do not know where to look. They are forced to scan a busy interface—full of sidebars, navigation menus, and data tables—just to find your tiny mouse cursor.
By automatically zooming in on the action, blurring the background, and applying a smooth, visible cursor, you actively guide the user’s eye. This technique makes the demo feel intuitive. You are not just making a video; you are directing the user’s attention, which directly improves feature comprehension and landing-page conversion rates.
Pro Tip: Video Demos vs. Interactive HTML Walkthroughs
One of the biggest mistakes SaaS teams make is using video for everything. High-converting teams use a hybrid strategy.
Cinematic Videos (FocuSee): Best for top-of-funnel landing pages, social media, and async sales communication. Video effectively captures attention and forces the user to follow your specific, controlled narrative.
Interactive HTML Demos (Arcade, Supademo, Storylane): Best for mid-funnel education and help-center onboarding. These tools clone your software’s HTML, allowing users to click through at their own pace and build muscle memory.
A Step-by-Step Procedure for Cinematic Product Demos on Windows
Establishing a repeatable procedure is essential. The marketing copy often claims FocuSee “removes the traditional timeline,” which sounds great until you actually need to edit something. Here is exactly how the practical execution works from start to finish.
Step 1: Configure Your Hardware Setup
Connect your external 4K monitor (keeping the scaling bug mentioned above in mind), a high-quality microphone (like a Blue Yeti or Rode), and your webcam (like a Logitech Brio). Ensure your Windows 11 environment has adequate lighting.
Step 2: Record the Walkthrough
Open FocuSee and select “Custom Area” or “Full Screen”. Crucial step: Enable separate audio track recording so you can mute annoying Windows notification dings later without deleting your voiceover. Perform your SaaS onboarding steps naturally. Do not worry about long pauses—just leave your mouse still while you think of what to say next.
Step 3: Adjust the “No-Timeline” Timeline
When you stop recording, you won’t see a complex video editing suite. Instead, you get a sidebar with styling toggles (backgrounds, padding, cursor style) and a simplified block-timeline at the bottom.
- Look at the colored blocks on the timeline—these are your auto-zooms.
- If the AI missed a hover-state, simply click the exact second on the timeline, press the “+” button, and drag a focus box over the area you want to highlight.
- Toggle the “Smart Cut” button to instantly collapse the empty space where you paused to think.
Step 4: Export the File
Select your framing (16:9 for YouTube/Landing pages, 9:16 for TikTok/Shorts). Always choose the 4K export (3840 x 2160) at 60fps. This is non-negotiable; standard 1080p compression will ruin the readability of small UI text like drop-down menus. Hit export, and your file will be ready in minutes.
Frequently Asked Questions
Building a workflow around demo automation naturally brings up technical questions. Here are the real, practical answers you need.
Can I fix the auto-zoom if it targets the wrong button?
Yes. FocuSee uses a simplified block-based editor. If the auto-zoom targets the wrong quadrant of your SaaS dashboard, you simply click the zoom block on your timeline and drag the target box to the correct location. It takes seconds to adjust.
How does FocuSee compare to Camtasia for Windows users?
Camtasia is a powerhouse for traditional, timeline-based video editing and deep annotation (like drawing arrows or blurring sensitive data). However, creating cinematic cursor tracking and smooth 3D auto-zooms in Camtasia requires manual keyframing, which takes significantly longer. Use FocuSee for speed and cinematic flair; use Camtasia for complex, multi-track tutorial editing.
Can I capture complex hover-states and drop-down menus accurately?
Yes, but with a caveat. FocuSee’s AI triggers zooms based on mouse clicks. If you have a complex drop-down menu that activates purely on a mouse hover, the software will capture it visually, but it may not auto-zoom into it. You will need to manually add a zoom block in the editor to ensure the viewer can read the drop-down text.
What export settings should I use for crisp UI recordings?
Always export your tutorial videos in 4K resolution at 60fps, even if your final destination is a 1080p player. High-resolution source files guarantee that interface text, fine dashboard lines, and cursor details survive the aggressive compression algorithms used by platforms like LinkedIn and YouTube.
Conclusion: Transform Your SaaS Demos Today
You no longer have to feel held back because Screen Studio is Mac-only. Creating cinematic demos on Windows does not require spending hours keyframing in advanced editing suites, nor does it require settling for the static, unengaging look of basic browser extensions.
By adopting a purpose-built AI tool like FocuSee, your marketing team can build a realistic, high-speed production pipeline. A 6-minute workflow to create premium, auto-zoomed, captioned videos is a game-changer for a busy SaaS startup. This scalable procedure ensures your product dashboards look premium, actively reducing viewer overwhelm and directly improving your landing-page conversions.
It is time to stop settling for outdated tutorial formats and regain control of your product’s narrative. Test out FocuSee on your PC today, follow the primary-monitor rule, and start capturing your next feature launch in stunning 4K.