How to Hide Your Mouse Cursor on Windows & Mac

You’ve just finished recording the perfect software tutorial, but on playback, a distracting mouse cursor zips across the screen, pulling focus from your demonstration. It’s a common frustration that can make an otherwise polished video look unprofessional.
This guide provides clear, tested solutions to hide your mouse cursor on both Windows and Mac. Whether you’re preparing for a screen recording, a live presentation, or a software demo, we’ll cover robust manual methods, specific software settings, and automated tools to help you achieve a clean, professional result.
How to Hide Mouse Cursor on Windows & macOS
If you prefer using built-in system tools or need a system-wide solution for live demos, these manual methods are your starting point. The procedures differ significantly between operating systems, so follow the instructions specific to your device.
How to Hide Mouse Cursor: Windows 10 & 11
The most effective system-wide technique on Windows is to replace the standard cursor with a blank, invisible one. This affects the cursor in all applications until you revert the setting.
This method requires downloading a blank cursor file (.cur). To ensure your system’s security, only download files from trusted sources. We have verified and recommend the open-source blank.cur file from the AniNIX-Mouse-Cursors repository on GitHub, a widely used resource among developers.
- Download the invisible cursor file from the official GitHub repository. Navigate to the src/cursors folder and download the blank.cur file.
- Open the Start Menu, type “main.cpl”, and press Enter to open Mouse Properties.
- Navigate to the Pointers tab.
- Under the ‘Customize’ list, select Normal Select.
- Click Browse… and navigate to the blank.cur file you just downloaded. Select it and click Open.
- Repeat this process for other common cursor states, like Link Select and Text Select, for a more consistent result.
- Click Apply, then OK. Your cursor will now be invisible.
- To reverse this, return to the Pointers tab, and under the ‘Scheme’ dropdown, select Windows Default (system scheme) and click Apply.
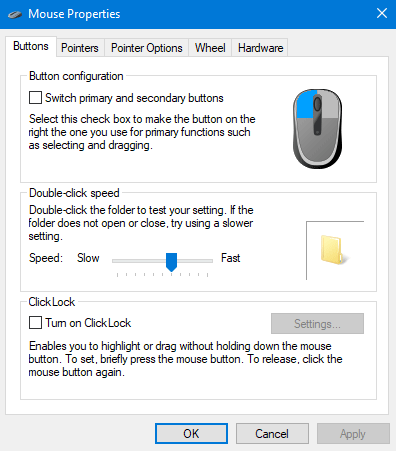
Mouse Properties
How to Hide Mouse Pointer on Mac
While macOS doesn’t have a native “invisible cursor” option, the built-in QuickTime Player automatically hides the cursor after a few seconds of inactivity during a screen recording. For a more active solution, you can move your cursor to a corner or off-screen to a second monitor.
Hiding the Cursor in Popular Recording Software
For users of popular screen recording software, hiding the cursor is a simple setting that is often overlooked. The most important tip is to configure the settings before you record.
Make Cursor Invisible in OBS
Step 1. In the Sources panel of OBS Studio, find your display source (e.g., ‘Display Capture’).
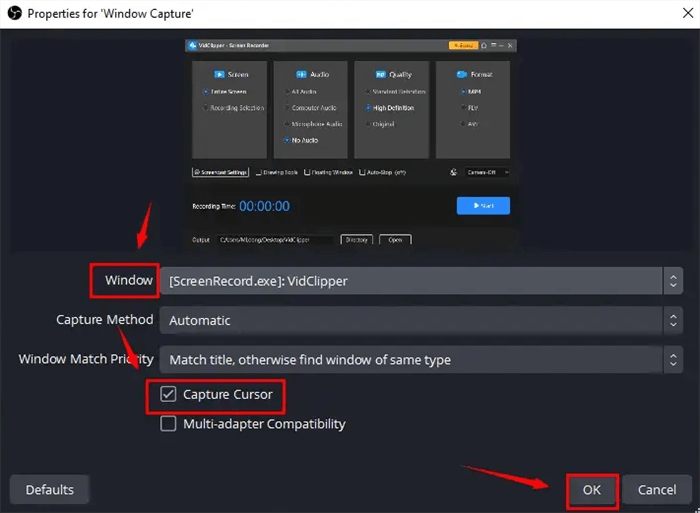
Hide the Mouse Pointer in OBS Studio
Step 2. Right-click the source and select Properties.
Step 3. In the properties window, uncheck the box labeled Capture Cursor.
Step 4. Click OK. Recordings from this source will now be cursor-free.
Hide the Cursor in Camtasia
Step 1. Open the Camtasia recorder.
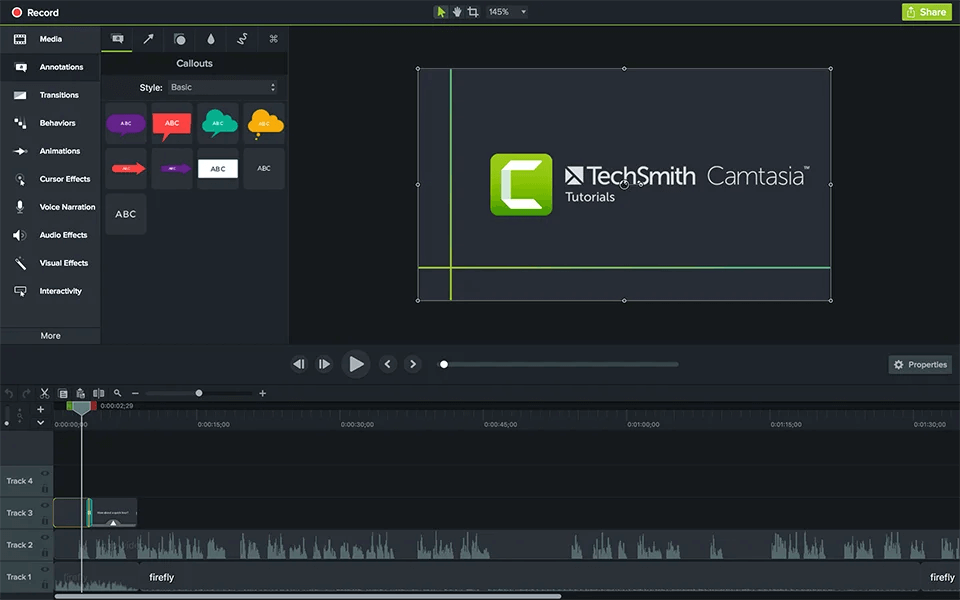
Hide the Cursor in Camtasia
Step 2. In the recorder’s toolbar, navigate to Tools > Options (or Preferences on Mac).
Step 3. Go to the Capture tab.
Step 4. Under the ‘Cursor’ section, uncheck the Capture cursor option.
Step 5. Click OK to save the new setting.
For creators who produce a high volume of tutorials, mastering these settings can significantly streamline your workflow.
Pro-Tip: Showing Clicks Without the Cursor
What if you want to hide the distracting pointer but still show your audience where you’re clicking? This is a common need for software tutorials, and many dedicated tools have a solution.
Software like Camtasia and FocuSee allows you to disable the actual mouse pointer while simultaneously enabling click effects. This feature records the click action and replaces it with a visual indicator, such as an animated circle or highlight, in the final video. This gives you the best of both worlds: a clean screen without a distracting cursor, but with clear visual cues for every interaction.
What If You Forgot? A Last-Resort Fix in Post-Production
We’ve all been there: you finish a long, complex recording only to realize the cursor was visible the whole time. The bad news is that removing a cursor that has been “baked into” a video file is extremely difficult. But it’s not entirely impossible.
If re-recording isn’t an option, your only real choice is to manually cover it up in a video editor like Adobe Premiere Pro or DaVinci Resolve. This involves:
- Creating a small mask or a color-matched solid shape.
- Placing it over the cursor in your timeline.
- Manually animating its position, frame by frame, to follow the cursor’s movement.
This process is incredibly time-consuming and rarely perfect, but for a short clip, it can be a lifesaver. To avoid this headache, it’s always best to get the settings right before you hit record.
When you need to hide your mouse pointer, you have two primary options: using manual OS methods or dedicated screen recording tools. Each approach has distinct advantages depending on your technical comfort, how often you record, and the consistency you need.
Manual methods can be effective for a one-off task, but they require different steps on Windows and macOS and may not work in all applications. Automated tools, on the other hand, offer a streamlined, single-click solution that works identically across platforms.
To help you decide, this table compares the methods based on key factors.
| Criteria | Manual Methods (OS & Free Utilities) | Integrated Tools (e.g., FocuSee) |
| Typical Use Case | Live demos, system-wide invisibility | Screen recordings and video tutorials |
| Consistency | Varies; may be app-dependent | High; settings are saved per project |
| Technical Skill | Low to medium | Low; designed for beginners |
| Cross-Platform Workflow | Low; different steps for Windows & Mac | High; same interface on both OS |
Hide Your Cursor Even After Recording with FocuSee
For creators who value efficiency and professional results, an integrated screen recording tool offers a far more flexible solution than system-level cursor settings. This is where FocuSee stands out.
Unlike native screen recorders that require you to hide the cursor before capture, FocuSee allows you to hide the mouse cursor after the recording is finished, directly during post-production. This means even if you forgot to disable the cursor while recording, you can fix it instantly—without re-recording or complex editing workarounds.

Show Mouse Cursor
Beyond simple cursor removal, FocuSee provides a full suite of Smart & Customizable Cursor Effects designed for instructional and demo-style videos:
- One-click cursor hiding in post-production – Remove the cursor entirely from the final video, even if it was visible during recording.
- Cursor size and style control – Make the cursor larger, clearer, or more visually consistent across different resolutions.
- Click highlights and animations – Automatically emphasize mouse clicks to guide viewer attention during tutorials.
- Smooth cursor movement optimization – Reduce jitter and make on-screen actions easier to follow.
To further enhance clarity, FocuSee pairs cursor control with Auto Zoom. As you click or interact with key areas on the screen, FocuSee automatically zooms in on the active region, ensuring viewers never miss important details. This is especially valuable for software walkthroughs, UI demos, and educational content where precision matters.
By handling cursor visibility and focus enhancement after recording, FocuSee lets you stay fully focused on presenting your content—knowing you can refine the visuals later with a single click. This post-production flexibility is what turns a good screen recording into a truly professional video.
Conclusion
A distracting mouse cursor shouldn’t undermine the quality of your hard work. While manual OS tweaks work for quick fixes, the platform differences and potential inconsistencies can be a recurring problem. For a repeatable, hassle-free workflow, using a dedicated recording tool with built-in cursor controls is the clear winner.
Stop wasting time searching for buried settings before every recording. You can solve the problem permanently by adopting a tool designed for this purpose. Download a free trial of FocuSee to regain full control over your screen recordings and ensure every video you create is polished and professional.
Frequently Asked Questions
Here are quick answers to common questions about managing your cursor during screen recordings.
How do I hide the mouse cursor during screen recording on Windows?
The most reliable way is to use software like OBS, Camtasia, or FocuSee, which all have a simple checkbox to disable cursor capture. For a system-wide solution, you can use the Mouse Properties panel to set your cursor to an invisible .cur file.
How can I hide the cursor while using a Windows built-in screen recorder?
The Windows Game Bar (Xbox Game Bar) screen recorder automatically hides the mouse cursor by default. You do not need to change any settings for this to happen.
Can I remove the cursor in QuickTime Player on macOS?
QuickTime Player automatically hides the cursor after a few seconds of inactivity. To keep it hidden, start your recording and immediately move the pointer to a corner of the screen or onto a second monitor. For a more robust solution, use a free utility like AutoHideMouseCursor.
What are the best screen recording tools for hiding the mouse pointer?
FocuSee, OBS Studio, and Camtasia are three of the best tools. They all provide a simple, reliable setting to turn off the mouse pointer for both Windows and Mac, ensuring a consistent workflow.
Will hiding the cursor affect the quality of my video recording?
No. Disabling the cursor does not impact the video’s resolution, frame rate, or overall quality. The recording software simply captures the screen without overlaying the pointer image.
How do I make the cursor invisible during a live software demo?
Use your operating system’s settings. On Windows, change your default pointer to an invisible cursor file. On macOS, use a free utility like AutoHideMouseCursor to make it disappear automatically when idle.