How to Hide Your Cursor When Screen Recording: The 2026 Guide

There’s nothing more frustrating than finishing a screen recording for a software tutorial, only to see your mouse pointer distracting from the action on playback. A visible, unnecessary cursor can undermine your video’s professionalism, make your content look cluttered, and pull your audience’s focus away from what truly matters.
If you’re looking for a reliable way to achieve a screen recording without a mouse cursor, you’ve found the definitive resource. This guide provides clear, actionable solutions that solve this problem at the source—before you even press record. We’ll cover everything from built-in OS tools to advanced software, giving you the tools to create polished, focused videos every time.
We tested these cursor-hiding methods across Windows 11 (OBS 30.1, PowerPoint 365), macOS Sonoma (built-in recorder) and OBS Studio (Display Capture vs Window Capture). Each method was evaluated based on reliability, setup time, and recording accuracy.
Choosing Your Method: Automated vs. Manual Ways to Hide Your Cursor
Before diving into the specific steps, it’s crucial to choose the technique that best fits your needs. The methods to hide the mouse pointer when recording your screen fall into two categories: manual and automated. Understanding the trade-offs in time, effort, and reliability will help you select the most efficient solution for your workflow.
This table breaks down the key differences to help you decide:
| Criteria | Manual Methods (Windows, macOS, OBS) | Automated Solution (FocuSee) |
| Time to Set Up | 1–5 minutes per session | < 30 seconds (one-time) |
| Reliability | High, but the settings are manual | Automated toggle prevents errors |
| Extra Editing Needed | None if configured correctly | None + auto zoom & focus |
| Technical Skill | Beginner to intermediate | Beginner |
| Best For | One-off recordings, setting-savvy users | Frequent recorders & pro tutorials |
4 Free Ways to Make Your Cursor Invisible on Any Platform
If you prefer to use built-in tools or free software, you can easily disable the cursor during screen recording on Windows, macOS, and with the popular open-source tool OBS Studio. These manual methods are effective and cost nothing.
How to Hide the Cursor in Windows using PowerPoint
While the native Windows Game Bar lacks a reliable cursor toggle for desktop recording, there’s another powerful tool that millions of Windows users already have: Microsoft PowerPoint. It’s built-in screen recorder offers a simple way to capture your screen without the mouse.
Step 1. Open PowerPoint and go to the ‘Insert’ tab.
Step 2. On the far right of the ribbon, click ‘Screen Recording’.
Step 3. A control dock will appear at the top of your screen. Before you record, make sure the ‘Record Pointer’ button is deselected (it should not be highlighted).
Record Pointer
Step 4. Select the area of your screen you want to record and click the ‘Record’ button.
Step 5. When finished, the video will be inserted into your PowerPoint slide. Right-click the video and select ‘Save Media as…’ to save it as a separate MP4 file.
How to Make Your Mouse Pointer Invisible in macOS Screen Recordings
Apple’s macOS includes a powerful, built-in screen capture tool with a straightforward option to control cursor visibility. This is the easiest native method available on any platform.
Step 1. Press Cmd + Shift + 5 on your keyboard to open the screen recording toolbar.
Step 2. Click on the ‘Options’ menu.
Step 3. In the dropdown menu, find the ‘Show Mouse Pointer’ option and uncheck it.
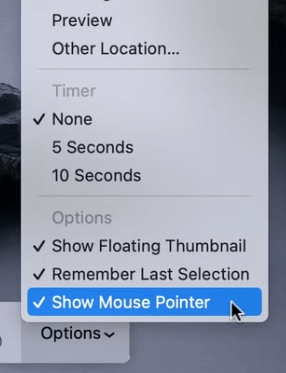
Show Mouse Pointer
Step 4. Proceed with your screen recording. The cursor will not be captured in the final video.
Pro-Tip: This macOS setting is “sticky.” If you turn the mouse pointer off, it will remain off for all future screen recordings until you manually re-enable it. We’ve wasted time re-recording videos because we forgot to turn the cursor back on when we needed it for a different project.
How to Hide the Mouse Pointer in an OBS Recording
OBS Studio is a free, powerful tool that gives you granular control over every aspect of your video production, including the mouse pointer.
Step 1. In the ‘Sources’ panel at the bottom of the OBS window, find your screen source (e.g., ‘Display Capture’).
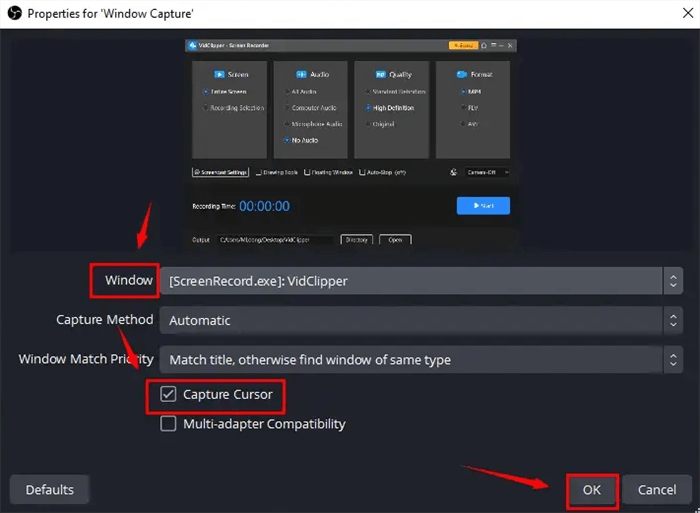
Hide the Mouse Pointer in OBS Studio
Step 2. Right-click on the source and select ‘Properties’.
Step 3. A new window will appear. Uncheck the box labeled ‘Capture Cursor’.
Step 4. Click ‘OK’. Your screen recordings will now be created without the cursor.
Make sure you’re editing the correct source. If you have multiple scenes or display capture sources, it’s easy to accidentally disable the cursor on the wrong one. Double-check that you’ve selected the active source before opening its properties.
A Note on the Windows Game Bar
The native screen recording tool in Windows, the Xbox Game Bar, has limited cursor settings. It automatically hides the cursor for most full-screen games and applications, but it lacks a universal toggle for standard desktop or windowed recordings. For this reason, we recommend using the PowerPoint method or a dedicated tool like OBS for reliable cursor removal on Windows.
Screen Recording Without a Mouse Cursor Using FocuSee
If your workflow demands maximum efficiency and you produce videos frequently, a dedicated tool like FocuSee can be a significant time-saver. It’s a professional screen recording software designed specifically to solve common frustrations like a distracting cursor, making the entire process seamless.
Instead of navigating settings menus, FocuSee offers Smart & Customizable Cursor Effects. This feature allows you to turn off the cursor in your screen recording with a single toggle. You can choose to hide it completely from the start or have it automatically become invisible when idle.

Show Mouse Cursor
This ensures your video remains clean and focused without requiring any post-production editing.
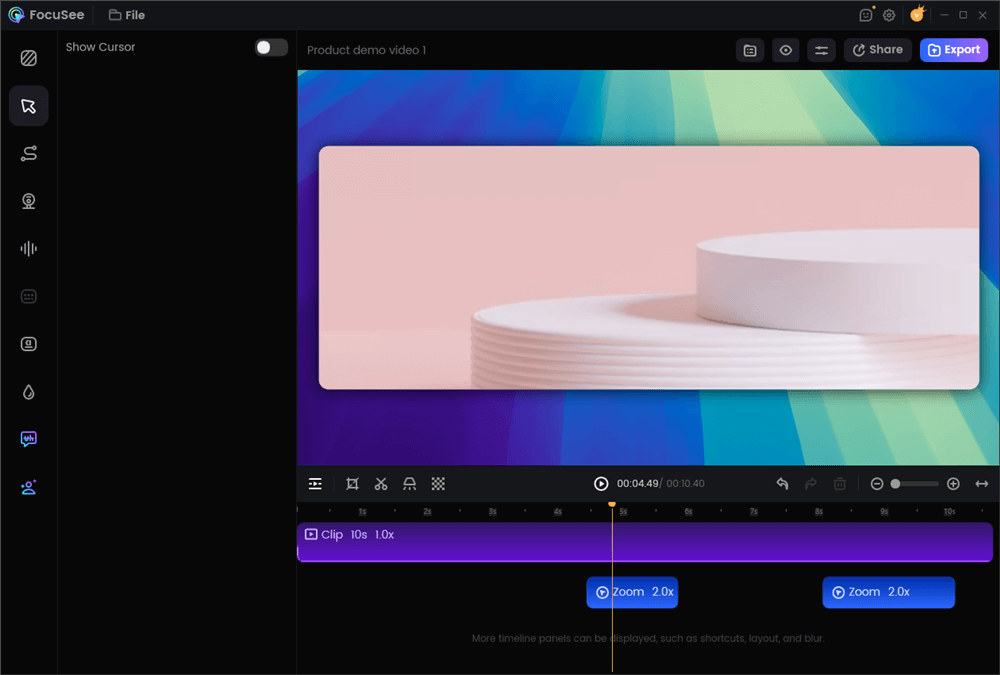
Hide the Mouse Cursor
Furthermore, FocuSee’s Smart Focus & Auto-Zoom capability automatically follows your actions, highlighting and zooming in on relevant parts of the screen. This dynamic focus often makes the cursor’s guiding role entirely unnecessary, leading to a more engaging and easy-to-follow video tutorial.
While FocuSee is a premium tool, its automated features save significant time and elevate the final quality of your video, making it a worthwhile investment for serious content creators.
Conclusion
A distracting mouse pointer no longer needs to compromise the quality of your videos. By choosing the right tool and configuring it correctly before you press record, you can eliminate this common frustration and save countless hours in post-production. The difference between a cluttered recording and a polished video is often just a single checkbox.
Please note: This guide focuses on pre-recorded videos. The techniques for hiding a cursor during live streaming often involve adjusting different settings and configuring specific software.
For creators who want to solve this problem and streamline their entire video production workflow, FocuSee offers the most direct, automated solution. Stop worrying about erratic cursors and start producing the clean, engaging content your audience deserves. Download a free trial of FocuSee and see how effortless professional screen recording can be.
Frequently Asked Questions
How can I hide my cursor when recording my screen?
The best method is to use a setting within your recording software before you start. In macOS, press Cmd + Shift + 5, click ‘Options’, and uncheck ‘Show Mouse Pointer’. In OBS, right-click your display source, go to ‘Properties’, and uncheck ‘Capture Cursor’. For Windows, the recorder in PowerPoint has a ‘Record Pointer’ toggle. Specialized tools like FocuSee also offer a simple switch for this.
Can I remove the cursor in OBS Studio while recording?
Yes. In the ‘Sources’ panel, right-click your ‘Display Capture’ or ‘Window Capture’ source, select ‘Properties,’ and uncheck the ‘Capture Cursor’ option. This prevents the cursor from appearing in any new recordings.
Is there a way to disable the mouse pointer during screen capture on Windows?
Yes. While the built-in Windows Game Bar is unreliable for this, the screen recorder included with Microsoft PowerPoint allows you to deselect ‘Record Pointer’ before you begin capturing. For more advanced control, a third-party application like OBS Studio or FocuSee is recommended.
Can I remove the cursor after screen recording, or do I need to hide it during capture?
Hiding the cursor during recording is generally recommended, as removing a visible cursor in post-production can be complex and often leads to inconsistent visual results in traditional video editors.
However, if the cursor was not hidden before recording, FocuSee provides a practical alternative. It allows you to automatically hide or minimize the cursor after recording with a single click, while keeping the screen content and visual flow intact. This significantly reduces the time and effort required compared to manual masking or frame-by-frame edits.
For the most efficient workflow, disabling the cursor during capture remains the best practice. When that is not possible, using FocuSee for post-recording cursor removal offers a fast and reliable solution without compromising video quality.
How do I make my mouse pointer invisible in macOS screen recording?
Press Cmd + Shift + 5 to open the screen capture toolbar. Click on the ‘Options’ menu and deselect ‘Show Mouse Pointer’. All subsequent recordings will be cursor-free.
What are the best screen recording tools for hiding the cursor in tutorials?
For a free and powerful manual solution, OBS Studio is a top choice, and the built-in macOS and PowerPoint tools are highly effective and easy to use. For an automated, beginner-friendly experience, FocuSee is excellent due to its smart cursor effects.
How can I hide the cursor for software demo videos without editing the video?
Use a screen recording tool with a built-in setting to disable cursor visibility before you start. FocuSee, OBS Studio, the native macOS recorder, and PowerPoint all provide this functionality, allowing you to create a clean recording that requires no post-production work to remove the pointer.