How to Get a Custom Cursor on Mac in 2026: The Complete Guide

You’ve seen amazing custom cursors on social media and want to personalize your MacBook to match your style. But after a quick search, you likely hit a frustrating reality: getting a cute or aesthetic cursor on a Mac isn’t as simple as it is on Windows. Let’s be upfront about it—this is because macOS does not natively support system-wide cursor themes or animated cursor files. This core limitation is why so many downloaded files don’t work and why finding a safe solution feels difficult.
This guide provides tested, effective methods for Mac cursor customization. We’ll manage your expectations honestly, explain the difference between system-wide apps and browser-only tools, detail the built-in accessibility features for better visibility, and recommend the safest approach for aesthetic changes. To ensure our guidance is reliable, these procedures were verified across multiple Apple Silicon MacBooks, with and without external monitors, to replicate common user setups.
How to Change Your Mac Cursor Size and Color with System Settings
Before installing any third-party tools, start with macOS’s built-in Accessibility settings. These native options let you safely improve cursor visibility by adjusting size and color—no downloads required and no impact on system performance. It’s the recommended first step for customizing the cursor on macOS (Sonoma or Ventura).
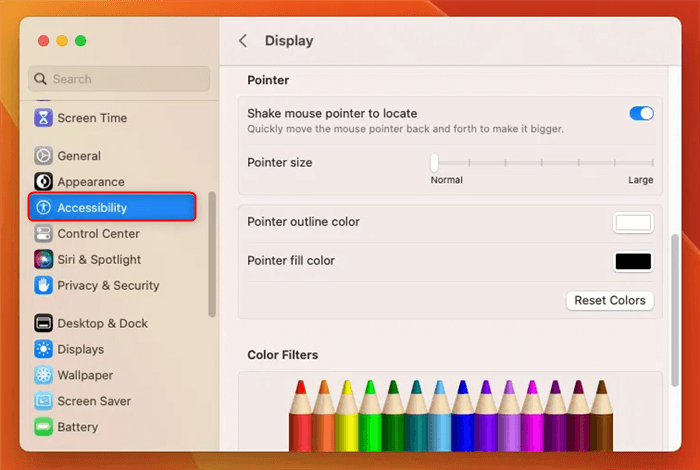
Change Pointer on Mac
How to Adjust Pointer Size and Color
Step 1. Open System Settings from the Dock or by clicking the Apple menu in the top-left corner.
Step 2. Go to Accessibility in the sidebar.
Step 3. Select Display from the Accessibility options.
Step 4. Click the Pointer tab.
Step 5. Adjust the Pointer size using the slider.
Step 6. Change the Pointer’s outline and fill colors to improve visibility.
Step 7. (Optional but recommended) Enable “Shake mouse pointer to locate” so the cursor temporarily enlarges when you shake your mouse or trackpad.
Increasing the pointer size or changing the colors to a high-contrast combination can make a significant difference in day-to-day use.
Pro-Tip: In this same menu, ensure the “Shake mouse pointer to locate” checkbox is enabled. When you quickly shake your mouse or finger on the trackpad, the cursor will temporarily become huge, making it easy to find.
System-Wide Apps vs. Browser Extensions: Understanding Your Options
Once you move beyond macOS’s built-in settings, you face a key decision: use a system-wide custom cursor app for Mac or a simpler browser extension. Understanding the trade-offs is crucial for making a safe choice.
- System-Wide Cursor Apps: These are third-party applications that attempt to overlay a custom cursor across your entire macOS environment. While they promise complete customization, they often require extensive permissions and can interfere with system performance. Apps like Cursor Pro, for instance, haven’t been updated for modern macOS versions and may require you to lower your system’s security settings—a major red flag.
- Browser Cursor Extensions: These are add-ons for browsers like Google Chrome or Firefox. They change the cursor’s appearance only within the browser window. This method is far less invasive and is generally safer, as the extension’s code is isolated from the core operating system.
To help you decide, here is a comparison based on four key factors:
| Feature | System-Wide App | Browser Extension |
| Customization Level | Entire OS (Desktop, Apps) | Inside Browser Only |
| Safety Risk | Higher (Requires permissions) | Lower (Sandboxed) |
| Performance Impact | Can be moderate | Negligible |
| Ease of Reverting | Can be complex | Simple (1-click disable) |
For most users seeking an aesthetic cursor, the safety and simplicity of a browser extension make it the recommended starting point.
How to Get a Cute or Aesthetic Cursor on Mac (The Safe Way)
For those wanting a cute cursor, a Mac or anime cursor purely for looks, the safest and most effective solution is a browser extension. Because macOS lacks native theme support, modifying the system cursor directly is risky. Browser extensions, however, operate in a secure, isolated environment, providing the aesthetic fun you want without asking for deep system access.
One of the most popular and well-regarded options is Custom Cursor for Chrome. It offers a massive library of cursor packs, from games and anime to simple, colorful designs. This is our expert-recommended method for aesthetic changes because it’s safe, easy, and has the content you’re actually looking for.
How to Install and Use a Browser Cursor Extension
Step 1. Open the Chrome Web Store. In Chrome, navigate to the official web store and search for “Custom Cursor for Chrome.”
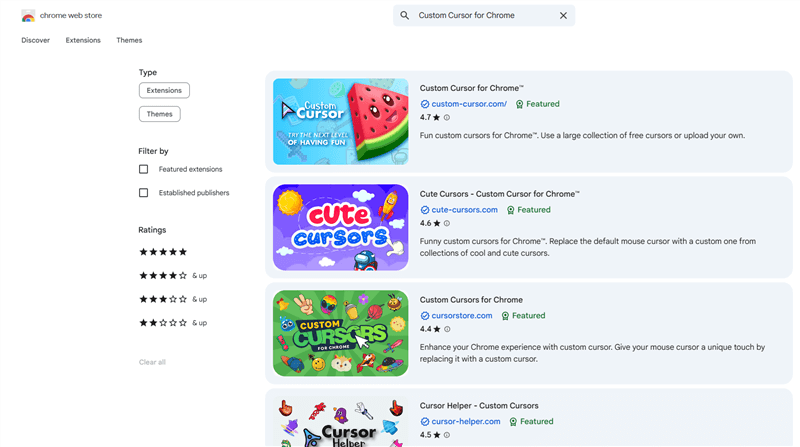
Custom Cursor for Chrome
Step 2. Add the Extension. Click the “Add to Chrome” button and confirm the installation when prompted.
Step 3. Pin the Extension. After installation, click the puzzle piece icon (Extensions) in your Chrome toolbar and click the pin icon next to Custom Cursor to make it easily accessible.
Step 4. Choose Your Cursor. Click the extension’s icon to open its gallery. You can browse hundreds of packs. Simply clicking on a cursor in the list applies it instantly within your browser.
This process is completely reversible and provides immediate results. You can change your cursor to match your mood or wallpaper in seconds.
A Quick Heads-Up: Based on our testing, you’ll notice the custom cursor won’t work on the Chrome Web Store page itself or on internal browser pages like Settings or Bookmarks. This isn’t a bug! It’s a security feature built into Chrome to protect these sensitive areas. The cursor will work perfectly on all other websites.
Pro Tip for Creators: Make Your Cursor Easy to Follow in Videos
If your goal isn’t just personal aesthetics—but creating clear tutorials, demos, or walkthroughs—custom cursors alone won’t solve the problem. Even high-contrast pointers can become hard to see once they’re compressed into video. That’s why we recommended FocuSee.
FocuSee is a screen recorder and editor designed specifically for instructional content. Instead of changing your system cursor, it adds smart visual effects to your cursor inside the video itself, including:
- Automatic cursor highlight so viewers never lose track of your pointer
- Animated click effects that make interactions obvious
- Auto zoom & focus when you move to important UI areas

Show Mouse Cursor
This means you can keep macOS completely secure and untouched, while still making your cursor crystal-clear for your audience—perfect for YouTube tutorials, onboarding videos, product demos, and support guides.
For Mac users especially, this is the safest and most professional way to “enhance” your cursor experience—without trying to force unsupported system-wide themes.
How to Restore the Default Mac Cursor in Seconds
Experimenting with customization is great, but knowing how to revert to the original settings is just as important. If you’ve changed your cursor and want to go back, you can restore default cursor settings quickly and easily.
To Reset from a Browser Extension (Chrome Example)
- Open Google Chrome.
- Click the three-dot menu in the top-right corner, go to Extensions, and then select Manage Extensions.
- Find the custom cursor extension in the list.
- Toggle the switch to disable it temporarily or click the Remove button to uninstall it completely.
To Reset Your Pointer in macOS System Settings
- Open System Settings and go to Accessibility > Display.
- Select the Pointer tab.
- Click the Reset button to instantly restore the pointer size and colors to their defaults. (If there is no reset button, simply move the Pointer size slider to the far left and set the colors back to white and black).
Frequently Asked Questions About Mac Cursor Customization
Can I use anime or cute cursor packs on Mac like on Windows?
Not natively. macOS doesn’t support system-wide cursor themes (.cur or .ani files) as Windows does. The best way to get a cute cursor Mac effect is by using a browser extension like Custom Cursor for Chrome, which applies the theme only within the browser window.
What’s the safest custom cursor app for Mac?
For aesthetic changes, the safest options are browser extensions from official sources like the Chrome Web Store. For system-wide changes, the only truly safe method is to use the built-in Accessibility settings in System Settings, as third-party apps carry security risks.
Do custom cursor apps slow down my MacBook?
Well-designed browser extensions have a negligible impact on performance. However, some system-wide third-party apps that work by placing an overlay on your screen can consume more system resources, potentially slowing down your Mac or increasing battery drain.
Why doesn’t my custom cursor show up in certain apps?
If you are using a browser extension, the custom cursor will only appear over web pages inside that browser. It will not show up on the desktop, in Finder, or in other applications like Pages or Photoshop. This is an intended security feature.
Can I use animated cursors on Mac?
Similar to cursor packs, macOS does not have native support for an animated cursor mac. While some browser extensions offer cursors with simple animation effects, system-wide animated cursors are generally not possible without installing potentially risky software.
Do I need to disable Gatekeeper to install a cursor app?
No. You should never disable Gatekeeper. If a custom cursor mac download requires you to turn off this core macOS security feature, it has not been verified by Apple and should be considered unsafe to install.
Conclusion
We periodically re-verify these tools and methods, especially after major macOS updates. For professional video creation, FocuSee offers dedicated customer support for any questions about its cursor effects.
You now have a clear, honest understanding of how to customize your cursor on a Mac. For personal style, a browser extension offers the fun of a cute cursor Mac without compromising security. For better visibility, macOS’s built-in Accessibility settings are the most reliable solution. You no longer need to rely on suspicious downloads or worry about complex software.
For content creators who need to ensure their on-screen actions are clear, a dedicated tool is the best option. You can create more professional tutorials automatically by enhancing your cursor for your audience. Download a free trial of FocuSee to see how its smart cursor and auto-zoom features can make your video guides easier to follow.