How to Change Cursor on Mac: Size & Color

If you often lose track of the tiny pointer on large or high-resolution screens, especially on dark or busy backgrounds, you’re not alone. Many users search for how to change the cursor on a Mac but end up with outdated or unclear advice.
This guide gives you a clear, up-to-date solution using built-in macOS settings to improve cursor visibility—no extra software needed for most users. We’ll also briefly cover tools for those who create tutorials or presentations and need to make their cursor easier for others to follow.
Can You Change the Cursor on a Mac?
If you’ve ever seen custom cursor setups online—like unique shapes, animated pointers, or themed designs—you might wonder if macOS lets you do the same. For example, some users on Reddit want to replace the default cursor entirely after seeing creative videos or tutorials and feel inspired to personalize their own Mac experience.
On macOS, however, the options are more limited. While you can adjust the cursor’s size, color, and visibility using built-in settings, Apple does not support full system-wide custom cursor replacement by default. This means you can improve how your cursor looks and behaves, but you cannot fully swap it out for custom-designed cursor packs without third-party tools.
How to Change Cursor Size and Color on Mac
For over 90% of users, the best solution for mouse pointer visibility is built directly into macOS. Instead of hunting for a custom cursor pack, you can solve the problem in under a minute by adjusting key Accessibility settings. This procedure creates a high-contrast, easy-to-track pointer without installing any software.
Step 1: Navigate to Mac Cursor Settings (macOS Sonoma & Ventura)
In recent macOS versions, Apple streamlined these options into the System Settings application.
- Click the Apple menu in the top-left corner and select System Settings.
- Scroll down the left sidebar and click on Accessibility.
- Choose Display from the list of options.
- Navigate to the Pointer tab.
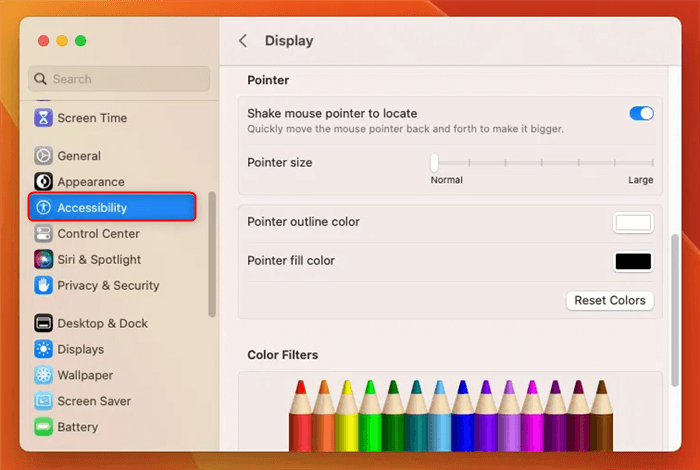
Change Pointer on Mac
Step 2: Adjust Your Cursor for Maximum Visibility
Inside this menu, you have complete control over the pointer’s appearance. Here are our recommended settings for the best results:
- Pointer Size: Drag this slider to the right. A small increase is often enough to dramatically improve visibility on your main screen.
- Pointer Outline Color: Click the color swatch to select a new border color. A bright, contrasting color like red, yellow, or magenta works best against various backgrounds. When you pick a color, make sure to drag the brightness slider in the color picker all the way to the top. A dim red is just as hard to see as the default black.
- Pointer Fill Color: Change the cursor’s interior color. White or a light color often pairs well with a vibrant outline.
- Shake Mouse Pointer to Locate: Ensure this toggle is on. When you can’t find your cursor, a quick shake of the mouse or a rapid finger movement on the trackpad will temporarily make it huge, instantly revealing its location.
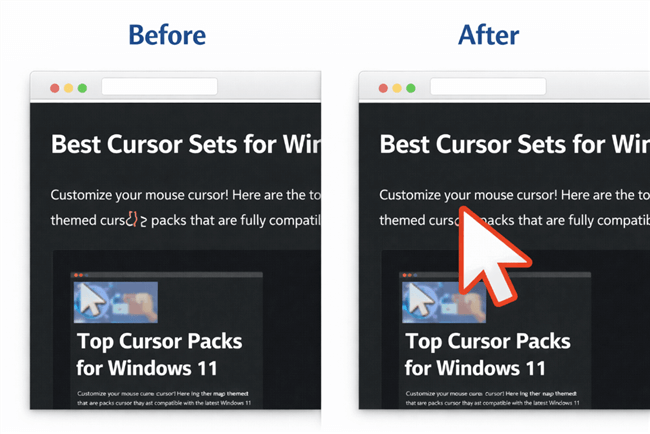
A Cursor Before-and-After Comparison
Finding Pointer Settings in macOS Monterey & Earlier
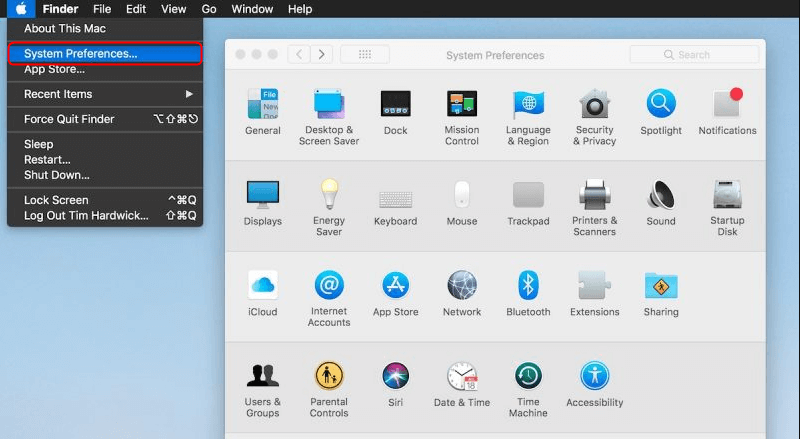
If you’re using an older version of macOS, you’ll find these same settings in System Preferences.
- Click the Apple menu () and open System Preferences.
- Click the Accessibility icon.
- Select Display from the menu on the left.
- Click the Pointer tab to access the sliders and color options for size, outline, and fill.
System Preferences
Troubleshooting Common Cursor Problems
Even after making adjustments, you might face lingering issues, especially with specific hardware or software setups. Here’s how to solve them.
Why Is My Cursor Still Too Small on an External Monitor?
This is a common issue caused by pixel density. A 4K or 5K external monitor has millions more pixels than your MacBook’s Retina display. A cursor set to a specific pixel size will appear physically smaller on a screen with a higher pixel density.
While macOS doesn’t let you set a different cursor size per display, the most effective workaround is to adjust your display’s scaling.
- Go to System Settings > Displays.
- Select your external monitor.
- Instead of “Default for display,” choose one of the “Scaled” options. Selecting an option towards “Larger Text” will make all interface elements, including your cursor, appear larger and more readable.
Important Note: Changing display scaling will make your entire user interface larger, not just the cursor. This may reduce the amount of usable space on your screen, but it is often the best compromise for readability on high-resolution displays.
Another Tip: Reduce Transparency for Better Contrast
If you find your cursor gets lost against busy desktop backgrounds or semi-transparent windows, one more setting can help.
- Go to System Settings > Accessibility > Display.
- Enable the Reduce Transparency toggle.
This setting makes elements like the menu bar and Dock opaque, creating a solid, stable background that makes it easier to track your pointer’s movement.
How to Reset Your Mac Cursor to Default
If you’ve experimented with the settings and want to return to the original look, resetting is simple.
- Navigate back to System Settings > Accessibility > Display > Pointer.
- At the bottom of the window, click the Reset button. This will instantly restore the pointer’s default size and black-and-white colors.
A Note on Custom Cursor Packs for Mac
Coming from Windows, you might wonder if you can customize your cursor on a Mac with themed packs (like a lightsaber or a cartoon hand). Natively, macOS does not support system-wide cursor replacement. While third-party cursor apps exist, they can introduce performance issues or security risks. For stable and reliable performance, the built-in accessibility adjustments are the recommended method.
Beyond Personal Visibility: Highlighting Your Cursor for an Audience
After making your own cursor easier to see, you might need to create a tutorial or presentation for your team. You’ll quickly discover that even a large, colorful cursor isn’t always enough—your audience needs to see exactly where you click and what you’re doing. A static pointer doesn’t show the action. This is where a dedicated screen recording tool can be a valuable addition.
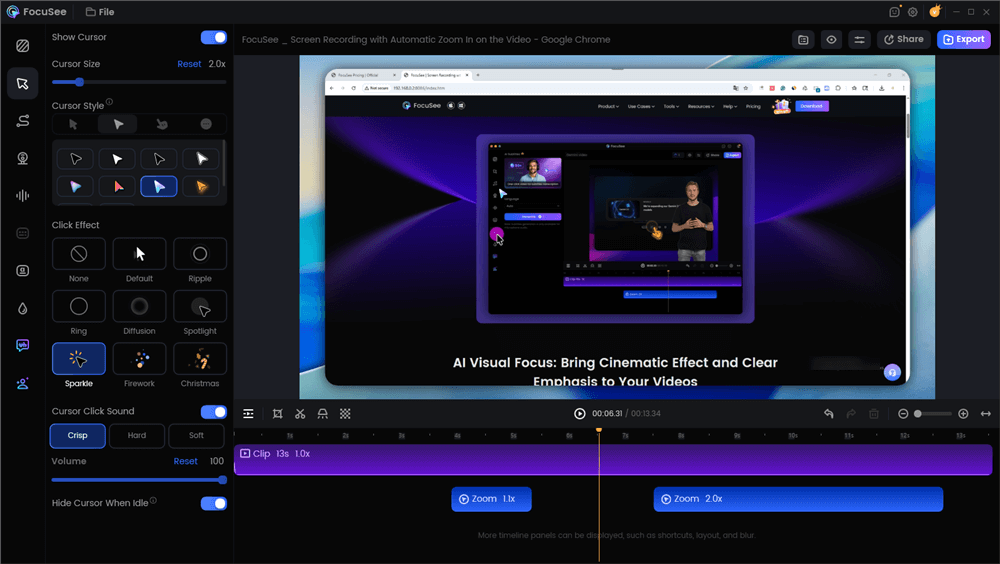
A great example is FocuSee, which is designed to make instructional videos clear and engaging. It automatically adds effects that would otherwise require hours of manual video editing.
Edit the Tutorial with Auto Effects
Key features for cursor clarity include:
- Smart & Customizable Cursor Effects: FocuSee can automatically add a professional cursor highlight (like a colored circle) around your pointer in the final video. It also animates clicks, making every action obvious to your viewers. You can customize the style and color to match your branding.
- Smart Focus & Auto-Zoom: The tool intelligently follows your cursor’s movement, automatically zooming in on the area of the screen where you click. This dynamic effect directs your audience’s attention to the most important part of the interface, ensuring no one misses a critical step.
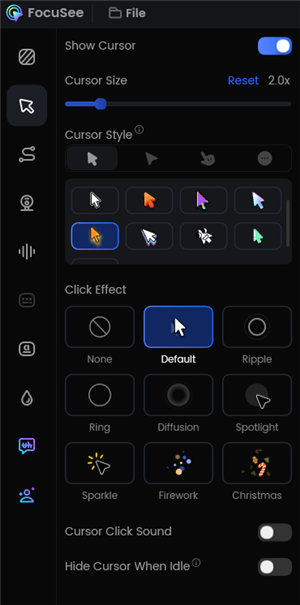
Change the Cursor Settings
For anyone who needs to create clear, polished tutorials, an application like FocuSee solves the problem of guiding an audience’s focus with ease. FocuSee is regularly updated to ensure compatibility with the latest macOS releases, and their support team is available to help users optimize their recording workflows.
Frequently Asked Questions (FAQ)
What’s the best cursor setting for accessibility or eye strain?
For maximum visibility, increase the Pointer size slider to about one-quarter of the way. Set the Pointer outline color to a high-contrast color like bright red and the Pointer fill color to white. Finally, ensure Shake mouse pointer to locate is enabled.
How do I change the cursor speed on Mac?
Cursor or “tracking” speed is in a different location. Go to System Settings > Mouse or System Settings > Trackpad. The “Tracking speed” slider controls how fast the pointer moves across the screen.
Does changing cursor size affect trackpad or mouse accuracy?
No. The clickable “hotspot” of the pointer remains the very tip of the arrow, regardless of its visual size. Changing the size is purely a visual aid and does not impact precision.
Can I change cursor settings on Mac without admin access?
Yes. All the pointer visibility settings discussed here are user-level preferences. You can adjust the size, color, and shake-to-locate feature on any standard user account without needing an administrator password.
How can I highlight the cursor for screen recording?
The most reliable method is to use a dedicated screen recording application like FocuSee, which automatically adds a professional highlight and other effects post-recording. Manually increasing the system cursor size can work but is less clear for an audience as it doesn’t show clicks.
Take Control of Your Mac Cursor
You no longer have to struggle with a cursor that’s too small or hard to track. By using the built-in macOS Accessibility settings, you can permanently solve the problem of mouse pointer visibility for your daily work in just a few clicks. This simple adjustment makes using your Mac, especially with an external monitor, a much more pleasant experience.
If your work involves guiding others, don’t let your audience get lost. A tool like FocuSee can transform your screen recordings from confusing to crystal-clear. It helps automate the process of highlighting your cursor and zooming in on key actions, saving you valuable editing time. Download FocuSee for free to see how easily you can create professional, easy-to-follow tutorials and presentations.