What Is a Video Presentation and How to Create One That Engages

Creating a video presentation often feels like a high-wire act. You spend hours planning and recording, haunted by ‘Retention Anxiety’—the fear your audience will lose focus and tab away. This is often paired with ‘Technical Overwhelm,’ where the world of lighting, audio, and software seems designed to frustrate you.
The goal is to create a professional business video presentation that connects with your audience, but the process can feel uncertain. This guide provides a clear, repeatable framework to overcome these challenges. We’ll walk through everything from setting up your space for success to structuring your script for maximum engagement.
This guide is based on hands-on testing on a MacBook Pro M3 with macOS Sonoma and a Microsoft Surface Laptop Studio 2 with Windows 11.
What Is a Video Presentation?
A video presentation is a structured, narrated piece of content that combines visuals—such as slides, screen recordings, or on-camera footage—with clear storytelling to explain an idea, teach a concept, or persuade an audience. Unlike a simple screen recording, a video presentation is intentionally planned and edited. It uses script, visuals, pacing, and audio to guide viewers toward a specific outcome, whether that’s understanding a topic, learning a new skill, or making a business decision.
Step 0: Your Pre-Recording Setup for a Professional Look
Before you even think about software, getting your physical environment right is the secret to a polished final product. These two areas—lighting and audio—have the biggest impact and don’t require a big budget.
Master Your Lighting (Without Breaking the Bank)
Poor lighting is the most common giveaway of an amateur video. You don’t need a Hollywood studio, just a little intention. The easiest method is to sit facing a window, using the natural daylight as your primary light source.
If natural light isn’t an option, use what you have. A simple desk lamp placed behind your webcam or a second lamp off to the side can eliminate shadows and make you look clear and professional. The goal is to light your face, not the wall behind you.
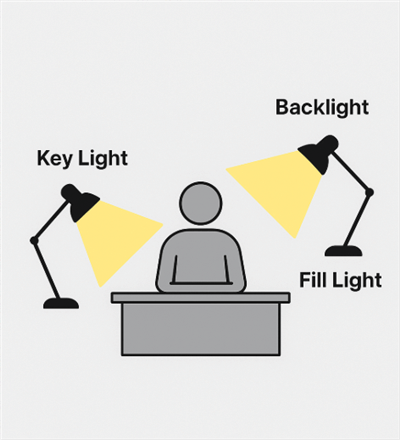
Master Your Lighting
Master Your Audio (Beyond Just the Mic)
Your room itself is an instrument. Hard surfaces like empty walls and hardwood floors create echo, which makes audio sound hollow and distant. An easy, no-cost fix is to record in a smaller room with soft surfaces. A room with a carpet, curtains, or even a walk-in closet filled with clothes will absorb sound and give your voice a much cleaner, richer quality.
A 5-Step Framework for an Effective Video Presentation
With your space ready, you can now focus on your content. This five-step process is tool-agnostic and ensures you cover all critical stages from concept to delivery.
Consider the case of Jordan, a compliance officer tasked with creating a mandatory training video presentation for 500 employees. Previous live webinars saw a 60% drop-off rate. Following this framework, Jordan created a clear, engaging series that boosted the completion rate to an unprecedented 92%.
Here is the exact framework Jordan used:
1. Plan (Script & Storyboard)
The foundation of any good video is a clear video presentation script. Simply saying “outline your content” isn’t actionable. Instead, use a proven structure. For longer content, plan logical ‘micro-chapters’ of 3-5 minutes to maintain focus.
Two Simple Script Templates:
- For a Training or Educational Video:
- Hook: Start with a question or surprising statistic to grab attention.
- Lesson: Teach the core concept clearly and concisely.
- Example: Show a real-world application of the concept.
- Summary: Briefly recap the key takeaway.
- For a Sales or Persuasive Video:
- Problem: State the specific pain point your audience experiences.
- Solution: Introduce your product or idea as the clear solution.
- Benefit: Explain exactly how it makes their life better.
- Call to Action (CTA): Tell them the specific next step to take.
2. Design (Visuals & Branding)
Prepare your slides with one goal: clarity. Avoid the “wall of text” that causes cognitive load. Your slides are there to support your voice, not replace it. Use a strong visual hierarchy with large, readable fonts and focus on one single idea per slide.
3. Record (Audio & Video)
Capture your screen, voice, and optional webcam video. As Jordan discovered, the most critical factor for engagement is audio quality. Using a dedicated USB microphone is the single best investment for crisp, clear audio that holds attention.
4. Refine (Editing & Enhancements)
This is where you transform raw footage into a polished product. Use non-linear editing to remove mistakes and awkward pauses. Add engaging elements like a Picture-in-Picture (PiP) webcam view or visual callouts to highlight key information.
5. Share (Export & Distribution)
Export your final video in a universally compatible format like MP4. Instead of emailing large files, which causes quality and delivery issues, upload your video to a service that provides a shareable link. This preserves quality and often provides valuable analytics on viewer engagement.
Choosing Your Video Presentation Software
Selecting the right video presentation tools is a critical decision. Many professionals already use excellent tools like Loom for quick screen shares, Canva for design, or Descript for transcript-based editing. These are powerful and effective.
However, if your primary anxieties are the fear of making mistakes during a take, sounding robotic on camera, or keeping your viewers focused, then a tool specifically designed to solve those problems can be a better fit. AI-powered presentation makers integrate recording, editing, and engagement features into a single workflow.
Here’s how to think about the choice based on your main challenge:
- If you need quick, informal screen sharing, A tool like Loom is perfect.
- If your process is built around a written transcript, Descript offers a unique and powerful editing workflow.
- If you need to overcome recording anxiety and maximize viewer engagement, An AI-powered tool like FocuSee automates the most tedious and stressful parts of the process.
How to Make a Video Presentation with FocuSee
For those who want to create a polished video presentation for work without a steep learning curve, FocuSee directly addresses the most common fears that creators face.
Solve Recording Anxiety with AI Smart Cut
The fear of making a mistake often leads to dozens of frustrating retakes. FocuSee’s ‘AI Smart Cut’ feature automatically detects and removes awkward silences and filler words. This allows you to record in one confident take, knowing the software will clean it up for you and save hours of manual non-linear editing.
Combat Viewer Distraction with Auto Zoom & Spotlight
To guide your viewer’s eye during a tutorial or demo, the ‘Auto Zoom & Spotlight’ function intelligently follows your cursor and zooms in on key actions. This technique directs the audience’s attention exactly where it needs to be, making your sales video presentation clear and dynamic.
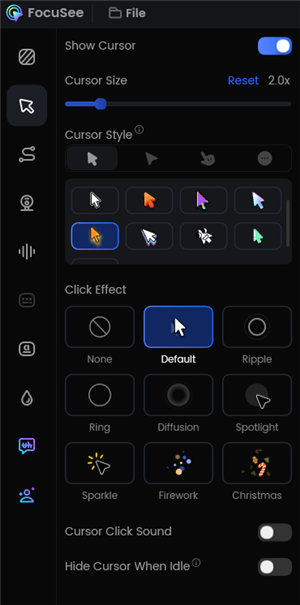
Change the Cursor Settings
Overcome On-Camera Discomfort with a Built-in Teleprompter
Feeling robotic while trying to remember a script is a common problem. FocuSee’s ‘Built-in Teleprompter’ lets you read your script while maintaining direct eye contact with the camera. This helps you deliver a natural, confident performance that connects with your audience.
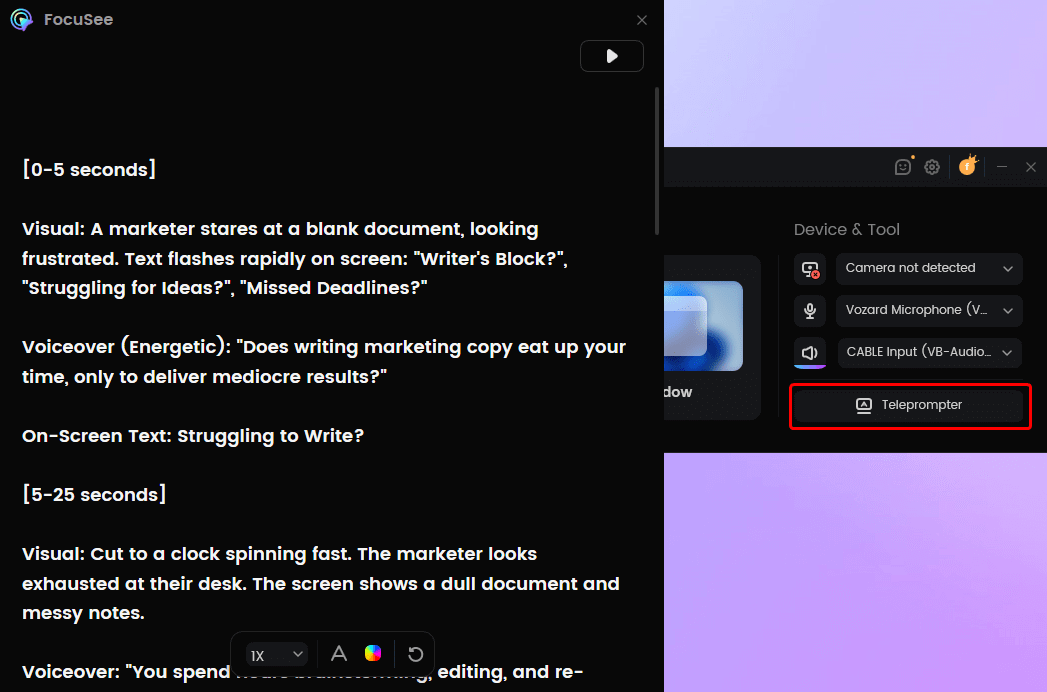
FocuSee Teleprompter
Optimizing Your Online Video Presentation
Once your video is edited, a few final steps are essential for ensuring it reaches your audience effectively and inclusively.
Ensure Accessibility with Auto-Generated Subtitles
First, address accessibility by including captions. Using a tool to generate auto-generated subtitles is an efficient way to make your content accessible to viewers who are deaf or hard-of-hearing, aligning with WCAG 2.1 standards. Subtitles also benefit those watching in noisy environments, significantly increasing your video’s reach.
Choose the Right Video Presentation Format (16:9 vs. 9:16)
Next, consider the viewing device. A standard widescreen video has a 16:9 aspect ratio, ideal for desktops and YouTube. For content intended for social media stories or mobile-first audiences, a vertical 9:16 aspect ratio is far more effective. A PowerPoint video presentation designed in 16:9 can become unreadable on a phone, so always preview your final export on a mobile device.

Serve the Right Video to Every Device
Use ‘Pattern Interrupts’ to Maintain Focus
To keep your audience engaged during a longer educational video presentation, use ‘Pattern Interrupts’—subtle visual changes every 45-60 seconds. This can be as simple as switching from a full-screen slide to a Picture-in-Picture layout, adding a text overlay, or zooming in on a detail. These small shifts reset the viewer’s attention.
Your Pre-Flight Checklist
Before you hit record, run through this simple checklist to avoid common mistakes:
- [ ] Environment: Is your background clean and free of distractions?
- [ ] Lighting: Are you facing your primary light source?
- [ ] Audio: Is the correct microphone selected in your software?
- [ ] Script: Is your script or teleprompter visible and ready?
- [ ] Notifications: Are all computer and phone notifications silenced?
- [ ] Test: Have you recorded a 10-second test to check your video and audio levels?
Frequently Asked Questions
How long should a business video presentation be?
For most topics, aim for a length of 3 to 7 minutes. If your content is longer, break it into a series of shorter ‘micro-chapters.’ For a detailed training module, individual videos should still rarely exceed 15 minutes.
What is the difference between a screen recording and a video presentation?
A screen recording is a raw capture of on-screen activity. A video presentation is a more structured product; it combines screen recordings or slides with intentional narration, a script, professional editing, and often a presenter on camera to guide the audience.
Do I need an expensive microphone for my presentation?
While a laptop microphone is functional, a dedicated external USB microphone is the single most important hardware investment for improving quality. As discussed, clear audio is more critical for viewer retention than high-resolution video. An entry-level USB mic provides a significant improvement. [Internal Link Suggestion: Link the preceding phrase to ‘/best-usb-microphones-for-recording-presentations’]
How can I track who has watched my presentation?
To track viewership, you must use a video hosting platform or sharing service with analytics. Uploading your video to a platform like Vimeo or Wistia, or using a tool that generates a tracked shareable link, will allow you to see metrics like view count and completion rate. [Internal Link Suggestion: Link the preceding phrase to ‘/how-to-share-large-video-files-without-losing-quality’]
Can I convert a PDF directly into a video presentation?
No single tool converts a PDF directly into a polished video. The standard procedure is to import each page of the PDF as an image into a slide deck (like PowerPoint or Google Slides) or a video editor. From there, you must record your voiceover to create the final video.
Conclusion
Creating a high-impact video presentation doesn’t have to be a source of anxiety. By focusing first on your setup and script, then choosing the right tool for your specific workflow, you can produce professional-quality content efficiently. The key is to move past the fear of low engagement by building a repeatable process that guarantees a polished result.
You can create clear and engaging videos today. If recording anxiety and manual editing are your biggest hurdles, download FocuSee to see how an AI-powered workflow can transform your process. Stop worrying about mistakes and start creating presentations your audience will watch.