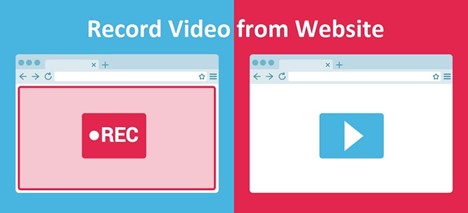
Proven Ways to Record Video from Website

In the modern era of digital advancements, online content is seamlessly woven into the fabric of our daily lives. It now spans a wide spectrum, encompassing educational materials, Christmas videos, entertainment platforms, virtual meetings, webinars, online classes, and captivating videos offered by various streaming websites. As our engagement with these resources deepens, there has been a significant surge in the demand to preserve and access these valuable materials offline.

Record Video from Website
There are numerous reasons why individuals may seek to record videos from websites. For instance, students attending virtual classes may wish to capture lectures and demonstrations for future revision. Professionals engaging in webinars might find it essential to capture valuable insights and presentations for reference or sharing with colleagues. This article will discuss 4 of the most efficient and user-friendly ways to capture video from a website. So, let’s begin!
Can I Record a Video from a Website?
Yes, you can record videos from websites using some Google extensions or third-party screen recorders. Google Chrome itself does not have a built-in screen recording feature. However, several third-party extensions and software can enable screen recording within the Chrome browser. Locating and installing these extensions from the Chrome Web Store is straightforward. Alternatively, you can use desktop screen recording software compatible with Chrome. There are numerous standalone applications available that can record your entire screen or part of it. Such software typically offers more advanced features, including editing capabilities, various output formats, and the ability to record audio simultaneously.
Can You Screen Record on Chrome?
When using any screen recording tool, it is essential to review and understand the permissions and access rights it requires. Use a reputable extension or software to protect your privacy and data security. Remember, the availability and functionality of screen recording options might change over time as software and browser updates occur. Therefore, checking the latest information and reviews from trusted sources is always a good idea before choosing a screen recording solution for your Chrome browser.
3 Ways to Record Screen Video Online
How to capture a video from a website? If you don’t want to install full desktop software, browser extensions or online tools are a quick and lightweight way to record video directly from a website. They work entirely inside your browser (Chrome, Edge, Brave, and sometimes Firefox) and can capture a single tab, the entire desktop, or even your webcam.
1. Loom Extension
Platform: Chrome, Edge, Windows, Mac
Best for: Quick, shareable recordings with instant cloud upload
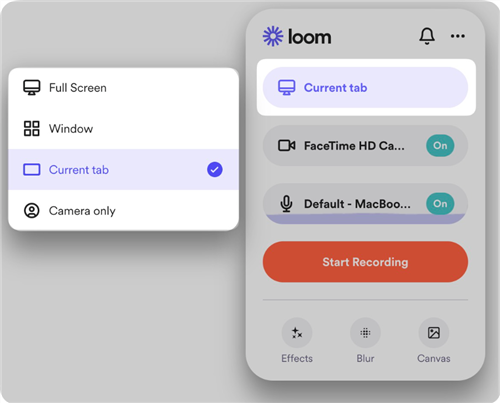
Loom Extension
Key Features:
- Capture tab, desktop, or camera view
- Record system audio + microphone narration
- Instant cloud storage & shareable link
- Basic trimming and annotations
- Viewer engagement insights (Pro)
- Works on desktop and mobile apps
Limitations:
- Free plan limited to 5 minutes per recording
- Loom watermark in free plan
2. Screencastify
Platform: Chrome extension
Best for: Educators, students, and quick browser tab recordings
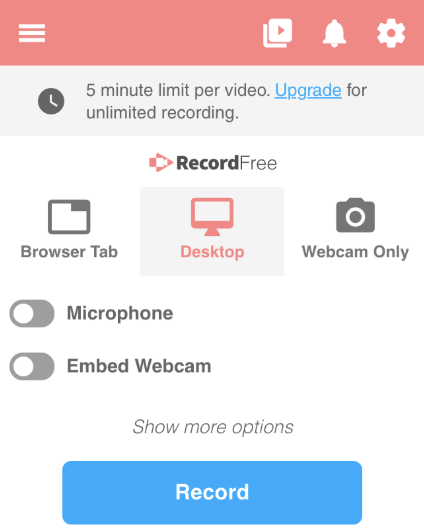
Screencastify Extension
Key Features:
- Record browser tab, desktop, or webcam
- Direct save to Google Drive or local storage
- Built‑in trim tool for quick edits
- Export to MP4, animated GIF, or MP3
- Interactive quizzes for education use (Pro)
Limitations:
- Free version limited to 30 minutes per recording
- Watermark on free exports
3. RecordCast
Platform: Web-based (Chrome, Edge)
Best for: Quick edits right after recording
RecordCast Online Screen Recorder
Key Features:
- Record screen, webcam, or both at the same time
- Choose browser tab, full desktop, or custom area
- Built‑in video editor for trimming, adding text, images, and transitions
- Export in 1080p (Free limited to 480p)
- No software installation required
Limitations:
- Free version limited to 5 minutes per recording
- Watermark in free plan
4 Free Ways to Capture Video Website (Desktop Solution)
Now, we will explore a selection of the simplest and most dependable methods for capturing video from a website:
FocuSee
Another solution is using FocuSee – a professional website video capture software with an auto-zoom effect. It provides you with the freedom to record the entire screen, a custom section, or a specific window. With its auto-zoom effects and mouse highlight function, FocuSee simplifies the recording process, making your video recording more efficient and concise. When it comes to recording tutorial videos, product demos, promo videos, and more, FocuSee ensures a seamless experience. It also provides effortless recording of selfies and voiceovers, catering to your specific needs.
Key Features of FocuSee:
- FocuSee is a powerful screen recorder with auto zoom. It tracks your cursor movement and dynamically zooms in to highlight the action for clearer, more engaging videos.
- Customize your recording with a variety of cursor styles, selfie and screen layouts, and visual enhancements like camera frames, filters, backgrounds, and design elements such as rounded corners and shadows.
- Export your videos in sizes optimized for social media or up to 4K resolution, and choose from video or high-quality GIF formats for versatile sharing options.
- Transcribe speech in your videos, automatically creating subtitles to improve accessibility and comprehension for your audience.
- Switch between preset layouts or freely adjust camera size and position anytime while recording.
- Upload videos from your device to jumpstart projects, enhance clips, and export polished results in minutes.
- Automatically blur sensitive content (faces, text, or objects) to safeguard privacy and ensure compliance.
Please freely download FocuSee to start the wonderful experience of recording the screen and the microphone.
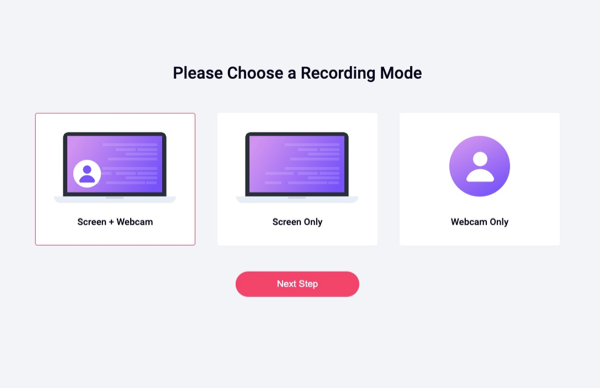
Step 1. Launch FocuSee on the computer and enter your account and password to log in to FocuSee. FocuSee supports 3 recording modes: record the full screen, customize the recording area, or record the window. You can choose the one you want to record.
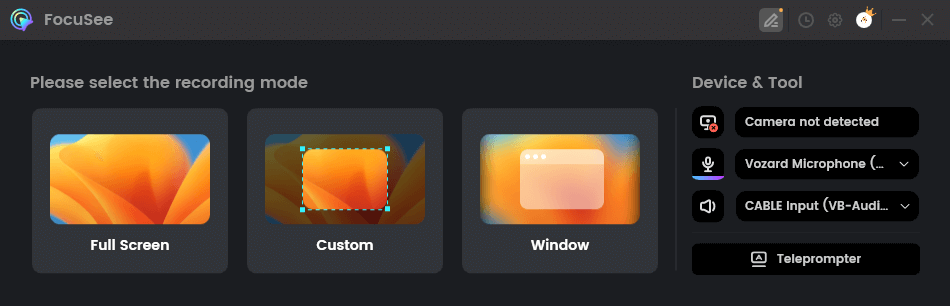
Choose the Recording Mode
Step 2. After choosing the recording mode, please just focus on your screen recordings. Let FocuSee handle the post-production automatically. After recording, you can change the background, adjust the cursor style, add captions and more.
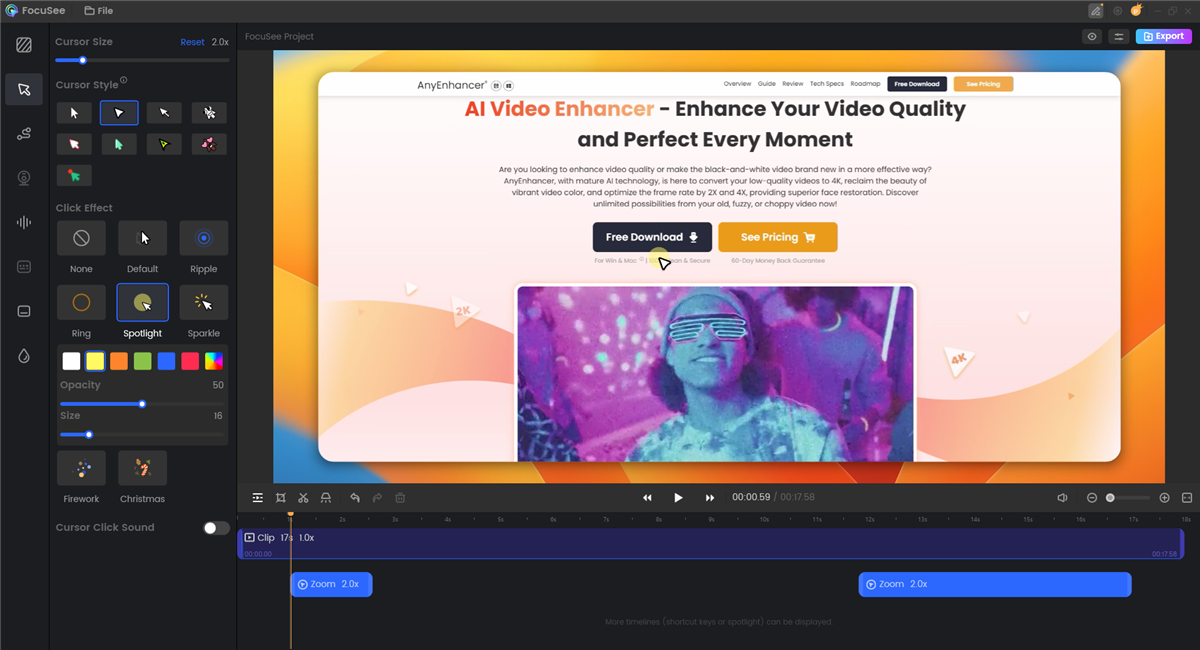
Edit Your Recorded Video
Step 3. Then, export your recordings as an MP4 or GIF file or share it with a link easily.
OBS Studio
OBS Studio is a remarkable free and open-source software compatible with Windows, macOS, and Linux. Its standout feature lies in its ability to capture videos from websites at no cost while also enabling simultaneous recording of multiple scenes on one screen. It makes it effortless to create reaction videos, blending video content with your reactions. Moreover, it offers various export formats such as MP4, MKV, FLV, MOV, TS, and M3U8, enhancing its versatility for users.
Step 1: Prepare for your video and launch OBS Studio. Customize your preferred output format by navigating to File > Settings > Output, then click OK to confirm.
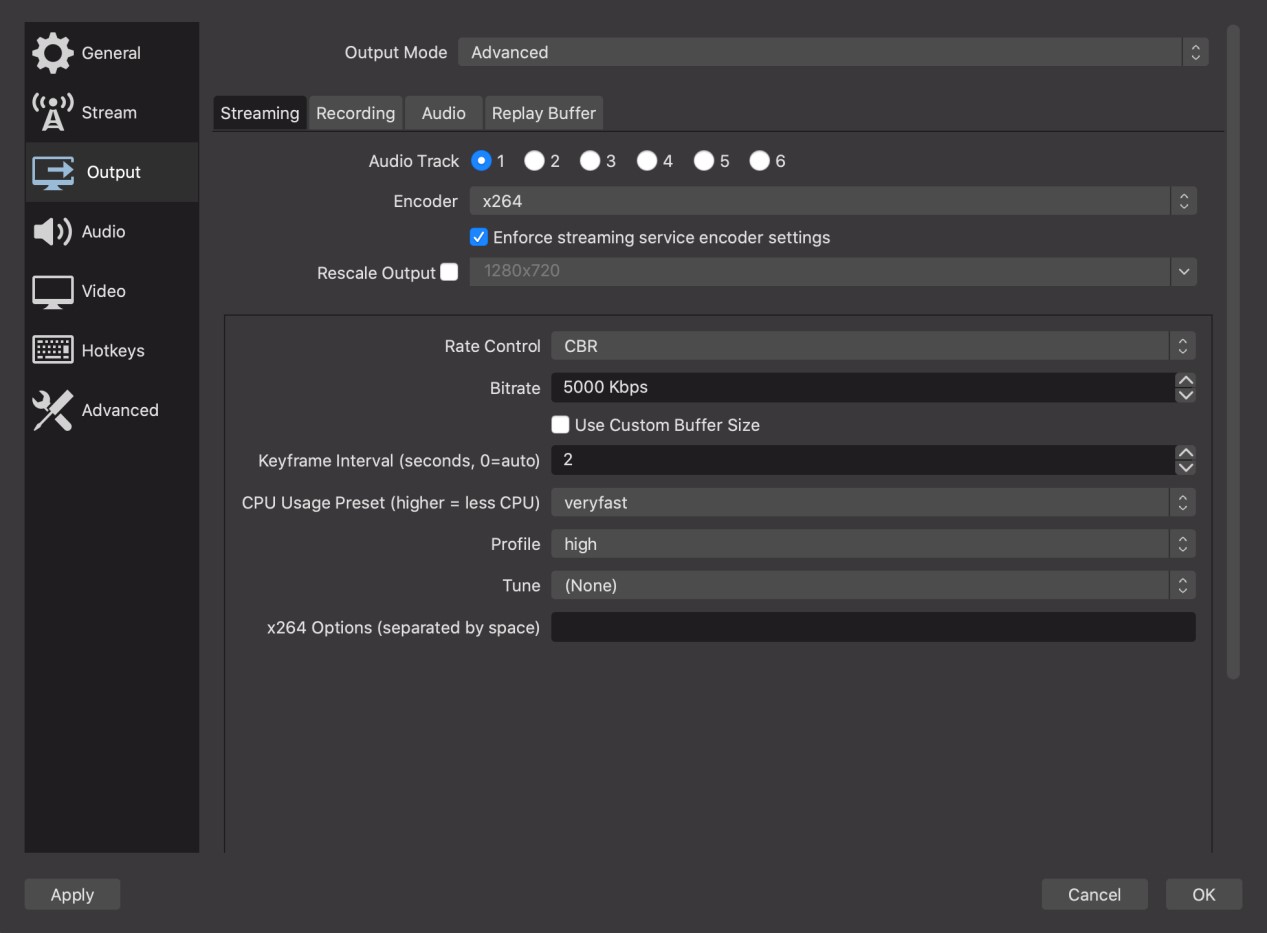
Customize Output Format
Step 2: To include your webcam for a reaction video, add Video Capture Device from Sources. For web content, paste the URL into the Browser source. Check the position and size of the sources as required.
Step 3: Start recording by clicking “Start Recording,” and play the video.
Step 4: When finished, click “Stop Recording.” The video will be automatically saved in the destination folder. Access recorded videos under File > Show Recordings.
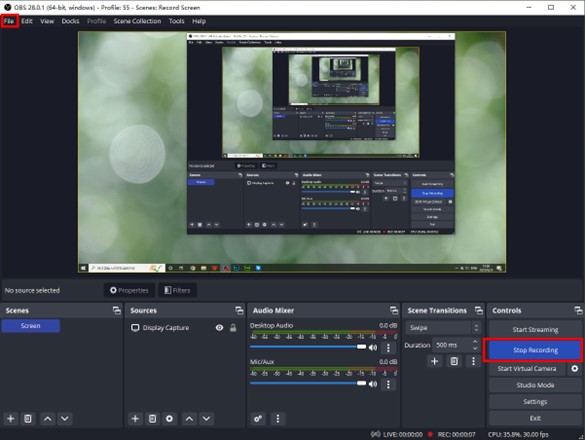
Click Stop Recording
Xbox Game Bar
Originally designed for recording Windows PC games, Xbox Game Bar is a built-in game recorder on Windows. However, it has evolved to function in any application. Utilizing this versatile tool, users can effortlessly record videos from games and any website. The process is simple and allows easy content capturing from various online sources. Xbox Game Bar is a valuable tool for effortlessly recording and sharing videos from web-based platforms.
Step 1: Activate Xbox Game Bar by going to Settings > Gaming > Game bar or simply press Windows + G keys to open it.
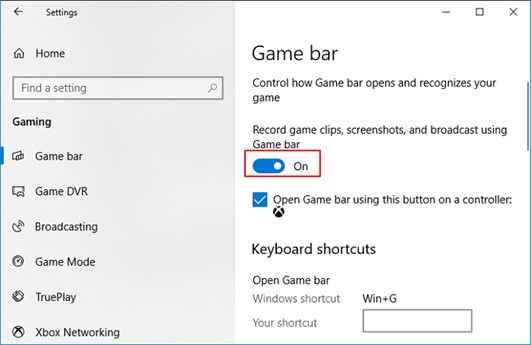
Turn on Xbox Game Bar
Step 2: Click the Start Recording icon to initiate the recording. Optionally, enable the microphone by clicking the Microphone icon. To stop the recording, use the End Recording icon.
Step 3: Once the recording is complete, access the “Show all captures” section to find a list of recorded video clips. Click on any of these clips to play and review your recordings.
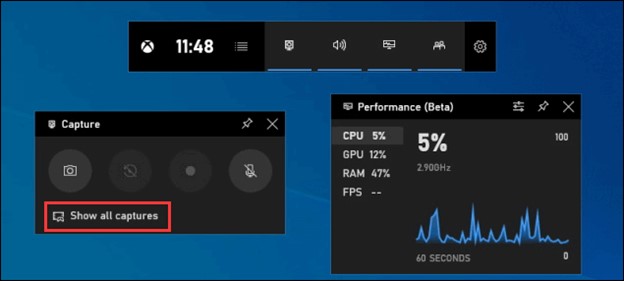
Access Show All Captures
QuickTime Player
Each Mac computer comes with a program called QuickTime Player already installed. There are numerous uses for this program. Videos and sounds can be recorded, edited, played, and shared. Since QuickTime Player features straightforward controls and tools, it is simple. This program allows you to modify your favorite movies, record gameplay, and create instructional content. It’s a reliable and powerful tool for all sorts of multimedia tasks. It enhances the overall Mac experience for its users.
Step 1: Access QuickTime Player by opening Launchpad and locating the app.
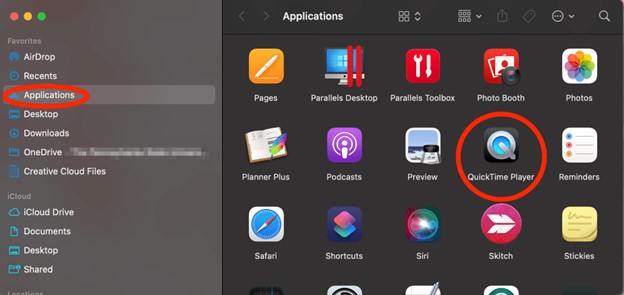
Open QuickTime Player
Step 2: Go to the file option and then click “New Screen Recording.”
Step 3: Customize settings, and then hit “Record” to start capturing your screen.
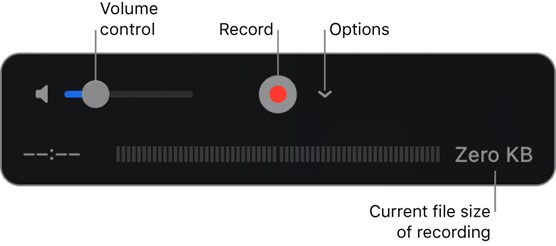
Click Record Button
Can Website Detect Screen Recording?
Generally, a website doesn’t detect screen recording. However, some websites may use specific technology to track the users’ actions on it and they may detect screen recording purposes. It can be a consideration of privacy and security.
Final Thought
In conclusion, we have provided some proven solutions to record video from website, depending on your device. Each solution provides easy-to-follow instructions for implementation. These options offer flexibility and convenience in capturing online videos for various purposes, such as saving educational content, creating tutorials, or preserving cherished moments. Remember to respect copyright laws and terms of use when recording videos. Furthermore, share your concerns with us in the comments sections below!