How to Record Your Phone Screen: The Ultimate Guide for iPhone & Android

When you encounter a critical bug in a banking app or need to capture a fleeting moment on social media, you rarely have time to download new software. You need to document the issue immediately. However, panic often sets in: will the recording capture sound? Will it accidentally reveal your private text notifications? And where is the button actually hiding?
If you need to know how to record your phone screen instantly without technical hurdles, you are in the right place. Whether you are creating a bug report for customer support or saving a clip for a friend, this guide provides a secure, tested method for your specific device. We will walk you through the native tools already installed on your phone, solve the mystery of missing audio, and—crucially—show you how to protect your privacy before you hit record.
Before You Start: The Privacy “Pre-Flight” Check
Before you press record, there is one critical step that most guides overlook. Screen recording captures everything visible on your display—including incoming text messages, emails, and two-factor authentication codes.
To avoid accidentally recording sensitive personal information:
Enable “Do Not Disturb” Mode:
- iPhone: Swipe down from the top-right to open Control Center and tap the “Focus” or moon icon.
- Android: Swipe down from the top to open Quick Settings and tap “Do Not Disturb.”
- Why? This suppresses pop-up banners, ensuring your video remains clean and your private conversations stay private.

Do Not Disturb Mode
Quick Start: How to Screen Record on Phone Using Built-in Tools
You do not need to install risky third-party apps to capture your screen. Learning how to screen record without app installations is possible because both iOS and Android offer a powerful built-in screen recorder. These native tools are secure, battery-efficient, and capable of high-definition capture.
How to Record Screen on iPhone (iOS)
Apple has streamlined this process, but if you have never used it, the button is likely hidden by default. To start a recording on an iPhone (iOS 16–18), you must first add the control.
Step 1. Enable the Tool: Navigate to Settings > Control Center. Scroll down to the “More Controls” section. Tap the green + icon next to Screen Recording. It will move to the “Included Controls” list.
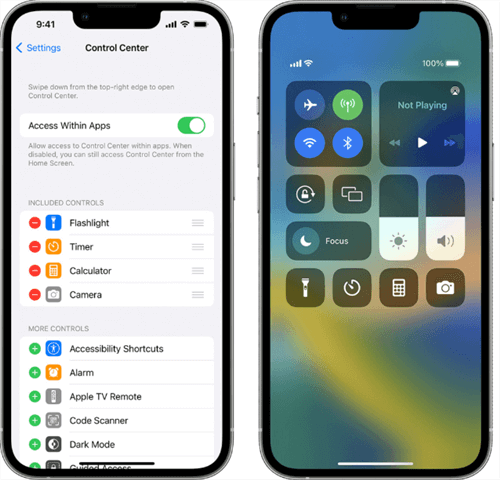
Control Center
Access Control Center:
- iPhone X and newer: Swipe down from the top-right corner.
- iPhone 8/SE and older: Swipe up from the bottom edge.
Step 2. Start Capture: Tap the circular Record button (a solid circle inside a ring). You will see a three-second countdown.
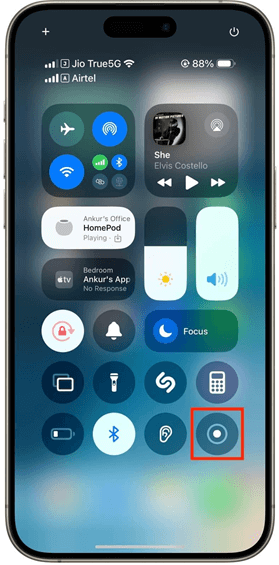
Tap Record
Step 3. Verify Recording: Look for the recording indicator. On older iPhones, this is a red bar at the top. On newer models (iPhone 14 Pro/15/16), look for the red dot inside the Dynamic Island at the top of the screen.
Step 4. Stop Recording: Tap the red status bar (or the Dynamic Island pill) at the top of your screen and select “Stop” in the prompt. The video is automatically saved to your Photos app.
How to Record Screen on Android
Android serves a massive variety of phones (Samsung, Google Pixel, Motorola, OnePlus). While the feature is standard, the location of the button varies by “skin” or manufacturer.
Step 1. Access Quick Settings: Swipe down twice from the top of your screen to fully expand the notification shade and Quick Settings menu.
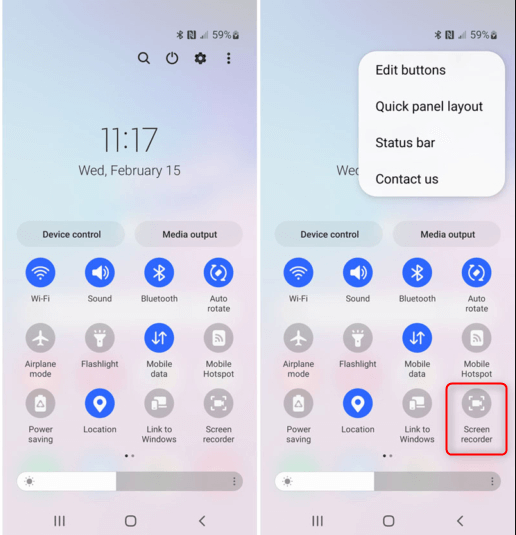
Quick Settings
Step 2. Locate the Tile (Crucial Step): Look for a tile labeled “Screen Record” or “Screen Capture.”
Don’t see it? This is common on new phones. You must manually add it.
Step 3. Edit Your Tiles:
- Tap the Pencil icon (Edit) or the three-dot menu icon in the corner of the Quick Settings panel.
- Scroll through the list of “Available buttons” (often at the bottom).
- Find “Screen Record,” tap and hold it, and drag it up into your active grid.
Step 4. Configure & Record: Tap the icon. You will likely see permission prompts asking if you want to record audio or show touches on the screen. Select “Start recording.”
Step 5. Stop: Swipe down to view your notifications and tap the red “Stop” or “Tap to stop” banner. The file will save to your Gallery or Google Photos.
How to Record Your Phone Screen with Sound
A silent video is often useless for troubleshooting or tutorials. If you are wondering how to record your phone screen with voice commentary, you must distinguish between two audio types:
- Internal/Device Audio: The sounds the phone makes (app noises, videos, game music).
- Microphone Recording: Your external voice narration.
Many failed recordings aren’t user error but OS-level defaults. On both iOS and Android, screen recording audio is often disabled by default to prevent feedback loops.
How to Record Screen with Audio on iPhone
Do not just tap the record button if you need to speak.
- Open the Control Center.
- Long-press (press and hold) the Screen Recording button.
- A new menu will appear. Tap the Microphone icon at the bottom so it turns red and says Microphone On.
- Tap “Start Recording.” Your video will now capture your voice along with the app’s sounds.
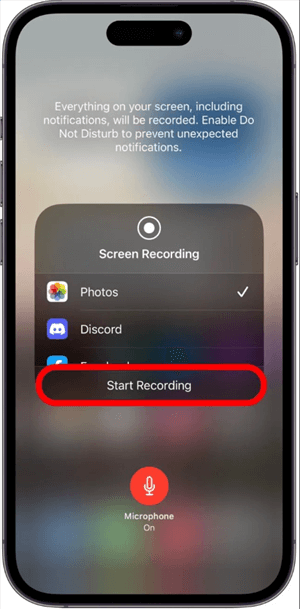
How to Record Screen with Audio on iPhone
How to Record Screen with Audio on Android
Android typically asks you for your preference every time you initiate a recording.
Step 1. Tap the Screen record tile.
Step 2. Look for the “Record audio” toggle in the pop-up menu. Tap the arrow next to it to select your source:
- Device audio: Records only internal sounds.
- Microphone: Records only your voice.
- Device audio and microphone: Records both (best for a phone screen recording tutorial).
Warning: The “Silent” Trap
On some Android devices, if your phone’s media volume is turned all the way down, the “Device Audio” recording will also be silent. Turn your volume up slightly before recording to ensure the internal sound is captured.
Can I Record Phone Calls or Zoom Meetings?
This is the most common frustration users face. You generally cannot use the built-in screen recorder to capture phone calls, FaceTime, or Zoom meetings with audio.
- The Reason: Hardware limitations and privacy laws prevent the microphone from being used by two apps simultaneously (the call app and the recording app).
- The Result: The video will record, but the audio from the other person will likely be missing.
Raw Footage vs. Professional Content: Choosing the Right Method
While the built-in screen recorder on your phone is excellent for quick captures, it has significant limitations for professional use. If you are creating a phone screen recording tutorial for YouTube, a presentation for your boss, or a bug report involving sensitive data, raw mobile footage often looks messy.
Method 1: Native Phone Recording (Quick & Utility)
- Best for: Instant utility, checking a bug, sharing a meme with a friend.
- Pros: Fast, no installation required.
- Cons: Captures messy status bars (battery, time) and lacks focus. It records the whole screen, meaning if you forgot to turn on “Do Not Disturb,” your privacy is at risk if a sensitive notification appears.
Method 2: Desktop-Enhanced Editing (Professional & Secure)
- Best for: Tutorials, public content, secure documentation for clients.
- Pros: Allows you to zoom in on specific buttons, blur out sensitive info you accidentally recorded, and add cursor effects.
- Cons: Requires transferring the video file to a computer.
To bridge this gap, many professionals record the raw clip on their phone but use desktop software to refine it. This ensures the final video is polished, follows the viewer’s attention, and hides sensitive info.
| Quick Capture | Professional Tutorial | |
| Purpose | Fast demos, instant sharing | Polished, in-depth instruction |
| Setup Time | Minimal (one-click start) | Moderate (planning & configuration) |
| Auto-Zoom | ✅ Automatic, context-aware | ⚠️ Optional or manual control |
| Privacy Blur | ⚠️ Basic (manual blur) | ✅ Advanced, auto-detect & track |
| Cursor Effects | ⚠️ Simple highlight | ✅ Rich effects (trails, clicks, magnify) |
| Audio Control | Basic mic/system toggle | Advanced mixing, noise reduction |
| Editing Tools | Light trimming | Full timeline editing |
| Branding | Limited | Custom intros, logos, themes |
| Best For | Social clips, quick walkthroughs | Courses, onboarding, client training |
Pro Workflow: Polishing Your Mobile Recordings with FocuSee
If you need to send your recording to a client or publish it online, you might find that transferring the file to a desktop for editing is worth the extra step. While it adds a moment to your workflow, tools like FocuSee solve the specific problems that mobile apps can’t: sloppy visuals and privacy risks.
FocuSee is a desktop application, but its “Import & Re-Edit Local Videos” feature is designed to process videos recorded on mobile devices. Additionally, beyond polishing imported videos, FocuSee enables the direct capture of mobile screens (Android & iPhone/iPad) via your computer, providing you with professional, high-quality footage from the outset.
Why Edit Mobile Clips on Desktop? Here are the key features of FocuSee:
- Fixing Privacy Mistakes: If you forgot to turn on “Do Not Disturb” and a private text popped up during your recording, you don’t need to re-record. FocuSee’s Privacy Blur allows you to mask that specific area easily.
- Enhancing Viewer Focus: Mobile screens are tall (vertical) and can be difficult to follow on wide desktop monitors. FocuSee uses Smart Focus & Auto-Zoom to automatically detect where you tapped the screen and zoom in, ensuring the viewer’s eye is drawn exactly to the button or menu you are discussing.
- Direct Mobile Recording Support: FocuSee lets you record your Android or iPhone/iPad screen directly on your Windows or macOS computer, capturing high-resolution video (up to 4K), audio, and the device display for tutorials, demos, or gameplay footage.
How to Capture Mobile Screen Directly With FocuSee
Recording your phone through FocuSee gives you higher fidelity and more control from the outset.
Step 1. Download and install FocuSee on your Windows or Mac computer. Launch FocuSee and adjust camera/mic settings before recording. Select Device mode.
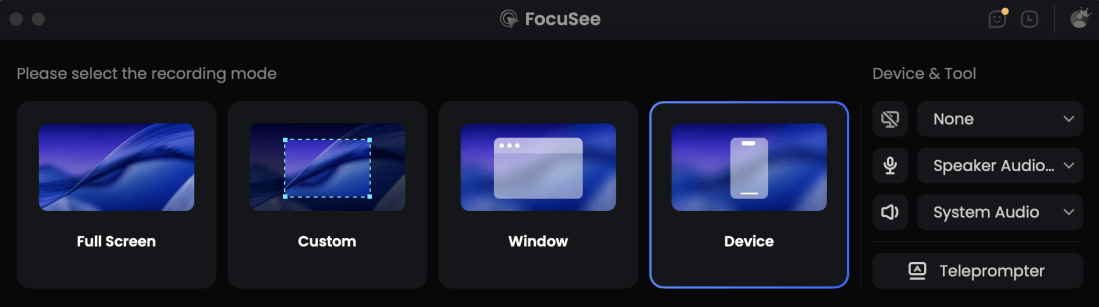
Choose the Device Recording Model
Step 2. Connect your Android device with a USB cable and enable USB debugging.
Step 3. Click the purple REC button to start. When done, click Stop and your recording is ready for editing.
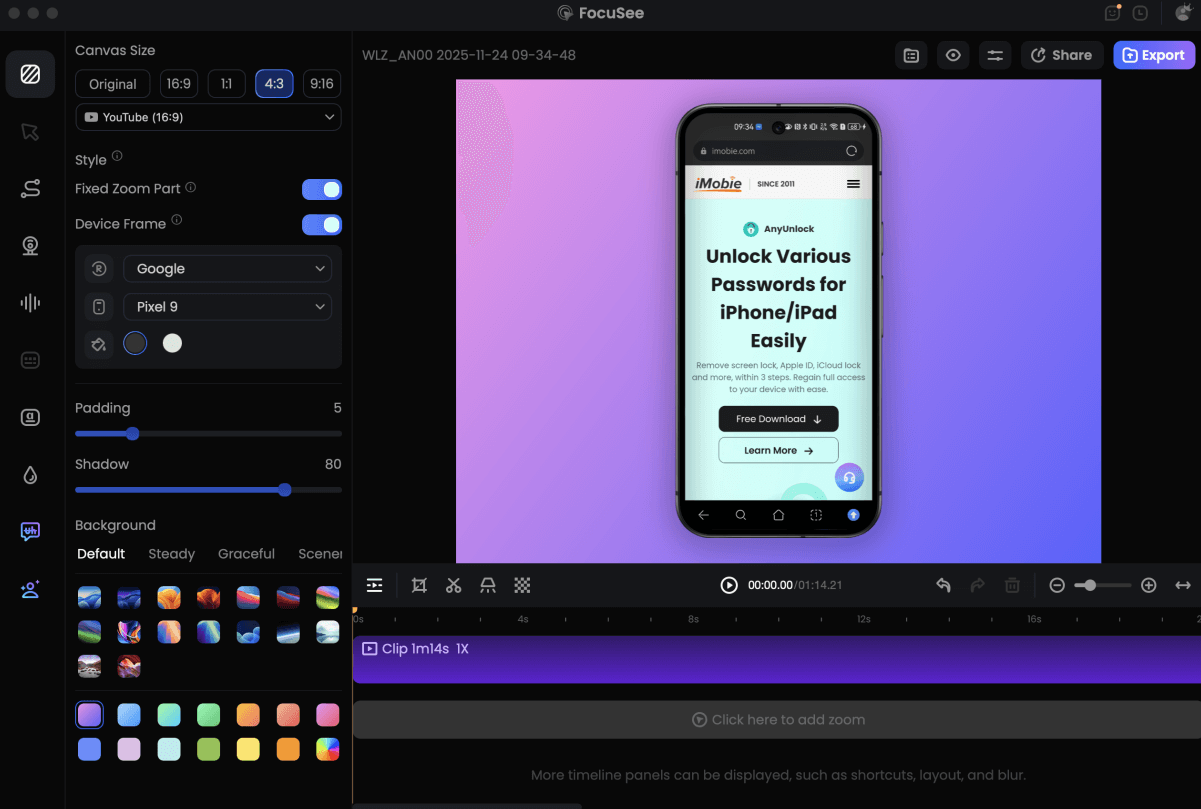
Record Android Phone Screen
This method captures your Android screen mirrored on your desktop and saves it directly into FocuSee for fine-tuning.
Troubleshooting: Why Screen Recording Stops or Fails to Save
Even with the correct steps, technology can sometimes fail. If you find that your screen recording stops unexpectedly or fails to save, here are the three most common culprits.
1. The “Black Screen” Issue (DRM)
If you tried to record a movie on Netflix or a banking app login screen, you likely ended up with a black screen.
This is not a bug. It is a security feature known as DRM (Digital Rights Management). Apps block screen capture to protect copyright and financial data. There is no software workaround for this on standard devices. If you strictly need proof of a bug in a banking app, you may need to use a secondary camera to record the physical phone screen.
2. Storage Limitations
High-definition video consumes space rapidly—roughly 100MB to 500MB per minute, depending on resolution. If your screen recording file location is full, the OS will terminate the recording immediately to prevent a crash.
Check your device storage. Delete old videos or offload them to the cloud before starting a long recording session.
3. Battery Saver Mode
Low Power Mode (iOS) or Battery Saver (Android) restricts background processes. This can interrupt long recordings or prevent the screen recording settings from maximizing frame rates. Always disable battery saving modes before hitting record.
Frequently Asked Questions About Mobile Screen Recording
How do I record my phone screen on iPhone?
Enable the feature in Settings > Control Center. Swipe to open Control Center, then tap the round Record button. Remember to tap the red status bar or Dynamic Island to stop.
How do I record my phone screen on Android?
Swipe down twice from the top to access Quick Settings. Tap the Screen record tile. If you don’t see it, tap the Pencil (Edit) icon to drag the tile into your active menu.
Can I record a phone call or Zoom meeting?
Usually, no. Due to privacy laws and hardware limitations, the screen recorder cannot access the microphone at the same time as the phone app, resulting in silent audio from the other caller.
Why doesn’t my screen recording have audio?
Audio is off by default to prevent echoes. On iPhone, long-press the record icon and tap “Microphone On.” On Android, toggle the “Record audio” switch in the setup prompt.
Do I need to install an app to record my phone screen?
No. Modern iOS and Android versions include a built-in screen recorder, eliminating the need for third-party apps for basic recording tasks.
Conclusion
Knowing how to record your phone screen gives you the power to troubleshoot errors, share moments, and communicate complex ideas instantly. By using the built-in screen recorder on iOS and Android—and remembering to enable “Do Not Disturb” first—you can capture what you need securely and quickly.
However, if your goal moves beyond simple capture—if you need to present, teach, or ensure client-facing materials look professional—raw footage often isn’t enough. While moving files to a desktop takes a moment, tools like FocuSee repay that effort by automatically polishing your mobile video with professional zooms and privacy blurs.