How to Record Mobile Screen: The Step-by-Step Guide for iPhone & Android

Imagine you are in the position of Michael, a college student facing a strict deadline. You need to submit a video assignment demonstrating a specific app workflow, but you have never captured footage from your phone before. As you stare at your device, anxiety builds: Will it record my voice? Will my notifications pop up and reveal private texts to my professor? Is the quality going to be blurry?
Facing a technical barrier when you simply need to get work done is a significant obstacle. This guide eliminates that confusion. We prioritize getting you the footage you need immediately using the tools already in your pocket.
Below, we detail the verified mobile screen recording step-by-step process for iOS and Android. Once you have mastered the basics, we will cover how to elevate those raw clips into professional tutorials using desktop tools.
How to Record Screen on iPhone (iOS 16, 17 & 18)
If you need to know how to record a screen on an iPhone, the capability is built directly into the operating system. However, the button is often hidden by default. Here is the standard procedure for iOS 16, 17, and the latest 18 updates.
Step 1: Enable the Screen Recording Button
Before you can record, you must add the control to your Quick Settings.
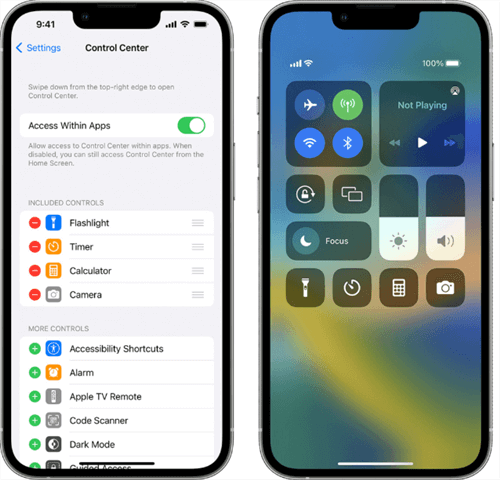
Control Center
- Open Settings and select Control Center.
- Scroll down to the “More Controls” section.
- Tap the green + icon next to Screen Recording. It will now appear in your “Included Controls” list at the top.
Step 2: Start the Recording
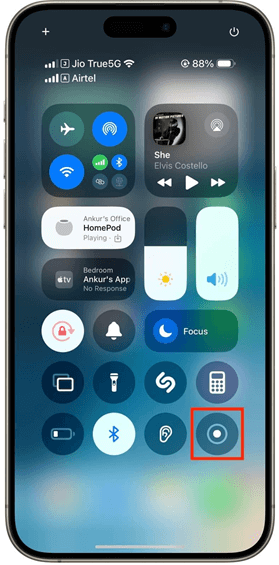
Tap Record
- Open the Control Center. (Swipe down from the top-right corner on iPhone X and later; swipe up from the bottom on older models with a Home button).
- Crucial Step for Audio: To record phone screen with audio, do not just tap the button. Long-press the Record button (a dot inside a circle). A menu will expand.
- Tap the Microphone icon at the bottom to turn it red (On). If you skip this, your video will be silent.
- Tap Start Recording. You will see a 3-second countdown within the icon.
Step 3: Stopping the Recording
When finished, tap the red status bar at the top of your screen (or the red indicator in the Dynamic Island on iPhone 14/15/16 Pro models) and select Stop. The video will automatically save to your Photos app.
Pro Tip for iOS Users: If the screen recording button is greyed out and won’t let you press it, check your restrictions. Go to Settings > Screen Time > Content & Privacy Restrictions. Ensure that “Screen Recording” is set to “Allow.”
How to Screen Record on Android Phone 2026 (Samsung, Pixel & More)
Learning how to record screen on Android is straightforward, though the interface varies slightly between manufacturers. Since Android 11, a native screen recorder has been standard. Below is the procedure for devices running Android 12 through 14, including Samsung Galaxy and Google Pixel models.
Step 1: Access Quick Settings

Access Quick Settings
Swipe down twice from the top of your screen to fully expand the Quick Settings panel. Look for a tile labeled “Screen Record” (Pixel) or “Screen Recorder” (Samsung).
If you do not see the tile, tap the Pencil (Edit) icon. On Samsung One UI 6.1 and newer, look for the “Edit” button specifically for the “Full” quick panel view. Find the recorder tile in the hidden list and drag it into your active grid.
Step 2: Maximize Native Quality (Don’t Skip This!)
Many users believe mobile recording is low quality, but that is often because the default settings are set to 720p to save space. You can change this.
- On Samsung: Instead of tapping the icon to start, long-press the text label “Screen Recorder” under the icon. This opens the settings menu.
- Resolution: Change from 720p to 1080p or 4K (if available) for the crispest text.
- Selfie Video Size: Adjust the slider if you plan to include your face in the recording.
- Show Taps: Toggle on “Show touches” here so viewers can see exactly where you are pressing.
- On Pixel: When you tap “Screen record,” a pop-up menu appears. Toggle “Show touches on screen” to make your taps visible—this is vital for app demonstration videos so viewers don’t get lost.
Step 3: Configure Audio and Record
Tap the recorder tile.
- Audio Source: Select Media and mic (Samsung) or toggle Device audio and microphone (Pixel). This captures both the app’s sounds and your voiceover simultaneously.
- Start: Tap Start recording. A countdown will begin.
To stop, swipe down to view the notification shade and tap the Stop notification. The video is saved to your Gallery or Google Photos library under a folder typically named “Screen Recordings.”
Audio & Privacy: Why You Might Lose Sound or Data
Many users, like Michael, worry about “sharing sensitive information” or losing audio. These are valid concerns. When you record your screen, incoming notifications—texts, emails, or reminders—are captured permanently in the video.
Protecting Your Privacy
Expert Tip: Before hitting record, enable Do Not Disturb (DND) mode.
- On iPhone: Open Control Center -> Focus -> Do Not Disturb.
- On Android: Swipe down -> Quick Settings -> Do Not Disturb.
This ensures your mobile tutorial recording remains professional and your private data stays off-screen. Additionally, be cautious when typing passwords; while many keyboards obscure characters automatically, it is safer to pause recording during login sequences.
The Audio Restriction Challenge (DRM)
If you try to record a call or a movie on Netflix, you will likely encounter silence or a black screen. This is due to Digital Rights Management (DRM). Operating systems block the built-in screen recorder from capturing audio in teleconferencing apps (to prevent wiretapping) and streaming apps (to prevent piracy). If your video is silent, check if the app you are using is copyright-protected.
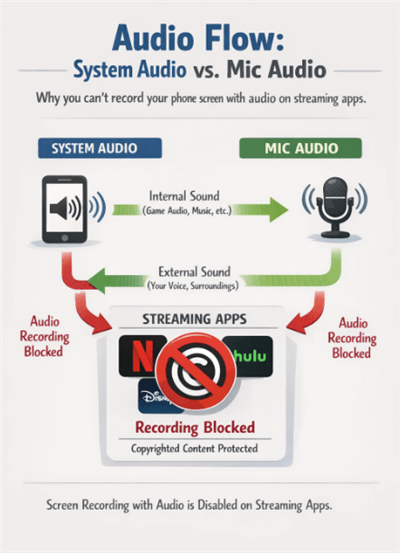
Audio Flow
Elevating Your Video: When to Use Desktop Tools
For quick bug reports or sharing a clip with a friend, the native tools described above are perfect. However, if you are in Michael’s position—where the quality of the video impacts a grade, or you are creating a professional tutorial—you might hit a wall with native editing.
Native recorders capture the whole screen statically. They don’t zoom in on buttons, they don’t highlight your cursor, and editing the audio tracks separately is often impossible on a phone.
Comparison: Native Recorder vs. Desktop-Assisted (FocuSee)
| Feature | Native Mobile Recorder | Desktop-Assisted (FocuSee) |
| Primary Use Case | Quick sharing, raw clips | Tutorials, assignments, presentations |
| Zoom / Focus | Static (Full screen only) | Dynamic (Auto-Zoom, Smart Focus) |
| Cursor / Touch | Basic white dots (Android) or none (iOS) | Polished cursor effects & spotlights |
| Audio | Mixed channels (hard to edit) | Separate tracks for voice & system |
| Workflow | Record → Edit on small screen | Record → Auto-edit on desktop |
The Workflow: From Phone to Polished Video
To get the best of both worlds—the ease of mobile recording and the polish of desktop editing—we recommend a hybrid workflow using FocuSee. This addresses the common pain point: “My video looks boring because it’s just a static view of a phone screen.”
Phase 1: Record & Transfer
Record your clip using the native iPhone or Android steps listed above (ensure you use the highest resolution settings).
Transfer the file to your computer. This is often the trickiest part for students or new users.
- iPhone to Mac: Use AirDrop. It’s instant and keeps the quality high.
- iPhone to PC: Use a USB-C / Lightning cable. It appears as a drive, allowing you to drag and drop the large file quickly.
- Android to PC/Mac: Use Quick Share (formerly Nearby Share) or a USB-C cable for the fastest transfer speeds. Avoid emailing the video, as this compresses the file and ruins the quality.
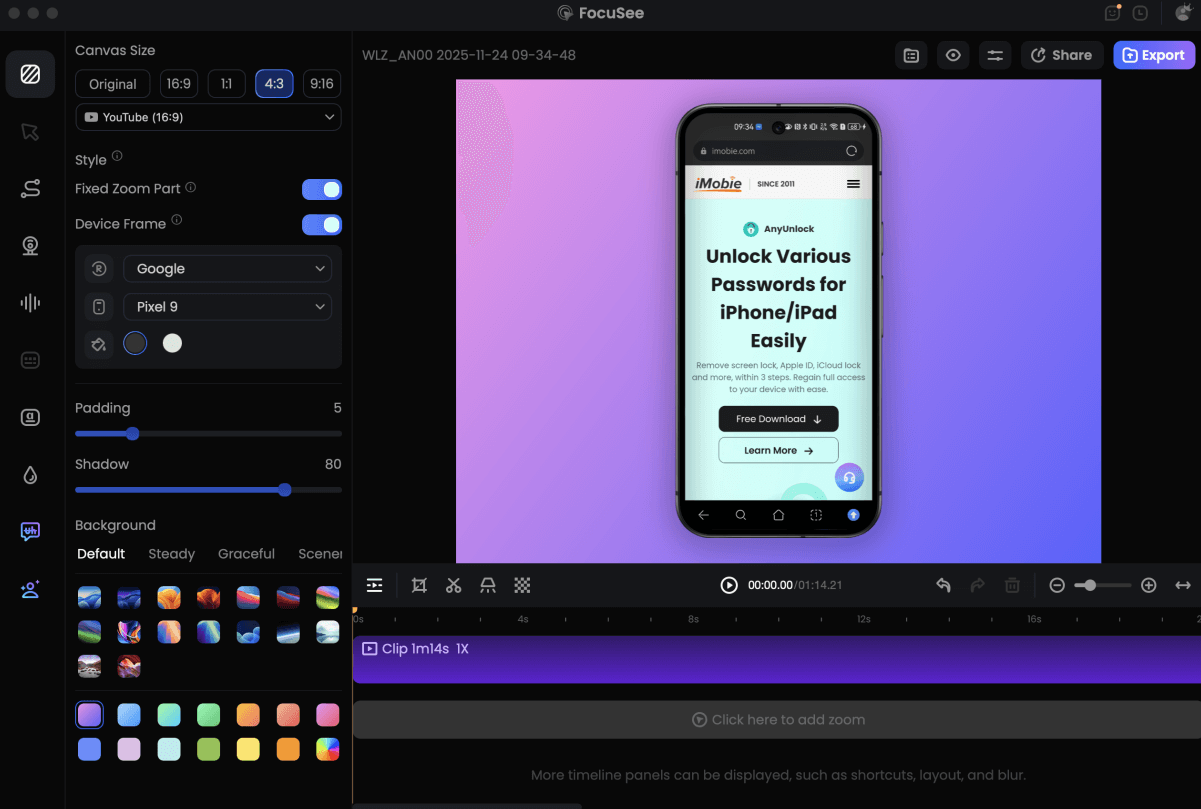
Phase 2: Polish with FocuSee
Once the high-quality file is on your desktop, drag it into FocuSee.
Record Android Phone Screen
- Automatic Zoom: The software detects where action is happening (like a menu opening) and automatically zooms in, guiding the viewer’s eye.
- Background Enhancement: If you recorded a vertical video, FocuSee adds an attractive blurred background to fill the empty space on horizontal screens (like YouTube or a classroom projector).
- Cursor Animation: It can simulate cursor movements or distinct touch highlights, making the tutorial easier to follow than standard mobile footage.
This workflow takes the raw, high-quality footage your phone is capable of producing and gives it the professional “YouTuber” finish that native apps cannot achieve.
Troubleshooting Common Mobile Recording Issues
Even with a clear guide, you might encounter technical obstacles. If you find yourself thinking, “My screen recordings don’t capture audio properly,” or the button simply won’t work, review these common solutions.
The Recording Button is Greyed Out or Missing
If the screen recorder icon is present but unresponsive (grey), it is often due to system restrictions.
- iOS: As mentioned, check Settings > Screen Time > Content & Privacy Restrictions.
- Android: Ensure no other overlay apps (like a game booster or third-party screenshot tool) are currently active. Android usually allows only one app to capture the screen at a time.
Recording Stopped Unexpectedly
This is almost always a storage issue. High-resolution video files (especially 4K on Android) consume space rapidly. If your phone is nearly full, the OS will terminate the recording to preserve system stability. Check your storage capacity before starting a long session.
No Audio in the Recording
If your video is silent:
- Check Physical Switches: Ensure your phone is not in Silent Mode (check the physical switch on iPhone).
- Verify Mic Settings: Did you long-press the recorder icon to enable the microphone? This is the most common error.
- App Restrictions: Remember, if you are recording a voice call or a copyrighted video stream, the audio is blocked intentionally by the software.
Frequently Asked Questions
Do I need to buy an app to record my mobile screen?
No. Both iOS and Android include robust built-in screen recorders. For 90% of users, these are sufficient. You only need third-party software like FocuSee if you want to add professional zoom effects, cursor highlights, or change the background for a presentation.
How do I stop and save a screen recording?
On iPhone, tap the red status bar (time indicator) or the Dynamic Island at the top of the screen and confirm “Stop.” On Android, swipe down to access your notification shade and tap the “Stop” or “Save” button on the recording notification. The video file is automatically saved to your device’s main photo gallery.
Where are my screen recordings stored?
- iPhone: Open the Photos app. Look for the “Recents” album or scroll down to “Media Types” and select “Screen Recordings.”
- Android: Open Google Photos or your Gallery app. You will typically find a dedicated folder labeled “Screen Recordings” or “Movies” under the Library tab.
Is screen recording on my phone private and safe?
Yes, the recording happens locally on your device. However, whatever is displayed on your screen (passwords, notifications, photos) will be captured in the video file. Always enable “Do Not Disturb” before you start, and never record sensitive login credentials.
Future Support Note: Mobile operating systems update frequently. We monitor iOS and Android beta releases and will update this guide if the screen recording functionality changes in future versions (iOS 19 or Android 15).
Conclusion
Recording your screen shouldn’t be a source of anxiety. By using the native tools on your iPhone or Android, you can capture high-quality footage simply by knowing where the hidden settings are—like the resolution toggle on Samsung or the microphone long-press on iOS.
For users like Michael, this means submitting an assignment on time without technical glitches. Whether you choose to stick with the raw footage from your device or use FocuSee to polish the final product with auto-zooms and pro backgrounds, you now have the control to demonstrate your work clearly and confidently.
Download FocuSee today if you are ready to take that raw mobile footage and transform it into a professional presentation.