How to Record a Video on Your Phone: Step-by-Step Guide

Facing a locked device or a confusing interface when you need to capture a critical moment can be a significant obstacle. You are likely here because you want to know how to record a video on your phone that looks professional, rather than shaky or blurred.
Consider the experience of Lisa, a small business owner. She bought a high-end smartphone specifically to film promotional clips but felt paralyzed by the complex settings, fearing her results would look amateurish. You do not need a film degree to solve this. Whether you are dealing with blurry focus, muffled audio, or simply do not know where the correct button is, this guide provides the exact procedure to take a video on your smartphone confidently and efficiently.
The Direct Method: How to Record Video on iPhone and Android
Depending on your device, the interface for mobile videography varies slightly. While manufacturers skin their apps differently, the core functionality remains consistent. Below is the standard procedure to record video on a phone, step by step, for the two major operating systems.
How to Record Video on iPhone
Apple’s interface is designed for speed, but hidden features often confuse beginners.
Step 1. Open the Camera App: Tap the camera icon on your home screen or swipe left from the lock screen.
Step 2. Select Video Mode: By default, the iPhone opens in “Photo” mode. Swipe the text labels above the shutter button (where it says PHOTO, PORTRAIT, PANO) to the left until VIDEO is highlighted in yellow.
Critical Note: Avoid simply holding down the white photo shutter button. This activates “QuickTake,” a feature that records video at a lower resolution and crop than the dedicated video mode. If the shutter button stays white while you hold it, you are in the wrong mode. It must turn into a red square (recording) or a red circle (standby) to ensure high-quality video.
Step 3. Start Recording: Tap the red shutter button once. A timer will appear at the top of the screen indicating recording has started.
Step 4. Stop Recording: Tap the red square button to finish. The video saves automatically to your Photos app.
How to Record Video on an Android Phone
Android ecosystems (Samsung, Google Pixel, OnePlus) have slight variations, but the logic follows a similar pattern.
Step 1. Launch the Camera: Open your default camera app.
Step 2. Switch to Video:
- Samsung/OnePlus: Swipe left or right on the screen (or the mode bar) until “Video” is selected.
- Google Pixel: Tap the video camera icon or swipe to the video mode tab.
Step 3. Begin Capture: Tap the designated record button (usually a red circle with a dot in the center).
Step 4. End Capture: Tap the stop button (a square icon). Your clip will be stored in Google Photos or your device’s Gallery.
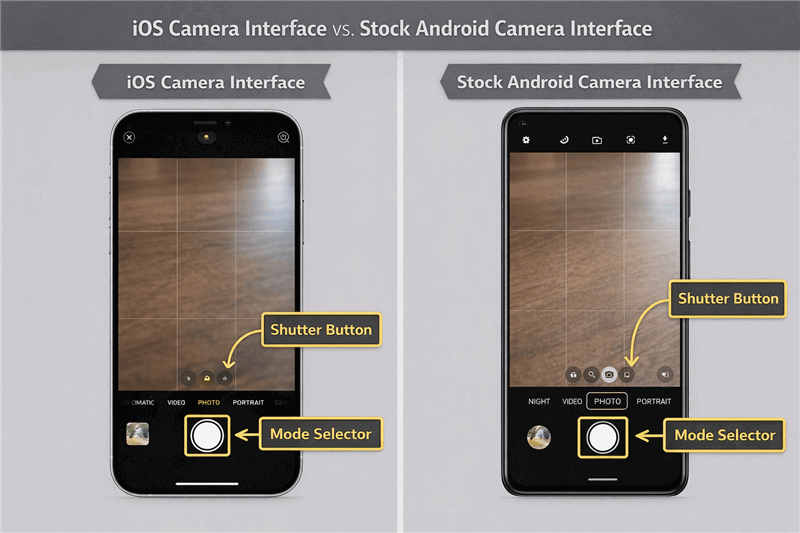
Comparison of Camera Interfaces – iOS vs Android
Essential Settings: How to Record High Quality Video on Phone
Simply hitting record is often not enough to achieve professional results. To record high quality video on phone devices, you must understand the settings buried in your camera menus. Beginners often ask “what settings should I use?” without realizing that higher numbers aren’t always better for every situation.
The First Decision: Vertical vs. Horizontal
Before you even touch a setting, you must decide on your orientation. This is the most common mistake beginners make.
- Vertical (Portrait Mode): Hold your phone upright. This is mandatory for TikTok, Instagram Reels, and YouTube Shorts.
- Horizontal (Landscape Mode): Turn your phone sideways. This is the standard for YouTube videos, TV playback, and website headers.
- Why it matters: If you record horizontally for TikTok, your video will be tiny with huge black bars. If you record vertically for YouTube, you get the dreaded “pillar-boxing” (black bars on the sides).
Video Resolution: 1080p vs. 4K
Resolution refers to the number of pixels in your video.
- 1080p (HD): This is the standard definition. It is sufficient for Instagram Stories, TikTok, and quick messages. It saves storage space and uploads quickly.
- 4K Video: This provides four times the detail of 1080p. It is the ideal video setting if you plan to edit the footage later on a computer or display it on a large TV. However, 4K video files are massive (approx. 300MB–400MB per minute) and can fill your phone’s storage rapidly.
Frame Rate: 30fps vs. 60fps
Frame rate (frames per second) determines the “feel” of the motion.
- 30fps: The standard for most video. It looks natural and cinematic, similar to what you see on TV news or dramas.
- 60fps: Captures hyper-smooth motion. It is perfect for sports or fast-moving subjects.
- The “Soap Opera” Warning: For a talking-head video or a tour of your shop, 60fps can make the movement look too real and uncomfortably smooth, often called the “soap opera effect.” Most viewers find this jarring for standard content. Stick to 30fps unless you are filming fast action.
Understanding HDR Video
HDR video (High Dynamic Range) balances the light in your shot, ensuring that bright skies aren’t blown out and dark shadows still show detail.
- On iPhone: Usually enabled by default as “Dolby Vision.”
- On Android: Often labeled as “HDR10+”.
- The Caveat: While HDR looks stunning on your phone screen, the colors can sometimes look washed out or overly bright when uploaded to platforms that do not support that specific HDR format. If you notice your colors look “gray” after uploading to social media, try turning HDR off in your settings.
| Scenario | Orientation | Recommended Resolution | Recommended Frame Rate |
| Social Media (TikTok/Reels) | Vertical | 1080p | 30fps |
| YouTube / Business Promo | Horizontal | 4K | 30fps (or 24fps) |
| Kids / Pets / Sports | Either | 1080p or 4K | 60fps |
| Archival Memories | Horizontal | 4K | 30fps |
Phone Video Recording Tips: Stabilization, Lighting, and Audio
Even with the correct settings, your video can suffer if you ignore physical technique. Many beginners assume video quality depends only on the phone model, but lighting and stabilization have a greater impact than resolution alone. Recording in good light and keeping the phone steady often improves video quality more than switching from 1080p to 4K.
1. Stabilization Techniques (The “Ninja Walk”)
Shaky footage is the number one mark of amateur video. While electronic stabilization in modern phones is good, it cannot fix everything.
- The Hold: Do not hold the phone with one hand. Grip it with both hands.
- The Stance: Tuck your elbows firmly against your ribs. This turns your upper body into a tripod.
- The Movement: When walking, do not walk normally. Bend your knees slightly and roll your feet from heel to toe.
- Visual: Imagine you are carrying a very full tray of drinks that you do not want to spill. This gliding motion is known as the “Ninja walk” and absorbs the shock of your steps, resulting in smoother mobile videography.
2. Lighting: The Golden Rule
Always position your subject facing the light source. If you are indoors, have the subject face a window. Never record with a bright window behind your subject, as this will turn them into a silhouette and confuse the smartphone camera exposure sensors.
3. Audio Recording Best Practices
Viewers will forgive grainy video, but they will click away immediately if the audio is bad.
- Locate the Mic: Identify where the microphones are on your device (usually near the charging port and the camera module).
- The Grip: Ensure your fingers or phone case are not covering these holes.
- Proximity: Get close. The microphone on a phone is effective within 3-4 feet. Beyond that, your voice will sound “roomy” or echoed.
Common Troubleshooting: Fixes Before You Finish
Before we look at editing, let’s address the immediate problems you might see on your screen right now. If your footage looks wrong, check these common culprits.
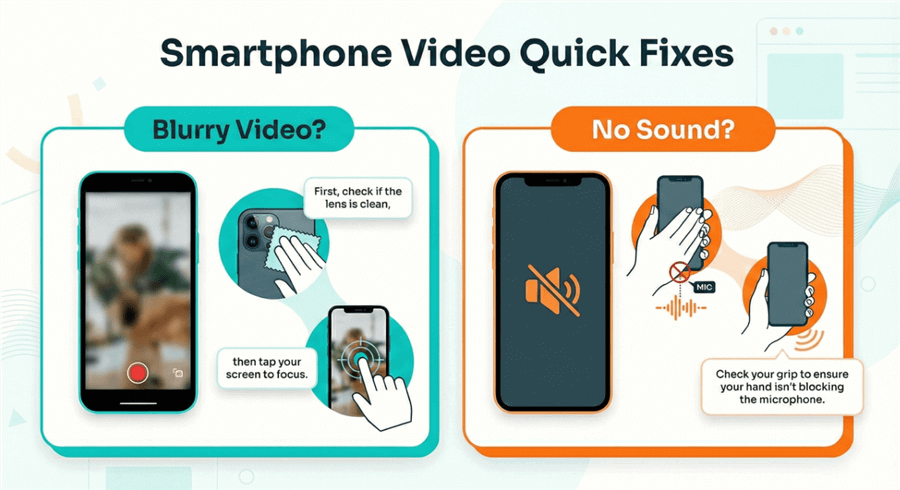
Troubleshooting flowchart for common smartphone video recording problems
Why is my video blurry?
Dirty Lens: This is the most common issue. Your phone spends all day in a pocket or bag, collecting oil and dust. Fingerprint smudges scatter light and create a soft, hazy look. Always wipe your lens with a microfiber cloth (or a clean T-shirt) before recording.
Focus Hunting: If the camera keeps pulsing in and out of focus, tap the screen on your subject and hold for a second. You will see a yellow box that says AE/AF Lock. This locks the focus on your subject so the camera stops guessing.
Why is there no sound?
The “Pinky Block”: When holding the phone horizontally, your pinky finger often naturally rests over the bottom microphone. Adjust your grip.
Bluetooth Interference: If you are wearing wireless earbuds or have a Bluetooth speaker connected nearby, the phone might be trying to record audio from that device instead of the phone itself. Turn off Bluetooth to be safe.
Why does the video look dark/grainy?
Low Light: Smartphone sensors are small and struggle in the dark. The “grain” is digital noise. The only real fix is to add more light—move a lamp closer or step outside.
Next Steps: Polishing Your Content Using FocuSee
Once you have captured your raw footage, you have a choice: upload it directly, or polish it for a more professional look.
For quick social media updates, uploading directly from your phone is fine. However, if you are creating a tutorial, a business promo, or a video that requires subtitles, working on a phone screen can be frustrating. The buttons are small, and precise editing is difficult.
If you find yourself squinting at your phone screen trying to edit a long video, it is often easier to transfer the file to a computer. This is where FocuSee serves as a helpful bridge. It is designed to take the raw smartphone camera footage you just recorded and apply professional polish without requiring you to learn complex editing software.
- Fixing “Amateur” Mistakes: If your hand wasn’t perfectly steady or you want to highlight a specific part of the screen, FocuSee’s Auto-Zoom can dynamically focus on the action, making the video feel dynamic.
- Accessibility: Most social media videos are watched without sound. FocuSee analyzes your clip and applies Auto Subtitles, saving you from manually typing out captions on a tiny phone keyboard.
- Cleaning Up the Background: If you filmed in a cluttered home office, you don’t need to re-shoot. The Background Blur feature isolates the subject, giving the video a clean look similar to “Portrait Mode” but for video.
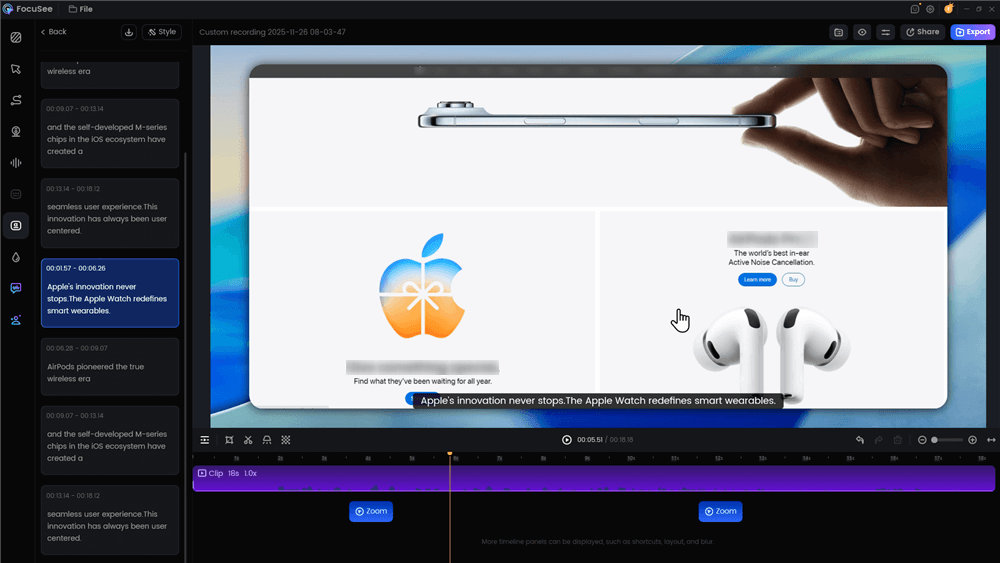
Automatic Subtitle Generation
Frequently Asked Questions
How do I record a video on my phone?
Open your Camera app, swipe or tap to switch from “Photo” to “Video” mode, and tap the red record button. Ensure the shutter button turns into a square or red circle; if it stays white, you are not in the dedicated video mode.
How can I record better-quality video on my phone?
Ensure your lens is clean, use good lighting (face the window), and hold the phone with two hands for stability. Switch your settings to 4K if you need high detail, but ensure you have enough storage space.
How do I stop my phone videos from being shaky?
Use the “Ninja Walk” technique: keep elbows tucked in, hold the phone with both hands, and walk heel-to-toe as if carrying a full cup of coffee. Alternatively, invest in a small handheld tripod.
Can I record both video and audio simultaneously?
Yes, but be sure your hand is not covering the microphone holes at the bottom of the phone. For professional results, try to record in a quiet room with soft furnishings (like rugs or curtains) to reduce echo.
How long can I record a video on my phone?
You can record until your battery dies or your storage fills up. 4K video consumes roughly 350MB per minute. If you have 10GB free, you can record about 30 minutes of 4K video.
Conclusion
You do not need to be a professional videographer to capture stunning footage. By understanding how to record a video on your phone correctly—selecting the right orientation, cleaning your lens, and stabilizing your shot—you can eliminate the frustration of blurry, shaky, or amateurish clips. The technology in your pocket is powerful, but it requires the right technique to unlock its potential.
If you decide to take that raw footage and refine it into a tutorial or promo on your computer, tools like FocuSee can handle the technical heavy lifting—like zooming, captioning, and audio cleanup—so you can focus on your message. Download FocuSee today to regain control over your video content and solve your production headaches in minutes.