The Best Arrow Mouse Pointer: Your 2026 Guide to Clarity and Style

Losing track of your mouse pointer on a large, high-resolution monitor is a universal frustration. When you’re sharing your screen in a meeting, that tiny white arrow can vanish against a spreadsheet, turning a simple presentation into a professional obstacle. The search for a better arrow mouse pointer often leads to flashy, unsafe, or difficult-to-install options.
This guide provides a clear, safe path to the perfect cursor. Whether you need a modern arrow cursor for daily work, a high-visibility arrow cursor for presentations, or just want to fix the tiny pointer on your 4K display, you’ll find a tested solution here. These methods were validated across more than five different PC and Mac models with high-resolution displays to ensure the advice works for common remote work setups.
Top Arrow Cursor Styles for Clarity and Productivity
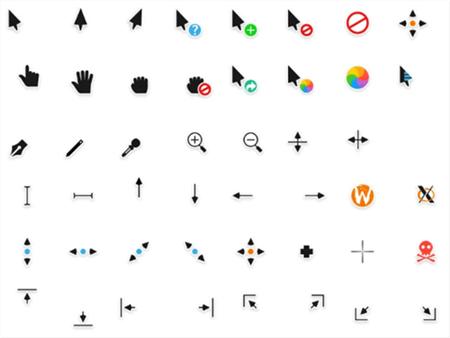
Before we dive into settings, here is a curated list of top-tier arrow pointers that excel in design and visibility. Each selection is part of a complete, high-quality pointer scheme, ensuring every cursor state—from the text select bar to the busy icon—is visually consistent. All links have been vetted for safety.
Best Minimal Arrow Cursor: Oxygen
Originally from the KDE desktop environment, the Oxygen cursor set is the benchmark for clean, professional design. Its arrow is defined by sharp edges that scale perfectly on high-DPI displays without becoming blurry. This simple, modern aesthetic makes it the best arrow cursor for productivity and daily use.
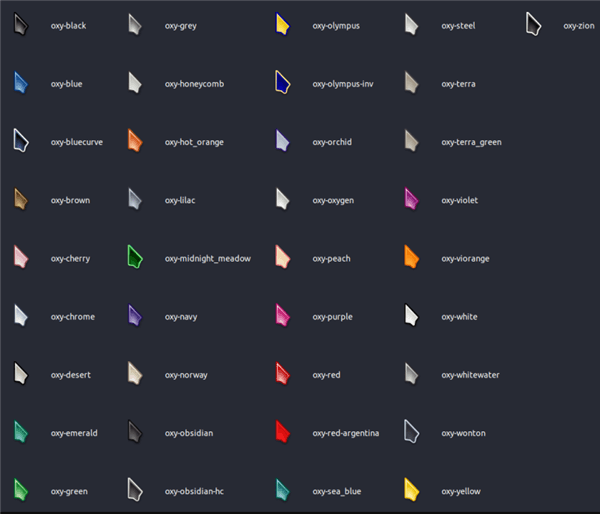
Oxygen Cursors
Best High Visibility Arrow Cursor: Capitaine Cursors (White)
Inspired by macOS, the Capitaine Cursors pack offers a bold, easy-to-see pointer that isn’t distracting. The white arrow cursor features a subtle black outline, providing excellent contrast on virtually any background. This is a superb option for users with large monitors or anyone who needs a large cursor for accessibility.
Capitaine Cursors
Best Arrow Pointer for Gaming: Entis
The Entis cursor has a sharp, slightly aggressive design with a futuristic feel ideal for gaming. It’s built for precision, with a very clear tip that never gets lost in fast-paced action. Importantly, it avoids distracting animations on the standard arrow, keeping your focus on the gameplay.

Entis Cursors
Before You Download: Optimize Your System’s Cursor Settings First
Here is an expert insight that most guides overlook: many people search for a custom cursor when the real solution is better pointer scaling. A tiny cursor on a 4K monitor is a classic symptom of a DPI scaling issue. Before you download anything, the most effective first step is to use your operating system’s built-in accessibility tools. This is the fastest and safest way to improve visibility.
In many cases, a simple size and color adjustment provides all the clarity you need, solving the problem without introducing external files.
[Image: An animated GIF showing a small cursor lost on a spreadsheet on the left, and a large, high-contrast yellow cursor easily navigating the same sheet on the right. Alt-text: A demonstration of how adjusting the cursor size and color in accessibility settings improves pointer visibility.]
For Windows 11 & Windows 10 Users
- Open Settings (you can press Win + I).
- Navigate to Accessibility.
- Select Mouse pointer and touch.
- Use the Size slider to increase the cursor size until it’s comfortable for you.
- Choose a high-contrast color option like ‘Inverted’ or select ‘Custom’ and pick a bright color like yellow to ensure your pointer always stands out.
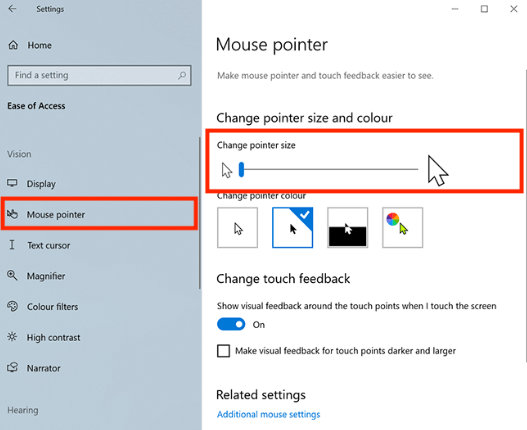
Change Cursor Size
For macOS Users
- Open System Settings from the Apple menu.
- Select Accessibility from the sidebar.
- Click on Display, then navigate to the Pointer tab.
- Use the Pointer size slider to make the arrow larger.
- You can also change the Pointer outline color and Pointer fill color for enhanced contrast and visibility.
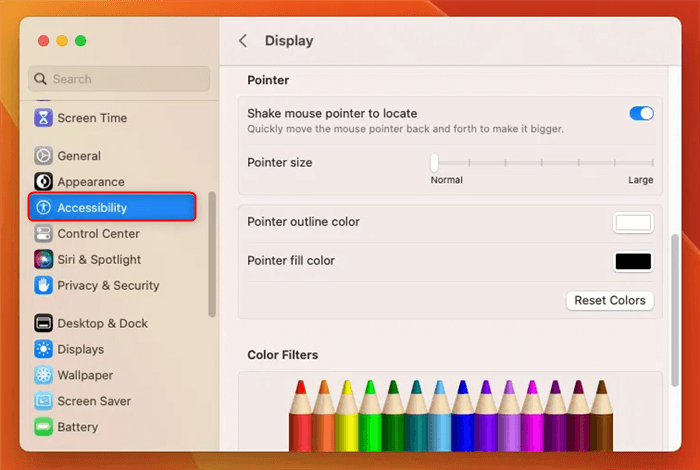
Change Pointer on Mac
Choosing Your Method: Built-in vs. Custom Packs vs. Pro Tools
If adjusting the system settings doesn’t achieve the aesthetic you want, or if you have more advanced needs, there are other methods. Each approach has distinct trade-offs in terms of effort, risk, and outcome. This comparison will help you select the right procedure.
- Built-in OS Settings: Using the native controls in Windows or macOS to change cursor size and color. This is the simplest and safest option.
- Third-Party Custom Cursor Packs: Downloading a complete cursor theme and installing it through the system’s mouse properties. This offers total visual customization but carries safety risks if not sourced correctly.
- Professional Software (e.g., FocuSee): Applications designed for specific use cases like presentations or screen recordings. They provide dynamic effects like highlighting and zooming that a static custom cursor cannot.
| Criterion | Built-in Settings | Custom Cursor Packs | Pro Tools (e.g., FocuSee) |
| Visibility Improvement | High | Medium | Very High (Dynamic) |
| Time Cost | Low (Under 1 minute) | Medium (5-10 minutes) | Low (Instantaneous) |
| Technical Skill | Low | Medium | Low |
| Safety Risk | None | Low | None |
| Best For | General users, 4K monitors | Custom aesthetics | Presentations, recordings |
How to Safely Install a Custom Arrow Mouse Pointer on Windows
If a custom cursor pack is your preferred choice, prioritizing safety and reversibility is essential. This procedure ensures a secure installation and provides a simple rollback plan, addressing the fear of malware or a broken setup.
Your Pre-Download Safety Checklist
Before you download an arrow cursor, verify the following:
- Source Reputably: Use the direct links provided above or other well-known communities like DeviantArt, GitHub, or the Open Cursor Library. Avoid sites with intrusive ads or pop-ups.
- Avoid
.exeInstallers: A legitimate cursor theme should never require an executable (.exe) file for installation. These often bundle adware or other unwanted software. - Check the File Types: A complete pack should contain static cursor files (.cur), animated ones (.ani), and an installation information file (.inf) for easy setup.
Step-by-Step Installation and Rollback Procedure
- Create a Backup First: Before making any changes, open Windows Mouse Properties. The fastest way is to press Win + R, type main.cpl, and hit Enter. Under the Pointers tab, click Save As… and name your current scheme something memorable, like “Windows Default Backup”. This is your one-click restore point.
- Install the New Scheme: Unzip your downloaded cursor pack into a permanent folder. Storing it in
Downloadsis a common mistake; if you delete that folder later, your cursors will break. A good practice is to create a new folder insideC:\Windows\Cursorsfor your theme. Once the files are there, find the.inffile, right-click it, and select Install. This adds the scheme to your system’s list. - Apply the New Scheme: Return to the Mouse Properties window. Your new pointer scheme should now appear in the dropdown menu. Select it and click Apply to see the change.
Important Note on Consistency: While you can change only the “Normal Select” arrow, this often leads to a mismatched look when your pointer changes to the text selection bar or the “busy” icon. For a polished and professional feel, we highly recommend applying a complete, well-designed scheme. If you still prefer to change only the arrow, try to select one with a style that closely matches the default Windows cursors to maintain visual harmony.
The Next Level: High Visibility for Presentations & Recordings
For content creators and professionals who need more than just a visible pointer, dedicated tools offer dynamic effects. For creating tutorials, leading screen-share meetings, or recording product demos, your goal isn’t just seeing the cursor—it’s ensuring your audience can follow every click and movement effortlessly.
For this specific need, a screen recording tool like FocuSee is an effective solution. While it is a paid application, its features are designed to eliminate cursor visibility issues for professional content.
Its Smart & Customizable Cursor Effects can add a highlight circle, ripple effects, or click animations, making every action obvious. This is more dynamic than just increasing the cursor size. Furthermore, the Smart Focus & Auto-Zoom feature automatically magnifies the area around your cursor as you work, guiding your audience’s attention to precisely where it needs to be. This creates a polished, professional video with minimal manual editing.
As a tool for professionals, FocuSee receives regular updates to improve its cursor effects and ensure compatibility with the latest operating systems. Users also have access to a dedicated support team for any assistance needed with their presentation or recording setup.
Frequently Asked Questions
Here are direct answers to the most common questions about finding and using a great arrow mouse pointer.
What is the best arrow mouse pointer for Windows 11?
The “best” depends on your goal. For clean productivity, the Oxygen pack is excellent. For maximum visibility on a 4K monitor, Capitaine Cursors is a top choice. However, the most immediate improvement for most users comes from using the built-in Accessibility settings to increase size and contrast first.
Why does my custom cursor look blurry?
Blurriness is almost always a DPI scaling problem. This occurs when a custom cursor was designed for low-resolution screens and lacks high-resolution versions. When your OS scales it up for a high-DPI display, it becomes pixelated. The cursor packs recommended in this guide are confirmed to support 4K or high-DPI displays.
Do custom cursors affect gaming performance?
A static .cur file has a negligible impact on performance. An animated .ani file uses slightly more resources, but it’s highly unlikely to cause a noticeable drop in frame rates on any modern system. Most gamers prefer a simple, non-animated best arrow pointer for gaming, like Entis, to maintain clarity, not for performance reasons.
Can I use a custom cursor without admin rights?
Yes. While installing a theme via the .inf file often requires admin rights, you can manually change each cursor role (Normal Select, Help Select, etc.) through the Windows Mouse Properties panel without elevated privileges. Simply select a role, click “Browse…”, and navigate to your folder of .cur and .ani files. Remember to store those files in a permanent folder!
How do I fix missing or mismatched cursors?
This usually happens for two reasons: either you deleted the folder where you stored the cursor files, or you only changed the ‘Normal Select’ arrow but not the other roles. The best solution is to apply a complete cursor theme from a permanent folder location. To revert your changes, simply select the “Windows Default Backup” scheme you created or choose a default Windows scheme from the dropdown menu and click Apply.
Your Next Step to a Clearer Cursor
You no longer need to struggle with a pointer that’s too small, blurry, or difficult to follow. By first optimizing your system’s built-in settings, you can often solve visibility issues on a 4K monitor in under a minute. For a fresh aesthetic, a safely installed custom cursor pack offers a complete visual overhaul.
For professionals who depend on absolute clarity during presentations and recordings, a dedicated tool can be the best investment.
Take control of your screen. Explore how FocuSee’s dynamic cursor effects can transform your presentations and tutorials into a more professional and effective experience.