How to Edit Video with AI: The Guide for Faster Content Creation

Balancing a full-time career with a content creation side hustle is a recipe for exhaustion. The excitement of filming quickly fades when you face the “editor’s block”—staring at hours of raw footage that needs to be chopped, synced, and polished. For years, manual editing was the single biggest bottleneck in my production schedule. It wasn’t just boring; it drained the mental energy I needed to stay consistent.
However, the emergence of AI video editing tools has changed the equation. Learning how to edit video with AI isn’t just about saving a few minutes; it is about reclaiming the time required to create.
This guide outlines specific methods and software—beyond just one tool—that took me from overwhelmed to organized, allowing me to double my output without hiring a team.
Manual Editing vs. AI Automation: Choosing the Right Method
Before diving into specific software, it is crucial to understand how an AI based video editing workflow differs from the traditional process. Many beginners assume AI is a “magic button” that does everything, but it is actually a shift in responsibility.
In traditional Non-Linear Editors (NLEs) like Premiere Pro, you are the builder. You make thousands of micro-decisions: cutting dead air, syncing audio waveforms, and manually typing captions. While this offers granular control, the time cost is immense. A standard 10-minute tutorial can easily take 4 to 6 hours for a creator with intermediate skills.
In contrast, automatic video editing platforms treat you as a reviewer. The software analyzes the footage to identify silence, speech patterns, and visual focal points. Instead of manipulating timelines and bitrates, you operate on a “drag-and-drop” or text-based basis.
| Feature | Manual Workflow (Traditional) | AI-Assisted Workflow |
| Rough Cut | Manual trimming of silence & mistakes (1–2 hours) | Instant AI-assisted trim & edit (< 5 mins) |
| Zoom / Focus | Manual keyframing (high skill) | Automated motion tracking (no skill) |
| Captions | Manual transcription & timing | Auto-generated (98%+ accuracy) |
| Burnout Risk | High (repetitive tasks) | Low (focus on creative review) |
The primary metric here is mental preservation. Manual editing forces you to watch your own footage repeatedly, leading to “editor’s fatigue” where you miss critical mistakes. AI video editor tools mitigate this by handling the rough cut instantly, allowing you to approach the final polish with fresh eyes.
Choosing Your Toolkit: A Comparative Overview
One size does not fit all. The tool you choose depends entirely on the type of content you create. Below is a breakdown of the top tools tested for this guide, categorized by their best use case.
| Tool | Best Use Case | Pricing Model | Learning Curve | Key Feature |
| FocuSee | Tutorials & Product Demo | Subscription/One-time License | Very Low | Auto-zoom on mouse clicks |
| Descript | Talking Head/Podcasts | Subscription | Low (text-based) | Edit video by deleting text |
| OpusClip | Repurposing (long → short) | Subscription | Very Low | Auto-reframing for TikTok |
| CapCut | General Social Media | Free / Pro Subscription | Medium | AI captions & templates |
Scenario A: Automating Tutorials and Demos with FocuSee
If your content focuses on software tutorials, product demos, or course creation, general-purpose tools often lack precision. For explaining a process on your computer screen, FocuSee is the most direct solution. It addresses the complexity of professional editing software by automating the post-production of screen recordings.
Automating the Technical Details
Automatic Zoom Effects
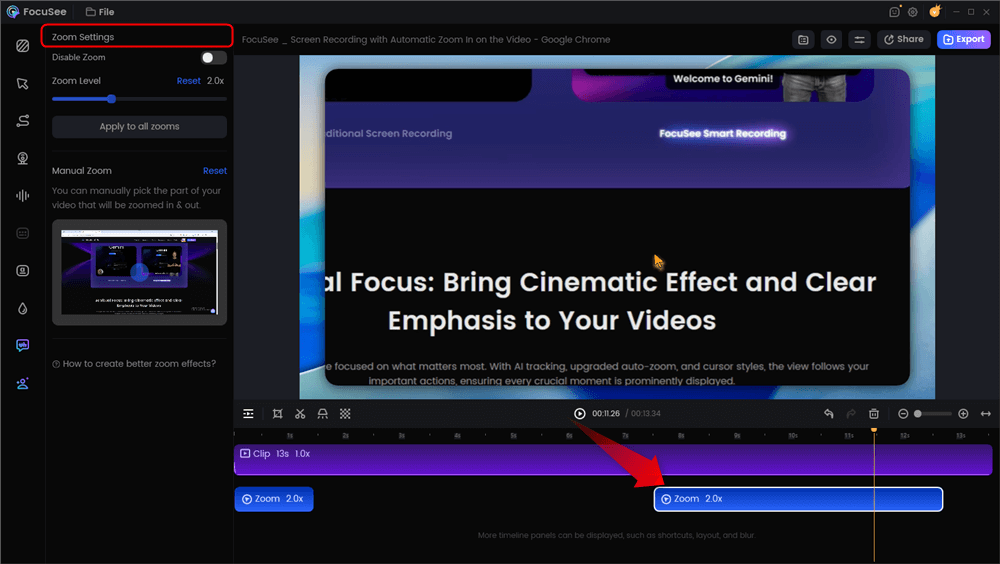
A major pain point for tutorial creators is the time required to manually keyframe zoom-ins. Without these zooms, screen recordings look static on mobile devices. FocuSee utilizes Smart Focus & Auto-Zoom, which automatically detects cursor activity and zooms in on the action without manual intervention. Here are the key features of FocuSee – a screen recorder with AI editing:
- Smart Focus & Auto-Zoom: Automatically adds smooth zoom-in and spotlight effects to highlight important actions, giving your walkthroughs a clear and polished look.
- AI Smart Cut: Clean up recordings by auto-removing filler words, dead air, and long pauses, making your videos concise and more engaging.
- Customizable Cursor Effects: Enhance on-screen clarity with adjustable cursor styles, highlight rings, click animations, and auto-hide behavior for distraction-free tutorials.
- Automatic Subtitles in 50+ Languages: Generate highly accurate captions in seconds—ideal for boosting accessibility and reaching global audiences.
To use this effectively:
- Record: Launch FocuSee and record your screen workflow.
- Auto-Process: Stop recording. The AI instantly generates a timeline with zoom points added wherever you click your mouse.
- Refine: Adjust the zoom level slightly if the AI was too aggressive, but the heavy lifting is done.
This transforms a raw screen capture into a professional asset in minutes, supporting multi-platform export (4K/60fps) for YouTube or LinkedIn.
Scenario B: Step-by-Step for Vlogs and Talking Heads
If your content extends beyond screen recordings to vlogs, talking-head videos, or interviews, you need a different set of tools. For this workflow, we recommend Descript or CapCut Desktop, as they utilize “Text-Based Editing.”
Here is the standard procedure for a modern AI based video editing workflow for social media:
Step 1. Upload and Transcribe
Open your chosen editor (e.g., Descript). Drag and drop your raw video file into the project window. The AI immediately analyzes the audio track and generates a time-stamped transcript.
Note: This process typically takes roughly 20% of the total video duration. Ensure your microphone audio is clear for the best accuracy.
Step 2. Text-Based Editing (The “Rough Cut”)
This is the core of AI powered video editing for beginners. You will see your video on the right and a text document on the left.
- The Action: Highlight a sentence in the transcript that you want to remove (e.g., a rambling tangent).
- The Result: Press “Delete” on your keyboard. The software automatically cuts that corresponding section from the video timeline and stitches the remaining clips together. You are editing the story, not the file structure.
Step 3. Silence and Filler Removal
Look for the “Sparkle” icon or “Edit” menu to find Filler Word Removal. Settings: Select “Remove all” to cut words like “um,” “uh,” and “you know.”
Set the silence duration gap to 0.3s or 0.5s. If you set it to 0s, the cuts will sound robotic and breathless.
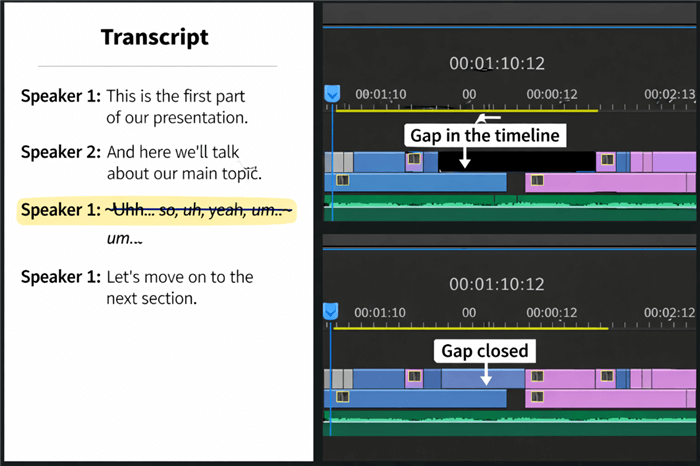
Text-based Video Editing
Step 4. Auto-Reframe for Social Media
If you are repurposing a YouTube video (16:9) for TikTok (9:16), you do not need to crop manually. Use the Auto-Reframe feature (available in OpusClip, Descript, and Premiere Pro).
The AI analyzes the frame to find the active speaker and keeps them centered, panning virtually as they move. Always watch the reframed clip once. Sometimes AI gets confused if there are two people in the frame; you may need to adjust the focal point manually.
Step 5. Enhancement and Export
Apply AI video enhancement tools such as auto-captioning or “Studio Sound” (audio isolation). Once reviewed, export the file. For TikTok/Reels, ensure “Burn-in Captions” is checked so the text is permanently part of the video file.
Refining the Edit: The Reality Check
While automation is powerful, relying entirely on it can lead to generic results. AI video editing tools shine most for content types that follow predictable formats—talking‑head videos or tutorials. However, strictly automated edits can sometimes lack “soul.”
The “Robotic Cut” Warning
A common issue with automatic video editing is the “breathless edit.” AI removes silences so efficiently that the speaker sounds like they never take a breath. This fatigues the viewer.
After the AI does the rough cut, go back and manually add 0.5 seconds of “room tone” or silence between major topic shifts to let the audience breathe.
Implementing a Hybrid Workflow
To achieve professional results, do not let the AI do the final export for complex projects.
- AI Phase: Use AI-assisted video trim and edit functions for the heavy lifting (rough cut, removing background noise, generating subtitles).
- Export XML: If you use professional software like DaVinci Resolve or Premiere, export your timeline as an XML or EDL file from the AI tool.
- Human Phase: Import that XML into your pro editor. Now you have a clean timeline to add music, color grading, and complex B-roll manually.
Polishing Audio
Use AI video enhancement tools (like Adobe Enhance or Descript’s Studio Sound) to clean up audio tracks. These tools isolate voice from ambient noise, creating studio-quality sound even from a home office.
Warning: If the effect is too strong, your voice may sound metallic. Dial the intensity down to 70-80% for a natural sound.
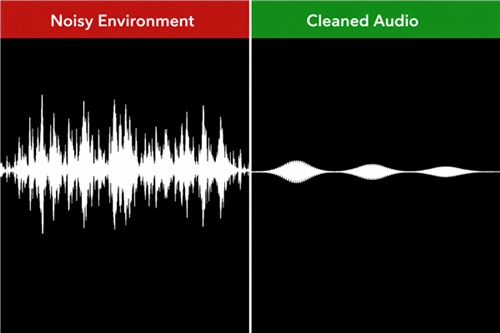
Noisy Environment vs. Cleaned Audio
Frequently Asked Questions About AI Video Editing
Which AI video editing tool is best for total beginners?
For general social media clips, CapCut is the most accessible entry point because of its template library. For tutorials and screen recording, FocuSee is the easiest because it handles the zoom and pacing automatically.
Can I move my AI project to professional software like Premiere Pro?
Yes, but only if the AI tool supports XML or EDL export (like Descript or Premiere’s built-in text editing). Simple tools like CapCut generally do not support exporting project files to other software, only finished video files.
Does AI editing lower video quality?
No, provided you export with the correct settings. Always ensure your export resolution matches your source footage (e.g., 1080p or 4K). However, aggressive “AI Zooming” on low-resolution footage can look pixelated, so try to record in 4K if you plan to use auto-zoom features.
How do I stop the “jump cuts” from looking weird?
Jump cuts are a natural side effect of removing silence. To hide them, you can use an AI feature often called “Morph Cut” (smooths the transition) or, more reliably, cover the cut with B-roll (images or overlay video) relevant to what you are saying.
Is AI video editing expensive?
It varies. Tools like CapCut and DaVinci Resolve offer robust free versions. Specialized tools like Descript or FocuSee often operate on a freemium model where you pay to remove watermarks or unlock higher export resolutions.
Conclusion: Start Editing Smarter in 2025
The goal of integrating AI into your workflow is not just about using new technology; it is about sustainability. In my case, the frustration peaked when I realized I was spending more time moving clips on a timeline than planning my next video. By shifting to an AI-assisted process, I solved the bottleneck that was killing my consistency.
If your primary focus is sharing knowledge through tutorials, FocuSee offers the most direct path to a polished result. For vloggers and storytellers, tools like Descript or CapCut allow you to edit video by editing text, removing the technical barrier of timeline manipulation.
Do not let the fear of technical complexity hold you back. Download one of these tools today, upload a single clip, and test the “remove silence” feature. You will likely find that the hours you save can be better spent engaging with your audience.