How to Record Online Course Videos: A Step-by-Step Guide for 2026
You have valuable expertise to share, but the thought of producing dozens of videos feels overwhelming. The frustration is common: your test recordings result in dark footage, echoey audio, and an unprofessional background. You know your content is solid, but you’re worried about wasting money on the wrong gear or getting stuck in complex editing software.
This guide provides a practical system for recording high-quality video lessons from home. We will cover an affordable equipment setup, preparing your space, and an efficient recording process, giving you the confidence to produce your entire course and create a professional learning experience for your students.
Your Essential Video Setup: A Tiered Gear Roadmap
The fear of buying the wrong equipment can stop a project before it starts. Instead of an expensive list, this section provides a strategic, tiered approach to online course video equipment for beginners. This roadmap focuses your budget on what matters most.
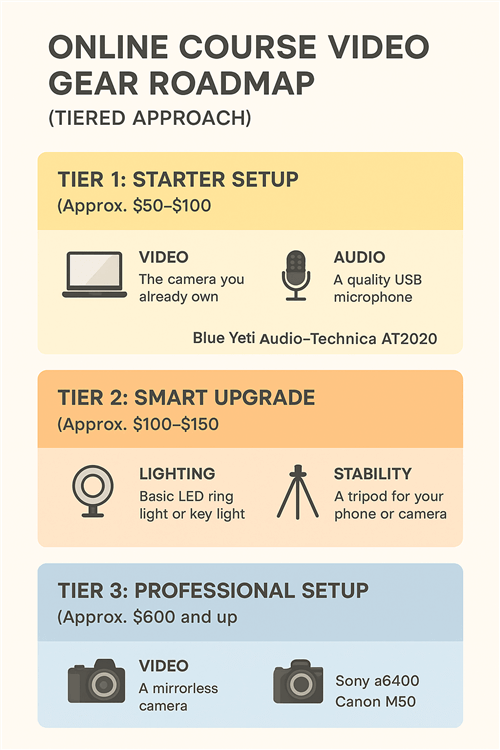
A Tiered Gear Roadmap
Your students will forgive average video quality, but they will not tolerate poor audio. Therefore, your first and most critical investment should always be in sound.
Tier 1: The Starter Setup (Approx. $50–$100)
This is the simplest, most affordable setup for high-quality audio and good-enough video.
- Video: The camera you already own. This can be your laptop’s built-in webcam or your smartphone. Learning how to record course videos with your phone is an excellent starting point.
- Audio: A quality USB Microphone. This is a non-negotiable upgrade. Models like the Blue Yeti or Audio-Technica AT2020 plug directly into your computer and provide a massive leap in audio clarity. This is the single most important step to record high quality audio for online courses.
Tier 2: The Smart Upgrade (Approx. +$100–$150)
Once your audio is clear, the next step is to improve lighting and camera stability.
- Lighting: A basic LED Ring Light or Key Light. Good lighting is what separates amateur video from professional-looking content. A single light source placed correctly can eliminate shadows and make your video look crisp.
- Stability: A tripod for your phone or camera. This ensures a stable, consistent shot and allows you to position your camera for better framing.
Tier 3: The Professional Setup (Approx. +$600 and up)
This tier is for when you are ready to invest course revenue back into your production.
- Video: A Mirrorless Camera. A camera like a Sony a6400 or Canon M50 offers a significant jump in video quality, with features like interchangeable lenses and better performance in low light.
Preparing Your Recording Space
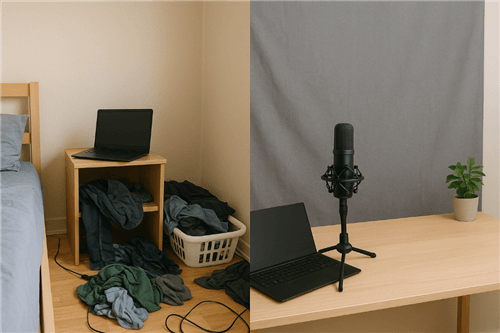
Most creators don’t have a dedicated studio; they have a corner of a bedroom or a desk in the living room. The good news is that you only need to control what the camera sees. Here’s how to turn a cluttered corner into a professional-looking scene for under $50.
Your goal is not perfection, it’s intentionality. A clean, simple background keeps the focus on you and your content.
- Step 1: Control the Background. The easiest way to hide a messy room is to replace it. A simple fabric backdrop on a stand or even a collapsible pop-up background can create a clean, neutral canvas. Choose a solid, non-distracting color like gray or navy blue.
- Step 2: Declutter the Frame. If you’re using your natural environment, remove everything from the camera’s view that doesn’t add to the scene. You don’t need to clean the whole room—just the small rectangle your students will see.
- Step 3: Add a Touch of Depth. A completely blank wall can feel sterile. Place one or two simple items in the background to make the shot feel more dimensional. A small plant or a single, tastefully positioned lamp can add a touch of warmth and professionalism without being a distraction.
Preparing Your Recording Space
The ‘Locked Baseline’ Method for Consistent, High-Quality Videos
One of the biggest indicators of an amateur course is inconsistency. When lighting, camera angle, or audio changes from one lesson to the next, it distracts the student. The solution isn’t more expensive gear; it’s a better process. Establishing your “Locked Baseline” involves one tech rehearsal where you define and document your setup, ensuring every video looks and sounds the same.
Follow these steps during one dedicated setup session:
- Set and Document Your Framing. Position your camera, chair, and any props exactly where you want them. Use small pieces of tape to mark the tripod legs on the floor or the laptop’s position on your desk. Note your chair height. Take a reference photo of the entire setup so you can recreate it perfectly.
- Lock in Your Lighting. Position your key light about 45 degrees to your side and slightly above your eye line to create a pleasant, dimensional look. Turn off any overhead room lights that create harsh shadows. If your light has adjustable settings, write them down. Your goal is a lighting environment you can replicate on demand.
- Normalize Your Audio Level. With your USB microphone in its final position (typically 6-12 inches from your mouth), record a 30-second audio test. Import this clip into an editor and check the waveform. The peaks should be strong but not hitting the top or bottom of the track (“clipping”). Adjust the gain knob on your microphone until you find a healthy level, then do not touch that knob again for the entire course.
Pro Tip: Tame Room Echo for Free
A great microphone in an empty, echoey room will still sound unprofessional. Here are simple ways to deaden sound without buying acoustic panels:
- Hang a heavy blanket just out of the camera’s frame.
- Place pillows on the floor or on furniture behind the camera.
- If possible, record in a room with a rug, curtains, and a full bookshelf.
- Face a closet full of clothes while recording; they are excellent sound absorbers.
- I record in a 10×10 room, and the biggest mistake I made at first was not hanging a heavy blanket just out of frame. It made a bigger difference than my $100 microphone.
How to Batch Record Course Videos: A 5-Step Process
Recording lessons one by one is inefficient. A professional system relies on batching—grouping similar tasks to save time and mental energy. Here is a repeatable, five-step process to produce your course content efficiently.
1. Plan: Outline and Script Your Content
Before you touch a camera, finalize your course structure. Prepare all your scripts or detailed bullet points for an entire module at once. Scripts are excellent for focus, but bullet points can feel more natural.
2. Prep: Re-establish Your ‘Locked Baseline’
This is where the work from the previous section pays off. Using your reference photos and tape marks, perfectly reconstruct your recording environment. This pre-flight check ensures your framing, lighting, and audio are identical to your tech rehearsal.
3. Record: Batch by Type
Don’t record lessons in numerical order. Record all videos of the same format in one session. This minimizes setup changes and keeps you in the right mindset.
Example Recording Schedule for Module 1:
Monday: Finalize scripts and slides for all lessons in Module 1.
Tuesday AM: Set up your ‘Locked Baseline’. Record all five “talking head” introduction and theory videos for the module.
Tuesday PM: Re-configure for screencasting. Record all three software demo videos for the module.
4. Edit: Trim and Polish
Once a batch of videos is recorded, perform your light edits. This usually involves trimming the beginning and end of each clip and running any automated enhancement tools. Resist the urge to seek perfection; focus on clarity and removing major mistakes.
5. Organize: Use a Clear File Naming System
Create a main folder for your course, with subfolders for each module (e.g., Module_01, Module_02). Name your final video files systematically, such as M01_L01_Lesson-Title.mp4. This makes uploading simple and error-free.
Choosing Your Recording Software: Manual vs. AI-Assisted
Once your physical setup is established, you need to select your software for recording and editing. There are two primary approaches: the traditional, manual path and a modern, AI-assisted path.
The Manual Path: OBS + Video Editor
This approach involves using separate, often free, tools. A typical combination is using OBS Studio for screen recording and webcam capture, then exporting those files to a video editor like DaVinci Resolve or Shotcut for manual editing.
- Pros: The software is often free and powerful, offering granular control.
- Cons: This method requires a significant time investment to learn multiple interfaces. The screen recording editing process is entirely manual, involving tedious tasks like cutting out pauses and managing separate tracks. The potential for technical issues is higher.
The AI-Assisted Path: FocuSee and Other Integrated Tools
For solo course creators where time is precious, AI-powered online course maker tools like FocuSee tackle the most common pain points by automating tedious tasks and enhancing production quality.
Here’s how FocuSee helps new creators deliver professional-looking courses effortlessly:
Problem: Stumbling over words or rambling.
FocuSee’s built-in Teleprompter lets you read from a script while recording, and its Smart Cut feature automatically removes awkward pauses and filler words, producing smooth, fluent narration in seconds.
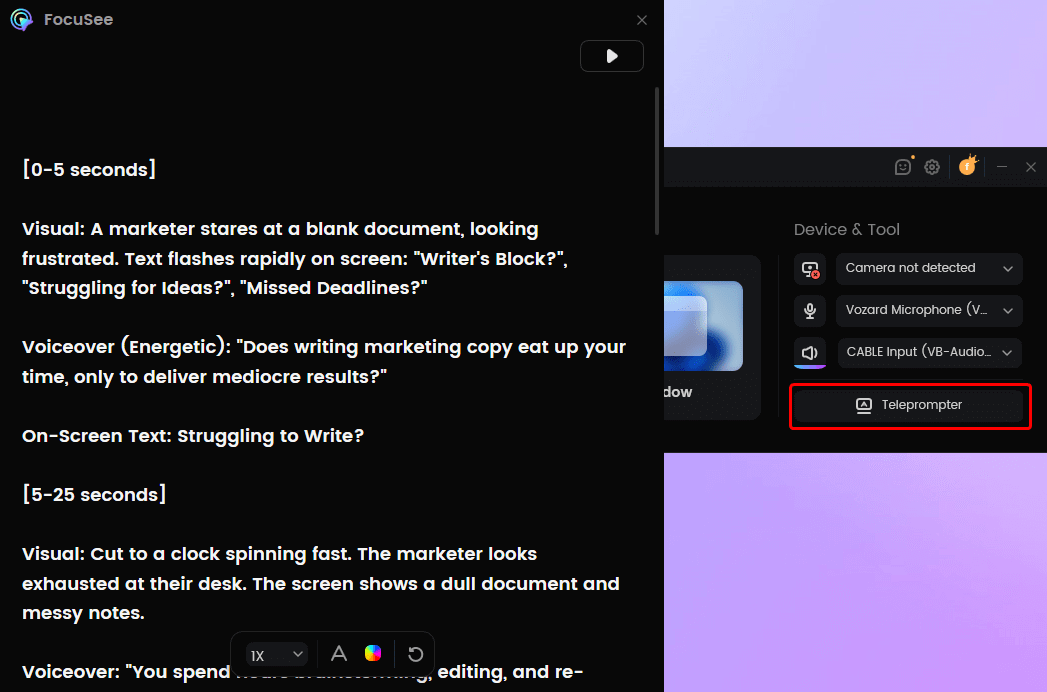
FocuSee Teleprompter
Problem: Screencasts often feel static and hard to follow.
FocuSee’s Auto Zoom, Spotlight, and cursor effects dynamically guide viewers’ attention, highlighting key actions and making tutorials engaging without manual animation.
Problem: Audio quality distracts from learning.
AI Audio Enhancement automatically removes background noise, breathing, and mouth sounds, delivering clear, professional-sounding audio that keeps learners focused.
Problem: Maintaining consistency is tedious.
Reusable templates let you save preferred recording and editing settings—colors, layouts, and styles—so every course video matches your brand effortlessly.
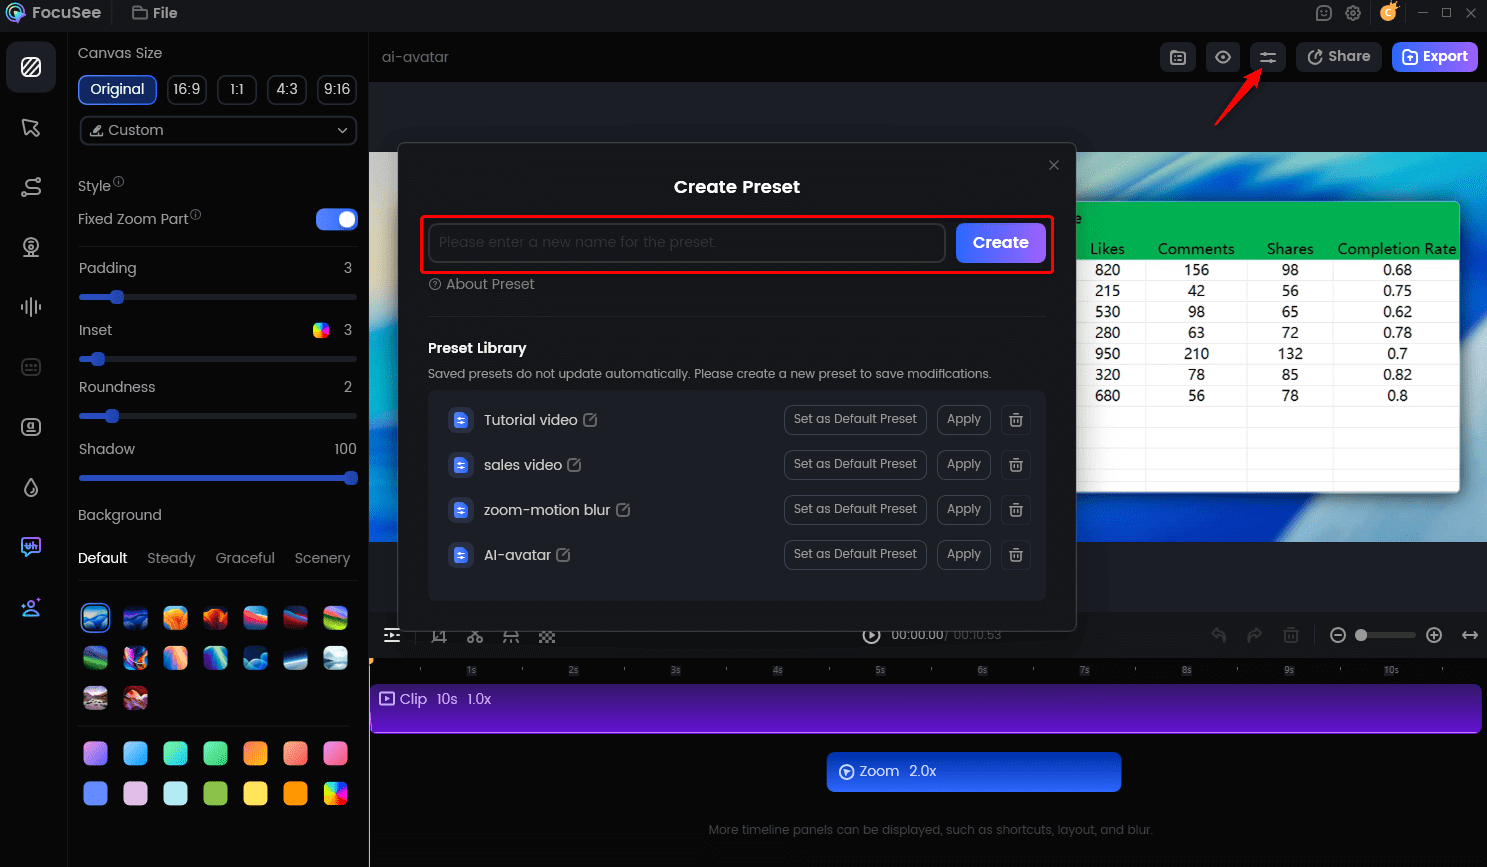
Create Your Presets
Problem: Mobile or multi-platform content is tricky.
FocuSee supports recording from desktops and mobile devices (iOS & Android) and exports in multiple formats and aspect ratios, making it easy to reach learners on any platform.
With FocuSee, solo creators can produce polished, engaging course videos quickly, focusing on teaching instead of spending hours on manual editing and post-production.
The Best Settings for Recording Course Videos: A Technical Cheat Sheet
Choosing the right settings ensures your videos are high quality and compatible with all major course platforms like Teachable, Udemy, and Kajabi. Here are the ideal settings that balance quality with manageable file sizes.
Course Platform Export Settings
- Resolution: 1920×1080 (1080p). This is the industry standard for Full HD video. It provides a crisp image without creating excessively large files.
- Frame Rate: 30 fps (frames per second). This provides smooth motion and is the standard for most online video.
- Export Format: MP4 (with H.264/AVC Codec). This combination is universally compatible and offers an excellent balance of high quality and small file size, which is ideal for managing video compression and upload speeds.
For accessibility, adding captions is crucial. Most modern course platforms have built-in tools that can auto-generate captions from your video’s audio.
FAQs about Recording Online Course Videos
How long should each course video be?
Aim for 5-12 minutes per video. This range is ideal for maintaining student engagement. It is better to break a complex 30-minute topic into three 10-minute videos than to create one long lesson.
When should I be on camera versus showing slides or a screencast?
Use a “talking head video” (you on camera) for introductions, conclusions, and to explain core concepts or stories to build a personal connection. Use a screencast for any software demonstrations. Use slide narration for data-heavy presentations or to display specific text and graphics.
What are the most common mistakes first-time creators make?
Three mistakes are the most frequent. First, neglecting audio quality, poor sound causes students to tune out faster than anything else. Second, creating inconsistent videos; using the ‘Locked Baseline’ method solves this. Third, trying to make every lesson perfect on the first take. It is more efficient to record with a few small mistakes and edit them out later.
Conclusion
Creating a professional online course is not about having a Hollywood budget. It’s about having a smart process. By focusing on a few key elements—a budget-friendly gear setup, an intentional recording space, and a consistent baseline—you can eliminate most of the technical friction.
The final hurdle for most creators is the time-consuming process of manual video editing. This is where modern software can make the biggest difference. An AI-assisted tool can automate the most tedious parts of editing, letting you focus on your content, not the software.
If that final editing step is what’s holding you back, consider exploring a tool built for efficiency. Download FocuSee to see how you can record, edit, and produce professional-quality course videos in a fraction of the time.