What macOS Video Recorder Should I Use to Capture App Demos with Click Highlights and Zoom Effects?

Recording a product demo is easy. Creating one that viewers can actually follow is much harder.
Without click highlights and zoom effects, important actions get lost in crowded dashboards, leading to confusion, follow-up questions, and longer onboarding times.
The right macOS screen recorder can automatically track your cursor, highlight clicks, and guide viewer attention—without requiring hours of manual editing.
This guide compares the best Mac tools for recording software demos and shows how to create a polished walkthrough in minutes.
Choosing the Best Mac App for Recording Software Demos
Most users comparing Mac screen recorders end up choosing between three options: automated tools like FocuSee, professional editors like ScreenFlow, and free recording software such as OBS Studio. The biggest difference is how much work happens after recording.
FocuSee automates click highlights, cursor tracking, zoom effects, captions, and basic editing tasks, making it ideal for SaaS demos, onboarding videos, and customer walkthroughs where speed matters.
ScreenFlow provides complete timeline control for advanced editing, motion graphics, and multi-track projects. The trade-off is a longer production process and a steeper learning curve.
Free tools can reduce software costs but often increase production time. QuickTime Player is simple and lightweight, but lacks click highlights, cursor tracking, annotations, and zoom effects, making complex workflows harder for viewers to follow. OBS Studio is far more powerful, but requires manual scene setup, audio configuration, and post-production work. For teams producing demos regularly, the additional setup and editing can quickly become a bottleneck.
The best choice depends on your priorities: speed and automation, advanced editing control, or maximum flexibility at no cost.
| Success Rate | Time Cost | Technical Skill | System Impact | |
| FocuSee (Automated Recorder) | High | Low | Low | Moderate |
| ScreenFlow (Timeline Editor) | High | High | High | Moderate |
| OBS Studio (Free Recorder) | Medium | High | High | Low–Moderate |
| QuickTime Player (Built-in Recorder) | Low | Low | Low | Low |
Best macOS Video Recorder to Capture App Demos with Click Highlights and Zoom Effects
For most SaaS teams, recording is rarely the bottleneck. Editing is.
With traditional tools such as OBS Studio or ScreenFlow, creating a polished product demo often means manually adding zoom effects, highlighting important clicks, trimming pauses, and generating captions after recording. Even a short 3–5 minute walkthrough can easily require 20–60 minutes of post-production work.
FocuSee takes a different approach by automating much of that process. Instead of treating recording and editing as separate tasks, it automatically transforms a raw screen recording into a presentation-ready demo.

Show Mouse Cursor
The Biggest Advantage: Less Editing, Faster Delivery
In my testing, the largest time savings come from three automated features working together:
- Auto Zoom and Smart Focus automatically emphasize clicks and important UI actions without manual keyframing.
- Cursor Tracking keeps viewer attention focused on the exact area of the screen being discussed.
- AI Captions can generate subtitles in more than 55 languages, eliminating the need to create captions manually for most tutorial videos.
For teams producing onboarding tutorials, feature announcements, or customer support walkthroughs, these automations can reduce production time dramatically. A demo that might take 30–60 minutes to polish in a traditional editor can often be prepared in under 10 minutes.
The result is not just faster editing—it is better viewer comprehension. Instead of scanning an entire dashboard, viewers immediately know where to look and what action is being performed.
Where Automation Still Needs Human Review
Automation handles most of the repetitive work, but it is not perfect.
- Subtitle Accuracy: Technical product names, API terminology, and industry jargon may require manual corrections.
- AI Audio Trimming: Smart Cut can occasionally remove pauses too aggressively, making narration sound less natural.
- Auto-Zoom Adjustments: Complex dashboards or large data tables sometimes benefit from manually slowing down or repositioning zoom effects.
These issues are generally quick to fix, but they are worth reviewing before publishing a customer-facing demo.
For most SaaS marketers, customer success teams, and founders, the trade-off remains favorable. Instead of spending time building zoom animations and click effects manually, you spend a few minutes reviewing automated edits and exporting the final video.
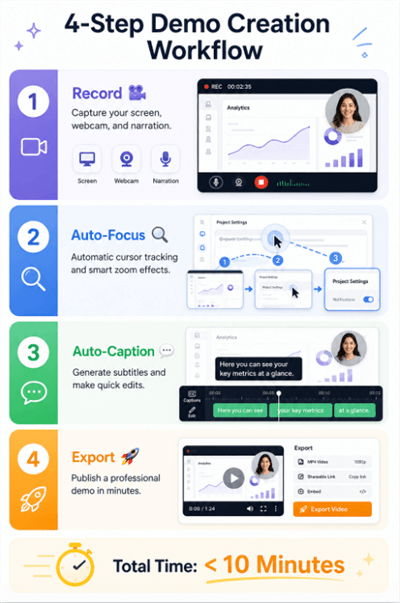
Step-by-Step Workflow: From Recording to Client-Ready Demo
“Automated” does not mean “instant.” Here is exactly what the workflow looks like when using an automated cursor-tracking tool, and how long it actually takes to produce a 3-minute onboarding video.
Product Demo Creation Workflow
Step 1: Setup and Record (Minutes 0–3)
Select your browser window and activate your webcam overlay (picture-in-picture). Ensure your microphone is selected.
Recording in high resolution with live cursor tracking will drain your Mac’s battery faster than standard QuickTime capture. Keep your MacBook plugged in during high-stakes client demos. Hit record and walk through your software.
Step 2: Auto-Zoom Adjustments (Minutes 3–5)
Once you stop recording, the software instantly generates a timeline with all your clicks highlighted. Click through the timeline to review the auto-zooms. If the AI zoomed in too tightly on a dense dropdown menu, use the sidebar to widen the zoom box or slow down the transition animation.
Step 3: Caption Cleanup (Minutes 5–7)
Toggle on the auto-generated captions. Skim through the text blocks and correct any misspelled SaaS jargon or company names. Adjust the background padding of the text so it does not block critical UI elements at the bottom of your screen.
Step 4: Export (Minute 8)
Click the export button, apply your preferred quality settings, and wait for the render. A highly polished, zoom-enabled video is ready to upload to your knowledge base in under 10 minutes.
Expert Workflow: Exact Export Settings for Sharp UI Text
Here is a critical expert insight that most other guides overlook: many marketers struggle because their UI text becomes a blurry, unreadable mess when uploaded to Zendesk or embedded in an email.
To fix this, you must stop treating your video like a passive screen capture and start treating it like a high-fidelity visual asset.
GOLDEN RULE: The 4K Downscaling Trick
Do not rely on digital scaling during recording. Your product demo should be recorded at a higher-than-delivery resolution—ideally 1440p or 4K—directly on a high-resolution Mac monitor or Studio Display.
Once you have captured crisp 4K footage, you must punch the correct settings into your export window to ensure the downscaling works properly. Use these exact settings for professional results:
- Resolution: 1080p (Downscaled from your 4K source file). This ensures the UI text remains incredibly crisp in standard web browser players.
- Framerate: 60fps. This is non-negotiable. Recording at 30fps makes cursor movements look laggy and distracting. 60fps provides buttery-smooth mouse tracking.
- Codec: H.264 (for the widest compatibility across PC and Mac users) or HEVC (for smaller file sizes if sharing exclusively within an Apple ecosystem).
- Bitrate: 15 Mbps to 20 Mbps. This is the “high bitrate” sweet spot. Anything lower than 10 Mbps will introduce compression artifacts, making small numbers in data tables look blocky and blurry.
Quick Technical FAQ for Mac Screen Recording
To ensure your next SaaS demo goes flawlessly, here are the core technical answers to the most critical recording questions.
How do I ensure my SaaS dashboard text isn’t blurry?
Record your screen natively at 1440p or 4K resolution. When you are ready to export, downscale the video to 1080p, ensure the framerate is set to 60fps for smooth cursor movement, and manually set your export bitrate between 15 Mbps and 20 Mbps.
Can I automatically zoom into clicks without manual keyframing?
Yes. Dedicated macOS tools like FocuSee natively track your mouse during the recording phase. During processing, the software recognizes the mouse click events and applies the zoom-and-pan motion automatically, removing the need to plot keyframes on a timeline.
Can I record a webcam overlay and my screen together?
Absolutely. Modern Mac demo tools allow you to capture your screen while utilizing your built-in webcam, or an iPhone connected via Apple’s Continuity Camera, as a picture-in-picture overlay. Including your face helps build trust during async onboarding videos.
Should I use OBS Studio for my product demos?
Generally, no. Unless you are live-streaming a webinar, OBS is overly complex for async product walkthroughs. It lacks automatic post-production features like cursor tracking and AI trimming, meaning you will spend more time configuring the software than actually recording your demo.
Conclusion
Producing engaging SaaS demos without losing hours to manual editing is a common challenge. Relying on passive screen capture like QuickTime frequently leads to confused clients and disjointed async communication.
By choosing a dedicated tool that natively tracks cursor movement and generates screen zooms automatically, you instantly regain control over your workflow. While tools like FocuSee require a paid subscription and occasional manual tweaks to AI subtitles, the trade-off is replacing a tedious video editing timeline with a streamlined, 10-minute workflow. Modern Mac-focused tools consistently update their Apple Silicon hardware acceleration, ensuring your async communication remains fast and reliable as your product evolves.
Stop wrestling with complex video editors. Transition to an automated workflow today to create polished, highly focused product demos that clearly guide your prospects and captivate your audience.