Pan and Zoom Effect: How to Add Cinematic Movement to Videos

The pan and zoom effect is a video editing technique that creates the illusion of camera movement by smoothly zooming into, zooming out of, or moving across visual content. Commonly known as the Ken Burns effect, it is widely used in presentations, tutorials, documentaries, and marketing videos to highlight key details and keep viewers engaged.
While the effect looks simple, creating smooth pan and zoom animations often requires manual keyframes, precise timing adjustments, and extensive editing experience. As a result, many creators find the process time-consuming and difficult to master.
This guide explains what the pan and zoom effect is, why it works so well for audience engagement, and how to add it to your videos using both traditional editing software and modern AI-powered solutions.

What is Pan and Zoom
What Is the Pan and Zoom Effect?
The pan and zoom effect is a technique that creates the illusion of camera movement by smoothly zooming or moving across images, videos, slides, and screen recordings. It helps emphasize key details, guide viewer attention, and make static content more engaging.
Widely used in tutorials, presentations, documentaries, and social media videos, pan and zoom effects can transform otherwise static visuals into a more dynamic viewing experience.
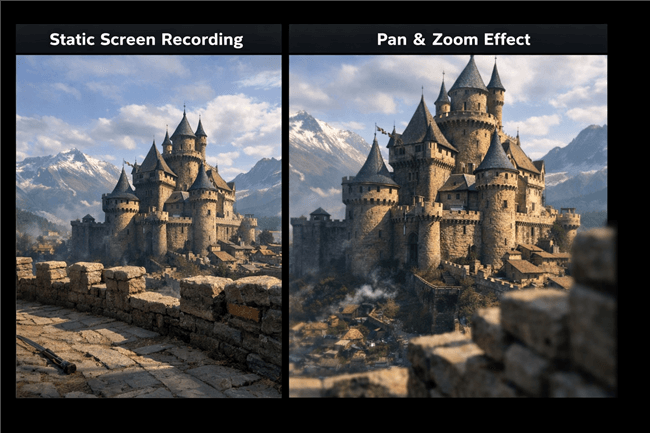
Static Footage vs. a Dynamic Pan and Zoom effect
Related Article: How to Create a 3D Camera Effect >
How to Add Pan and Zoom Effects to Video – 3 Methods
Before starting your edit, you must choose the right tool for the job. Historically, you had to choose between difficult professional software or oversimplified slideshow makers. Today, there are three distinct paths: the Manual Pro Method, the “Middle Ground” (Canva/CapCut), and Specialized Automation.
Method 1. The Manual Method (The Professional Way)
Manual editing involves using NLE (Non-Linear Editing) software like Adobe Premiere Pro, DaVinci Resolve, or Final Cut Pro. This relies on motion keyframes.
- Pros: Total control over every pixel. You can create complex movements tailored exactly to your narrative.
- Cons: Higher learning curve. It requires understanding how to smooth out motion so it doesn’t look robotic.
How to do it:
In most pro editors (like Premiere Pro), the workflow looks like this:
- Select your clip and open the “Effect Controls” or “Inspector” panel.
- Move your playhead to where you want the movement to start.
- Crucial Step: Click the Stopwatch Icon (Toggle Animation) next to “Scale” and “Position.” This places your first diamond-shaped keyframe.
- Move the playhead forward to where the movement should end.
- Adjust the Scale (zoom in) and Position (pan) numbers. The software automatically places the second keyframe.
- Pro Tip: Right-click the keyframes and select “Ease In/Ease Out” to make the motion smooth rather than mechanical.

Effect Controls
Method 2. The “Middle Ground” (Canva & CapCut)
Most creators today aren’t using Hollywood-level software. If you are making presentations or social media clips, you likely use tools like Canva or CapCut.
For Presentations (Canva):
Canva has democratized the Ken Burns effect.
- Select your photo.
- Click “Animate” in the top menu.
- Choose “Pan” or “Photo Flow”.
- Limitation: You have less control over exactly where the zoom finishes compared to professional software, but it is instant and free.
For Social Media (CapCut):
CapCut bridges the gap between manual and easy.
- Select your clip on the timeline.
- Tap the Diamond Icon (Keyframe) under the video preview.
- Scroll forward, then pinch and drag the video image with your fingers to zoom/pan.
- CapCut automatically calculates the movement between the two diamonds.
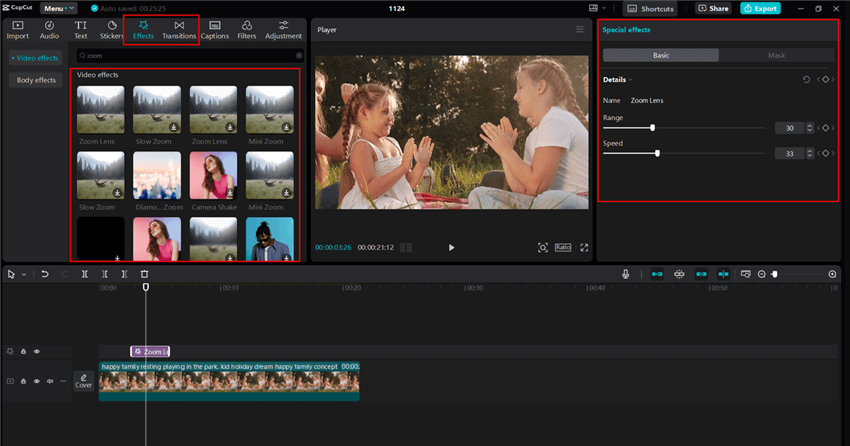
CapCut Zoom Effects
Method 3. The Automated Method (Automating Pan and Zoom with FocuSee)
Many users search for how to add a pan and zoom effect, but quickly run into problems: keyframes are confusing, motion can look unnatural, and editing takes too much time. If you’re creating tutorials or demos, manual keyframing is often too slow. Instead of manually setting zoom points, tools like FocuSee automatically apply pan and zoom effects based on your cursor movement and clicks, making it one of the most efficient ways to add cinematic motion to screen recordings without any editing skills.
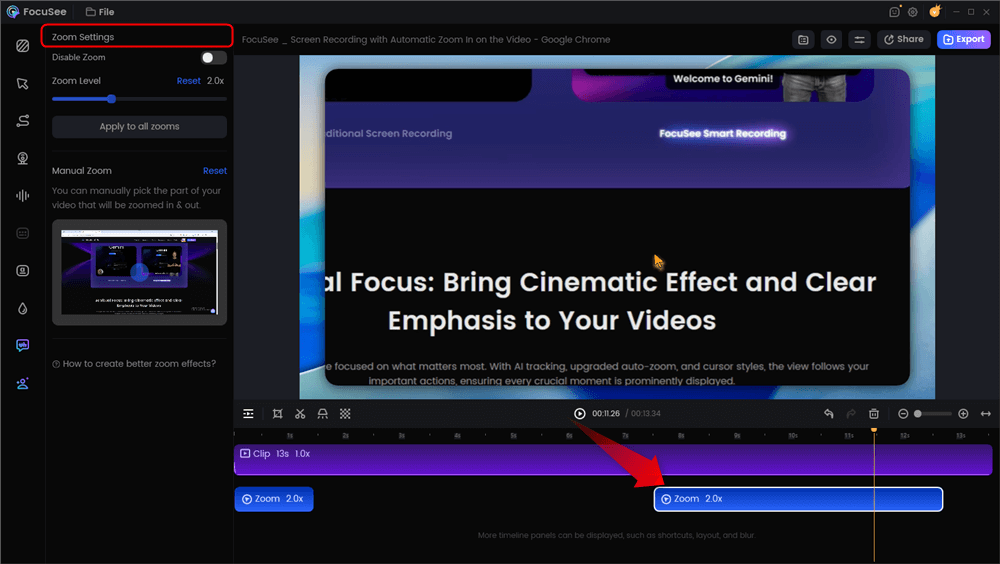
Automatic Zoom Effects
Important Distinction: FocuSee is not a photo editor. If you are creating a documentary that incorporates historical photos, use the Manual or Canva methods outlined above. But if you are recording a software demo, FocuSee automates the heavy lifting.
Addressing the Engagement Gap
The primary struggle with screen recordings is that viewers often struggle to follow a small cursor on a high-resolution screen. FocuSee addresses this via Smart Focus & Auto-Zoom.
- Automatic Tracking: Instead of manually setting keyframes every time you click a button, the software detects the click and zooms in automatically.
- Cursor Effects: To further ensure the audience knows where to look, it applies customizable Mouse Highlights.
From Recording to Polish
Unlike standard screen recorders that produce a flat video file, FocuSee treats the cursor data as a roadmap for the camera. You record your screen as usual, and the software handles the post-production—adding smooth zoom-in and zoom-out effects that would otherwise take considerable time to animate manually.
Key Features for Engagement:
- Smart Focus: Automatically detects meaningful action on screen.
- Auto-Zoom: Smoothly scales into the area of interest.
- Motion Blur: Adds a cinematic feel to the movement, reducing the harshness often seen in manual edits.
Below is the effect of applying Pan and Zoom after I recorded my screen with FocuSee.
- Pros: Immediate results. It “edits” the video while you record.
- Cons: Designed specifically for screen recordings, not photo slideshows or cinematic films.
Comparison: Which Method Fits Your Needs?
| Feature | Manual Keyframing | Middle Ground | Automated Smart Zoom (FocuSee) |
| Speed | Slow learning curve; fast once mastered | Very fast | Instant (automated) |
| Difficulty | High (stopwatches & curves) | Low (drag & drop) | None (automatic) |
| Precision | Pixel-perfect control | Good control (CapCut) /basic (Canva) | Predictive/algorithmic |
| Best For | Narrative films, documentaries | Social media, slide decks | Software tutorials, demos |
If you have the time to master professional software, the manual method offers unlimited creative freedom. However, if you are an educator prioritizing content delivery over editing mechanics, or a creator needing a quick social post, the “Middle Ground” or Automated tools are likely your best bet.
What is Pan and Zoom? (Definitions & Best Practices)
To use these tools effectively, it is helpful to understand the mechanics behind the magic. What is pan and zoom? In digital editing, it is the process of simulating camera movement on a static clip or image.
- Pan (Panning): Moving the frame horizontally or vertically across the image (e.g., sliding from left to right). This mimics a camera operator swiveling the camera on a tripod.
- Zoom: Changing the focal length to make the subject appear closer (zoom in) or further away (zoom out).
When applied to still photography, this is famously known as the Ken Burns effect, named after the documentary filmmaker who used it to bring historical photos to life. By slowly panning across a vintage photograph while simultaneously zooming in, Burns created a sense of depth and emotion that a static image lacks.
The Resolution Trap
Here is a critical tip that most beginners miss: Digital zoom is fundamentally different from optical zoom.
- Optical Zoom: Uses physical lenses to magnify the subject without losing quality (what cameras do).
- Digital Zoom: Uses software to crop and stretch the image (what you do in editing).
Why does this matter?
If you zoom in 200% on a standard 1080p video, the result will look pixelated and blurry because you are effectively displaying a 540p image on a 1080p canvas.
To maintain professional quality, you must start with high-resolution footage. Using a 4K source file allows you to zoom in significantly (up to 200%) while still maintaining a crisp 1080p output. This is the secret to why professional videos look sharp even when zoomed in, while amateur videos often turn blurry.
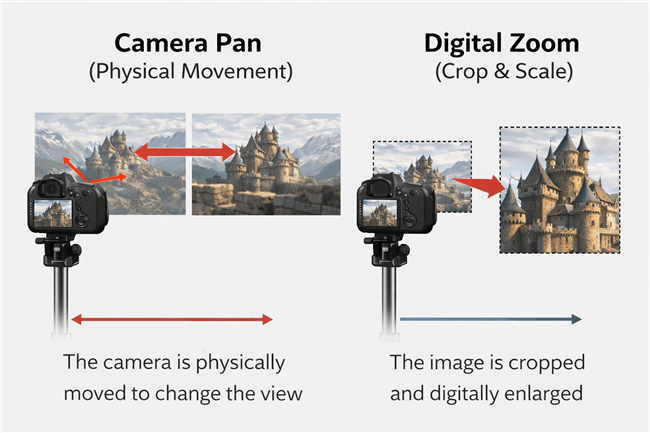
Camera Pan vs Digital Zoom
Why Your Pan and Zoom Animation Looks Amateurish
Even with the right tools, poor technique can ruin the viewer’s experience. Understanding common pitfalls helps you create cinematic movement rather than a chaotic slideshow.
Mistake 1: The “Yo-Yo” Effect
Rapidly zooming in and out creates a jarring visual experience that can actually cause motion sickness.
Use pan and zoom animation sparingly. If you zoom in to highlight a menu item, hold that frame long enough for the viewer to read it before zooming out. Think of the camera as a human eye—it doesn’t dart around randomly; it focuses intently.
Mistake 2: The Vertical Video Mismatch
Creating content for TikTok or Reels (9:16 aspect ratio) often involves using horizontal source footage. Beginners often just shrink the video to fit, leaving black bars.
Use the Pan tool to scan horizontally across the image. Instead of showing the whole wide image at once (which makes details tiny), zoom in to fill the vertical screen and “pan” the camera from left to right to reveal the full scene over time.
Mistake 3: Robotic Motion (Linear Keyframes)
In manual editing, placing two keyframes creates a linear path—a robot moving from point A to point B at a constant speed. This feels unnatural.
Professional motion graphics use “easing” (slowing down the start and end of the movement) to mimic the physics of a real camera operator. If using Premiere or CapCut, look for the “Ease In/Out” or “Graphs” feature.
Mistake 4: Aggressive Cropping
As noted in the previous section, zooming in too far destroys image quality. A good rule of thumb is never to scale a raster image (like a JPEG or PNG) beyond 120% unless it is significantly higher resolution than your project sequence. Subtle, slow movements generally feel more cinematic and professional than deep, aggressive zooms.
Frequently Asked Questions About Pan and Zoom Effects
What is pan and zoom in video editing?
Pan and zoom is a technique that creates the illusion of camera movement by moving across a frame (pan) or changing its magnification (zoom). It is commonly used to make static images, videos, and screen recordings more engaging.
What is the difference between pan and zoom?
A pan moves the viewer’s perspective horizontally or vertically across a scene, while a zoom changes the size of the subject by moving closer or farther away. These effects are often combined to create smooth cinematic motion.
Is panning the same as zooming?
No. Panning changes the viewing position across the frame, whereas zooming changes the scale of the image. Both help direct viewer attention, but they achieve it in different ways.
What is the easiest way to add pan and zoom effects?
The easiest method is to use automated tools that generate pan and zoom effects for you, eliminating the need for manual keyframing and timeline adjustments.
What is the best tool for adding pan and zoom to screen recordings?
For screen recordings, tools like FocuSee can automatically follow cursor movements and apply zoom effects, making tutorials and demos easier to create.
Does zooming reduce video quality?
Digital zoom can reduce image quality because it crops into the original footage. To maintain sharp results, record in a higher resolution, such as 4K, before applying zoom effects.
Conclusion
Mastering the pan and zoom technique is about more than just movement; it is about directing attention and storytelling. You don’t need a film school degree to stop the viewer drop-off—you simply need to understand the fundamentals of resolution and choose the workflow that matches your skill level. Whether you are using keyframes in CapCut, the “Animate” button in Canva, or automated tracking for tutorials, the goal remains the same: guiding your viewer’s eye.
Remember the three golden rules:
- Source Matters: Always start with the highest resolution possible (4K is ideal) to avoid the “Resolution Trap.”
- Keep it Smooth: Avoid rapid, jerky movements. Cinematic motion is slow, deliberate, and easy.
- Choose the Right Tool: Don’t struggle with complex software for a simple slideshow. Use Canva for photos, CapCut for social, and tools like FocuSee for screen recordings.
If you are ready to solve the “static content” problem for your tutorials immediately, you don’t need to spend hours learning complex timeline editors. Tools like FocuSee can automate the process, giving you the polish you need without the frustration. Download FocuSee today to regain control of your audience’s attention and create videos that truly stand out.