Mastering DaVinci Resolve Pan and Zoom: The Ultimate 2026 Guide

Adding movement to static footage is essential for engaging videos, but pan and zoom in DaVinci Resolve can be confusing for beginners. Many users struggle to get smooth results, often ending up with shaky or unprofessional motion.
If you’ve tried adding movement but found it too complex or time-consuming, you’re not alone. This guide helps you understand the key tools and workflows to create smooth, professional pan and zoom effects without overcomplicating the process.
Mastering DaVinci Resolve Pan and Zoom
Further Reading: How to Master Pan and Zoom in Premiere Pro >
Method 1: The Quick “Ken Burns” Effect with Dynamic Zoom
For those committed to working within DaVinci Resolve, the most accessible entry point is the Dynamic Zoom tool. Often referred to as the Ken Burns effect, this feature automates the movement between two frames.
In my testing, I found this tool best suited for rapid turnarounds on slideshows. However, be aware: Many users default to Dynamic Zoom because it’s fast, but generic settings offer limited control over easing and direction.
How to Activate Dynamic Zoom
Step 1. Select your clip in the Edit Page timeline.
Step 2. Open the Inspector panel (top right corner of the interface).
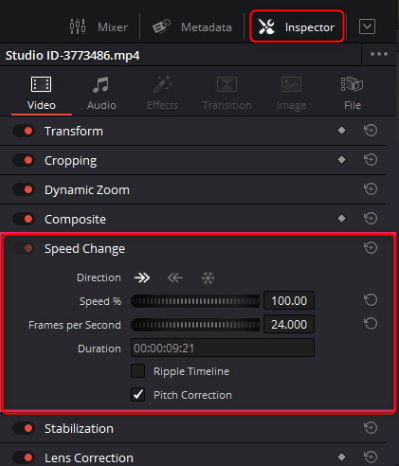
Inspector panel
Step 3. Scroll down to the Dynamic Zoom section and toggle the switch to ‘On’.
Step 4. In the bottom left of the Timeline Viewer, change the dropdown menu from ‘Transform’ to ‘Dynamic Zoom’.
You will see two colored boxes overlaying your footage:
- Green Box: Indicates the Start Position.
- Red Box: Indicates the End Position.
By dragging these boxes, you define the animation path.
The “Swap” Button Trick
A common frustration occurs when you meticulously set your boxes, play the clip, and realize the camera is zooming out when you wanted it to zoom in.
Don’t redraw the boxes. In the Inspector panel, under the Dynamic Zoom section, simply click the Swap button. This instantly reverses the animation direction, saving you time and frustration.
While this is the fastest way to zoom in and out in DaVinci Resolve, users eventually find this method “robotic” because the speed of the zoom is constant—it lacks the acceleration and deceleration that makes motion feel natural to the human eye.
Method 2: Cinematic Control Using Inspector Keyframes
When you realize that Dynamic Zoom cannot deliver the specific emotion or timing you need, it is time to switch to manual keyframing. This is the definitive method for achieving cinematic motion. It involves manually telling DaVinci Resolve exactly where the clip should be positioned and how large it should be at specific points in time.
For professional results, Inspector keyframes provide better precision for most use cases. Here is the procedure to fix “jumpy” or robotic zooms using the Inspector transform controls.
The Manual Keyframe Workflow
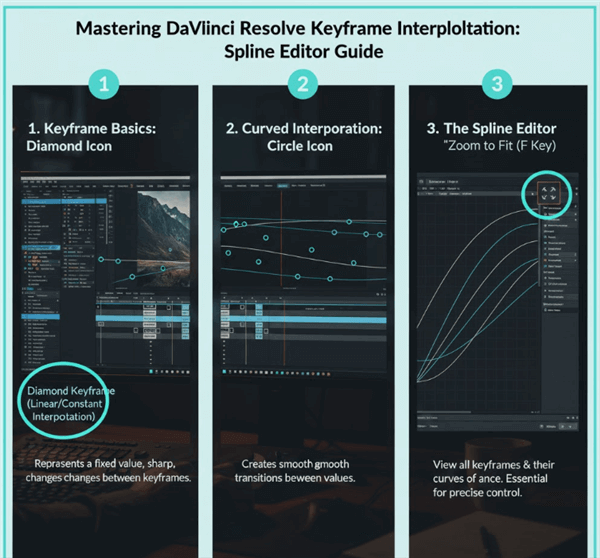
- Set the Start: Place your playhead where the move should begin. In the Inspector under the Transform section, click the small Diamond icons next to Zoom and Position. These diamonds will turn red, indicating a keyframe has been set.
- Set the End: Move the playhead to the point in the timeline where the move should finish. Adjust the Zoom and Position X/Y values to frame your subject. A new keyframe is added automatically.
Smoothing the Motion (The Secret Sauce)
If you play back your clip now, the motion will likely look mechanical. This is because the movement is linear—it starts and stops abruptly at full speed. To fix this, you must smooth the animation curve using the Spline Editor.
Note: This is where most beginners get stuck because the UI buttons are small and easily confused.
Timeline View Distinguishing
Open the Curve Editor: Look at your clip on the timeline. On the bottom right of the clip, you will see two tiny icons. Do not click the diamond. Click the icon that looks like a small squiggly line (curve). This opens the timeline curve editor.
Select the Property: By default, you might not see your keyframes. Click the dropdown menu in the curve editor (usually labeled “Transform” or similar) and ensure “Zoom” and “Position” are checked.
Zoom to Fit (Critical Step): If you still see a blank grid or a flat line, look for the “Zoom to Fit” icon (usually diagonal arrows) in the center-top of the curve editor panel. Clicking this will force the graph to display your keyframes clearly.
Apply Easing:
- Click and drag a box around the keyframes (the white dots on the graph) to select them.
- Click the “Ease In” and “Ease Out” icons at the top of the curve editor (they look like a flattened ‘S’ curve).
- You can now drag the “handles” on the curve to physically shape the speed of the zoom, making it start slow, speed up, and slow down again.
This adjustment creates the fluid video animation DaVinci Resolve is capable of, transforming a mechanical movement into a professional camera operation. This is the “aha!” moment where content shifts from amateur to premium.
DaVinci Resolve Pan and Zoom: Choosing the Right Workflow
It’s important to choose the right DaVinci Resolve pan and zoom workflow for your project. Many beginners assume manual keyframing is always the best option—but in reality, the ideal method depends on how you balance speed vs. control.
For creators producing regular content, the decision often comes down to using DaVinci Resolve’s built-in tools or switching to automated solutions for faster results.
Comparing the Workflows
To help you decide which path to take, we have broken down the three primary methods based on speed, precision, and intended use case.
| Method | Speed | Precision | Curve (Difficulty) | Ideal Use Case |
| Dynamic Zoom | Fast | Low | Low | Quick slideshows or basic Ken Burns-style photo motion |
| Manual Keyframes (Edit Page) | Slow | High | Moderate–High | Narrative films, documentaries, cinematic motion with custom easing |
| Automated Solutions (FocuSee) | Instant | High (Auto) | Low | Screen recordings, software tutorials, cursor-tracked demos |
If you’re working on cinematic content, mastering DaVinci Resolve pan and zoom manually is essential. However, for tutorials or demos—where clarity matters more than artistic control—manual keyframing often becomes a time-consuming bottleneck.
The Efficiency Hack: Automating Pan and Zoom for Tutorials
For screen recordings and software demos, manually creating DaVinci Resolve pan and zoom effects—especially when tracking cursor movement—can quickly become inefficient and repetitive.
If your goal is smooth motion without dealing with complex tools like the Spline Editor, automated solutions provide a much faster path.
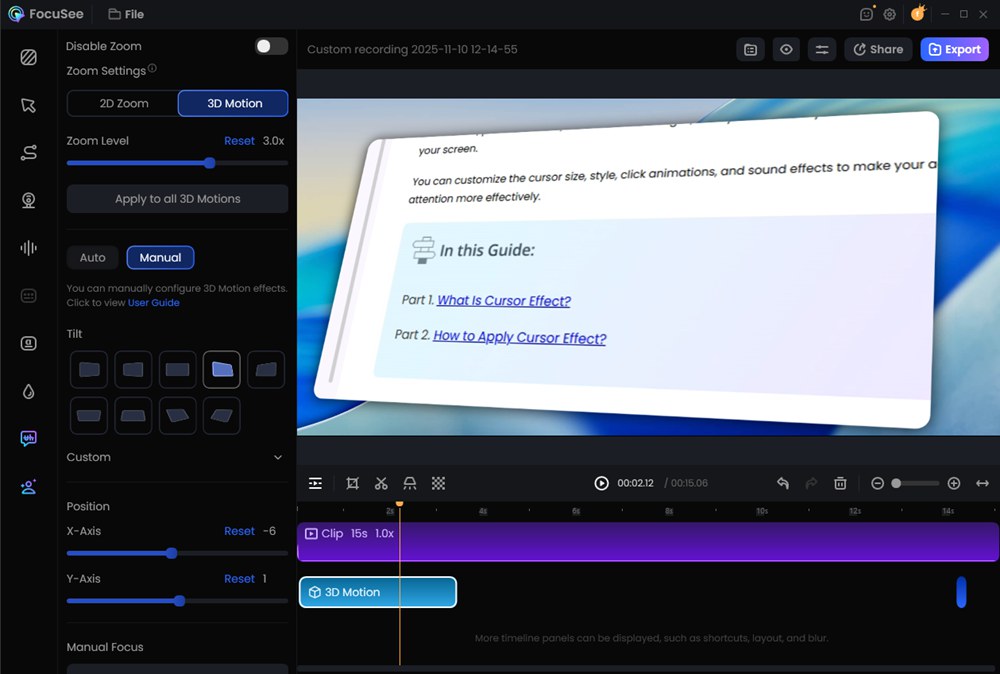
Tools like FocuSee are designed to simplify DaVinci Resolve pan and zoom-style workflows for instructional content. Instead of manually animating every movement, FocuSee uses Smart Focus and Auto-Zoom to detect on-screen activity and apply motion automatically.
Add Pan and Zoom Effect on FocuSee
What Makes FocuSee Different?
- 2D Smart Zoom: Automatically applies clean, smooth zoom-ins and zoom-outs to highlight key areas—similar to traditional pan and zoom, but without manual keyframes
- 3D Motion Effects: Adds depth and perspective-based movement, making screen recordings feel more dynamic and less flat compared to standard 2D edits
- Cursor Tracking & Highlighting: Follows mouse movement and adds visual emphasis, so viewers never lose focus
Instant Workflow: Eliminates repetitive keyframing, turning hours of editing into minutes
In short: use DaVinci Resolve pan and zoom for full creative control, and automation tools like FocuSee when speed, clarity, and scalability matter most.
Why Consider FocuSee as an Alternative?
- Instant Polish: Bypasses the need for manual keyframing entirely.
- Visual Clarity: Automatically highlights the active area so viewers don’t get lost on a busy screen.
- Workflow Speed: Ideal for creators who need to churn out instructional content where clarity trumps cinematic expression.
Pro Tips: Preventing Blur and Managing Resolution
A common obstacle creators face is degrading image quality. You might execute a perfect pan and zoom DaVinci Resolve animation, only to find the result looks pixelated or soft. This usually happens because you are zooming in past the native resolution of your footage.
Here’s a critical tip that most other guides miss, and it’s something I learned the hard way: Starting with higher-resolution media is critical to maintaining image sharpness during zooms. For example, if you are editing on a 1080p (HD) timeline, you should ideally use 4K source footage.
The Resolution Math
When you take a 1080p clip on a 1080p timeline and zoom in and out DaVinci Resolve by 200%, you are digitally enlarging the pixels, causing blur. However, a 4K clip is four times the size of a 1080p frame. You can zoom a 4K clip up to 200% on an HD timeline without losing any genuine quality, as you are simply displaying the pixels that were already there.
Cut Page vs. Edit Page vs. Fusion
- Cut Page: Offers a “Close Up” button for instant zooms, but lacks control.
- Edit Page: The standard for video animation DaVinci Resolve workflows.
- Fusion Page: While the Edit page is sufficient for 90% of tasks, Fusion pan and zoom workflows should be reserved for complex compositing or when you need to animate multiple layers in 3D space. Stick to the Edit page for standard cuts to keep your project efficient.
DaVinci Resolve Pan and Zoom FAQ
How do I add pan and zoom in DaVinci Resolve to photos?
The process for photos is identical to video. Import your image, place it on the timeline, and use either Dynamic Zoom for a quick effect or Inspector Transform keyframes for precision. Ensure your photo resolution is high enough to withstand the zoom without pixelation.
Why does my zoom look choppy in DaVinci Resolve?
Choppy playback usually stems from two causes. First, your hardware may be struggling to render the effect in real-time; try enabling “Render Cache” in the Playback menu. Second, if the motion itself looks jerky, you likely haven’t applied easing (smoothing) to your keyframes in the spline curve editor as detailed in Method 2 above.
What is the difference between Cut Page and Edit Page for zooming?
The Cut Page offers a streamlined interface for quick edits and includes the “Close Up” feature, which automatically zooms into the center of a frame. However, for detailed DaVinci Resolve pan zoom tutorial workflows involving custom paths and easing, the Edit Page provides the necessary Inspector controls that the Cut Page hides for simplicity.
Can I use Fusion for Pan and Zoom?
Yes. Fusion pan and zoom is powerful but complex. It is best used when you need to track a moving object and zoom into it simultaneously, or when integrating text and VFX into the zoom movement.
Conclusion
Mastering the DaVinci Resolve pan and zoom workflow is about choosing the right tool for the job. The journey involves moving away from the robotic feel of linear motion and embracing the control of Inspector keyframes and the Spline Editor for cinematic results. By understanding the difference between scale and position and applying proper easing, you can eliminate “jumpy” footage and produce professional-grade video.
However, remember that manual keyframing is a time investment. If your goal is purely instructional—creating tutorials or demos where clarity trumps cinema—manual keyframing can be an unnecessary drain on your resources.
Ready to streamline your screen recording workflow?
If you want to bypass the timeline entirely and get instant, polished zooms on your software demos, try FocuSee for free today. It automatically handles the heavy lifting of pan and zoom, allowing you to focus on your message, not the edit.