Camera Movement Templates for After Effects: How to Use Them Without Manual Keyframing
Staring at a timeline while a deadline looms is a familiar stress for any video editor. You know your project needs that polished, cinematic feel, but manual keyframing often results in robotic, shaky motion that looks amateur rather than professional. “I don’t have time to build camera animations from scratch” is not just a complaint; it is a reality for creators managing tight turnarounds.
This guide focuses on ready-made camera movement templates and presets for After Effects—what they are, how to apply them safely, and when templates are actually the wrong tool.
The Professional Workflow: Implementing Camera Movement Correctly
Many editors download a camera movement pack expecting instant results, only to find their project becomes unmanageable. The most common error is “stacking” presets—applying a shake effect on top of a zoom preset on the same layer. This breaks the 3D coordinate system, causing the camera to flip or drift unpredictably.
To use these tools like a pro, you must first understand what you have downloaded, and then separate the movement data from the camera itself using a specific hierarchy.
Phase 1: Identify Your File Type (.ffx vs .aep)
Before you open your timeline, you need to know how your template was packaged. This dictates your workflow.
- Presets (.ffx): These are effect files containing saved keyframes or expressions. You install them via the “Effects & Presets” panel. They are lightweight but rely on you setting up the layer structure correctly first.
- Project Templates (.aep): These are full After Effects project files. They usually contain a “Controller” layer or a pre-built Null structure with keyframes already applied. You generally copy the keyframes from these projects and paste them into your own.
Phase 2: The Null Object Camera Rig Technique
Consider Sarah, a marketing video editor producing weekly explainer videos. She previously wasted hours trying to smooth out manual keyframes. Her breakthrough came when she stopped animating the camera directly and started using a null object camera rig.
Here is the standard industry procedure to ensure stability and successful ingestion of the template:
Step 1. Create a Camera: Navigate to Layer > New > Camera. Select a “Two-Node” camera. This creates a camera with a “Point of Interest,” making it easier to target specific elements in your scene.
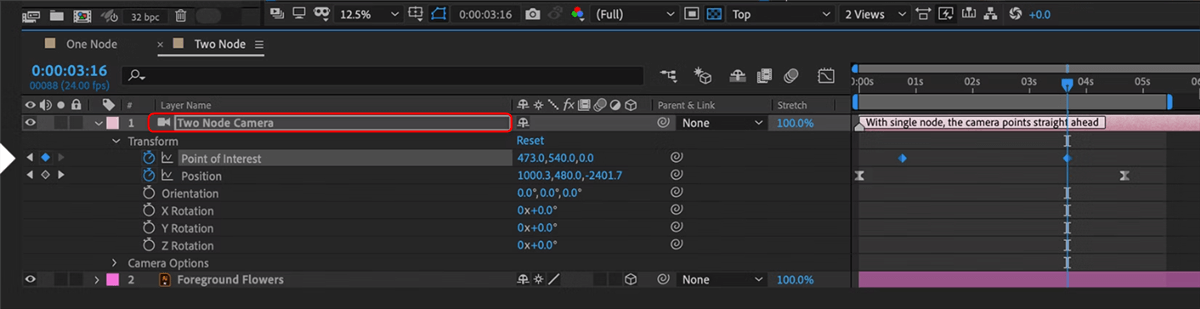
Two-Node Camera
Step 2. Create a Null Object: Go to Layer > New > Null Object. This invisible layer will act as the “driver” for your camera. Crucially, enable the “3D Layer” switch (the cube icon) for this Null. If you skip this, the camera cannot track it in 3D space.
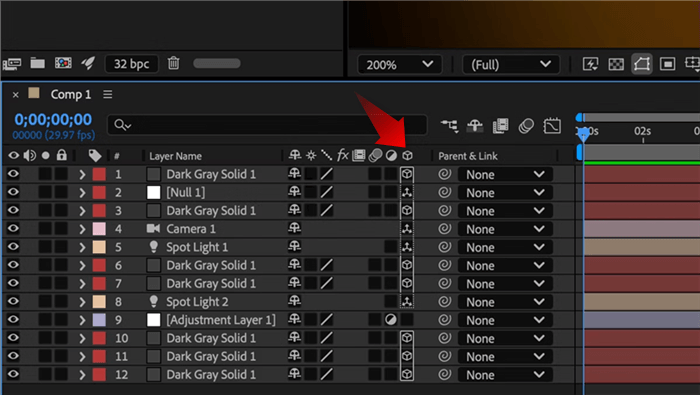
Click the cube Icon
Step 3. Parenting: In the timeline, identify the “Parent & Link” column. Click the pick whip (spiral icon) on the Camera layer and drag it to the Null Object. Now, wherever the Null moves, the camera follows.
Step 4. Apply the Template: This is where most tutorials leave you hanging. Depending on your file type (from Phase 1), follow Method A or Method B:
- Method A (Using .ffx Presets): Select your Null Object in the timeline. Go to your Effects & Presets panel, locate your installed camera preset (e.g., “Smooth Zoom In”), and double-click it. The keyframes will populate directly onto the Null’s transform properties.
- Method B (Using .aep Project Files): Open the template project file in a separate instance of After Effects or import it into your current project. Locate the layer labeled “Camera Control” or “Null.” Select the position/rotation keyframes on that layer, copy them (Cmd+C/Ctrl+C), return to your main composition, select your Null Object, and paste (Cmd+V/Ctrl+V) at the start of your shot.
By applying the motion data to the parent Null, the camera follows the motion smoothly. This leaves the camera’s own transform properties free for additional manual adjustments if necessary. This method provides the control needed to meet output goals without fighting the software.
Common Types of Camera Movement Templates
| Template Type | Best For |
| Smooth Push In / Zoom | Interviews, explainers |
| Orbit / Parallax Move | Product showcases |
| Whip Pan | Transitions |
| UI Focus Zoom | App demos |
| Subtle Handheld | Documentary style |
If you’re searching for camera movement templates mainly for screen recordings or software demos, it’s worth pausing here.
Decision Matrix: Manual Keyframing vs. Templates vs. Automated Tools
For editors like Sarah, the choice between manual animation, After Effects camera presets, and automated software usually comes down to three factors: time cost, technical skill, and consistency.
Building a 3D camera movement from scratch offers the highest level of control but demands mastery of Bezier curves and spatial interpolation. Conversely, automated tools offer speed but less granular control.
Use this comparison to decide which tool fits your current project:
| Manual Keyframing | Pre-made AE Templates | Automated Tools (FocuSee) | |
| Primary Use Case | High-end VFX, complex 3D scenes | Music videos, kinetic typography | SaaS explainers, tutorials, demos |
| Time Investment | High (Hours / Days) | Medium (Minutes / Hours) | Low (Seconds / Minutes) |
| Skill Level | Expert (Graph Editor mastery) | Intermediate (Parenting / Layers) | Beginner / Intermediate |
| Consistency | Varies by animator | High (if using same pack) | Very High (Automated) |
| Render Load | Low to Medium | High (Heavy expressions) | Low |
For high-end motion graphics involving complex parallax animation in 3D space, an After Effects template is the industry standard. However, for screen recordings or software demos, the overhead of managing a full camera rig often outweighs the benefits.
The Efficient Alternative for Explainers: FocuSee
While camera motion packs are powerful, they are often overkill for standard explainer videos or SaaS tutorials. Sarah frequently searches for “camera movement templates,” hoping to find a quick solution, but often finds herself bogged down by complex 3D layers just to zoom in on a simple button click.
For this specific use case, FocuSee offers a specialized alternative that replaces the manual camera rig entirely.
Automating the “Smart Focus” Workflow
FocuSee addresses the primary pain point: “I don’t have time to build camera animations from scratch.” Instead of manually keyframing positions, FocuSee’s Smart Focus & Auto-Zoom technology automatically detects cursor clicks and on-screen action, generating smooth zoom-ins and pans instantly.
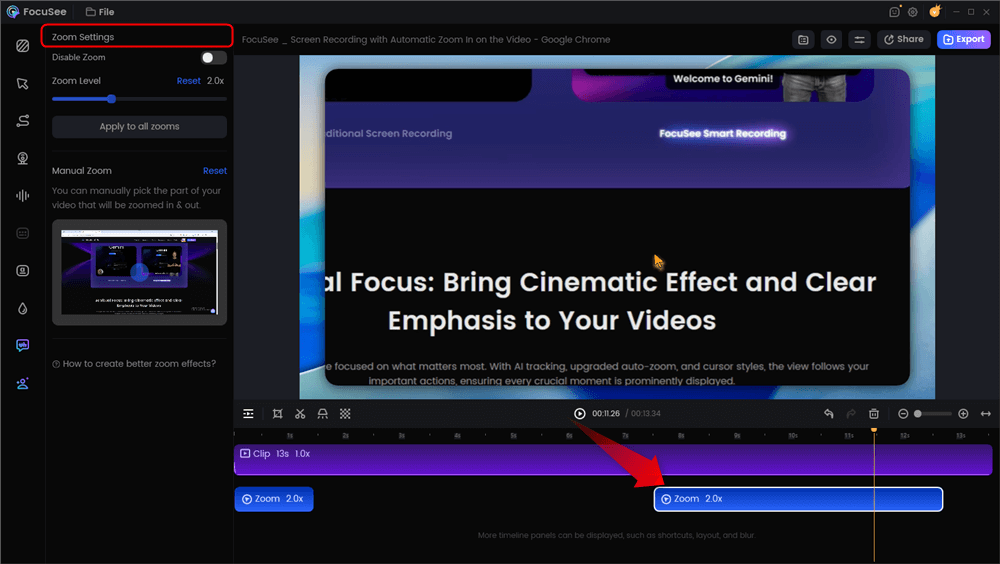
Automatic Zoom Effects
This creates a cinematic, polished look without the rendering time associated with After Effects.
- Consistency Across Projects: You can define reusable settings (padding, zoom speed, background style) to ensure every tutorial maintains a uniform brand look.
- No Graph Editor Required: The software handles the easing curves automatically, ensuring professional motion.
- Post-Production Speed: For editors who need cinematic camera movement on software demos, this tool bridges the gap between efficiency and polish.
A demonstration of FocuSee creating cinematic camera movement effects automatically.
Deep Dive: Customizing AE Templates Without Breaking Them
If you proceed with an After Effects template, you must know how to customize it. A common mistake is assuming a drag and drop template is finished the moment you apply it. Often, the pre-baked speed of the camera movement will not match the pacing of your voiceover or music.
Pro Tip: Separate Dimensions for Better Control
Before you even touch a keyframe, there is one critical step that separates the pros from the beginners: Separate Dimensions.
By default, After Effects groups X, Y, and Z positions into a single property. This makes editing curves in the Graph Editor a nightmare because adjusting the “X” curve inadvertently twists the “Y” path.
- Select your Null Object.
- Press P to reveal Position.
- Right-click on the word “Position” and select Separate Dimensions.
- Now you have individual control over X, Y, and Z. This allows you to smooth out a horizontal pan without ruining your vertical alignment.
Refining Timing and Easing
To adjust timing without breaking the rig:
Step 1. Select the keyframes on your Null Object (specifically the dimension you want to change).
Step 2. Open the Graph Editor (Shift+F3).
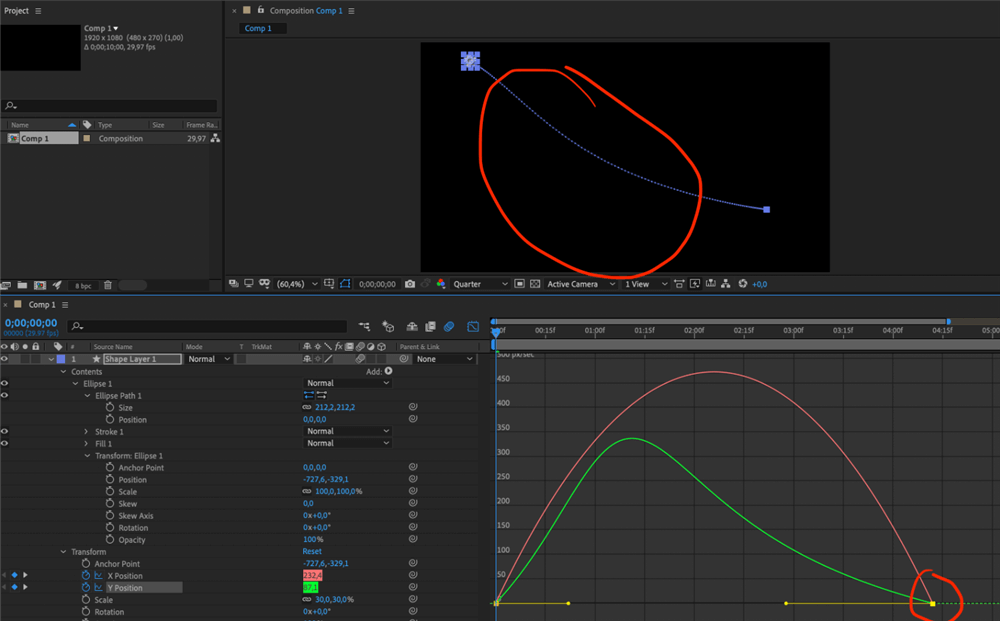
Graph Editor
Step 4. Do not delete keyframes, as this can destroy the loop or path.
Step 5. Select the Bezier handles and stretch them horizontally.
- The “S” Curve: Aim for a curve that looks like a gentle “S”. Flattening the curve at the start and end eases the motion in and out, eliminating that robotic start/stop jerkiness.
- Steep Curves: A steep, vertical line in the graph represents high speed—useful for “whip pan” transitions.
Managing Depth of Field
Most professional templates enable depth-of-field control by default. This creates a cinematic look but can cause blurriness if your layers aren’t positioned correctly in Z-space.
- Check Focus Distance: Ensure the camera’s “Focus Distance” value matches the Z-position of your subject.
- Adjust Aperture: Lower the aperture value if the background blur is too aggressive.
These small tweaks transform a stock camera animation template into a bespoke asset that fits your specific footage.
Performance & Optimization: Avoiding the Render Bottleneck
A comprehensive 3D camera movement project often includes complex expressions and high-resolution motion-blur samples. Even on powerful hardware like a Mac Studio or MacBook Pro M3 Max, these assets can cause significant lag.
To maintain a responsive workflow, implement these optimizations:
- Draft Mode Preview: In the timeline panel, disable the “Motion Blur” switch for the composition while working. Only enable it for the final render. This frees up substantial processing power.
- Adaptive Resolution: Set your Preview resolution to “Half” or “Quarter.” This allows After Effects to render frames faster during playback.
- Use Proxies: If your template involves high-resolution video footage within the camera rig, create low-resolution proxies. Right-click your footage in the Project panel, select Create Proxy > Movie. After Effects will automatically swap back to the high-res original for the final output.
By managing these settings, you ensure that the camera presets enhance your video rather than causing the software to freeze.
Frequently Asked Questions Camera Movement Templates
Why does my camera “flip” or look distorted when I apply a template?
This usually happens due to a Gimbal Lock or incorrect orientation settings. If you apply rotation keyframes directly to a camera rather than a Null Object, the camera may rotate along an axis you didn’t intend. Using the Null Object Rig detailed above resolves this by separating the point of rotation from the camera itself.
Do I need 3D layers to use camera movement templates?
Yes. For a 3D camera to affect your visual assets (text, video, shapes), those layers must have the “3D Layer” switch (the cube icon) enabled in the timeline. If a layer is 2D, the camera will simply move past it without changing its perspective.
Are camera movement templates suitable for beginners?
They are accessible, but they require a basic understanding of After Effects’ parenting hierarchy. Using a template is easier than manual animation, but you still need to know how to navigate the timeline and layer switches.
What types of videos work best with camera movement templates?
These templates excel in music videos, kinetic typography, and high-energy product showcases where cinematic motion is required to keep viewer engagement high. For simple software tutorials, automated tools like FocuSee are often more appropriate.
Conclusion
Creating professional motion doesn’t have to mean sacrificing your evenings to the Graph Editor. Whether you choose a robust camera movement template for a high-end commercial or utilize an automated tool like FocuSee for your weekly explainers, the goal is the same: efficiency and polish.
You now have the knowledge to set up a null object camera rig correctly—including the vital steps of separating dimensions and parenting hierarchy—and the insight to choose the right tool for the job. If you are looking to regain control over your production schedule while ensuring consistent, smooth zooms and pans in your screen recordings, consider testing FocuSee. It resolves the complexity of manual keyframing in minutes, allowing you to focus on the story rather than the settings.