Master After Effects Camera Movement: The 2026 Cinematic Guide for Marketers

There is a distinct frustration when you compare your in-house explainer video to a top-tier agency production. Yours feels flat. The agency’s video breathes with depth and perspective. For marketers and designers like “Ryan”—who need to produce high-quality SaaS explainer videos without an entire VFX team—this gap often comes down to one missing element: proper After Effects camera movement.
Transforming a 2D scene into an immersive, cinematic camera movement after effects sequence is the defining factor between amateur projects and professional broadcast work. If you have struggled with shaky transitions, confusing tools, or animations that simply refuse to behave, this guide addresses those specific obstacles. We will move beyond basic keyframing to the exact technical workflows—specifically the “Null Object” technique—that professionals use to achieve depth and parallax.
The Pro Workflow: Null Object Camera Control
The most common error in After Effects camera movement is attempting to animate the camera layer directly. This method often produces erratic, “shaky” motion trajectories that are notoriously difficult to edit. If your camera moves feel uncontrollable, this is likely the cause.
The professional standard—and the solution used by top motion designers—is null object camera control.
The Null Object Technique
Instead of keyframing the camera properties directly, you create a Null Object (an invisible helper layer), convert it to a 3D layer, and parent the camera to it. You then animate the Null Object. This method separates the point of interest from the camera’s physical position, offering superior control over complex moves.
Step 1. Create Your Camera: Go to Layer > New > Camera. A “Two-Node” camera is generally best for orbiting subjects.
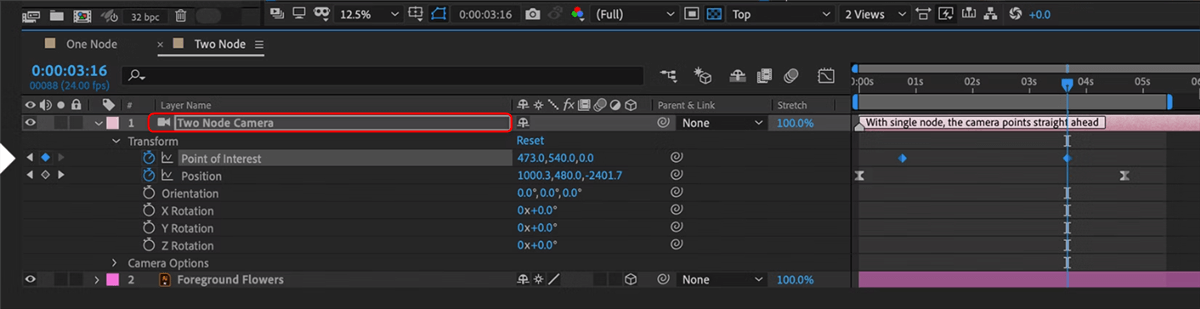
Two-Node Camera
Step 2. Create the Controller: Go to Layer > New > Null Object. Rename this layer “Camera Control.”
Step 3. Enable 3D: Toggle the “3D Layer” switch (the cube icon) for the Null Object. This is critical. If the Null is 2D, it cannot control the camera in 3D space.
Step 4. Parent the Camera: Select the Camera layer. Use the “Pick Whip” (the spiral icon) to drag a connection to the “Camera Control” Null layer.
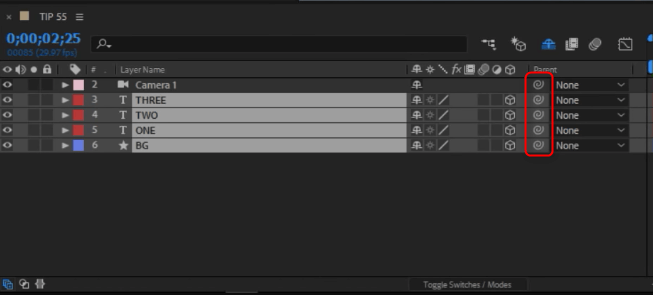
Pick Whip
Step 5. Lock the Camera: Click the “Lock” icon on the Camera layer immediately. Do not touch the Camera’s transform properties again. You must only animate the Null. If you keyframe both, your animation will break.
Step 6. Animate: Select the Null Object and press P (Position) or R (Rotation). Set your keyframes here to move the camera.
Pro Tip: Watch Your Anchor Point
If your camera orbits feel “wobbly” or off-center, check the Null Object’s Anchor Point. The camera will rotate around the exact center of the Null. Use the Pan Behind (Anchor Point) Tool (Y on keyboard) to move the Null’s anchor point to the exact center of your subject before you start animating rotation.
Expert Insight: Subtlety is Key
Many beginners focus heavily on camera rotation (orbiting), but professional motion designers rely more on slow dolly moves combined with strong Z-axis layer spacing.
This approach creates a natural parallax effect—where foreground objects move faster than background objects—providing depth without inducing motion sickness. A good rule of thumb for corporate or SaaS videos: Keep camera rotation under 15 degrees. Anything more aggressive tends to distract from the text and can disorient the viewer.
Constructing the Scene: Z-Space, Views, and Scale
Understanding the Null Object is only half the battle. The Null controls the camera, but the camera needs something to look at. For after effects 3d camera movement to work, your layers must be arranged at different depths in “Z-space.”
This is where most beginners get stuck. You push a layer back, and it disappears or becomes tiny. Here is how to construct your scene properly without guessing.
1. The “2 Views” Setup
Trying to arrange 3D layers while looking through the “Active Camera” is frustrating because you cannot see how far apart layers truly are.
- At the bottom of the Composition panel, change the View Layout from “1 View” to “2 Views – Horizontal”.
- Set the Left View to “Top” and the Right View to “Active Camera”.
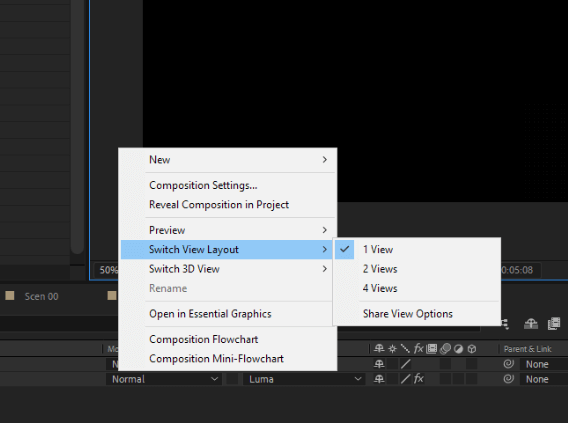
2 Views – Horizontal
Now, you have a bird’s-eye view of your scene (Left) and the final output (Right). You can select layers in the “Top” view and drag them along the blue Z-axis arrow to space them out physically. This gives you precise control over your depth.
2. The Parallax Paradox (Scale Correction)
When you push a background layer far back in Z-space (e.g., Z position +2000), it will appear much smaller in your camera view. This is natural perspective.
To fix this, you must scale the layer up.
- Step A: Push your background layer back in Z-space until it is far behind your foreground.
- Step B: Press S to reveal Scale. Increase the scale percentage until the layer fills the frame again.
By making the layer physically distant but visually large, you create the conditions for parallax. When the camera moves effectively via the Null, the distant background will move slowly, and the foreground text will move quickly, creating that professional 3D feel.
Achieving Smooth Camera Movement
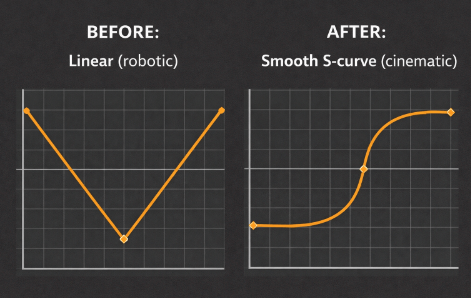
Robotic, linear motion is the hallmark of beginner animation. To achieve smooth camera movement after effects, you must move beyond default keyframes and use the Graph Editor. Selecting your keyframes and pressing F9 (Easy Ease) is the first step, but refining the velocity curve is where the quality improves.
Mastering the Graph Editor
- Select your Null Object’s keyframes.
- Open the Graph Editor (icon near the timeline switches).
- Ensure you are viewing the Speed Graph (right-click the graph and select “Edit Speed Graph”).
- Drag the influence handles to create a “Bell Curve” or high peak in the center.
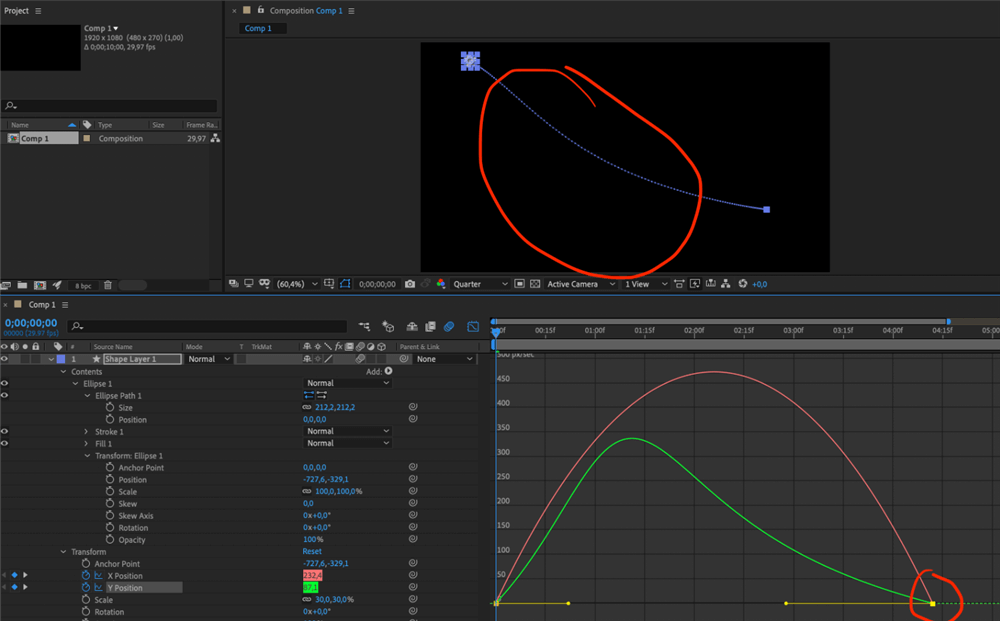
Graph Editor
This shape causes the camera to accelerate slowly, hit peak speed during the movement (where no one is reading), and decelerate gently to a stop. This mimics the physics of a real camera dolly, making the motion feel intentional and high-budget.
Performance Tip: Draft 3D
Adding depth and motion blur can tax your system’s GPU, causing preview lag. For a smoother workflow:
- Enable “Draft 3D” in the composition toolbar. This temporarily disables heavy calculations like lights and shadows.
- Only toggle final quality settings when you are ready to render. This keeps your interface responsive while you fine-tune the motion graphics.
Adobe After Effects Graph Editor
The Shortcut: Cinematic Motion with FocuSee
If the workflow above—Null Objects, Z-Space, Scale Correction, and Graph Editors—sounds like “overkill” for a simple software demo, you are correct.
For users like Ryan, who need to record a quick SaaS product update or a tutorial where the camera simply follows the mouse, manual After Effects animation produces a low Return on Investment (ROI). In these specific scenarios, FocuSee offers a specialized alternative.
The 30-Second Alternative
FocuSee automates the process of cinematic camera movement for screen recordings.
- Auto-Follow: Instead of keyframing a camera to follow your cursor, FocuSee detects mouse activity and pans automatically.
- Auto-Zoom: It applies smooth zoom-ins on clicks without manual graph editing.
| Manual After Effects | FocuSee Automation | |
| Feature | Manual After Effects | FocuSee Automation |
| Setup Time | 30–60 Minutes | Instant |
| Skill Required | Advanced (3D Space, Graphs) | None (Auto-generated) |
| Best For | Custom Brand Videos, Commercials | Tutorials, Demos, Quick Social Clips |
If your goal requires custom physics and bespoke branding, use the After Effects Null workflow. If you need a polished screen recording by end-of-day, FocuSee removes the technical friction so you can focus on the content.
Troubleshooting Common Camera Mistakes
Even with the correct settings, After Effects camera motion techniques can present challenges. If your project isn’t behaving as expected, consult this diagnostic block to resolve the issue quickly.
Diagnostic Checklist: Why is my camera broken?
1. Everything looks flat.
Fix: Check the “3D Layer” switch (cube icon) on your layers. If a layer is 2D, it ignores the camera. Also, ensure you have actually spaced layers out in Z-space (Top View).
2. The animation is wild/shaky.
Fix: Did you keyframe the Camera layer by accident? Delete those keys. Only animate the Null Object. Also, check if your rotation is greater than 15 degrees—reduce it.
3. My background turned into a tiny dot.
Fix: This is the “Parallax Paradox.” Select the background layer and increase its Scale property until it fills the frame again.
4. I can’t see my animation.
Fix: Check your Composition View dropdown. It must be set to “Active Camera.” If it is set to “Front” or “Custom View 1,” you will not see the final render.
Frequently Asked Questions
How do I add camera movement in After Effects?
To add camera movement, create a new Camera layer (Layer > New > Camera). For best results, create a Null Object, enable its 3D switch, and parent the camera to the Null. Animate the Null Object’s position and rotation properties rather than the camera itself.
Why is my camera not moving anything in After Effects?
The most likely cause is that your layers are not set to 3D. You must toggle the “3D Cube” icon for every layer you want the camera to affect. If layers remain 2D, they will ignore the camera’s movement completely.
What is the best camera movement for cinematic animations?
For a cinematic look, prioritize slow “dolly” movements (moving forward or backward along the Z-axis) combined with wide spacing between your layers. This creates a rich parallax effect. Avoid rapid pans or rotations, which can look amateurish.
How do I make camera movement smooth in After Effects?
Use “Easy Ease” on your keyframes by pressing F9. Then, open the Graph Editor and adjust the velocity curves to create a “Bell” shape. This smooths out the acceleration and deceleration, eliminating robotic starts and stops.
Should I animate the camera or a null object?
It is highly recommended to animate a Null Object that is parented to the camera. This workflow separates the camera’s focus point from its physical location, making it much easier to control complex animations and prevent erratic motion trajectories.
What is the difference between one-node and two-node cameras?
A one-node camera behaves like a standard handheld camera; it looks in the direction you rotate it. A two-node camera always looks at a specific “Point of Interest,” making it easier to orbit around a subject but harder to use for simple panning shots.
Conclusion
You no longer need to settle for flat, static presentations. Whether you choose the granular control of the null object workflow in After Effects or the efficiency of automated tools, the solution to “shaky” video is within reach. By mastering the Null Object, understanding Z-space scaling, and utilizing the Graph Editor, you can finally produce the smooth camera movement that defines professional work.
If your immediate goal is to create polished software demos without spending hours in the Graph Editor, FocuSee offers the most direct route to a professional result. It handles the zoom, focus, and pacing automatically, allowing you to regain control of your schedule and deliver high-quality video content instantly.