3D Camera Movement Guide: How to Add Cinematic Depth to Your Videos

You have likely poured hours into an edit only to feel that the final result looks “flat” compared to the professional examples you see online. This gap in quality is rarely due to the footage resolution; it is often the lack of 3D camera movement.
For creators producing explainer videos, social ads, or tutorials, facing a static timeline can be discouraging. Unlike simple 2D scaling, cinematic 3D camera movement introduces depth perception, guiding the viewer’s eye through a scene and transforming a standard recording into a polished production. However, terms like “z-axis,” “parallax,” and “graph editor” often make 3D camera tools feel unnecessarily complex.
This guide clarifies the confusion. We will first explain exactly what 3D camera movement is (and how it differs from a simple zoom). Then, we will present two distinct workflows: a manual method for total control over live-action and motion graphics, and an automated solution specifically for screen recordings where “simulated” depth is the goal.
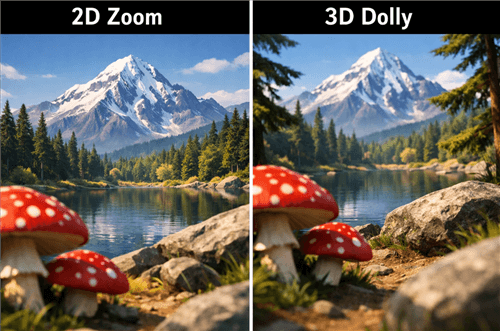
2D Zoom and 3D Dolly Movement
What is 3D Camera Movement & How Does Parallax Work?
Before choosing a tool, you must understand the mechanics. A common frustration for beginners is realizing their “camera move” just looks like the image is getting bigger. This happens when you confuse magnification (2D) with locomotion (3D).
Defining the Mechanics of Depth
In a standard 2D zoom, you are simply cropping into the image. The relationship between objects does not change—it is like bringing a photograph closer to your face.
True 3D camera movement involves changing the position of a virtual camera within a three-dimensional space. The camera physically travels along the z-axis depth (forward and backward), interacting with layers positioned at different distances.
The Parallax Effect Explained
The most critical component of cinematic motion is the parallax effect. This optical phenomenon occurs when objects closer to the camera move across the frame faster than objects in the background.
- Real-world example: Imagine looking out a moving train window. The utility poles near the track whip by instantly, while the distant mountains appear to barely move.
- Video application: To achieve this, you must separate your foreground (e.g., text, a character, or a logo) from your background. Moving a camera past these separated layers creates a perspective shift.
If your software or footage does not allow for layer separation, you cannot achieve true 3D motion—you can only simulate interest.
Manual Keyframing vs. Automated Tools: Which Method Fits Your Project?
Deciding between manual keyframing and automated software depends on your source material (live video vs. screen capture) and your deadline.
The following comparison breaks down the Return on Investment (ROI) for each approach regarding 3D camera movement.
| Manual Editing (After Effects) | Automated Software (FocuSee) | |
| Primary Use Case | Live-action video, motion graphics, complex compositing. | Screen recordings, tutorials, product demos, slide decks. |
| Depth Type | True 3D. Uses Z-space and parallax. | Simulated. Uses smart 2D zooming/panning to mimic attention. |
| Time Cost | High. Requires setting up a virtual camera, camera tracking, and smoothing curves. | Low. The software automates the focal points instantly. |
| Technical Skill | Advanced. Requires understanding graph editors and spatial geometry. | Beginner. No prior knowledge of animation is required. |
If you are editing a short film or a high-end commercial, there are no shortcuts—you need the manual workflow. However, if you are creating software tutorials or presentation videos where the “subject” is a flat screen, the manual effort often yields diminishing returns.
Step-by-Step: The Manual Workflow in After Effects
For those requiring total control, 3D camera movement in After Effects is the industry standard. This allows for complex camera tracking and custom 2.5D animation.
Expert Warning: Enabling 3D on layers can sometimes break other effects (like certain transitions or 2D masking) and will significantly increase render times. Ensure your machine has a dedicated GPU (e.g., NVIDIA RTX series) and at least 32GB of RAM for smooth playback.
1. Enable 3D Layers
In your composition timeline, locate the “cube” icon switch for the layers you wish to manipulate. Activating this places the 2D layer into 3D space, allowing it to interact with the z-axis. Push your background layer back in Z-space (e.g., +2000 pixels) and scale it up to fill the frame. Keep your subject or text closer to the camera (0 pixels).
2. Create a Virtual Camera
Go to Layer > New > Camera. Select a Two-Node Camera. Choose a focal length (35mm for dynamic wide shots, 50mm for standard portraits). This creates a virtual camera object in your timeline.
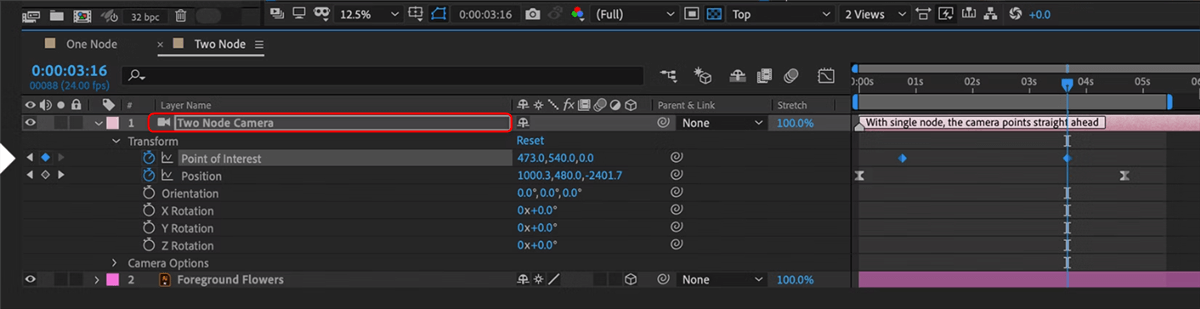
Two-Node Camera
3. Animate Position
Open the Camera layer properties (Transform).
- Set a keyframe for “Position” at the start of your timeline.
- Move the playhead forward.
- Adjust the Z-value to push the camera physically forward. Because your layers are at different depths, the foreground will grow larger faster than the background—creating parallax.
4. Smoothing Movement (The “S-Curve”)
A common mistake is leaving keyframes as “linear,” resulting in robotic starts and stops. To fix this:
- Select your keyframes and press F9 (Easy Ease).
- Open the Graph Editor (icon looks like a squiggly line).
- Ensure you are viewing the Speed Graph.
- Create an S-Curve: Drag the influence handles of your keyframes toward the center. The graph should look like a hill or bell curve—low at the start (slow), high in the middle (fast), and low at the end (slow). Why? Real cameras have mass. They take time to accelerate and decelerate. This curve mimics that physics.
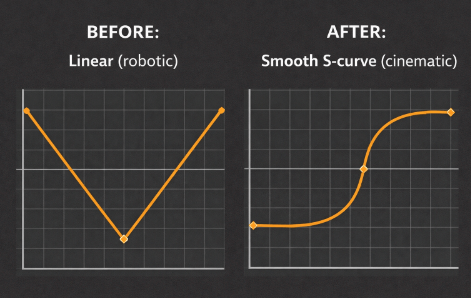
Adobe After Effects Graph Editor
The Efficient Route: Simulating Motion for Screen Recordings
If your project is a software tutorial, a slide deck, or a website walkthrough, true 3D depth is technically impossible because your source is a flat 2D screen capture. However, you still need to guide user attention.
In these specific scenarios, manual keyframing is often a waste of time. This is where tools like FocuSee provide a practical alternative.
How Automation Mimics Interest
FocuSee is not a 3D compositor; it is a screen-recording tool that applies intelligent 2D motion. It solves the “flat” video problem by automating the “zoom and pan” process that typically takes hours to keyframe manually.
Instead of requiring you to plot points, the software utilizes Smart Focus technology. It detects cursor activity and mouse clicks, automatically zooming in on the area of action.
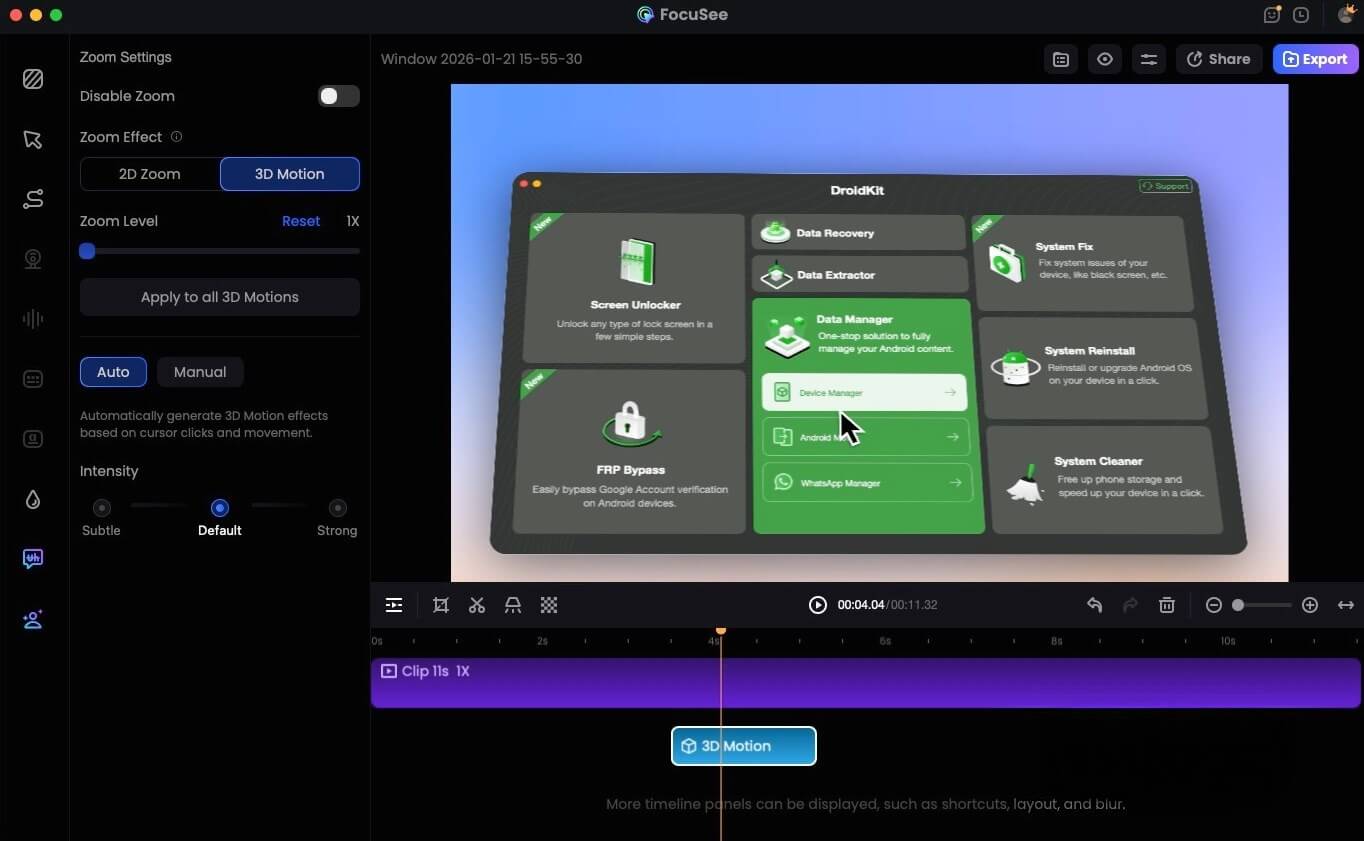
FocuSee 3D Motion
Is this “Real” 3D?
No. Since there is no z-axis separation between your mouse and the browser window, there is no parallax. However, by adding Motion Blur and smoothing the cursor path, it simulates the feeling of a camera focusing on details.
Key benefits for high-volume creators:
- Automatic Focus: No need to manually set start and end points for every click.
- Simulated Depth & 3D Motion: Background blur, cursor highlights, and smart motion tracking mimic Depth of Field and parallax effects found in cinematic workflows—all in real-time.
- Simulated Motion Blur: Adds a cinematic “shutter” feel to the movement, preventing the clinical look of digital scaling.
- Cursor Smoothing: Turns erratic mouse jitters into fluid, intentional navigation.
If you are creating educational content or product demos, this “simulated” motion is often superior to true 3D because it prioritizes clarity over artistic flair.
Also Read: 8 Best Screen Recorder for Tutorials >
Applying Cinematic Motion: Best Practices for Storytelling
Whether you are using complex After Effects rigs or automated zoom tools, the temptation to overuse motion is high. Many creators worry about making their videos look “amateurish” by adding too many effects.
Expert analysis reveals a critical insight: Effective camera moves should be invisible. They should guide attention, not distract from it. If your viewer notices the camera move more than the content, the edit has failed.
The “Do’s” of Camera Movement
Here is how to apply specific moves effectively:
Dolly In (The “Focus” Move):
- Action: Move the camera slowly toward the subject along the z-axis.
- Use Case: Use this to increase emotional intensity or signal that a specific detail is important.
Trucking (The “Reveal” Move):
- Action: Move the camera physically left or right, parallel to the subject.
- Use Case: Ideal for following a subject or revealing details in a product interface.
The “Don’ts” of Camera Movement
- Avoid “Whipping” and “Jitter”: Sudden, fast movements increase cognitive load and can physically disorient the viewer.
- Don’t Move Without Purpose: Every camera move should have a motivation. If you are just moving the camera to “keep it moving,” you will likely induce motion sickness.
Frequently Asked Questions About 3D Camera Techniques
What if I have live-action video, not graphics?
If you want to add 3D elements (like floating text) to live video, you need Camera Tracking (also known as Match Moving). In After Effects, selecting your footage and choosing Track Camera will analyze the video and create a 3D camera that matches the movement of the original operator. This allows you to place text in the “real world” of your video.
Is 3D camera movement hard to learn?
The manual workflow has a steep learning curve. Understanding the Graph Editor, interpolation, and z-space hierarchy takes practice. However, simulated tools for screen recording (like FocuSee) or template-based mobile apps (like CapCut’s “3D Zoom” effect) have made specific types of 3D movement accessible to beginners.
Do I need a powerful computer?
For 2.5D animation (moving 2D layers in 3D space), standard hardware (e.g., MacBook Air M1/M2) is sufficient. However, if you are using true 3D camera movement with ray-traced rendering, motion blur, and 4K footage, you will need a dedicated GPU to avoid frustratedly long render times.
Final Thoughts: Choosing the Right Tool for Your Workflow
Understanding the mechanics of 3D camera movement—from the parallax effect to z-axis depth—is crucial for any creator wanting to elevate their work.
If you are a filmmaker or motion designer looking for artistic control, the time spent mastering the After Effects Graph Editor and virtual cameras is an investment in your career. The results offer a level of depth and immersion that automation cannot match.
However, if your goal is to produce engaging tutorials or product demos without fighting complex timelines, admit when “simulated” depth is enough. Tools like FocuSee allow you to bypass the technical hurdles of keyframing, providing a polished, professional look that respects your deadline.
Select the method that serves your story, not just the one that looks the most impressive in a tech demo.