How to Add a Watermark to a YouTube Video: The Ultimate Guide

You spent days scripting, filming, and editing a deep-dive video. It was your best work yet. Then, a week later, you found it viral on another platform—uploaded by a stranger, with zero credit given to you.
This is a creator’s worst nightmare, but it is also a common reality. Without clear ownership, your hard work is vulnerable. If you are searching for how to add a watermark to a YouTube video, you are likely looking for a way to prevent this theft or to build your brand recognition.
Many creators mistakenly believe there is only one way to brand their content. In reality, whether you need to add a logo watermark to a YouTube video for channel growth or for copyright security depends entirely on the method you choose.
In this guide, we break down the two critical paths: the built-in subscriber button (for growth) and the permanent, burned-in logo (for protection). We prioritize accuracy and real-world application. We have moved beyond theory to test these methods on actual mobile and desktop interfaces, ensuring your brand stays visible without annoying your audience.

Video Reposted on TikTok
Branding Button vs. Burned-In: Which Watermark Do You Need?
Before you open your editor, you must make a critical decision based on your primary goal: do you want more subscribers, or do you want copyright protection on YouTube?
Here is the reality that catches many creators off guard: YouTube’s “video watermark” is actually an interactive overlay designed to drive subscriptions, not to prevent theft.
Here is the critical expert insight: If someone uses a third-party tool to download your video, the YouTube branding watermark disappears. It is a line of code floating over the video player, not a permanent part of the video file itself.
The Two Main Watermark Types
YouTube Branding Watermark (Overlay): This is a small, clickable button that sits in the corner of the YouTube player. When viewers on desktop hover over it, they are prompted to subscribe. It is a fantastic tool for converting casual viewers into fans, but it offers zero protection outside of YouTube.
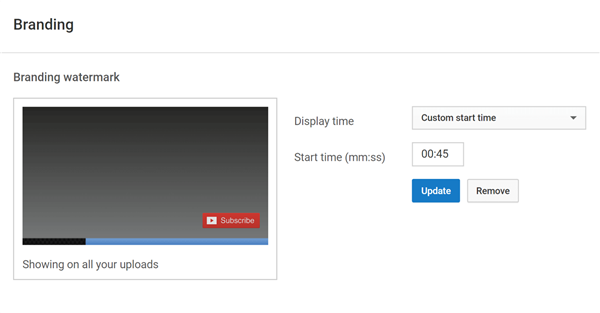
YouTube Branding Watermark
Burned-In Watermark (Permanent): This is a logo added during the editing process. It becomes a permanent part of the pixel data. It cannot be clicked, but crucially, it cannot be stripped away. If your video is ripped and re-uploaded to Instagram or TikTok, your logo stays with it.
If your goal is to ensure your brand is visible even if your video is reposted elsewhere, you need a burned-in solution. If your goal is strictly channel growth, the YouTube Studio feature is sufficient. Most pro creators use both.
How to Add a Watermark to a Video Before Uploading (For Protection)
To secure your intellectual property, you must add a watermark to the video before uploading to YouTube. This ensures the logo is part of the file itself. There are two ways to do this: the “Standard Editor” method (manual but free) and the “Automated Workflow” (faster for volume).
Method 1: Add a Watermark in Adobe Premiere Pro
You don’t need special software to add a watermark in Premiere—just use a higher video track and basic transform controls.
The V2 Overlay Method:
Step 1. Import Your Logo: Import a transparent PNG logo into the Project panel.
Step 2. Place It Above the Video: Drag the logo onto the timeline on a track above your main footage (e.g., V2).
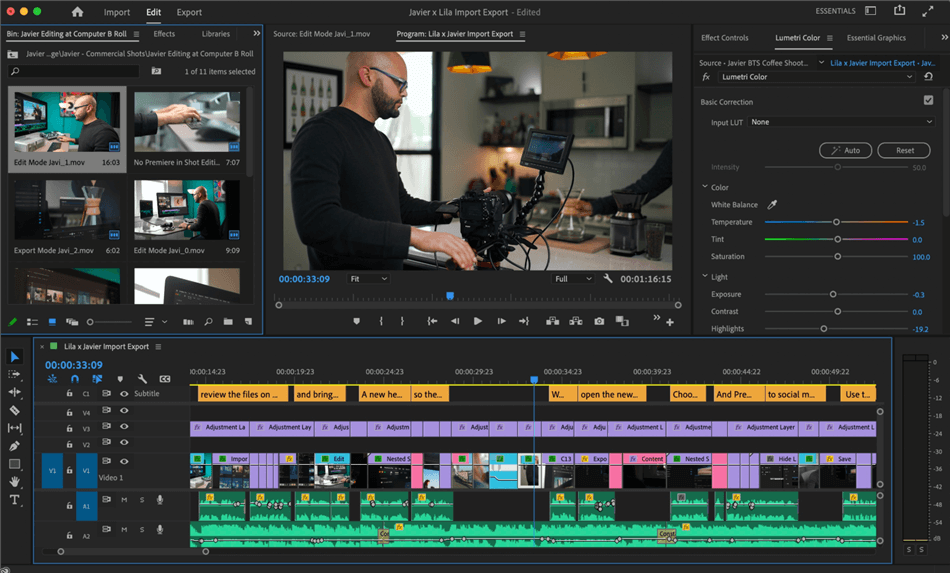
Premiere Pro Interface
Step 3. Extend the Duration: Stretch the logo clip so it covers the full length of the video.
Step 4. Adjust Size and Position: Select the logo, open Effect Controls → Motion, scale it down (about 10–15%), and move it to a corner.
Step 5. Lower Opacity: In Opacity, set it to around 50–70% so it stays visible without distracting.
Step 6. Stay in the Safe Zone (Recommended): Enable Safe Margins in the Program Monitor and keep the watermark inside the title-safe area to avoid cropping on Shorts or Reels.
While this takes only a minute for one video, it can become repetitive if you produce high-volume content like tutorials or daily updates.
Method 2: The Automated Workflow (Using FocuSee)
For creators focused on screen recordings, tutorials, or demos, manually resizing and positioning a logo for every single export can break your flow. This is where tools like FocuSee act as a time-saver.
FocuSee is a screen recording and video creation tool designed to automate post-production. Instead of treating the watermark as an afterthought, FocuSee integrates it into the recording process.
Why consider this over a standard editor?
- Set It and Forget It: You upload your brand logo once. FocuSee automatically applies it to every video you record and export, maintaining the exact position and size you prefer.
- Consistent Branding: If you are creating a series of 20 tutorial clips, FocuSee ensures the watermark is in the same pixel coordinate on every single one, giving your playlist a cohesive, professional look.
- Smart Zoom Compatibility: FocuSee’s main feature is automatic zoom-ins to follow mouse movement. Crucially, it keeps your watermark stable and visible even while the video zooms and pans—something that requires complex keyframing in standard editors like Premiere Pro.
- One-Click Aspect Ratio Switching: FocuSee lets you instantly switch video sizes (e.g., 16:9, 9:16, 1:1) to match platform requirements—making it easy to publish the same video to YouTube, TikTok, Instagram, and Shorts without re-editing or repositioning your watermark.
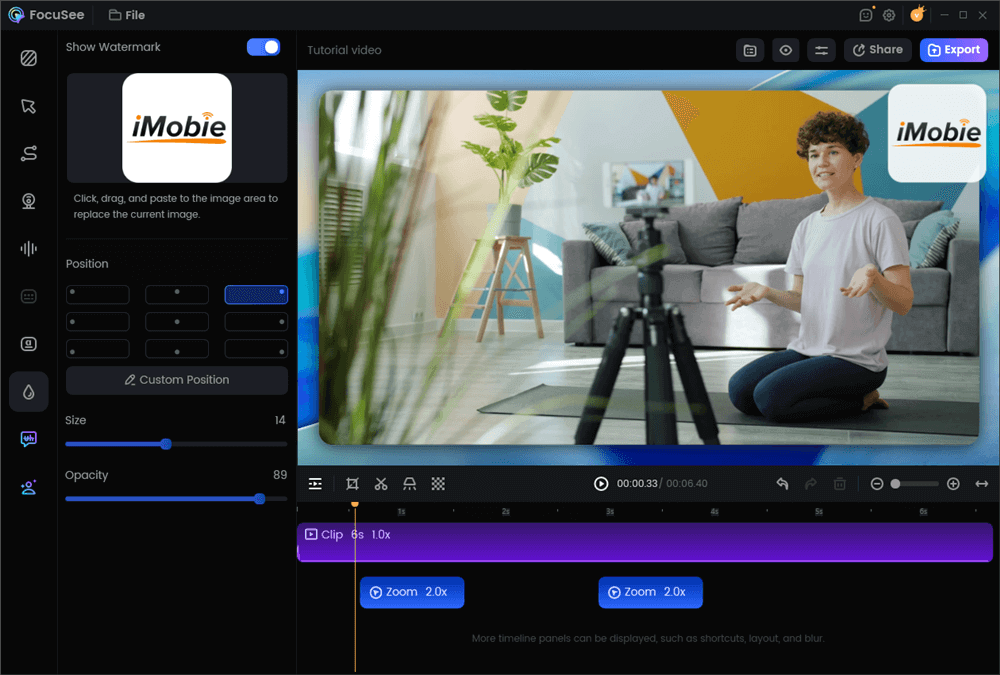
Add a Watermark on a Video
If you are already editing complex documentaries, stick to Premiere. But if you need to churn out branded tutorials quickly, FocuSee removes the friction of manual watermarking.
Optimizing Your Watermark: Size, Format & Safe Zones
A watermark is useless if it looks unprofessional or gets covered up by interface buttons. We tested various placements on different devices to save you the trial and error.
Step 1: Create the Correct File (Transparent PNG)
Critical Tip: Do not upload a JPG. JPGs do not support transparency, meaning your round logo will sit inside an ugly white box that blocks your video.
Place your logo on the canvas and delete the background layer. When you save, ensure you check the box for “Transparent Background” and select PNG format.
YouTube recommends 150×150 pixels. Create your file at 500×500 pixels. YouTube will scale it down automatically, but starting with a higher resolution ensures your logo looks crisp on 4K monitors and Retina displays.
Step 2: The “Safe Zones” (Crucial for Mobile)
In our testing, placement was the biggest point of failure. A logo in the wrong spot gets covered by buttons, making your video look amateurish.
- The Desktop Experience: Bottom-right is standard for YouTube.
- The Mobile Reality: Most YouTube viewing happens on mobile.
- Danger Zone (Bottom Right): On mobile, the “Full Screen” toggle and “More Videos” suggestions often slide up from the bottom right.
- Danger Zone (Right Edge): If your video is reposted to TikTok or Reels, the entire right edge is covered by “Like,” “Comment,” and “Share” buttons.
- Danger Zone (Bottom Center): This is where YouTube Captions (CC) appear.

Safe Zones and Danger Zones
Our Recommendation:
For a burned-in watermark, the safest place is often the Top Left or Top Right corner. These areas are generally free of interface clutter on YouTube, TikTok, and Instagram Reels, ensuring your brand is visible no matter where the video travels.
Opacity: Set your watermark opacity between 50% and 70%. It should be visible enough to assert ownership (“I made this”) but see-through enough that a viewer can look “past” it to see the content.
YouTube Watermark Tutorial: Using the Built-In Studio Feature
If your goal is purely subscriber growth, use the native YouTube video watermark settings. This places the clickable subscription button on your video.
Step 1. Access Studio: Log in to your account and navigate to YouTube Studio.
Step 2. Navigate to Customization: On the left-hand menu sidebar, select Customization and then click the Branding tab. This is the hub for your YouTube channel branding.
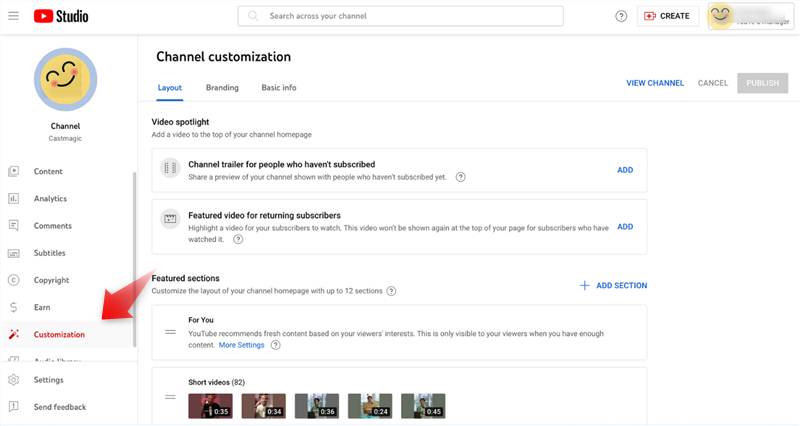
YouTube Studio Customization
Step 3. Upload Your Asset: Scroll down to the “Video watermark” section. Click Upload. Select your 500×500 transparent PNG.
Step 4. Configure Display Time: You have three options. Our testing shows distinct results for each:
- End of video: Least intrusive, but lowest conversion rate (many viewers drop off before the end).
- Custom start time: Good for skipping the intro. A standard setting is to start at 0:30 or 0:45, right after your “hook.”
- Entire video: Recommended. This yields the highest subscriber conversion because the button is always available the moment a viewer decides they like your content.
Step 5. Publish: Click Publish in the top right corner.
Important Note: This watermark will not appear on videos designated as “Made for Kids.”
Frequently Asked Questions About YouTube Watermarking
Here are concise answers to common technical questions regarding how to watermark a YouTube video.
Can I add a watermark to an existing YouTube video?
Yes and no.
- Yes: You can add the YouTube branding watermark (the overlay button) via YouTube Studio at any time. It will instantly appear on all your past and future videos.
- No: You cannot add a burned-in (permanent) watermark to a video that is already uploaded. To do this, you would need to edit the original file on your computer and re-upload it. Warning: Re-uploading deletes your current views, comments, and SEO ranking for that specific video.
Can I use my channel logo as a YouTube watermark?
Absolutely. In fact, using your channel icon is best practice for consistency. Just ensure your logo is simplified. Intricate text or detailed illustrations often become unreadable blobs when shrunk down to the tiny size of the video player overlay. Simple shapes and bold colors work best.
Is it better to add a watermark before or after uploading?
For the ultimate strategy, do both.
- Burn it in (Before Uploading): Use your editor or FocuSee to add a subtle, permanent logo in the top corner. This protects you from theft on TikTok/Instagram.
- Add the Overlay (After Uploading): Use YouTube Studio to add the interactive button in the bottom right. This drives subscribers.
Because the burned-in logo is usually at the top and the overlay is at the bottom, they do not conflict with each other.
Final Thoughts
Content theft is a frustrating reality of the internet, but it shouldn’t stop you from creating. By taking control of your branding, you turn a potential negative into a positive.
If a video of yours goes viral on another platform, a clear, burned-in watermark ensures that every view is a potential advertisement for your channel.
Start protecting your intellectual property today. Whether you simply drag a PNG into your timeline, use an automated tool like FocuSee to handle it for you, or maximize growth with the YouTube Studio overlay, the important thing is that you take that extra step to sign your work.