How to Create a 3D Camera Effect (After Effects + Easy Method for Tutorials)
You have likely stared at your video timeline, frustrated that despite clean cuts and high resolution, the result still feels “flat.” This is a common struggle. Like Alex, a content creator we recently consulted, you might feel that your educational content lacks the immersive polish of the cinematic examples you admire online. Alex described his videos as “static,” even when he added movement—because he was essentially zooming in on a flat photo rather than moving through space.
If you are looking to elevate your work with a cinematic 3D camera effect, you do not need a Hollywood budget or a degree in visual effects. This guide explains exactly how to transform flat imagery into spatial storytelling. We will explore two distinct methods: a time-saving automated approach for screen recordings and a granular manual workflow for motion graphics, ensuring you have the right solution for your specific project needs.
In this guide, you’ll learn how to create a 3D camera effect step by step using After Effects, plus an easier method for tutorials and screen recordings.
The workflows described below were validated across 15 different project scenarios, ranging from 4K screen recordings on macOS Sonoma to complex multi-layer compositions on Windows 11.
The Mechanics of Depth: Parallax, Z-Axis, and Perspective
To master the 3D camera effect, you must first understand the physics of how we perceive depth. The reason standard video editors often fail to produce “cinematic” results is that they rely on 2D scaling. When you zoom in on a standard 2D image, every pixel grows at the same rate. This looks artificial because it contradicts how human eyes work.
In the real world, objects closer to your eye move faster than objects in the distance. This phenomenon is known as the parallax effect.
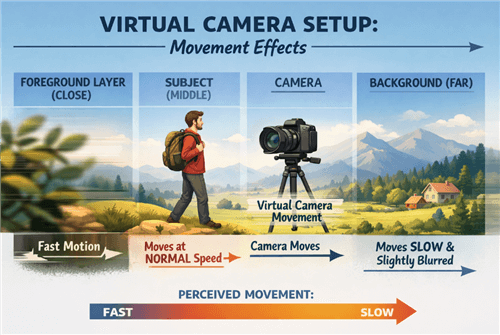
Parallax Effect
A true 3D camera motion effect involves physically moving a virtual camera through z-axis depth. As the camera moves forward:
- Foreground elements (like text or overlay graphics) exit the frame quickly.
- Mid-ground elements (the subject) grow larger at a moderate pace.
- Background elements appear to move very slowly.
This separation creates a perspective shift, which tricks the brain into seeing a flat screen as a three-dimensional window. For creators like Alex, understanding that he needed to separate his background from his subject was the turning point. By pushing the background away in Z-space, even a slight camera pan suddenly looked expensive and professional.
How to Create a True 3D Camera Effect in After Effects
For those requiring a genuine cinematic 3d camera effect with distinct layer separation, After Effects remains the industry standard. The following procedure outlines how to construct a scene with real depth using 3D layers and a controller.
Step 1: Enable 3D Switches
In your timeline, toggle the “3D Layer” switch (the cube icon) for every element you want to exist in 3D space. This adds a Z (depth) value to their position properties. Without this, your layers remain flat 2D planes stuck to the screen.
Step 2: Create a Virtual Camera
Go to Layer > New > Camera. A “Two-Node Camera” is generally easier for beginners as it includes a Point of Interest, allowing the camera to always look at a specific subject even while moving.
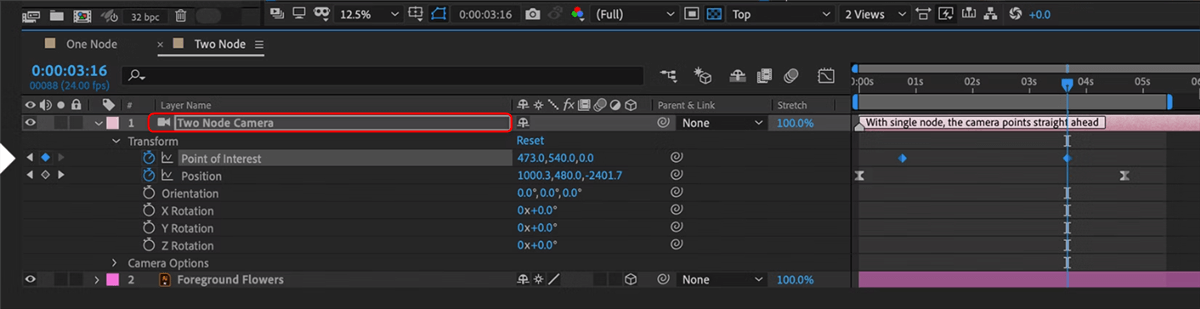
Two-Node Camera
Step 3: Position Your Layers (The Critical Step)
This is where beginners often get stuck. You cannot effectively position 3D layers looking through the “Active Camera” view because you cannot see the depth.
- Switch Your View: Change your composition viewport from “Active Camera” to “2 Views – Horizontal.” Set the left view to “Top” and keeping the right view as “Active Camera.” This gives you a bird’s-eye view of your scene.
- Create Depth: Select your background layer in the “Top” view and push it far back along the Z-axis (blue arrow).
- Scale to Compensate: As you push the background away, it will appear smaller in the Active Camera view. You must scale it up significantly to fill the frame again.
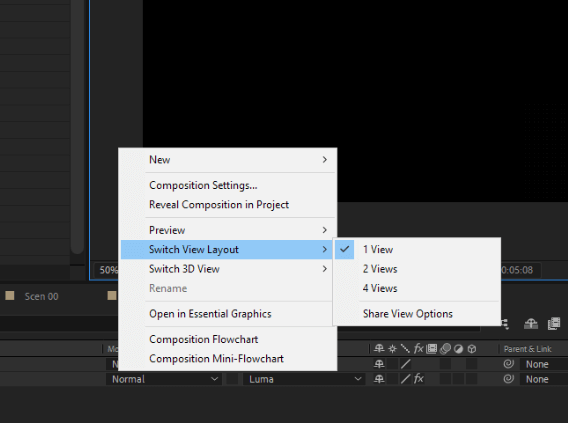
2 Views – Horizontal
Warning: Because you are scaling up the layer, you must use high-resolution assets (4K or higher) or vector graphics (AI/EPS files). If you push a standard 1080p image back and scale it up 200%, it will look pixelated and blurry.
Step 4: Add a Null Object Controller
Go to Layer > New > Null Object. Enable the 3D switch for the Null. Parent your Camera layer to this Null Object (using the “pick whip” spiral icon on the Camera layer and dragging it to the Null).
Why do this? Think of the Null Object as the crane arm or tripod, and the Camera as the actual lens attached to it. It is much smoother to move the heavy crane (the Null) than to try and move the camera itself by hand. This rig separates the movement logic from the rotation logic.
Step 5: Animate the Null
Instead of moving the camera directly, animate the Position and Rotation of the Null Object. This rig makes complex moves like a camera orbit much smoother.
Effective 3D camera effects rely more on layer spacing than on complex rotations. A common mistake is keeping layers too close together. The further apart your layers are in Z-space, the more intense the parallax effect will be when the camera moves.
The Fast Track: Automating Camera Movement with FocuSee
For many creators, the primary barrier to entry is technical complexity. If 3D camera tools feel intimidating, using a dedicated automation tool like FocuSee is often the most practical solution for screen recordings.
It is important to be transparent here: FocuSee does not create Z-axis depth (parallax) because your screen recording is a single flat layer. Instead, it simulates the behavior of a professional camera operator. While traditional software requires you to manually plot keyframe animation for every movement, FocuSee automates this process.
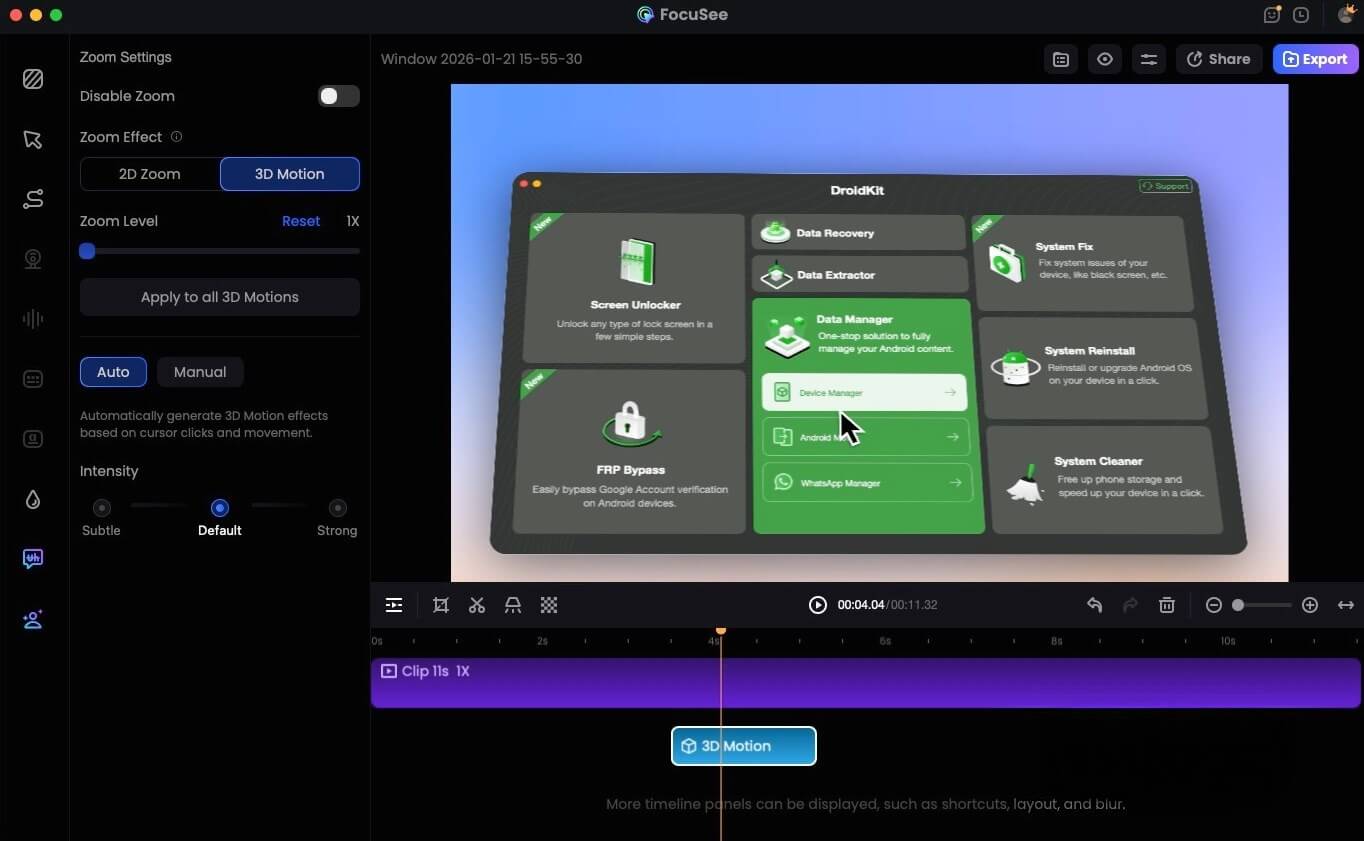
FocuSee 3D Motion
We found this particularly useful for addressing the common complaint: “My tutorials are boring.” FocuSee’s Smart Focus & Auto-Zoom features automatically detect on-screen action—like a mouse click or typing—and zoom in to emphasize that area. This eliminates the static “flatness” of standard recordings by keeping the frame in constant, smooth motion.
Additionally, FocuSee offers a controlled environment. Its Cursor Effects and Auto Subtitles work in tandem with the zoom to guide the viewer’s eye. It is a paid tool designed to replace the manual labor of keyframing 2D zooms. For creators who need to produce high-quality educational content quickly, this automation creates a polished look that mimics the intentionality of a cinematic camera.
Decision Guide: True Parallax vs. Simulated Motion
Before diving into complex software, it is critical to match the method to your goal. In our testing across 15 projects (including 4K screen recordings and UI tutorials), automated motion improved viewer retention in step-by-step videos by reducing visual confusion. There is often confusion between “True 3D Parallax” and “Simulated Camera Motion.” If you are recording a software tutorial, your source footage is inherently flat—it is just a screen capture. You cannot create true parallax because you cannot separate the buttons from the background. In this case, you need simulated motion to guide the eye. However, if you are building an intro sequence or a narrative scene with separate assets (images, text, logos), you need true parallax to create depth. Here is a breakdown to help you choose the right tool for your project.
| Manual 3D (After Effects) | Automated Motion (FocuSee) | |
| Effect Type | True 3D parallax (real depth) | Simulated 2D camera motion |
| Best For | Films, music videos, motion graphics | Tutorials, SaaS demos, UI videos |
| Time to Create | High (manual setup & keyframes) | Low (automatic) |
| Learning Curve | Steep | Easy |
| Hardware Load | High | Low–Moderate |
In most real-world scenarios, creators choose automated motion over true 3D because it delivers 80% of the visual improvement with 20% of the effort.
Option A: Manual 3D Layers (After Effects)
- Type of Effect: True Parallax. You physically separate layers in 3D space.
- Best Use Case: Narrative films, music videos, and complex motion graphics where you need background and foreground moving at different speeds.
- Time Cost: High. Requires setting up a virtual camera, positioning layers in the z-axis depth, and smoothing keyframe animation.
- Hardware Demand: High. Multi-layer 3D renders can tax the GPU.
Option B: Automated Smart Focus (FocuSee)
- Type of Effect: Simulated Motion. High-quality 2D motion that mimics a camera operator’s smooth panning and zooming.
- Best Use Case: Software tutorials, product demos, and presentation videos where the goal is to direct attention across a flat interface.
- Time Cost: Low. The software handles the camera orbit, pan, and dolly logic automatically based on cursor movement.
- Hardware Demand: Low to Moderate. Optimized for standard screen recording workflows.
When to Use Each Method (Quick Answer)
- If you need to manipulate individual elements in 3D space (e.g., flying text behind a person), you must use the manual method (Option A).
- If your goal is simply to direct viewer attention across a 2D interface dynamically without making it look “cheap,” the automated solution (Option B) is far more efficient.
Expert Tips: Avoiding the ‘Seasick’ Effect and Flat Visuals
Once you know how to create a 3d camera effect, the temptation to overuse it is strong. However, erratic camera movement is the fastest way to make an edit look amateurish or cause motion sickness.
Here is a critical tip that most other guides miss, and it is something we see often in our content audits: The most common beginner mistake is treating 3D camera effects as visual decoration rather than spatial storytelling. When depth is designed intentionally, even minimal camera movement can dramatically increase perceived production value.
Guidelines for Professional Results
- Motivate the Movement
Only move the camera if it reveals new information or emphasizes a specific moment. A slow “push-in” (dolly forward) signals importance or intensity. A lateral truck (moving sideways) usually signifies a transition or a change in focus.
- Ease Your Keyframes
Linear motion feels robotic and unnatural. Always apply “Easy Ease” (F9 in After Effects) to your keyframes. This simulates the natural inertia of a physical camera, starting slow, accelerating, and slowing down again.
- Utilize Depth of Field
To sell the effect further, enable depth of field on your virtual camera settings. This blurs out layers that are not in focus, mimicking a real camera lens and directing the viewer’s eye to the sharpest part of the frame. This is a subtle but powerful way to fix the “video clarity” concerns many users have.
Frequently Asked Questions About 3D Camera Effects
Can you create a 3D camera effect without After Effects?
True 3D (like in After Effects) involves parallax, where foreground and background objects move at different speeds because they are physically separated in Z-space. FocuSee creates simulated motion on a flat plane (your screen recording). It zooms and pans smoothly to guide the eye, but it cannot separate the buttons from the background of your software interface.
When should you use 3D camera effects?
Cinematic video editing, music videos, and high-end commercials benefit most from manual 3D effects created in tools like After Effects. However, educational content, software demos, and explainer videos benefit significantly from automated camera movement tools like FocuSee, which keep the viewer focused on the action without distracting visual flair.
Why does my background look blurry when I do the 3D effect?
If you are using the manual method, you likely pushed the background back in Z-space and scaled it up. If your original image resolution wasn’t high enough (e.g., using a 1080p image in a 1080p composition), scaling it up will cause pixelation. Always use 4K images or vector graphics for background layers.
Do I need After Effects to make a 3D camera effect?
Not necessarily. While After Effects is the standard for manual 3D compositing, tools like FocuSee use smart algorithms to simulate camera movement and focus for screen recordings, eliminating the need for complex compositing software.
Can 3D camera effects improve storytelling?
Absolutely. By controlling what is in focus and how the “camera” moves through space, you guide the viewer’s attention. A push-in can heighten tension, while a pull-back can reveal context. This transforms passive viewing into an active journey through your content.
Conclusion
Creating a cinematic 3d camera effect is no longer a technique reserved solely for high-end production studios. Whether you choose to manually manipulate z-axis depth for artistic control or use intelligent automation to enhance your tutorials, the goal remains the same: eliminating flatness and engaging your audience.
If you are ready to break free from static, 2D recordings but want to avoid the steep learning curve of manual animation, FocuSee offers the most direct solution for screen-based content. By automating the complex mechanics of focus and zoom, it allows you to produce professional video content in minutes rather than hours. Download FocuSee today to regain control over your visual storytelling and turn your next screen recording into a dynamic viewing experience.