3D Camera Edit: Cinematic Depth for Creators (2026 Guide)
Your videos look flat—even when your content is strong. Basic zooms don’t create depth, and pro tools feel too complex or time-consuming to learn. A true 3D camera edit fixes this by adding real spatial movement and cinematic depth. This guide shows you how to achieve it—fast with automated tools or precisely with manual control.
What Is a True 3D Camera Edit?
To understand why some videos feel “deep” and others feel “flat,” you must grasp the mechanics of a true 3d camera edit. Unlike a standard 2D zoom—which simply scales a flat image larger—a 3D edit manipulates elements within a three-dimensional space using Z-axis depth.
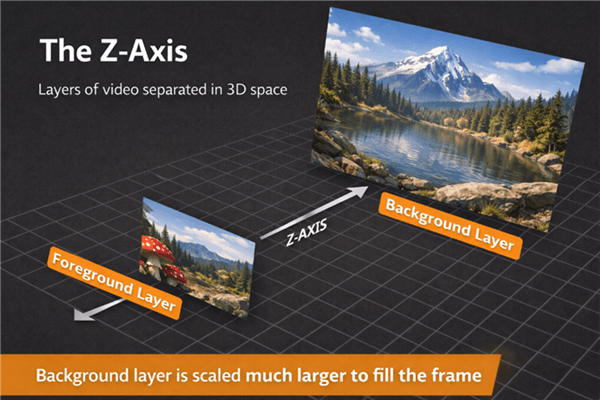
The Z-Axis
Z-Axis & Parallax
By placing elements at different depths, closer objects move faster than distant ones (parallax), making the scene feel spatial and realistic.
Virtual Camera
With layers arranged in 3D space, a virtual camera can move (pan, orbit, dolly) through the scene, producing real perspective shifts instead of basic scaling.
3D Camera Editing: Automated vs. Manual Workflows
Before attempting a 3D camera effect editing workflow, you must select the procedure that fits your resources. The choice between manual compositing and smart automation is not just about skill level; it is about the return on investment for your time.
We have analyzed both approaches based on time cost, skill requirements, and rendering demands.
Choosing Your Method: Manual Compositing vs. Smart Automation
| Category | Manual Compositing (True 3D) | Smart Automation (Simulated 3D) |
| Workflow Type | Layer-based compositing in a true 3D space with a virtual camera | Intelligent tracking with automated pans and zooms |
| Depth & Parallax | Real Z-axis depth and cinematic parallax | Simulated depth, no real 3D space |
| Time Cost | Very High — hours per minute of footage | Low — minutes per video |
| Skill Level | Advanced (keyframes, graphs, 3D space, parenting) | Beginner to Intermediate |
| Learning Curve | Steep | Minimal |
| Editing Speed | Slow and meticulous | Fast and streamlined |
| Rendering Demands | Heavy CPU/GPU usage | Lightweight and efficient |
| Creative Control | Maximum, fully customizable camera paths | Limited but optimized for clarity |
| Best Use Cases | Music videos, cinematic intros, narrative B-roll | Tutorials, software demos, presentations, explainers |
| Return on Time (ROI) | Low for routine content, high for cinematic projects | High for recurring content and fast production |
Manual Compositing (The “True 3D” Method)
This approach, typically performed in software like Adobe After Effects, represents the industry standard for cinematic video editing. It involves placing 2D layers into a true 3D space using z-axis depth and manipulating a virtual camera to fly through them.
- Time Cost: High. Expect to spend hours editing for every minute of final footage.
- Skill Required: Advanced. You must understand keyframes, graph editors, parenting, and spatial arrangement.
- Best For: Music videos, high-concept channel intros, and narrative B-roll where true depth and parallax are essential.
Smart Automation (The “Simulated” Method)
This method uses software like FocuSee to simulate camera motion. It does not create true 3D space with Z-axis depth, but intelligently tracks on-screen action to apply smooth pans and zooms.
- Time Cost: Low. A polished video can be ready in minutes.
- Skill Required: Beginner to Intermediate. No knowledge of keyframes is necessary.
- Best For: Tutorials, software demos, presentation recordings, and explainer videos where clarity and speed are the priorities.
How to Do a 3D Camera Edit in After Effects
For projects requiring total creative control, such as high-end B-roll or music videos, Adobe After Effects remains the industry standard. This workflow transforms static assets into a dynamic environment.
Real 3D layers can be demanding on your computer. If you experience lag, lower your playback resolution to “Third” or “Quarter” at the bottom of the composition window.
1. Enable 3D Layers
Import your footage and identify the layers you want to manipulate (e.g., a text title, a foreground subject, and a background texture). In the timeline, toggle the “3D Layer” switch (represented by a cube icon) for every clip. This disconnects the layer from the 2D plane.
2. Arrange Your Scene (The Critical Step)
This is where most beginners get stuck. Simply turning on the 3D switch does not create depth; it just enables the potential for depth.
You must now physically separate your layers:
- Select your background layer.
- Press
Pto open Position. - Increase the third value (Z-position) to push the layer far back into space (e.g., to 2000 or 3000 pixels).
- Crucial: As you push the layer back, it will appear smaller. Press
Sfor Scale and increase the size until it fills the frame again.
By pushing the background away and scaling it up, you create the gap required for the parallax effect.
3. Create a Virtual Camera
Navigate to Layer > New > Camera. We recommend choosing a “Two-Node Camera.”
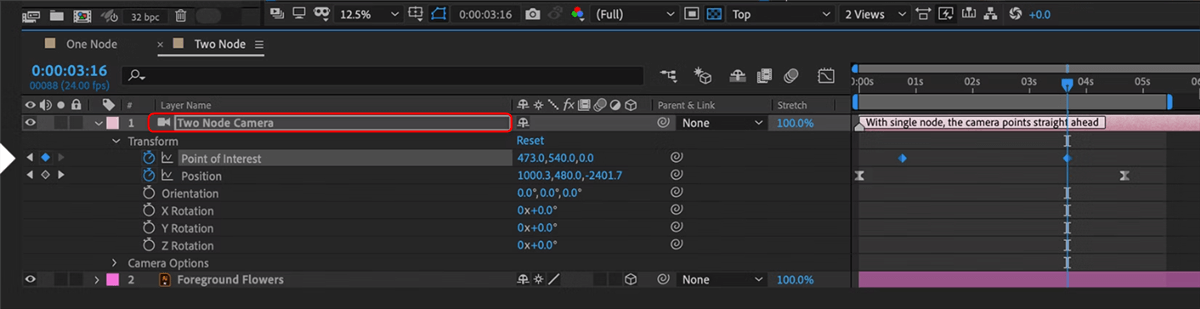
Two-Node Camera
Why Two-Node? A One-Node camera functions like a handheld camera—it looks wherever you position it. A Two-Node camera has a “Point of Interest” (target). This makes it much easier to keep your subject centered while the camera orbits around it.
4. The Null Object Control Method
Directly animating the camera’s position often leads to jerky, uncontrollable motion. To solve this, we use a virtual “tripod” called a Null Object.
- Create a Null Object (Layer > New > Null Object).
- Toggle the Null Object’s 3D switch (essential).
- Parent the Camera: Locate the “Parent & Link” column on your Camera layer. Click the spiral “pick whip” icon and drag it onto the Null Object layer.
You will now apply camera keyframes to the Null Object, not the camera itself. Rotate the Null Object to orbit the camera, or move the Null’s position to dolly in. Because you separated your layers in Step 2, you will now see the foreground moving faster than the background—true cinematic depth.
The Efficient Solution: Simulated Camera Movement for Tutorials
For creators who need to produce consistent reviews without spending days on a single edit, manual keyframing is often impractical. If you are producing screen recordings or tutorials, the goal is to keep the viewer engaged with the content, not to distract them with complex animation.
FocuSee serves as a specialized tool for generating a dynamic workflow specifically for screen recordings. It directly addresses the feeling of being overwhelmed by complex 3D tools by automating the camera movement based on your actions.
Solving the “Static Content” Problem
It’s important to be transparent: FocuSee does not create true 3D depth with parallax, where background layers move slower than foreground layers. Instead, it acts as a virtual camera operator for your 2D screen recording.
If you struggle with the common issue where camera motion looks flat or unnatural, FocuSee offers a practical solution:
- Smart Focus & Auto-Zoom: Automatically tracks your mouse cursor or key on-screen actions, applying smooth, simulated pans and zooms that guide the viewer’s attention like a professional camera.
- Simulated 3D Motion: By combining subtle background blur, cursor highlights, and motion smoothing, it creates the illusion of depth and cinematic movement without rendering a true 3D scene.
- Fluid Navigation: Erratic mouse movements are smoothed out, and automatic focus points ensure that every interaction feels intentional and visually engaging.
With these features, even static 2D content gains dynamic camera movement, helping tutorials, demos, and presentations feel polished and professional in minutes rather than hours.
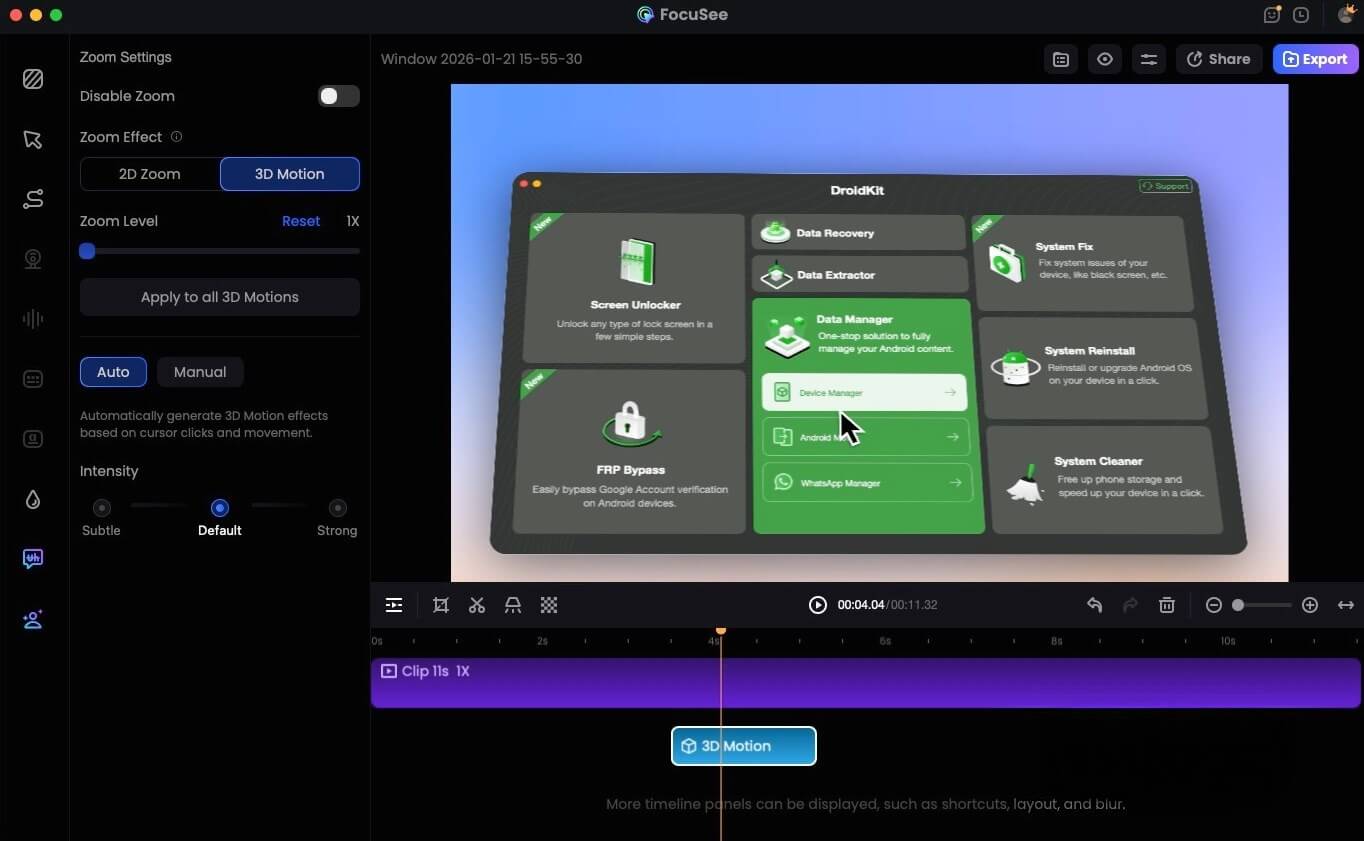
FocuSee 3D Motion
Elevating Production Value
For users who worry that their edits look amateur, the tool creates immediate production value through Cursor Effects and Motion Blur. Instead of a static screen, the video shifts perspective as you navigate.
While FocuSee is a paid software, it eliminates the need to manually set hundreds of keyframes. This allows you to turn a raw screen capture into a polished video in the time it takes to record the footage. This efficiency lets you focus on your script and delivery rather than the technical minutiae of the edit.
Frequently Asked Questions About 3D Camera Edits
Is 3D camera editing hard for beginners?
It depends on the result you want. Creating a “True 3D” scene in After Effects has a steep learning curve involving Z-space management and parenting. However, if your goal is simply to make screen recordings look dynamic, automated tools like FocuSee remove the difficulty entirely by simulating the motion for you.
What types of videos work best with 3D camera edits?
Cinematic 3d camera edit techniques excel in tech reviews, product showcases, and explainer videos. These formats benefit from the ability to isolate specific details using spatial separation. Conversely, simple vlogs or interview content rarely require complex 3D camera work and may even suffer from it if overused.
Can 3D camera edits improve storytelling?
Yes. By controlling the perspective, you direct the audience’s emotional response. A slow push-in can create tension or intimacy, while a wide pull-back can signal a conclusion or context. This transforms the camera from a passive observer into an active storytelling device.
How do I make 3D camera movement look smooth?
Smoothness comes from “easing.” In manual animation, this means adjusting the velocity of your keyframes so the camera accelerates and decelerates gradually, rather than starting and stopping instantly. In automated software, look for settings related to “damping” or “smoothness” to ensure the motion feels organic.
Conclusion
The journey from static, flat reviews to dynamic content doesn’t require you to become a full-time animator overnight. It is about finding the balance that works for your specific content.
For your standard software tutorials or quick walkthroughs, using a tool like FocuSee to add simulated camera movement is a smart efficiency play. It keeps the viewer engaged without blowing up your production schedule. However, for those high-stakes channel intros or “hero” shots, investing the time to build a manual 3D scene in After Effects—pushing those layers back in Z-space—will give you that unmistakable premium feel.
You now have the framework for both paths. Whether you choose the efficiency of smart automation or the granular control of manual compositing, the goal remains the same: guiding your viewer’s eye with intention.
If you are ready to stop fighting with keyframes for your daily content and want to see an immediate improvement in your screen recordings, FocuSee offers the fastest route to professional results. Download the free trial today and apply your first template. It is time to regain control of your editing process and finally add the depth your story deserves.