How to Make a Promo Video on iPhone in 2025: A Step-by-Step Guide

You have a powerful video camera in your pocket, but getting that clean, professional footage for your promo video can be a frustrating experience. You follow tutorials, but your product shots look shaky or amateurish, and your final uploads appear washed out. This is a common obstacle, but it is one you can solve with the right settings and techniques.
This guide provides a complete, mobile-only workflow to create a promotional video on your iPhone that looks and sounds professional. We’ll cover specific, actionable steps for stabilizing your phone, recording clean audio, choosing the right camera settings, and editing your video for platforms like TikTok, Instagram Reels, and YouTube Shorts.
To ensure our recommendations are accurate, this guide is based on hands-on testing with an iPhone 15 Pro and iPhone 13 on iOS 17.
A 5-Step Workflow for Creating Promotional Videos on iPhone
This five-step roadmap provides a clear path from idea to final export, all on your iPhone. Following these steps in order will help you stay organized and produce a polished, professional video every time.
- Plan & Prepare: Outline your video’s message (Hook, Value, Proof, CTA). Before shooting, prepare your gear and settings to ensure stable shots, clear audio, and good lighting.
- Set Up Your Camera: Configure your iPhone’s camera settings for the best quality. This means selecting the right resolution, disabling HDR video, and locking your exposure.
- Edit for Impact: Assemble your clips in an app like CapCut. Trim unnecessary footage, add text, and arrange your shots to tell a clear and engaging story.
- Perfect Audio & Branding: Clean up your audio, balance music with voiceover, and add on-brand elements like auto-captions with your custom fonts and colors.
- Export for Social Media: Export your video using the optimal settings for your target platforms to ensure it looks sharp on TikTok, Instagram, or YouTube Shorts.
How to Get Stable Shots and Clear Audio for iPhone Promo Video
Before you even touch your iPhone’s camera settings, the most significant improvements come from how you physically handle your phone and record audio.
Get Stable Shots (No Gimbal Required)
Shaky footage is the most common sign of an amateur video. You don’t need an expensive gimbal; stability comes from technique and simple tools.
- Use a Tripod: The easiest way to guarantee a stable shot is with a small, inexpensive phone tripod. A basic model with a phone mount costs less than $25 and will drastically improve your video quality.
- Brace Yourself: If you must shoot handheld, become a human tripod. Keep your elbows tucked in against your body and brace them on a stable surface like a table or countertop. This minimizes small shakes.
- Avoid Flicker Under LED Lights: If you see a strobing or flickering effect in your video when shooting indoors, it’s because your camera’s shutter speed is out of sync with the frequency of your lights. The native iPhone camera app doesn’t allow you to change this. The solution is to use a free pro camera app like Blackmagic Cam, which lets you manually set the shutter speed to 1/60 to eliminate flicker under standard US lighting (or 1/50 in most other regions).
A Simple Audio Kit for Clear Voiceovers
Poor audio quality can make even the best footage seem unprofessional. The microphone on your iPhone is good, but it picks up everything, including distracting echo and background noise.
- The Closet Hack: If you can’t buy a microphone yet, record your voiceover in a closet full of clothes. The soft fabrics absorb sound reflections, killing the echo and giving you a surprisingly clean vocal track.
- The Best Budget Mic: For about $20, you can buy a simple lavalier microphone (a small mic that clips to your shirt) with a Lightning or USB-C connector. This is the single biggest upgrade you can make to your audio. It isolates your voice, making it sound crisp and clear, just like you hear in professional content.
iPhone Camera Settings for Professional-Looking Video
With your setup ready, it’s time to configure your camera. These adjustments prevent common issues like washed-out colors and shifting focus.
Choose Your Resolution and Frame Rate (24fps vs 30fps)
Navigate to Settings > Camera > Record Video. For most social media promos, 4K at 30 fps (frames per second) is the best choice. It delivers sharp detail and smooth motion that feels native to social feeds. For a more cinematic, film-like look, you can select 24 fps, but shoot all your clips at the same frame rate to avoid jarring motion.
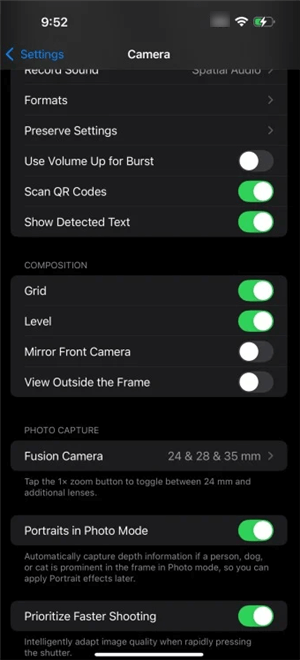
iPhone Camera Settings
Disable HDR Video to Prevent Washed-Out Uploads
One of the biggest frustrations for creators is a video that looks great on their phone but appears pale or “washed out” after uploading. This is caused by HDR (High Dynamic Range) video. To ensure consistent colors, disable it.
In the Record Video menu, find the HDR Video toggle and switch it off. This records in universally compatible SDR (Standard Dynamic Range), preventing color shifts when you upload.
Quick Tip: Already Shot in HDR?
If you have existing footage with this problem, you can easily convert it. Open a new project in CapCut, import your HDR clips, and then export the video using the H.264 codec. This process will convert the video to SDR, restoring the correct colors.
Use Exposure Lock (AE/AF Lock) for Crisp, Stable Shots
To stop your iPhone from automatically changing focus or brightness mid-shot, use the AE/AF Lock.
In the Camera app, frame your subject. Tap and hold on your focal point until you see the yellow AE/AF LOCK banner at the top. Now, a small sun icon will appear. Place your finger next to it and slowly slide down to decrease the exposure by −0.3 to −0.7. This simple move protects the bright parts of your image from looking blown out and adds a rich, professional quality to your shot.
How to Edit a Promo Video on iPhone with CapCut
With your clips filmed, it’s time to assemble them into a cohesive story. The free app CapCut provides all the tools you need to create a repeatable branding workflow.
Structure Your Video and Add On-Brand Captions
Arrange your clips in the timeline following the Hook, Value, Proof, CTA structure. Then, add captions and text overlays.
- Generate Captions: Use CapCut’s Auto Captions feature to transcribe any speech.
- Add Brand Fonts: CapCut lets you import custom fonts. First, download your font file (OTF or TTF) and save it in your iPhone’s Files app. In CapCut, select a text layer, go to Font > Add font, and choose the file.
- Position Text in Safe Zones: Keep all important text and logos away from the edges of the screen where they can be covered by platform interfaces. This ensures everyone can read your message.
Find Commercially Safe Music
Using popular music without the proper license can get your video taken down or lead to legal issues. For a business promo, always use music you have the right to use.
- Platform Libraries: Both TikTok and Meta (for Instagram) offer libraries of commercially licensed music that are free and safe to use for business content within their apps.
- Royalty-Free Services: For more variety, services like Epidemic Sound or Artlist offer subscriptions for high-quality music that is fully licensed for commercial use anywhere.
Apply Professional Sound Mixing and Ducking
To make your voiceover stand out, you need to lower the volume of the background music whenever you speak. This is called “audio ducking.”
In CapCut, this is done manually with keyframes:
- Select your music clip in the timeline.
- Play the video to the point just before the speech begins. Tap the keyframe icon (it looks like a diamond with a plus sign).
- Move a few frames forward, into the speech, and drag the volume of the music track down. A second keyframe is automatically added.
- A professional standard is to lower music by -8 to -12 dB during speech. Repeat the process at the end of the voiceover to bring the music volume back up.

Edit Video on iPhone with CapCut
Manual vs. AI Editing: Choosing Your iPhone Video Workflow
The manual workflow in CapCut is powerful and gives you complete creative control. However, it takes time to learn and execute. As a busy business owner, you can choose the method that best aligns with your goals.
| Feature | Manual Method (CapCut) | AI-Powered Tool (FocuSee) |
| Time to Edit | 1-3 hours per video | 5-15 minutes per video |
| Learning Curve | Moderate | Low |
| Audio Quality | Manual noise reduction and keyframe mixing | One-click AI noise removal & auto-ducking |
| Visual Polish | Depends on user skill and time | Automated zooms & professional templates |
| Consistency | Requires a detailed personal checklist | Automated through saved brand kits |
The Automated Option: Create Your Promo in Minutes with FocuSee
For creators who need to produce professional videos quickly, an AI-powered tool like FocuSee automates the most time-consuming parts of editing. While CapCut is excellent for manual control, FocuSee is a paid app designed for speed and consistency.
If you find yourself spending too much time on manual edits, here’s how a tool like FocuSee can help:
For Tedious Audio Mixing: In FocuSee, AI Audio Ducking does this automatically with one click. Its AI Noise Removal is also a simple way to clean up recordings from less-than-ideal locations.
For Highlighting Key Details: Instead of manually setting keyframes to zoom in on a product feature, FocuSee’s Intelligent Visual Focus automatically adds smooth zooms to highlight important actions.
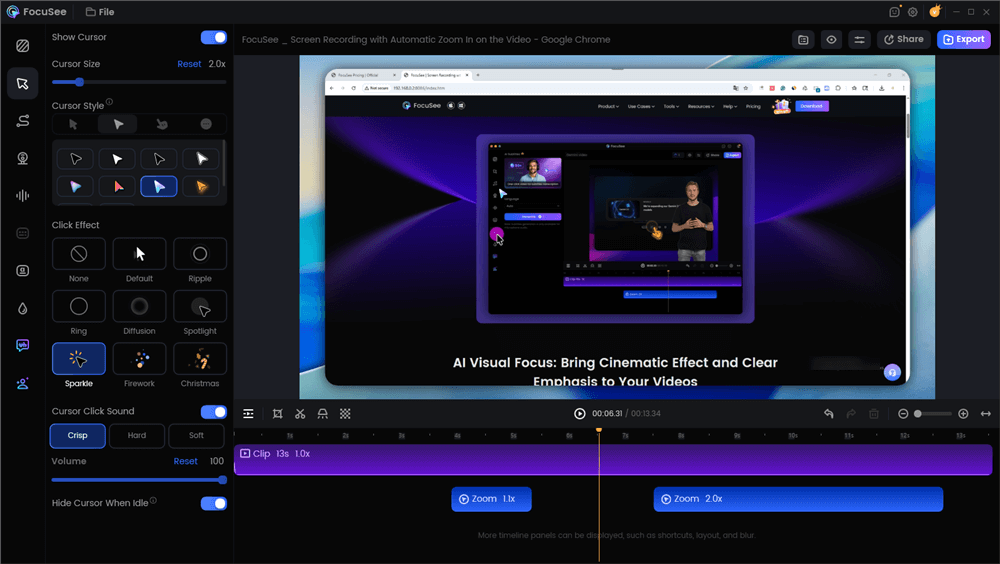
Edit Your Video with Auto Effects
For Faster Captioning: The Auto Subtitles feature generates fast, accurate captions in over 50 languages, saving you the manual effort of typing and timing them.
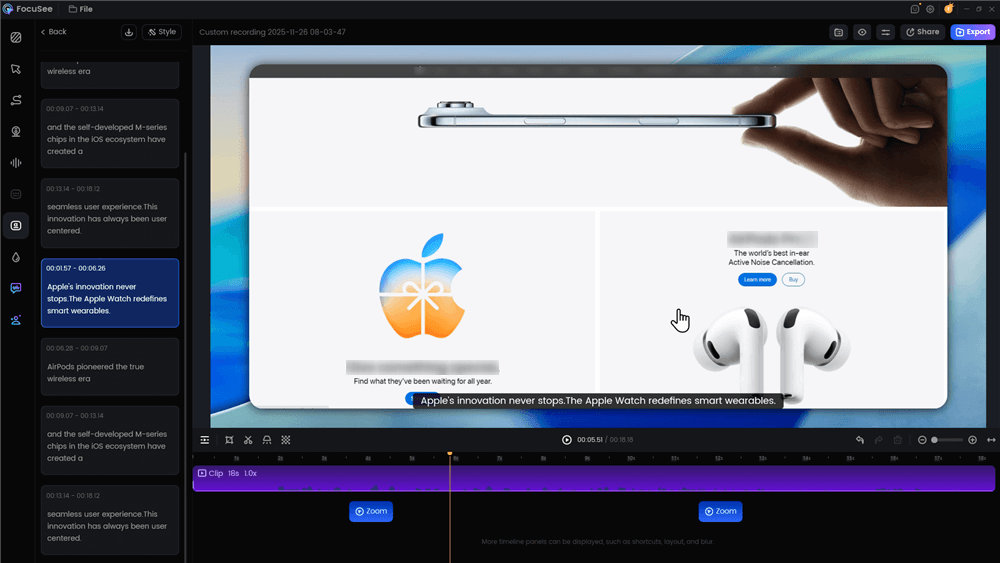
Automatic Subtitle Generation
FocuSee is an ideal solution for those who value speed and need to produce consistent, high-quality promotional content without a deep technical background.
Part 4: Export Settings and File Management
After your edit is complete, the final step is exporting the video with the correct settings. This ensures it looks sharp without being compressed into a blurry mess by social media platforms.
Recommended Export Settings for Instagram Reels, TikTok & Shorts
For all vertical video platforms, you should export in a 9:16 aspect ratio. Use these settings in your editing app for the best results:
| Platform | Resolution | Codec | Bitrate (Mbps) |
| Instagram Reels | 1080×1920 | H.264 | 10–14 Mbps |
| TikTok | 1080×1920 | H.264 | 12–16 Mbps |
| YouTube Shorts | 1080×1920 | H.264 | 12–16 Mbps |
The H.264 codec offers the widest compatibility. The bitrate balances file size and quality; staying within the 10–16 Mbps range is perfect for online streaming.
Managing Large 4K Video Files
Shooting in 4K creates large files that can fill your iPhone’s storage. After a shoot, use AirDrop or a USB-C cable to move your footage to a computer or an external SSD. Once the files are safely backed up, you can delete them from your phone to free up space.
FAQs About iPhone Promo Videos
How do I structure a 15–30s promo that converts?
A successful short promo uses a four-part structure: a strong Hook in the first 2-3 seconds, a clear Value proposition, social Proof like a customer quote, and a direct Call-to-Action (CTA).
What are the most important iPhone camera settings for a clean promo?
Set your camera to 4K at 30 fps. Most importantly, go to `Settings > Camera > Record Video` and turn the HDR Video toggle off to prevent washed-out colors. Use the AE/AF Lock to set your focus and exposure for stable, professional-looking shots.
How do I get clear audio and balance my voice with music?
For the best results, use an external lavalier microphone that connects to your iPhone’s charging port. To balance audio, use your editing app’s keyframe feature to lower the background music volume by -8 to -12 dB whenever someone is speaking.
How do I stop my video from looking washed out after I upload it?
This is almost always caused by recording in HDR. By disabling the HDR Video setting on your iPhone before you shoot, your video will be in the more compatible SDR format, ensuring colors look correct everywhere.
Conclusion
Creating a professional promo video on your iPhone is an achievable skill. By following a structured workflow—from stabilizing your phone and setting your camera correctly to editing with brand consistency—you can solve the core problems of shaky footage, washed-out colors, and poor audio.
Whether you choose the detailed manual control of CapCut or the automated speed of a tool like FocuSee, you now have a repeatable system for producing high-quality video. The key is to start with a solid foundation of stable, well-exposed, and clear-sounding footage. With these techniques, you can confidently create content that grows your brand.