How to Record Virtual Tour Videos: The Agent’s Guide to Pro Walkthroughs

If you are a real estate agent like Jamie, you know the panic of a seller demanding a “viral video” for their listing when you lack the budget for a professional film crew. Jamie searched “how to record virtual tour videos” after a disastrous attempt where the footage was shaky, the rooms looked like caves, and a client’s sensitive mail was clearly visible on the counter.
That feeling of staring at a “paperweight” phone—knowing the tool is powerful, but the results are amateur—is a major obstacle. This guide removes that frustration. We provide a tested workflow to stabilize your footage, fix lighting flicker, and protect client privacy, helping you ship professional videos that actually generate showings.
Defining the Format: Video Walkthrough vs. 3D Tour
When sellers demand video marketing, knowing how to record virtual tour videos effectively becomes a critical skill. Before you pick up a camera, it is vital to distinguish the format, as the terminology often confuses beginners.
- Video Walkthrough (Our Focus): This is a linear video file (MP4) that guides the viewer through a home from start to finish. It allows for voiceover, music, and specific framing.
- 360/3D Tour: This is an interactive simulation (like Matterport or Zillow 3D Home) where the user clicks to move through the space.
Jamie’s initial struggle stemmed from trying to make a video look like a 3D tour, resulting in disorienting spins. A successful virtual house tour video should feel like a guided open house, not a video game.
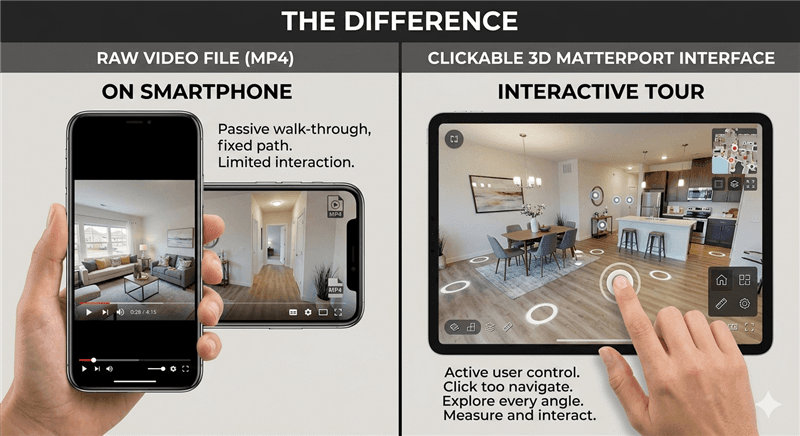
Video Walkthrough vs 360 Tour
Decision Guide: Physical Filming vs. Digital Capture
Before selecting your gear, you must determine which production workflow suits your current assets. There are two primary ways to record virtual tour videos: physically walking through the home with a camera (Manual), or digitally recording a screen capture of an existing 3D tour (Digital).
Method 1: Physical Walkthrough (Manual)
This involves being on-site with a smartphone or camera. This method provides the highest authenticity, allowing for live narration and highlighting specific details like high-end finishes or window views. However, it requires gimbal stabilization and knowledge of lighting to avoid grain.
Method 2: 3D Tour Screen Capture (Digital)
If you already have a Matterport or Zillow 3D link, you do not need to re-film the house to create social media content. You can use screen recording software to navigate the 3D space and export it as a video file. This method eliminates physical stability issues but requires software that can smooth out the jerky “click-and-drag” motion of a mouse.
Strategic Comparison Table
| Physical Walkthrough (Phone + Gimbal) | Digital Screen Capture (FocuSee) | |
| Time to Publish | 2–4 Hours (Travel + Filming + Editing) | 15–30 Minutes (Record + Auto-Edit) |
| Stability | Depends on operator skill (“Ninja Walk”) | 100% Perfect (Software smoothed) |
| Privacy Control | Hard (Hide or blur manually) | Easy (Blur in post-production) |
| Cost | High (Gear, travel) | Low (Software subscription) |
The Digital Shortcut: Turning Existing 3D Tours into Video with FocuSee
For agents who already possess a 3D scan (Matterport, Zillow 3D Home) but need a video file for Instagram Reels or TikTok, re-visiting the property to film is inefficient. The digital shortcut is to record a virtual tour video directly from your computer screen using FocuSee.
FocuSee automates the post-production process, addressing the common complaint that “screen recordings look static and boring.” When you record your navigation through a 3D model, FocuSee’s Smart Focus/Auto-Zoom automatically applies cinematic pans and zooms to cursor movements. This mimics the smooth motion of a physical camera slider without requiring manual keyframe editing.
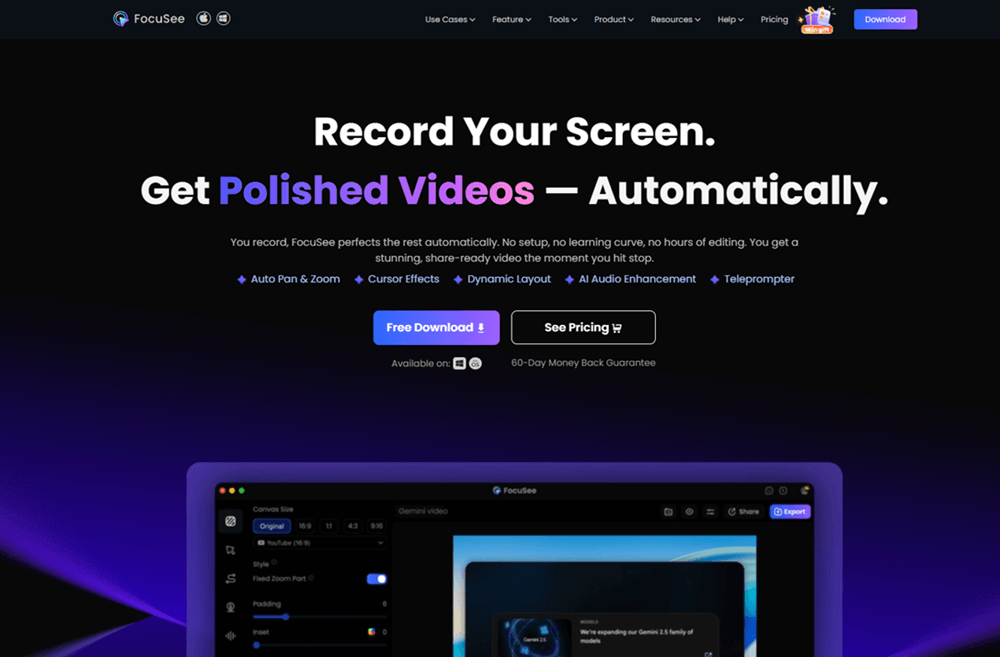
FocuSee Official Website
This tool also addresses specific real estate pain points:
- Privacy Protection: If a family photo or security code is visible in the 3D scan, you can use the Privacy Blur feature to obscure it instantly, ensuring the final video is safe for public social platforms.
- Platform Optimization: You can export the final video in vertical formats optimized for mobile viewing, allowing you to repurpose a horizontal 3D tour for TikTok or YouTube Shorts.
- Automatic Captions: If you narrate over the screen recording, FocuSee generates subtitles automatically—crucial for social media where many users watch without sound.
For users prioritizing speed, this converts a passive 3D link into an active marketing asset in minutes.
Gear & Settings: Preventing Flicker and Grain on Smartphone Shoots
If you are filming physically, the biggest quality leap comes from controlling motion and lighting artifacts, not buying a cinema camera. In Jamie’s case, the initial footage suffered from distracting strobing lights—a common issue in real estate virtual tour videos.
The Expert Fix for 60Hz Flicker
For US homes, the electrical grid operates at 60Hz. Many creators accidentally shoot at settings that clash with this frequency (like 24fps or variable shutter speeds), causing LED lights to band or flicker.
To fix this, you must match your camera settings (fps/shutter/ISO) to 60Hz-friendly values:
- Frame Rate: Set your phone to shoot at 30fps or 60fps.
- Shutter Speed: If using a pro app (like Filmic Pro), lock your shutter speed to 1/60 or 1/120.
- Avoid 24fps: Unless you can manually set the shutter speed to 1/60, avoid the “cinematic” 24fps setting, as it often introduces strobing in homes with LED recessed lighting.
Exposure and White Balance
Before pressing record, tap and hold your screen to activate AE/AF Lock (Auto Exposure/Auto Focus Lock). This prevents the video from brightening and darkening wildly as you move from a dark hallway to a bright kitchen. It also stops the white balance consistency from shifting, keeping your walls looking the same color throughout the video.
Minimal Gear Stack & The “Audio Safety Check”
You do not need a heavy DSLR. A lightweight setup helps you move through tight spaces.
- Camera: A modern smartphone (iPhone 13+ or Pixel 7+) using the tripod + wide lens (0.5x) setting for bathrooms and small bedrooms.
- Stabilization: A budget gimbal stabilization tool (like the DJI Osmo) is essential to remove micro-jitters.
- Audio: A wireless lav mic plugged into the phone ensures your narration is crisp.
Pro Tip: Before you record the whole house, do a “scratch test.” Record 10 seconds of you speaking and scratching the microphone lightly. Play it back immediately. If you don’t hear the scratch, your phone is using its internal mic, not the lav. This ten-second check prevents the heartbreak of recording a 20-minute silent tour.
The Shot List: A Room-by-Room Walkthrough Strategy
One of the main obstacles Jamie faced was getting lost in the house, resulting in awkward footage where they had to turn around in a closet. To avoid this, use a consistent room-to-room shot list.
The Logical Path Template
- Exterior: Start at the curb or front door to establish context.
- Entry/Foyer: The “welcome” shot.
- Main Living Areas: Living room flowing into the dining area.
- Kitchen: The heart of the home (spend extra time here).
- Primary Suite: Bedroom and attached bath.
- Secondary Rooms: Quick pans of guest rooms.
- Backyard/Closing: End with the outdoor lifestyle feature.
Movement Technique: The Ninja Walk
Even with a gimbal, your footsteps can shake the camera. Use the slow walking (“ninja walk”) technique:
- Pace: Walk at half your normal speed. If you think you are moving slowly, go slower.
- Posture: Bend your knees slightly to lower your center of gravity.
- Step: Roll your feet from heel to toe to absorb shock. Imagine you are balancing a full glass of water on your head. This keeps the camera horizon level and prevents the “bobbing” effect.
The Doorway Rule
Avoid turning in the middle of a room, which can cause viewer motion sickness. Instead, follow this specific sequence for every room entry:
- Walk straight through the doorway into the room.
- Stop completely.
- Pivot slowly using the joystick on your gimbal to show the space.
- Walk forward again to the next point of interest.
This “Move-Stop-Pivot-Move” cadence creates a logical flow that helps viewers understand the floor plan overlay if you choose to add one later.
Mobile Editing: How to Fix Footage on Your Phone
In my case, the moment of frustration I hit was realizing—after filming a perfect take—that a visible stack of mail and a family portrait were clearly legible in the video.
When you film physically, you cannot use desktop tools like FocuSee to fix these issues; you need a mobile editor that handles the footage right on your device.
Recommended Mobile Apps
You do not need to be a video editor to get professional results. We recommend these two apps for their balance of power and ease of use:
- CapCut: The industry standard for mobile creators. It has excellent stabilization features and specific “Mosaic” or “Blur” effects to hide private items.
- VN Video Editor: A great alternative if you want a clean interface with no watermarks on the free version.
The Privacy Checklist & How to Fix It
Before exporting, review your footage for specific risks: family photos, diplomas, mail on counters, prescription bottles, or security system panels.
How to blur items in CapCut:
- Import your video clip.
- Tap Effects -> Video Effects -> Lens.
- Select Blur.
- Tap Object and select the area of the screen (or use an “Overlay” mask) to cover the sensitive item specifically.
The Voiceover Script Template
A video that doesn’t generate leads is just entertainment. If you struggle with what to say, use this 3-Point Script Template for every major room to ensure high conversion:
- The Hook (What is it?): “Here is the newly renovated chef’s kitchen…”
- The Flow (Where are we?): “…which opens directly onto the family room, perfect for entertaining…”
- The Lifestyle (Why does it matter?): “…imagine hosting your holiday dinners here with this double oven.”
End with a Call to Action (CTA): “Text [Number] for a Private Showing.”
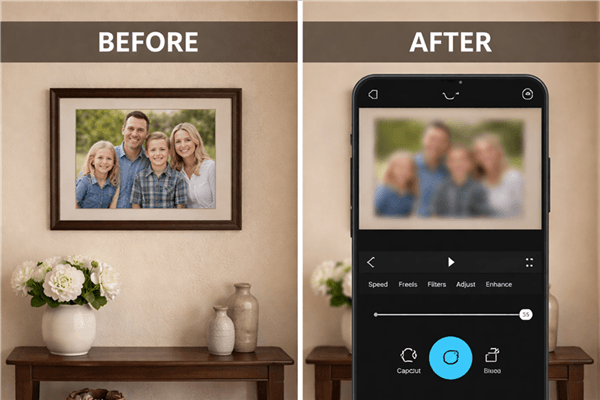
Blurred Private Details in a House Tour Video
Publishing Your Virtual Tour: MLS, Social, and YouTube
Once your video is polished, you need a distribution strategy. A single record virtual tour videos session should yield multiple assets formatted for different platforms. This is often called a “Content Waterfall.”
1. The Master Cut (Horizontal, 16:9)
- Destinations: YouTube/Vimeo/Wistia hosting, listing website, MLS (if allowed).
- Format: 2-3 minutes. Includes full walkthrough, b-roll and cutaways, and detailed voiceover vs live narration.
- Goal: Inform serious buyers who are researching the property deeply.
2. The Social Cut (Vertical, 9:16)
- Destinations: Instagram Reels, TikTok, YouTube Shorts, Zillow Listing Media.
- Format: 15–60 seconds. Fast-paced, music-driven, highlighting only the “hero” rooms (Kitchen, Primary Bed, Backyard).
- Goal: Viral reach and awareness.
Hosting and Embedding
For the MLS, avoid hosting the video directly if file size limits apply. Instead, host the video on YouTube or Vimeo and use the unbranded link (to comply with MLS rules about agent branding). For social media, always upload the raw vertical file directly to the platform rather than posting a link, as native videos perform significantly better.
Frequently Asked Questions About Virtual Tour Videos
What are the best apps for editing virtual tour videos on a phone?
For physical walkthroughs filmed on a smartphone, CapCut and VN Video Editor are the top choices. Both allow you to trim clips, add music, and crucially, apply blur effects to sensitive items like family photos or mail.
What is the difference between a virtual tour video and a 360/3D virtual tour?
A virtual tour video is a standard video file (MP4) that plays from start to finish, guiding the viewer through the home. A 360 or 3D tour (like Matterport) is an interactive simulation where the user clicks to move around and look in different directions.
How do I record a virtual tour video with clear audio?
Do not rely on the phone’s built-in microphone if you are more than two feet away. Use a wireless lav mic that clips to your collar. Always perform a “scratch test” (scratch the mic while recording for 5 seconds and play it back) to ensure the audio is capturing from the lav, not the phone.
Can I turn a Matterport/3D tour into a video?
Yes. You can use screen recording software like FocuSee to record your screen while you navigate the 3D tour. FocuSee’s auto-zoom and mouse smoothing features make this recording look like a professionally filmed video, which you can then share on platforms that don’t support interactive 3D links (like Instagram or TikTok).
Conclusion
Recording a professional virtual tour does not require a film crew, but it does require a plan. By choosing the right workflow—whether that’s the physical “Ninja Walk” with a gimbal or the digital shortcut of screen-recording a 3D tour—you solve the core issues of shaky footage and lighting flicker that plague amateur videos.
Remember Jamie’s “paperweight” moment? You can avoid that. If you need to turn an existing 3D tour into a sharable video file in minutes, FocuSee is the most efficient tool to automate the process. If you are filming on-site, grab your gimbal, perform your audio scratch test, and use the “Stop-Pivot-Move” doorway rule. Regain control of your listing marketing today—download FocuSee for your digital captures, or open CapCut to start editing your first physical masterpiece.