How to Make a Virtual Tour: A Step-by-Step Guide for Real Estate

Losing a potential listing because a competitor offered a “3D immersive experience” is a specific kind of frustration. Take Sam, a real estate agent we spoke to recently. Sam bought a high-end smartphone, assuming that making a virtual tour was as simple as spinning around in a circle. The result? A disorienting, disjointed mess with dark windows and mismatched walls that looked nothing like the professional examples online.
How to Make a Virtual Tour
If you are stuck asking, “I want the easiest setup that still looks professional,” or worrying that your current attempts look “cheap,” you are not alone. Learning how to create a virtual tour requires understanding the difference between simple panoramas and true spatial capture. This guide creates a distinct path from frustration to a repeatable marketing asset. We will cover the hardware, the capture geometry, and the specific software needed to build a tour that keeps viewers engaged.
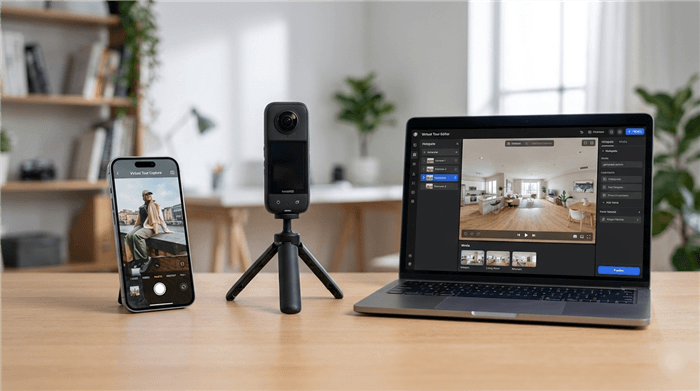
The methods below have been verified across three distinct setups: a handheld iPhone using Zillow 3D Home, a stand-alone Insta360 camera, and a full Matterport pro-level workflow.
The “Day-of-Shoot” Prep Checklist
Before you even touch a camera, the room must be prepped. The camera sees everything—in 360 degrees. You cannot hide clutter behind the lens because there is no “behind.”
Save this checklist to your phone or send it to your assistant before the shoot:
- Lighting: Turn on ALL overhead lights, lamps, and under-cabinet lighting.
- Blinds: Open all blinds to a 45-degree angle (slanted up) to let light in but obscure the view of the street/neighbors.
- Doors: Open all internal doors to create a clear walking path (except closets and small pantries).
- Bathrooms: Close ALL toilet lids. This is non-negotiable for a professional look.
- Surfaces: Clear countertops of mail, soap dispensers, and family photos.
- Privacy: Remove or blur family photos, diplomas, and visible Wi-Fi passwords.
- Reflections: Check mirrors. If you can see the camera (or yourself) in the mirror from the center of the room, you will need to adjust your position slightly.
Method 1: The Professional Standard (360 Camera)
If your goal is to learn how to make a 360 virtual tour that secures listings, the most effective method involves a dedicated 360 camera. While smartphones are capable, devices like the Ricoh THETA Z1 or Insta360 X3 are purpose-built to capture an entire room in a single click using 360 photo (equirectangular) formats.
Why Upgrade?
- Speed: Capture a whole room in 3 seconds.
- No Stitching Errors: The dual lenses snap simultaneously, eliminating the “ghosting” (chopped-up walls or furniture) common with phone apps.
- HDR: These cameras handle bright windows and dark corners far better than a phone can.
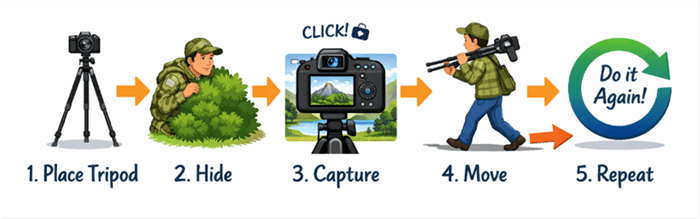
The Workflow
- Tripod Placement: Place a slim monopod in the center of the room. Ensure the camera is at roughly eye level (approx. 5ft to 5’4″).
- Hide and Capture: Connect to the camera via its mobile app. Step out of the room or hide behind a wall to avoid being in the shot.
- Trigger: Tap capture on your phone screen.
- Relocate: Move the tripod to the next logical spot—usually 5 to 8 feet away—ensuring a clear line of sight to the previous point.
How to Make a Virtual Tour with a 360 Camera
Method 2: The Budget Option (iPhone/Android)
For those asking how to make a virtual tour on iPhone or Android with zero budget, apps like Zillow 3D Home or the Google Street View app provide a viable entry point. This method relies on manually rotating your phone to capture a scene in segments.
The “Nodal Point” Technique (Crucial for Sharpness)
The biggest mistake beginners make is holding the phone out and rotating their body. This changes the perspective of the lens and causes walls to misalign (parallax error).
Do this instead:
Imagine your phone is balancing on the tip of a vertical stick (a monopod). You must rotate the phone around the lens, not your body around the room.
- Tuck your elbows into your ribs.
- Hold the phone close to your chest.
- Shuffle your feet in a tight circle, keeping the phone lens in the same point in space, simply pivoting the angle.
Lighting and Exposure
Phones struggle with high contrast (bright windows vs. dark hallways).
Lock Exposure: Before starting the scan, tap and hold your finger on a mid-tone area of the screen (like a grey wall, not a bright window) until AE/AF LOCK appears. This prevents the video from flickering from light to dark as you spin.
Expert Optimization: Fixing “Jumpy” Navigation
Even with a high-end camera, a tour can fail if the movement feels unnatural. The #1 reason virtual tours feel “cheap” isn’t the camera resolution—it’s inconsistent 360 camera tripod placement.
If your tripod height varies or is placed too close to walls, viewers experience abrupt spins and disorienting “teleport” transitions.
The Shot Plan Checklist
To fix this, you must standardize your geometry:
- Consistent Height: Keep the camera at the same height (approx. 5’4”) for every single shot. Do not raise it for high ceilings or lower it for bedrooms. Consistency grounds the viewer.
- The Hallway Rule: Never shoot from inside a doorway. Place one shot in the hallway and one inside the room, ensuring a clean transition through the threshold.
- Line-of-Sight: Only place capture points where the previous point is clearly visible. This allows scene-to-scene navigation to feel like walking rather than warping.
- Lighting Transitions: When moving from a dark hallway to a bright bedroom, adjust your exposure manually if your camera allows. If the transition is too drastic, the viewer will be momentarily “blinded” by the white balance shift.
Software Selection: Where to Host Your Tour
Once you have your photos, you need software to stitch them into a walkable tour. This is where pricing models often confuse new agents.
The Breakdown: Subscription vs. One-Time Pay
| Matterport | CloudPano | Kuula | Zillow 3D Home | |
| Best For | High-end listings | Budget-conscious pros | DIY customizers | Total beginners |
| Pricing Model | Monthly subscription | One-time or lifetime | Monthly (low cost) | Free |
| Key Features | Auto “Dollhouse” 3D model, polished experience | Own tours forever, flat fee, customizable | Affordable, high-quality images, flexible hotspots | Basic quality, boosts Zillow listing visibility |
Recommendation: If you want the “Dollhouse” effect, pay for Matterport. If you want to keep costs low and own your data, CloudPano or Kuula are excellent alternatives.
The Social Media Problem: Sharing Your Tour
Here is a common pain point: You cannot post an interactive Matterport link to Instagram or TikTok. Those platforms only support video files. This often leaves agents with a great tour that no one on social media sees.
The Solution: Guided Video Tours with FocuSee
To bridge this gap, you need to turn your interactive tour into a video. FocuSee is a screen recording tool that automates the “cinematography” of this process.
Instead of trying to smoothly drag your mouse across the screen (which often looks shaky), FocuSee records your clicks and automatically applies smooth zooms and pans.
- How it works: You record yourself clicking through the tour. If you click on a granite countertop hotspot, FocuSee detects the click and automatically zooms in on that area smoothly in the final video.
- Cursor Effects: It highlights your mouse movements, visually teaching the viewer how to navigate the property when they eventually visit the full link.
- Vertical Export: You can export the recording in vertical (9:16) format, making your virtual open house video ready for Instagram Reels and TikTok immediately.
Related Article: 10 Best Screen Recorders for Windows: Tested & Ranked >
Publishing and Google Maps Integration
You have captured the photos and built the tour. Now, how do you actually get it on your website?
Embedding on Your Website
Most tour software provides an embed code (starting with <iframe…).
- WordPress: Add a “Custom HTML” block to your page. Paste the iframe code inside. Preview the page to ensure the tour loads.
- Wix/Squarespace: Look for the “Embed Code” or “Embed Site” widget. Paste the code there.
- Tip: Ensure the width is set to 100% so it scales correctly on mobile devices.
Google Street View & GPS Metadata
If you are asking how to make a virtual tour with Google Street View, specific hardware is required. Google requires GPS metadata inside the image files to place them on the map correctly.
- The Problem: Most DSLR cameras and some older 360 cameras do not have built-in GPS. If you upload these files to Google Street View Studio, they may be rejected or placed in the middle of the ocean.
- The Fix: Use a camera with built-in GPS, such as the Insta360 X3, Ricoh THETA Z1, or Trisio Lite 2. Check your camera specs for “Built-in GPS.” If your camera lacks this, you will have to manually tag GPS coordinates using third-party software, which adds significant time to your workflow.
Frequently Asked Questions
What is the easiest way to make a virtual tour without buying a camera?
The easiest method is using the Zillow 3D Home app. It guides you through capturing panoramas and handles the stitching automatically. It is free and directly integrates with your Zillow listing, though the visual quality is lower than that of a dedicated camera.
How many 360-degree photos do I need for a house?
A general rule is one photo per small room (bedrooms, bathrooms) and two to three photos for larger spaces (living rooms, kitchens) to maintain line-of-sight navigation. A standard 3-bedroom home usually requires 15–20 scans.
How do I make the tour load faster on mobile?
Optimize your images before uploading. If you are editing photos in Photoshop or Lightroom, export them as JPEGs with a quality setting of around 70-80%. Large, uncompressed TIFF or PNG files will kill your page load speed.
Do I need a professional photographer?
For luxury listings (over $1M), a professional photographer is recommended because they understand advanced lighting and window masking. for standard residential listings, a modern 360 camera allows an agent to produce a very competitive tour with about 30 minutes of practice.
Conclusion
Learning how to make a virtual tour transforms a simple property listing into an interactive experience that builds trust before a client ever steps through the door. Whether you choose the “phone-first” method for budget projects or the “pro camera” method for high-end listings, the success of your tour relies on preparation.
Remember the basics: Pre-stage the room using the checklist, maintain a consistent camera height, and choose the hosting platform that fits your budget model (subscription vs. one-time).