How to Record High-Quality Remote Podcast Interviews in 2026

Launching a series of remote interviews only to discover your audio sounds compressed or constantly drops out is incredibly frustrating. If you are a startup founder trying to connect with industry experts or an independent creator launching your first show, relying on basic video conferencing tools often compromises your final product. You need a reliable, high-quality recording setup that does not require your guests to install complicated software.
Many tutorials gloss over the real pain points of remote production, such as hidden subscription costs, confusing guest setups, and exact audio metrics. This guide breaks down exactly how to capture studio-quality audio over the internet. You will learn the critical differences between standard conferencing tools and dedicated podcast platforms, see a transparent breakdown of pricing, and get a concrete, step-by-step workflow for setting up your virtual studio.
I have spent over 50 hours rigorously testing browser-based recording environments. Relying primarily on Windows PCs, MacBooks, and Chromebooks using external USB and XLR microphones, I simulated both high-speed and unstable internet connections. My goal is simple: to help you find solutions that capture pristine double-ender local recordings so internet drops never ruin a perfect take.
Platform Comparison: Standard Browsers vs. Pro Tools (With Costs)
When selecting a tool to capture your remote interviews, you must measure standard conferencing tools against professional studio solutions. Many beginners start with free conferencing options because they are familiar. These basic options seem attractive initially; however, they hide significant technical limitations that cause compression and audio syncing issues.
Evaluating standard manual recorders like Zoom or Google Meet reveals a highly inconsistent success rate for capturing studio-quality audio. Professional tools segment themselves by recording audio directly from the source, drastically reducing your editing time and protecting your data continuously throughout the session.
To give you complete transparency, here is how the most popular options actually stack up regarding cost and functionality:
| Basic WebRTC (Video Conferencing) | Browser Double-Ender (SaaS) | Desktop / Hybrid Local Recorder | |
| Example Tools | Zoom, Google Meet | Riverside.fm, SquadCast | FocuSee |
| Estimated Cost | Free (time limits may apply) | $15 – $20 / month | $40 – $70 (one-time license) |
| The Verdict | Compressed audio; fine for meetings, not pro podcasts | Excellent audio; browser-based but requires subscription | High quality; local recording saves long-term cost |
You avoid the hidden cost of lost time and poor quality by upgrading to a specialized solution. A professional setup provides stable connections, automated backups, and separate tracks, making the editing phase incredibly simple.
Why Audio Quality Drops: Local Recording vs. Web Recording
Many creators wonder why their final output sounds tinny or low quality compared to professional shows. Here is the critical distinction that transforms your production quality: the difference between WebRTC recording and “local recording” (frequently called double-ender recording).
When you use standard video conferencing software, your voice travels over the internet via WebRTC (Web Real-Time Communication) before the software saves it to a server. Think of this process like a standard mobile phone call; if your Wi-Fi signal drops or fluctuates, the software aggressively compresses your audio to maintain the live connection. This creates the robotic, skipping audio everyone dreads.
Local double-ender recording acts entirely differently. It saves the uncompressed audio directly to your hard drive (and your guest’s hard drive) in real-time. This method is similar to writing a physical letter on your own desk before mailing it; the original copy remains flawless regardless of what happens in transit. Once the session ends, the software automatically uploads these pristine local files to the cloud.
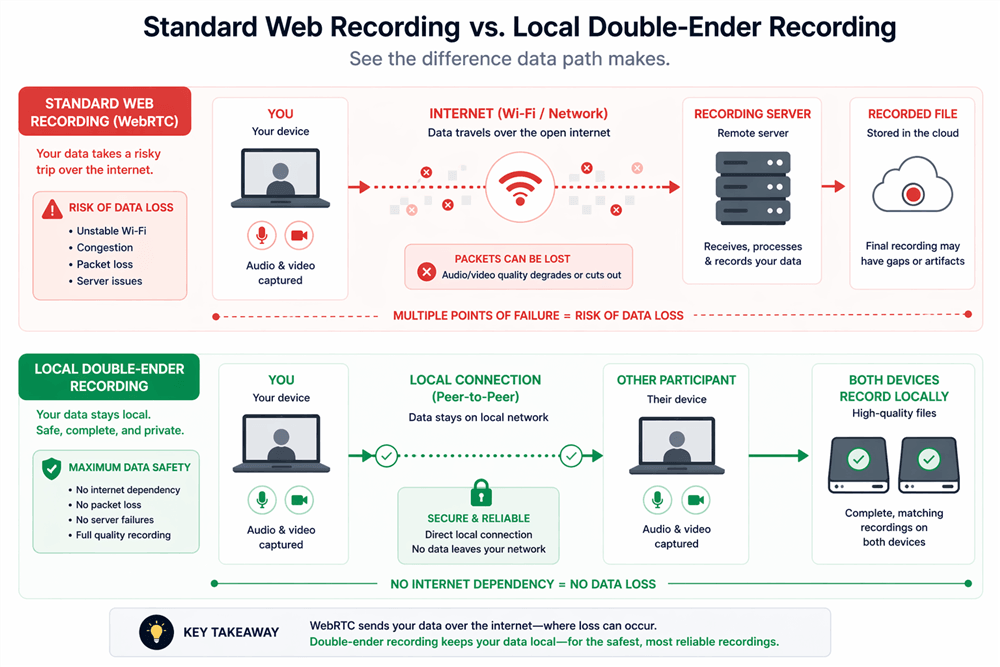
Web vs. Local Recording Comparisons
PRO TIP: The Wi-Fi Safety Net
During a remote interview last year with a high-profile guest, my office Wi-Fi completely dropped for about 10 seconds. We kept talking, assuming the recording was ruined. Because I was using a double-ender platform that recorded locally to our respective hard drives, the final downloaded file was completely flawless. The software seamlessly patched the file together after my connection stabilized.
High-quality setups capture audio at a sample rate of 44.1kHz or 48kHz (16-bit or 24-bit). By applying a double-ender recording method, you capture the full, uncompressed data directly from the source, ensuring your guests sound exactly as they do in real life.
FocuSee: Understanding the All-in-One Desktop Alternative
If you are researching platforms, you will eventually compare monthly SaaS tools (like Riverside) against downloadable desktop solutions. FocuSee frequently appears in these discussions. It is categorized as a premium screen recording and video creation tool for Windows and macOS, which often confuses podcasters looking for an audio solution.
Why use a screen recorder for a podcast? Two main reasons: cost and control.
Many creators despise paying $20 every single month for a browser tool. FocuSee offers a robust alternative. You, as the host, download the software. It handles the heavy technical processing locally on your machine. FocuSee specifically includes Separate Audio Track Recording, allowing you to capture your local microphone on one track and your system audio (your guest’s voice coming through the video call) on an entirely independent track.
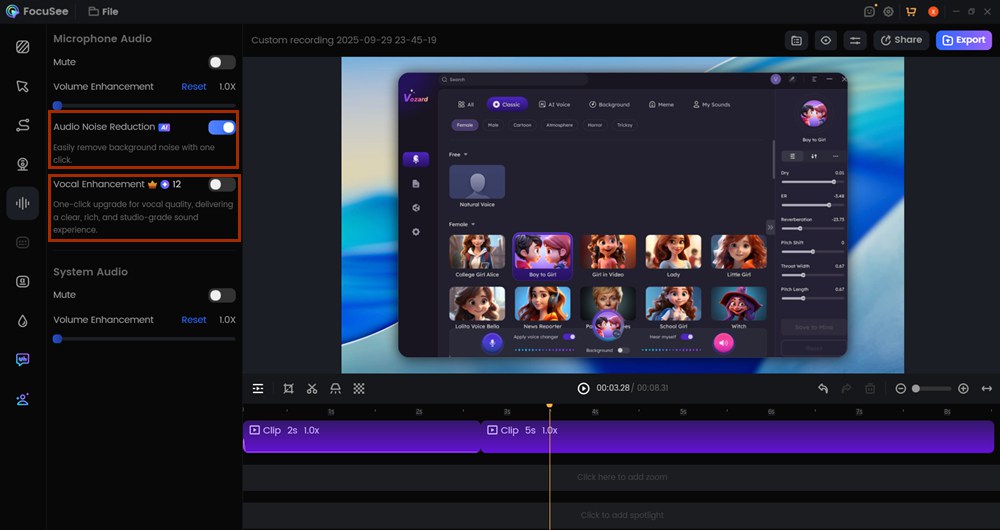
AI Audio Enhancement
To solve the problem of background noise, FocuSee features AI Audio Enhancement. This tool automatically removes computer fan noise, heavy breathing, or room echo for perfectly clear audio. Furthermore, if you need easy editing tools, FocuSee’s AI Smart Cut instantly trims out filler words and long pauses.
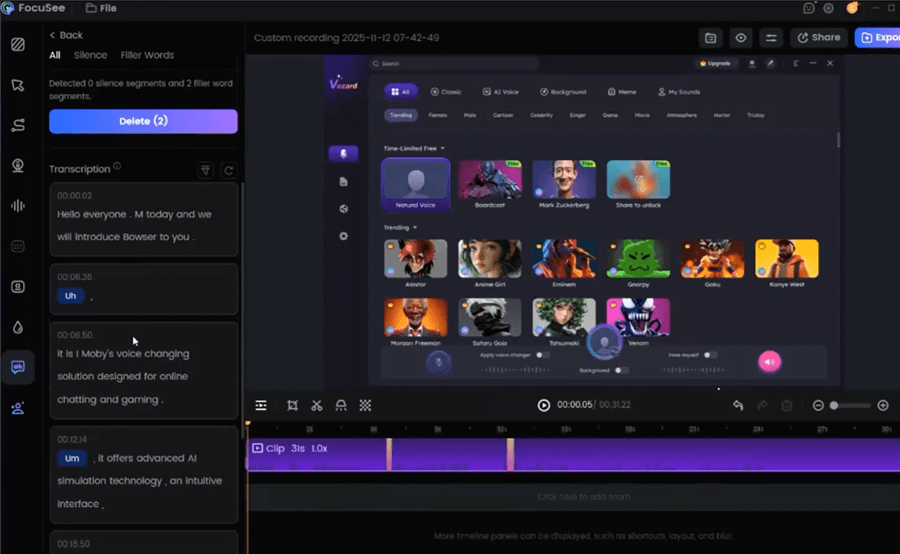
Remove Filler Words
Do not force your guests to download software. If you use a host-side tool like FocuSee to capture the call, your guest simply joins a standard Google Meet or browser link that you generate. They experience zero friction, and you get isolated audio tracks without the monthly subscription fee.
Practical Step-by-Step Procedure: The Recording Workflow
Setting up your virtual studio requires precision, not a degree in sound engineering. Follow this exact workflow to host your remote industry experts and capture flawless audio.
Step 1: Configure Your Hardware and Audio Levels
Plug in your external USB or XLR microphone. Position it about a fist’s width away from your mouth. Open your recording platform’s settings menu and select your external microphone.
Crucial Metric: Speak at your normal volume and watch the audio meter. Your levels should consistently peak between -12dB and -6dB. If you hit 0dB (the red zone), your audio will clip and distort permanently.
Step 2: Create Your Virtual Studio and Isolate Tracks
Inside your chosen professional tool (whether Riverside, SquadCast, or a local capture tool), click “Create New Studio.” Look for the settings gear icon and ensure the toggle for “Record Separate Audio Tracks” is turned ON. This is mandatory for editing later.
Step 3: Generate and Send the Guest Link
Click the “Invite Guest” button to copy your studio URL. Email this directly to your guest.
What the guest sees: They will click the link, opening a secure web browser window. They will be prompted to type their name and click “Join Studio.” They do not need to create an account or download any applications.
Step 4: Soundcheck and Record
Once your guest enters the room, perform a quick soundcheck. Confirm they are wearing headphones to prevent audio bleed (where your voice plays out of their speakers and back into their microphone). Once their audio meter registers healthy green levels, click the master Record button.
Podcast Editing: From Multitrack to Publishing
Processing a multitrack recording is the distinct advantage of using a professional setup. Having isolated tracks allows you to adjust your guest’s volume independently. If your guest speaks quietly, you boost their track without blowing out your own vocal levels.
Instead of manually slicing every awkward pause, apply audio enhancement AI tools built into modern platforms. This text-based editing cleans up “ums,” “ahs,” and dead air automatically.
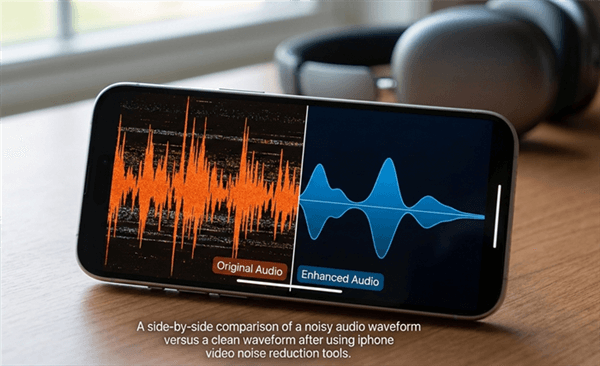
Noisy Waveform vs. Smooth Waveform
Once your tracks sound crisp, export your final episode. Avoid low-quality formats. Export your master file as an uncompressed WAV file for archival purposes, and render a high-quality 320kbps MP3 for uploading.
Finally, upload the MP3 to your podcast hosting platform (like Buzzsprout or Spotify for Podcasters). The host generates an RSS feed, seamlessly distributing your show to Apple Podcasts and Spotify.
Frequently Asked Questions
- What is the best way to capture high-quality remote audio?
The most reliable method is using a double-ender tool (like Riverside or SquadCast). This saves audio locally to each participant’s hard drive, preventing quality drops caused by internet instability. - Are free online podcast tools worth it?
Free versions (like Zoom) compress audio heavily using WebRTC. Freemium tiers of pro tools are excellent for testing but usually restrict recording time to about two hours per month. For long-term projects, budgeting for a dedicated app or a monthly SaaS is highly recommended. - Do my guests need to download anything?
No. The best platforms generate a simple browser link. Your guest clicks the link, enters their name, and joins the virtual studio entirely within Google Chrome or Edge. - Why does my audio sound robotic or glitchy?
This occurs because basic video conferencing software compresses audio to keep the live call stable over fluctuating Wi-Fi. Upgrading to a local recording solution fixes this instantly. - Can I record separate audio tracks for each speaker?
Absolutely. Dedicated podcast platforms allow you to capture independent multitrack files. This is essential for adjusting individual volume levels and applying targeted noise reduction during post-production. - What is the best audio format for publishing?
For editing, capture your audio as uncompressed WAV files (44.1kHz, 16-bit minimum). When you are ready to publish, export the final episode as a high-quality MP3 (at least 192kbps, ideally 320kbps) for optimal streaming performance on platforms like Apple Podcasts.
[Image: A set of custom icon graphics for each FAQ topic. Alt-text: Frequently asked questions about finding the best online podcast recording tools and managing cloud recording.]
Securing professional audio for remote interviews is entirely achievable once you step away from basic video conferencing tools. By adopting a dedicated local-recording setup, you eliminate the risk of internet dropouts ruining your files and gain the massive editing advantage of isolated audio tracks. Whether you choose a premium browser-based subscription or a one-time desktop application like FocuSee to manage your recordings, prioritizing uncompressed audio ensures your audience enjoys a premium listening experience from episode one.