How to Turn a Virtual Tour into a Video: The Cinematic MP4 Guide

There are few professional roadblocks more frustrating than having a pristine marketing asset you cannot actually use.
You are likely here because you have a high-end Matterport or 3D link ready to launch. You go to upload the listing to Zillow, Instagram Reels, or TikTok, only to realize these platforms demand a standard video file (MP4), not a 3D web link. You look for a “Download Video” button on your dashboard, but it doesn’t exist.
If you are reading this, you need to know how to turn a virtual tour into a video without sacrificing the immersive quality of the original scan. While 3D platforms excel at interactivity, they often lack native export tools for social media. To convert a virtual tour to video, you generally have to record the tour’s playback on your screen. However, simply hitting “record” often results in a choppy, cursor-filled clip that looks unprofessional.
This guide outlines specific, tested workflows to export a virtual tour as a video that looks cinematic rather than technical.
The Strategy: Choose Your Workflow Before You Record
Before downloading any software, you need to assess the assets you actually have. The “best” method depends entirely on the state of your virtual tour link.
Scenario A: The “Highlight Reel” Method (Best for Matterport)
If your Matterport tour has a “Play” button in the bottom-left corner, the platform includes a built-in “Highlight Reel.”
- The Strategy: You do not need to manually navigate the house. You simply hit “Play” within the tour and use screen recording software to capture the automated walkthrough.
- Pros: The motion is perfectly smooth; no mouse clicks required.
- Cons: You must accept the pre-set path determined by the tour creator.
Scenario B: The Manual Navigation Method (Best for Raw Links)
If your link is just a series of dots on the floor with no “Play” button, you must drive the tour manually.
- The Strategy: You will plan a route, hide your mouse cursor, and click through the home while recording a virtual tour.
- Pros: Total control over what you show.
- Cons: High risk of jerky movement or “warping” transitions if not done carefully.
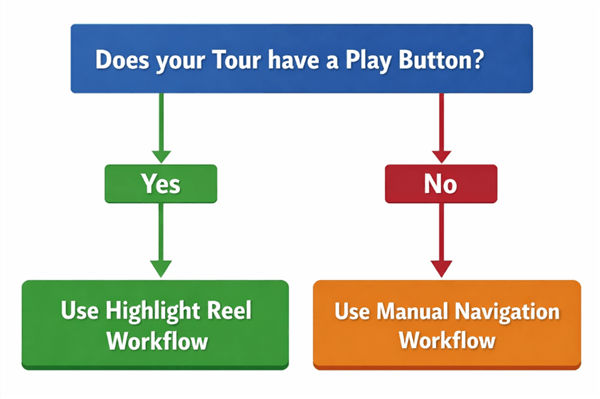
Virtual Tour Decision Tree
Tool Selection: Manual Recording vs. Smart Automation
Once you know your strategy, you need a tool to capture the screen.
1. The Manual Standard: OBS Studio (Free)
Open Broadcaster Software (OBS) is the industry standard for streaming. It captures exactly what is on your screen.
- Best for: Users who want zero cost and have 15-20 minutes to learn basic settings.
- The Trade-off: You must manually hide your cursor (or disable it in settings) and ensure your hand is steady.
2. The Automated Assistant: FocuSee (Paid)
FocuSee is designed to make a video from a virtual tour by treating screen recordings like editable timelines.
- Best for: Agents who need to produce a polished video quickly.
- The Trade-off: It is a paid tool.
- Key Feature: It offers “Smart Zoom.” If you are manually clicking through a tour, FocuSee can automatically zoom in on the focal point of your click, masking the mouse movement and adding a dynamic “camera push” effect that mimics high-end video production.
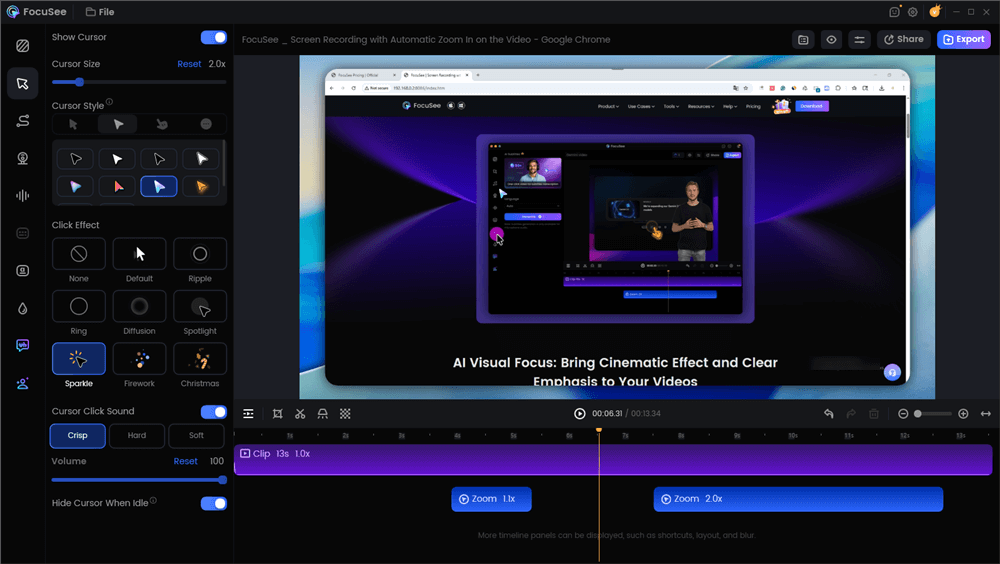
Edit the Video with Auto Zoom Effects
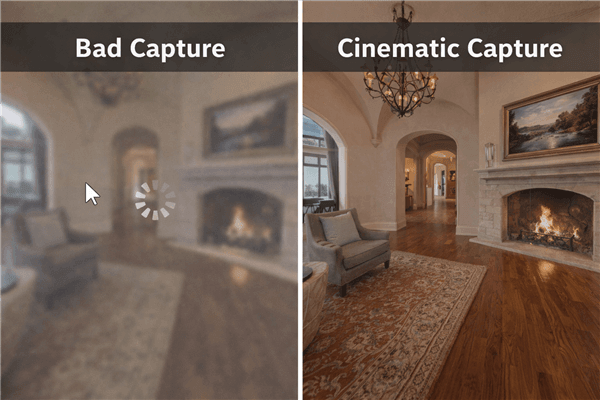
The “Cinematic Recipe”: A Pre-Flight Checklist
Whether you use OBS or FocuSee, simply hitting “record” will not yield a professional result. The biggest difference between a messy screen recording and a cinematic walkthrough is capture discipline.
To avoid texture “pop-in” (where walls look blurry for a second before sharpening) and stuttering, execute this protocol:
1. Pre-Load the Route (Critical Step)
This is an expert insight often missed. Walk through every room you intend to record before you start capturing. This forces your browser to cache the high-resolution textures. If you skip this, your final video will capture the blurry “loading” phase of every room, ruining the immersion.
2. Browser Hardware Acceleration
If your recording comes out black, flickering, or stuttery, check your browser settings.
- The Fix: Go to Chrome/Edge Settings > System > “Use graphics acceleration when available.”
- Toggle it: If it is On, try turning it Off (or vice versa) if you experience capture lag. This changes how your computer renders the 3D data relative to the screen recorder.
3. Hide the UI
A cinematic video should not look like a web browser.
- Keyboard Shortcuts: Press ‘U’ or ‘H’ (depending on platform) to hide the overlay.
- URL Parameters: For Matterport, add &brand=0&mls=1&help=0 to the end of your URL to strip away branding and help buttons.
- Cursor Management: If using OBS, go to Source Properties and uncheck “Capture Cursor.” If using FocuSee, use the “Hide Cursor” effect in the editor. [Internal Link Suggestion: Link ‘screen recording’ to ‘/how-to-screen-record-windows-11’]
4. Manage the “Warp”
Virtual tours move between points via a “warp” or fast fade.
The Trick: Do not click rapidly. Click to move, let the room settle for 3 seconds, then pan slowly. In post-production, you can cut the static time, but you cannot fix a jerky pan.
Bad Capture vs Cinematic Capture
Shot Lists: Templates for Social vs. Web
You are likely creating this video for two different audiences. Do not try to make one video fit everywhere. Use your screen recording to create two distinct cuts.
Template A: The “Teaser” (Instagram Reels / TikTok)
Goal: Stop the scroll. High energy, fast cuts.
Format: Vertical (9:16). You will need to crop the center of your screen recording.
Duration: 15–30 Seconds.
Shot List:
- 0:00–0:03: The “Hero Shot” (Exterior or stunning Living Room).
- 0:03–0:06: Rapid pan of the Kitchen (focus on island/appliances).
- 0:06–0:09: Master Bath or unique feature (fireplace/pool).
- 0:09–0:15: Quick montage of 3 other rooms (1.5 seconds each).
- End: Call to Action text overlay.
Template B: The “Virtual Showing” (YouTube / Zillow)
Goal: Replicate an open house. Logical flow.
Format: Widescreen (16:9). Use the full screen capture.
Duration: 2–3 Minutes.
Shot List:
- Entrance: Start at the front door. Move into the foyer.
- Living Areas: Spend 10–15 seconds panning slowly across the living room and kitchen.
- The Flow: Walk down the hallway naturally. Do not jump through walls.
- Bedrooms: Briefly show guest rooms; spend more time in the Primary Suite.
- Exterior: End with the backyard or view.
Packaging & Delivery: The Last Mile
Once the capture is done, you have a raw video file on your computer. To turn a virtual tour into a video that generates leads, you must handle the export correctly.
The Mobile Handoff (Crucial Quality Step)
Most people ruin their video in the final step: sending it to their phone to post on Instagram.
- Do NOT email the file to yourself. Email services compress video, making your crisp 4K recording look blurry.
- Do: Use cloud storage or direct transfer.
- Apple Users: Use AirDrop. It sends the raw file instantly with zero quality loss.
- Windows/Android Users: Upload the file to Google Drive or Dropbox, wait for it to process, and then download the full-resolution file via the app on your phone.
Privacy & Compliance
High-resolution scans can reveal family photos, diplomas, or visible mail.
- The Risk: Broadcasting private seller info is a liability.
- The Fix: Use video editing software (or FocuSee’s Privacy Blur feature) to mask these elements. If using a basic editor, you may need to cut around shots that show personal photos.
Frequently Asked Questions
Can I export my virtual tour directly as an MP4?
Generally, no. Most platforms like Matterport or Kuula render 3D environments in real-time using WebGL code, not video files. To share a virtual tour as MP4, you must screen record the playback.
Why is my screen recording black or stuttering?
This is usually a hardware acceleration conflict. Your browser and your recording software are fighting for your Graphics Card (GPU) resources. Go to your browser’s settings, search for “Hardware Acceleration,” and toggle it off. Restart the browser and try recording again.
How do I make the “warp” between rooms look smooth?
If you are clicking manually, the “warp” can look jarring. Ideally, use the platform’s “Autoplay” or “Highlight Reel” feature so the computer handles the transition. If you must click manually, pause for 2 seconds after every click. In your video editor, you can apply a “Cross Dissolve” transition between these static moments to hide the warp entirely.
How do I record without the cursor showing?
If using OBS, right-click your “Display Capture” source, select “Properties,” and uncheck “Capture Cursor.” If using FocuSee, the software automatically offers effects to hide or minimize the cursor in the final export.
Conclusion: Use What You Have
You do not need to reshoot the property to get video content; you just need to know how to make a Matterport tour video from the assets you already have.
- If you have a “Play” button on your tour: Hit play, hide your cursor, and record the screen using OBS for a free, high-quality result.
- If you need to navigate manually: Pre-load your route to avoid blur, toggle your hardware acceleration if needed, and consider a tool like FocuSee if you want to automate the zooms and cursor hiding.
By following the “Cinematic Recipe”—pre-loading textures, hiding the UI, and using the correct transfer method—you can turn a static link into a dynamic video asset in under 30 minutes.