How to Hide Mouse Cursor on Android: Verified Workarounds & Fixes

Setting up your workstation should feel smooth and satisfying—tablet ready, Bluetooth mouse paired, Android connected. But when a bold black cursor stays front and center, it can distract from an otherwise polished screen. This is especially noticeable when you’re recording an app demo or sharing your screen during a live presentation, where every detail matters.
You may have already explored Android’s settings, only to find there’s no simple toggle to hide the cursor. That’s because Android is designed to keep the pointer visible for accessibility and input consistency. While the cursor itself can’t be disabled, there are practical ways to make it disappear visually—without losing mouse control.
That’s where this guide comes in. Instead of generic tips, we focus on two reliable, real-world solutions: a live workaround using lightweight overlay apps (including ready-to-use files), and a clean post-production approach for creators who want studio-quality recordings. Both methods are tested, effective, and designed to keep your content looking professional from start to finish.
Method 1: Using “Invisible” Overlay Apps (For Live Use)
If your primary goal is to hide the mouse cursor on Android directly on the device screen while you are using it—for example, during a live presentation or while browsing—you need a software intervention. Since Android does not provide a native switch in the accessibility settings to turn off the pointer visibility, you must use third-party customization apps to override the system’s default icon.
This technique is a “masking” solution. You will use an app designed to customize the mouse pointer, but trick it by uploading a transparent image.
Apps like “Always Mouse Visible” or generic “Custom Mouse Pointer” utilities allow users to replace the standard white or black arrow with a custom image. By choosing a transparent .png file (essentially a 1×1 pixel blank image), you render the Android mouse cursor invisible to the human eye. The system, however, still registers the X/Y coordinates, allowing you to click and scroll as usual.

How to Hide Mouse Cursor on Android
Step 1. Download a Customization App: Go to the Google Play Store and search for “Custom Mouse Cursor” or “Always Mouse Visible.” Ensure the app you choose requests the “Display over other apps” permission, as this is required to overlay the new icon.
Step 2. Get the Transparent Image (Crucial Step): Searching Google Images for a “transparent png” often results in fake checkerboard backgrounds that aren’t actually transparent. To save you the headache, we have hosted a verified, 1×1 pixel transparent file for you.
Step 3. Configure the Overlay: Open the app and grant the necessary permissions. Navigate to the “Icon” or “Skin” settings and select the option to upload a custom image. Choose the transparent PNG you just downloaded.
Step 4. Calibrate the “Hotspot”: This is the most critical step. Since the cursor is invisible, you need to ensure the click registers exactly where you think it is.
- How to test: Enable the overlay. Move your mouse (which is now invisible) toward a known app icon. Click.
- Adjustment: If the click registers slightly above or below where you intended, go back into the app settings and adjust the X/Y Offset sliders until the click point feels natural.
Important Safety Warning: Navigating “Blind”
Before you toggle this on, understand that once the cursor is invisible, you will not see where you are clicking. This can make it difficult to turn the feature off.
- The Escape Route: If you lose track of the cursor and cannot find the “Stop” button in the app, disconnect your mouse or simply use your finger on the touchscreen. The touchscreen input overrides the mouse overlay, allowing you to easily navigate back to the app and disable the invisible cursor.
- Pro-Tip: Combine this method with “Show Taps” in developer options on Android. This visualizes your clicks as small white circles, giving you visual feedback even when the cursor itself is hidden.
Manual Hacks vs. Professional Recording Tools
If you are presenting live, Method 1 (above) is your only real option on the device itself. However, if you are a content creator recording tutorials, fighting with invisible cursors and overlay apps often leads to lower-quality video.
Below is a comparison to help you decide if you should hack your phone or switch your recording workflow to a desktop using tools like FocuSee.
| Feature | Overlay Apps (Method 1) | Professional Recording (Method 2) |
| Best Used For | Live Presentations & Browsing | Pre-recorded Tutorials & Content Creation |
| Cursor Visibility | Invisible to everyone (you and the audience) | Visible to you (for control), hidden in the final video |
| Ease of Use | Difficult. You are navigating blindly | Easy. You use the mouse normally |
| Reliability | Variable. Updates to Android often break overlay apps | Guaranteed. Post-production effects are consistent |
| Requirements | Android device only | Android device + PC/Mac |
Method 2: Creating Clean Tutorials with FocuSee (Best for Creators)
If you are a creator, using an invisible cursor on your phone (Method 1) creates a major problem: you can’t see what you’re doing, which leads to fumbling and awkward pauses in your video.
For high-quality screen recording of Android content, the professional standard is to mirror your Android screen to a computer and record it there. This allows you to see the cursor while you record, but remove it automatically in the final video.
Note: This method requires a computer. If you are mobile-only, stick to Method 1.
The “Mirror & Record” Workflow
By using FocuSee on your desktop, you unlock a level of control and polish that simply isn’t possible when recording directly on a mobile device. This workflow is especially effective for Android app demos, tutorials, and product walkthroughs.
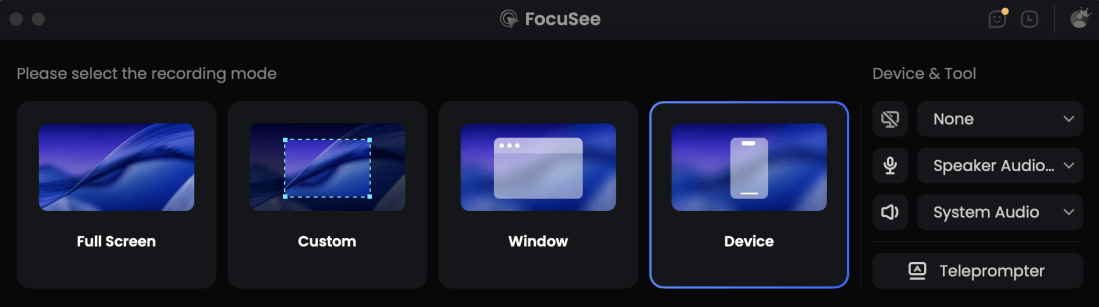
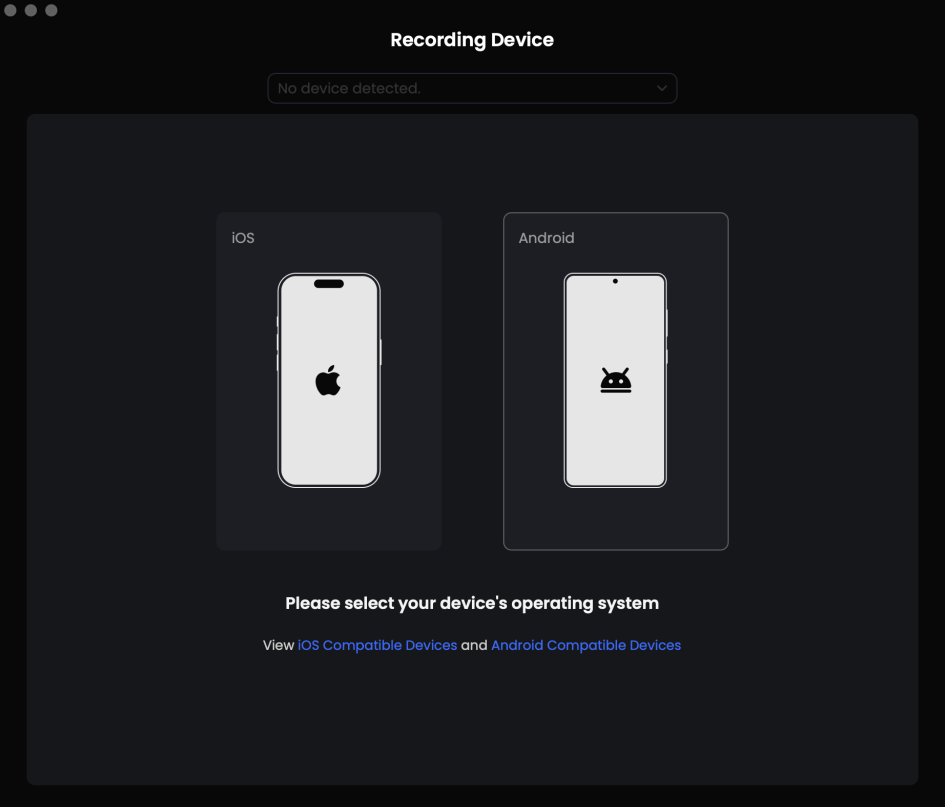
Choose the Device Recording Model
1. Mirror Your Mobile Device
Connect your Android phone to your computer—either by plugging it in via USB or by using a desktop mirroring tool such as scrcpy (free and open-source) or Samsung Flow. Your phone’s screen is displayed in real time on your desktop monitor, ready to be recorded.
Connect your mobile device
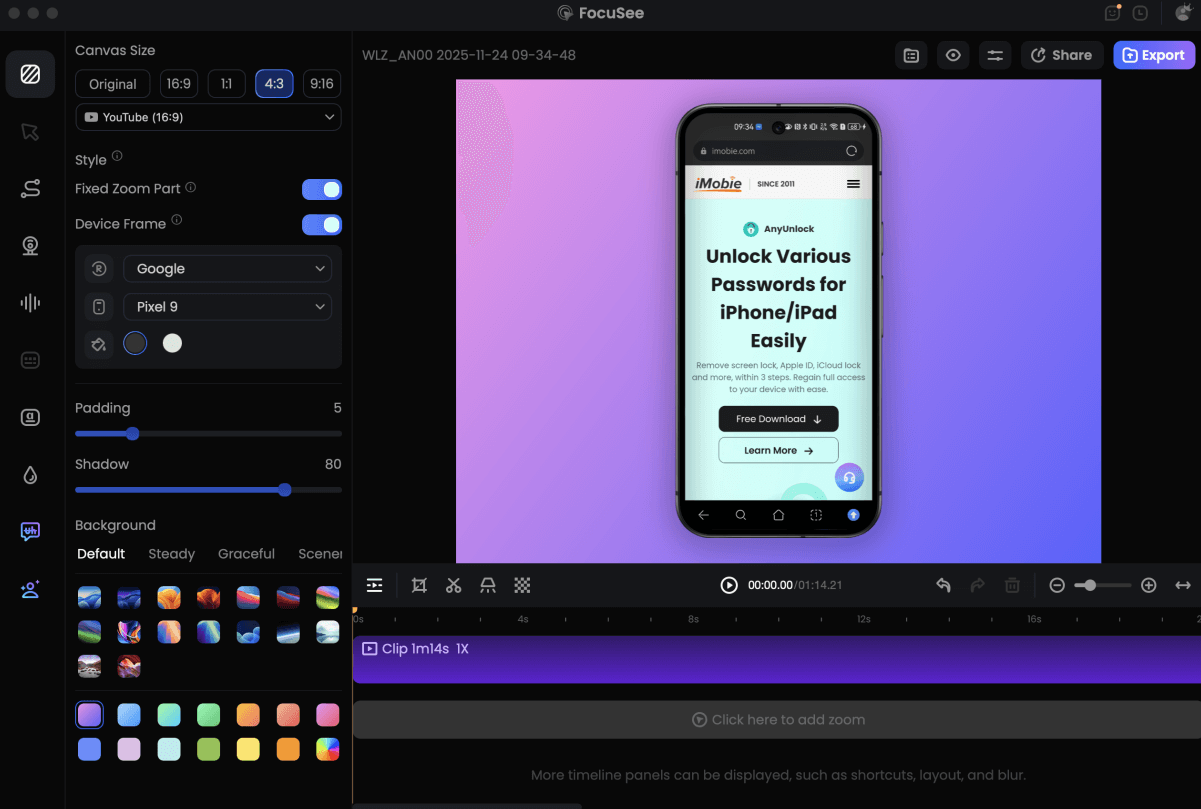
2. Record the Mirrored Screen with FocuSee
Launch FocuSee on your computer and select the mirrored Android window as the recording source. FocuSee captures everything at full resolution, ensuring text, UI elements, and gestures remain crisp and readable.
Why this approach works better:
- You control the phone using your computer mouse, giving you far more precision than touch input.
- The cursor is fully visible during recording, so navigation feels natural and accurate.
- No performance-heavy recording apps are running on the phone itself, keeping the mobile experience smooth.
3. Automated Post-Production with FocuSee
Record Android Phone Screen
Once you stop recording, FocuSee automatically analyzes your video and applies smart enhancements designed specifically for screen recordings:
- Hide the Cursor Completely: If you want a clean, touch-like mobile demo, you can disable cursor visibility entirely—no distractions, no workarounds.
- Smooth Cursor Motion: Keep the cursor, but remove shaky or abrupt movements. FocuSee automatically smooths paths to create a calm, professional flow.
- Auto Zoom & Focus: FocuSee detects clicks and interactions, then intelligently zooms into key areas of the mobile UI—perfect for small buttons and dense app layouts.
- Professional Click Highlights: Replace the default black pointer with subtle click animations and visual feedback that clearly communicate user actions.
- Clean, Creator-Ready Output: The result is a polished mobile screen recording that looks intentional, instructional, and ready for tutorials, marketing videos, or product demos—without manual keyframing or complex editing.
Why Native Settings Fail: Understanding Android’s Cursor Architecture
You might be asking, “Why is this so hard? Why isn’t there just a switch in settings?”
If you have spent hours digging through developer options android or accessibility menus looking for a simple toggle, you are not missing anything—it simply doesn’t exist.
Based on technical analysis of the Android InputManager, the OS views the mouse cursor as a core accessibility element, not just a visual overlay. In a desktop OS (like Windows), the cursor is often a separate layer that can be hidden while input remains active. In Android, the pointer is hard-coded as the primary feedback mechanism for Android external mouse input.
The “Hard-Coded” Limitation
When you connect a Bluetooth mouse android or a wired peripheral, the system kernel maps the X/Y coordinates and immediately attaches the standard pointer icon. There is no native code in the standard Android framework to suppress this visual while keeping the input active.
This is why:
- Disconnecting isn’t an option: If you unplug the mouse, you lose the input method entirely.
- Developer Options don’t help: These options focus on visual feedback for touch (like “Show Taps”), not mouse pointer visibility.
- Consistency issues: Solutions that work on one version of Android often break on the next because Google frequently updates how the “InputMethodService” handles overlays for security reasons.
Samsung DeX & Tablet Specifics: Managing the Pointer
Owners of Galaxy devices (like the Tab S8 or S9) often face unique challenges. However, Samsung’s “One UI” offers slightly more flexibility than stock Android when trying to hide the cursor on Android tablet interfaces.
If you are using presentation mode Android via Samsung DeX, you still cannot remove the cursor entirely without the overlay hack (Method 1), but you can minimize its distraction factor natively.
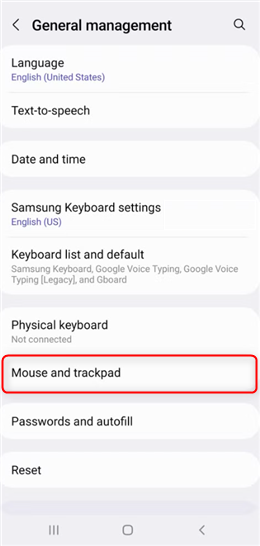
Mouse and Trackpad
Navigate to Settings > General Management > Mouse and Trackpad.
- Size: Reduce the pointer size to the absolute minimum.
- Color: Change the pointer color to white (or a color matching your presentation background) to make it less conspicuous.
- Pointer Speed: Adjusting android pointer speed can sometimes make the look less jerky, even if the cursor remains visible.
The S-Pen “Phantom” Cursor
If you are using an S-Pen as a mouse replacement, check the “Air View” settings. Disabling the floating pointer for the S-Pen prevents the small circle from appearing when you hover the pen over the screen. While distinct from a USB mouse, Android is often the culprit for users seeing “phantom” cursors during presentations.
Conclusion
The struggle to hide mouse cursor visuals is a result of Android’s system architecture, but it doesn’t have to be a workflow blocker. While native settings fail to provide a simple “off” switch, you now have two clear paths forward.
- For Live Use: Use the overlay app method with our provided transparent PNG. Just remember to memorize where your “Stop” button is, or use the touchscreen to regain control if you get lost!
- For Video Production: Don’t fight the device. Mirror your screen to a PC and use FocuSee to remove the cursor in post-production. This gives you the best of both worlds: control while you record, and a clean look for your viewers.
Stop fighting your device settings. Choose the method that fits your goal, regain control of your screen, and create without distraction.
Frequently Asked Questions About Android Mouse Cursors
Can I completely hide the mouse cursor on Android using native settings?
No, standard Android settings do not offer a toggle to hide the pointer. This applies to both Bluetooth mouse Android and USB mouse Android connections. The cursor is a core accessibility feature that the system forces to remain visible.
Can I hide the cursor during screen recording on Android?
Yes. If you are recording directly on the phone, you must use a transparent cursor overlay app (Method 1). If you want a higher quality result, mirror your screen to a PC and record with software like FocuSee (Method 2), which allows you to mask the cursor in post-production automatically.
Are there apps that make the mouse cursor invisible?
Yes. Apps like “Always Mouse Visible” allow you to upload a custom image. By uploading a transparent PNG (linked in Method 1), you can make the android mouse cursor invisible to the eye while maintaining input functionality.
How do I get the mouse cursor back after hiding it?
If you used an overlay app to apply a transparent icon and can’t find your cursor: use the touchscreen. Tapping the screen with your finger overrides the mouse overlay, allowing you to easily navigate to the app and turn the service off.
Is it possible to hide the cursor on Samsung DeX?
Not natively. Samsung DeX does not have a “hide cursor” switch. However, you can minimize its impact by reducing the pointer size and changing its color in the “Mouse and Trackpad” settings, or by using the overlay app method described above.