Screen Recorder with Pointer Android: How to Show Mouse Cursor

There is a specific moment of confusion that hits many content creators: you connect a mouse to your tablet, record a perfect walkthrough, and play it back, only to find the cursor is missing. You assume that because you see the arrow on your screen, the software sees it too. Unfortunately, that is not always the case.
For app developers, educators, and creators who rely on an external mouse to create precise tutorials, this technical quirk renders hours of work useless. The “phantom cursor” effect makes complex instructions impossible to follow, leaving viewers guessing where to click.
If you are struggling with Android screen recording where the pointer vanishes, or if you simply need a screen recorder with a pointer Android solution that works every time, you are in the right place. This guide covers the technical realities of capturing mouse inputs and the specific methods that guarantee your audience sees exactly what you are pointing at.
How to Record Android Screen with Pointer (Native Method)
Most users searching for this solution want to record directly on their phone or tablet without dragging out a laptop. The good news is that the built-in tools available on modern Android versions (Android 12 through 15) are often the only on-device apps capable of capturing the mouse cursor reliably.
While less feature-rich than desktop software, this method works for quick captures if you follow the setup order correctly.
Confirmed Supported Devices
In our testing, the native screen recorder successfully captured the mouse pointer on the following hardware:
- Samsung: Galaxy S21–S24 series, Z Fold 4/5, Tab S7–S9 (One UI 5.0+).
- Google: Pixel 6, 7, and 8 series (Stock Android 13+).
- Motorola: Edge and Razr series (Recent builds).
- Tablets: Lenovo Tab P11/P12 Pro.
Step 1: Connect Your Mouse First
Before opening any recording app, you must establish a connection to ensure the system recognizes the input device. Pair your Bluetooth mouse to your Android device via Settings > Connections > Bluetooth. Connect a USB-C mouse directly or use a USB-A to USB-C dongle (OTG adapter).

Connect a USB-C mouse
Pro-Tip: Ensure the mouse pointer is visible on your screen before you start the recording. If the system doesn’t register the mouse input first, the recorder may initialize without the cursor layer.
Step 2: Access Quick Settings
Swipe down twice from the top of your screen to open the full Quick Settings panel. This is the standard access point for the native recorder on Pixel, Samsung, and Motorola devices.
Step 3: Locate and Configure Screen Recorder
Find the “Screen Recorder” tile. If it is missing, tap the pencil icon (edit) to modify your panel and drag the recorder tile into the active area.
- Tap the tile to open the prompt.
- Select your audio preference (Media sounds, Mic, or both).
- Important Note on “Show Taps”: You may see an option to “Show taps and touches.” Do not rely on this for mouse visibility. This setting toggles the white dots that appear when your finger touches the glass. It is technically separate from the mouse cursor overlay. While you can leave it on, it will not force the mouse arrow to appear if the system isn’t already capturing it.
Step 4: Verify Capture with a Test
Perform a test recording where you move the external mouse Android cursor vigorously. Stop the recording and watch the playback immediately. Do not record a 10-minute tutorial without this 10-second test.
Why Third-Party Apps Fail: The ‘System Compositor’ Issue
A common question I receive is, “Why can I see the mouse while recording, but it vanishes in the video?” or “Why does AZ Screen Recorder ignore my mouse?”
I tested several popular Play Store apps, including AZ Screen Recorder, XRecorder, and Mobizen, on a Pixel 8. In almost every test case, these apps failed to record the mouse cursor, even though it was visible to my eye during the recording.
The Technical Explanation
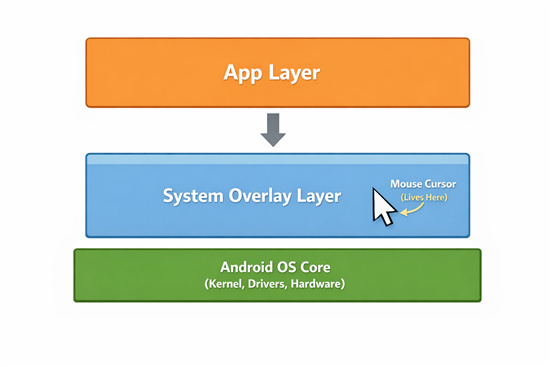
Based on expert analysis, Android records the mouse cursor at the system compositor level, not as part of the app UI.
- App Layer: This is where your icons, games, and browser windows live.
- System Overlay Layer: This is drawn on top of the apps. The mouse cursor lives here.
Most third-party recorders only have permission to scrape the App Layer to save battery or adhere to strict privacy sandboxing. They literally cannot “see” the mouse cursor because it exists on a layer above what they are recording.
The Native Recorder Advantage: The built-in Android recorder has system-level privileges. It grabs the entire display buffer (Composite Layer), which includes the mouse overlay. This is why the native tool is often the best screen recorder with pointer Android for on-device capture.
Android Screen Recording Layer
Method 2: The Pro Method (Desktop Mirroring)
If you only need a quick clip to report a bug, the built-in Android screen recorder is usually enough. But when you’re creating a professional tutorial, native tools quickly reach their limits—especially when viewers need to clearly follow actions on a small mobile interface.
Native mobile recordings often suffer from:
- Limited visual clarity
- Small or inconsistent system cursors
- No intelligent framing or emphasis
- That’s where desktop mirroring comes in.
Instead of recording directly on the phone or tablet, you mirror the mobile screen to a computer and capture it using professional software like FocuSee. This approach dramatically improves stability, visibility, and post-production control.
Why Mirroring Is More Reliable Than Native Recording
By recording the mirrored mobile screen on a desktop, you bypass many system-level limitations of Android and iOS screen capture:
- Larger, clearer preview during recording
- More consistent frame rate and resolution
- Full access to FocuSee’s editing workspace
Quick Decision: Native vs. Professional Mirroring
| Feature | Native Android Recorder | Professional Desktop Mirroring (FocuSee) |
| Cursor Visibility | System-dependent | More predictable via desktop capture |
| Visual Polish | Low (raw footage) | Medium–High (editor-driven refinement) |
| Setup Time | Instant (< 1 min) | Moderate (USB connection required) |
| Editing Needed | High | Moderate |
| Auto Zoom | ❌ Not available | ❌ Manual only |
| Cursor Effects (Android footage) | ❌ | ❌ Not supported |
How FocuSee Improves Mobile Recordings (Realistically)
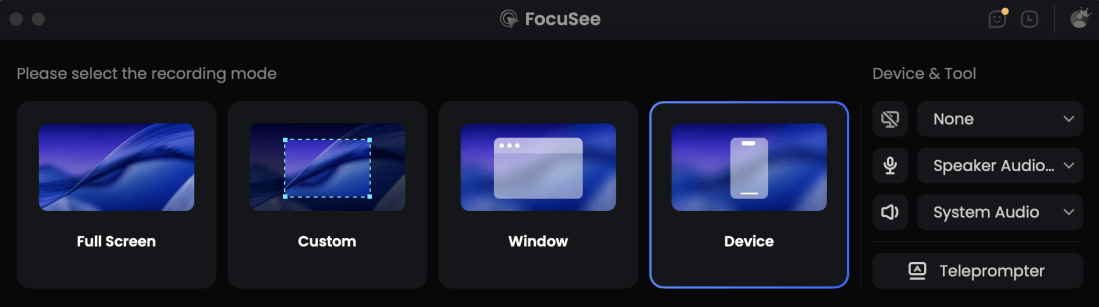
Choose the Device Recording Model
Using FocuSee to record mirrored mobile screens doesn’t magically add desktop-only effects—but it does give you far better control over the final result:
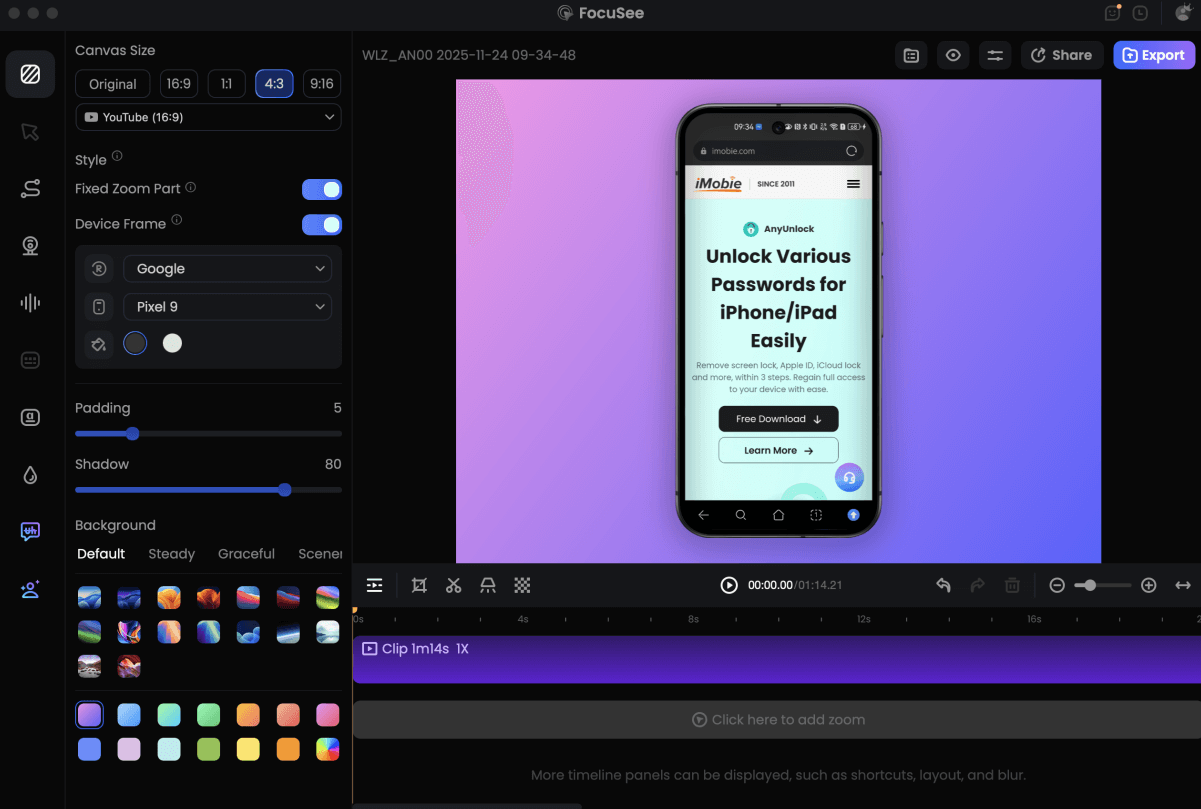
- Manual Zoom & Pan: You can precisely zoom into buttons, menus, or gestures during editing—essential for tutorials watched on smaller screens.
- Cleaner Editing Workflow: Instead of fighting with raw mobile footage, you work inside a professional editor with trimming, framing, and pacing tools.
- Consistent Output Quality: Ideal for product demos, onboarding guides, and app walkthroughs where clarity matters more than speed.
Record Android Phone Screen
When This Method Is the Right Choice
If your goal is to create clear, professional mobile tutorials—and you’re willing to spend a bit more time refining visuals in post-production—desktop mirroring with FocuSee is the most stable and predictable approach, regardless of Android or iOS system limitations.
Important Distinction: Touch Indicators vs. Mouse Cursors
It is important to distinguish between a screen capture pointer and the “Show Taps” feature found in Android Developer Options. While they might seem similar, they serve different purposes in presentation recording Android contexts.
Show Taps (Touch Indicator)
By enabling “Show Taps” in Developer Options, Android displays a small white circle whenever you touch the screen.
- Best for: Recording finger gestures or swipes on a phone.
- Limitation: It is not a continuous pointer. The white dot disappears the moment you lift your finger. It does not guide the viewer’s eye across the screen before a click happens.
Mouse Cursor
An external mouse Android device provides a persistent arrow cursor.
- Best for: Desktop-style tutorials, complex app walkthroughs, and precise navigation.
- Advantage: The cursor remains visible even when you are not clicking, allowing you to hover over elements to explain them before taking action.
If your goal is to create a tutorial that mimics a desktop experience, do not rely on the touch indicator Android setting as a substitute for a real mouse. The intermittent flashing of the white dot can be distracting and lacks the directional context that a permanent mouse arrow provides.
Pro-Tip: Samsung DeX for Better Recording
If you are a Samsung user, you have a secret weapon: Samsung DeX.
When you launch DeX (Samsung’s desktop experience mode), the operating system treats the mouse pointer differently than it does in standard tablet mode. In DeX, the mouse cursor is a core part of the desktop UI, not just an overlay.
Why this matters:
- High Reliability: The native recorder in DeX mode rarely fails to capture the cursor.
- Customization: You can easily change the mouse size and color in the DeX settings, making it more visible for your audience without needing external software.
If you own a Galaxy Tab or a high-end Galaxy phone, try recording your tutorial inside the DeX environment for the best native screen recorder with cursor Android results.
Frequently Asked Questions
Which screen recorder shows the mouse cursor on Android?
The most reliable option is the native screen recorder built into Android 12 and later (especially on Samsung One UI and Google Pixel), as it captures the system compositor layer where the cursor lives. Many third-party apps like AZ Recorder fail to capture this layer. For professional tutorials, using a desktop tool like FocuSee via screen mirroring is the superior method.
Can I record the screen with a Bluetooth mouse on Android?
Absolutely. Once you pair a Bluetooth mouse Android device, the system generates a cursor overlay. As long as you use a recorder that supports system-level capture (like the native tool), the Bluetooth mouse movements will be included in the video file. Wired USB-C mice function identically in this regard.
Why doesn’t my mouse pointer appear in screen recordings?
This usually happens because the screen recording app you are using only captures the “App Layer” and misses the “System Overlay Layer” where the mouse cursor exists. Switching to the native Android recorder or a desktop mirroring solution usually fixes this.
Does “Show Taps” help with mouse visibility?
No. “Show Taps” enables a white dot for finger touches. It operates independently of the mouse cursor. Enabling it will not make the mouse arrow appear in a recording if the recorder isn’t capturing the system overlay layer.
Conclusion
The frustration of an invisible cursor can stall your content creation, but it is a solvable problem. You no longer have to settle for videos where your audience has to guess where you are clicking.
For most users, the solution is simpler than downloading a new app: switch to the Native Android Recorder found in your Quick Settings. It is the only on-device tool with the permissions necessary to see your mouse. However, if you need to produce polished, high-E-E-A-T tutorials without the headache of manual editing or tiny cursors, mirroring your device to a desktop and using FocuSee offers the most robust control.
Choose the method that fits your workflow, and ensure your viewers never lose track of your cursor again.