How to Hide Mouse Cursor in OBS: The Complete Guide

When recording tutorials, gameplay, or presentations in OBS Studio, you may want to hide the mouse cursor to create a cleaner and more professional video.
Unlike many screen recorders, OBS does not provide a single global option to hide the cursor. Instead, cursor visibility is controlled separately for each recording source.
In this guide, you’ll learn how to hide the mouse cursor in OBS for Display Capture, Window Capture, Game Capture, and other common sources.
How to Remove Mouse Cursor Artifacts (Immediate Fix)
To fix this issue immediately, you must adjust the settings at the Source level. The moment of frustration usually hits when a user assumes there is one button to control the entire canvas. Because OBS is designed for modularity, you must tell the software how to handle the cursor for every layer you present.
Here is the standard procedure for the three most common sources to ensure the hide mouse pointer function works correctly.
1. Display Capture Settings
This is the source most commonly used for desktop tutorials, where you show the entire screen. Because it captures everything the monitor sees, the cursor is visible by default.
- Navigate to the Sources dock at the bottom of your OBS interface.
- Right-click your Display Capture source.
- Select Properties from the context menu.
- Locate the checkbox labeled Capture Cursor.
- Uncheck the box.
- Click OK to save the change.
2. Window Capture Settings (And the Critical Windows Fix)
If you are recording a specific application (like a browser, Excel, or Discord) rather than the whole screen, you are using Window Capture. This setting works similarly to Display Capture, but with a crucial nuance for Windows users that is often the root cause of the “cursor won’t hide” bug.
- Right-click your Window Capture source in the Sources dock.
- Select Properties.
- Uncheck the Capture Cursor box.
- Check your Capture Method. (See the Pro Tip below).
- Click OK.
3. Game Capture Settings
For gameplay, the Game Capture source is your best option. It is the most efficient way to record games and offers the cleanest cursor removal to ensure cinematic immersion.
- Right-click your Game Capture source.
- Select Properties.
- Uncheck Capture Cursor.
- Click OK.
Why OBS Hides the Cursor Differently Per Source
A common point of confusion comes from users who ask: “The cursor disappears instantly in Game Capture, but I still see ghosting or glitches in Display Capture. Why?”
Here is the critical insight: Cursor visibility is controlled at the system rendering level, not just inside OBS.
Understanding this architectural difference explains why a fix that works for one capture source fails for another.
The Rendering Hierarchy
Display Capture (Composited):
This source captures the entire video buffer sent to your monitor. Because the operating system renders the mouse cursor on top of everything else (to ensure it is always visible to your eyes), OBS has to actively “subtract” or mask the cursor image from the frame if you uncheck the box. This is a software-level mask. If your GPU is under heavy load, the OS might update the cursor graphic faster than OBS can mask it, leading to “ghosting” or a flickering cursor.
Game Capture (Hooked):
This method operates deeper in the system. It hooks directly into the graphics API (DirectX, OpenGL, or Vulkan) of the game process itself. It intercepts the frames before the operating system draws the mouse cursor overlay. This makes hiding the cursor in Game Capture flawless because OBS is grabbing the raw image data from the game engine, completely bypassing the Windows cursor layer.
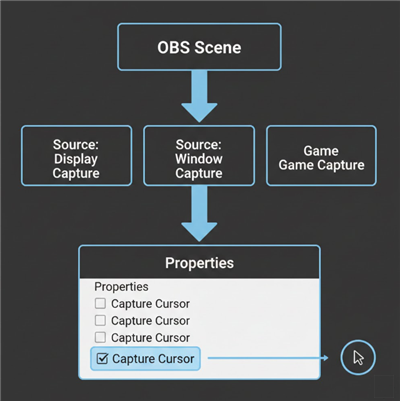
A Technical Diagram
When you understand that Window Capture relies on how Windows draws specific app windows (BitBlt vs. Windows Graphics Capture), it becomes clear why changing the “Capture Method” is often the magic bullet for fixing persistent cursor issues.
Hide Mouse Cursor: Live Streaming vs. Post-Production Polish
Deciding how to handle your mouse cursor depends heavily on your format. Are you broadcasting live, or are you recording content to edit later? While OBS is the industry standard for streaming, relying on it for high-end tutorials introduces a specific workflow challenge: destructive recording.
In video production, “destructive” means the choices you make during recording (like hiding the cursor) are baked into the video file forever.
Comparison: Baked-In Settings vs. Post-Production Flexibility
| Criteria | Standard OBS Workflow | Post-Production Workflow (e.g., FocuSee) |
| Cursor Flexibility | Baked in; cannot be changed later | Editable; toggle cursor on/off anytime |
| Setup Time | High capture settings need testing | Low; record first, adjust later |
| Commitment | Permanent mistakes require re-recording | Forgiving; fix issues in editor |
| Best Use Case | Live streaming (Twitch, YouTube Live) | Tutorials, demos, evergreen content |
For live streaming screen capture, you must get your OBS settings right before you go live. However, if you are creating edited tutorials, you might find that manually managing source properties for every scene slows down your production.
How to Hide Mouse Cursor in Recording?
For creators focusing on recorded tutorials, a major source of anxiety is finishing a 20-minute recording only to realize the cursor was visible when it should have been hidden—or vice versa. Since OBS burns the cursor into the video, this often means a full re-record.
A workflow alternative for non-live content is using tools like FocuSee, which separate the screen recording from the cursor data. This solves the “fix it in post” need.
FocuSee records screen data and cursor information on independent layers. This directly addresses the pain point of “I tried hiding the cursor in my OS settings, but it still appears.” With a tool designed for post-production flexibility, you don’t need to make the final decision before hitting record. You can toggle the cursor visibility off completely during the editing phase.
Why Separating Cursor Data Matters
If you frequently struggle with cursor management, separating the data layer allows you to apply Cursor Effects that OBS cannot do natively:
- Retroactive Hiding: Did you accidentally leave the mouse in the middle of a cinematic shot? Turn it off in the editor without affecting the video behind it.
- Smoothing: Eliminate the “shaky hand” look of a nervous mouse movement.
- Click Animations: Automatically generate visual ripples whenever you click, making tutorials easier to follow even if you choose to hide the pointer itself.

Show Mouse Cursor
Here is the hide mouse cursor effect:
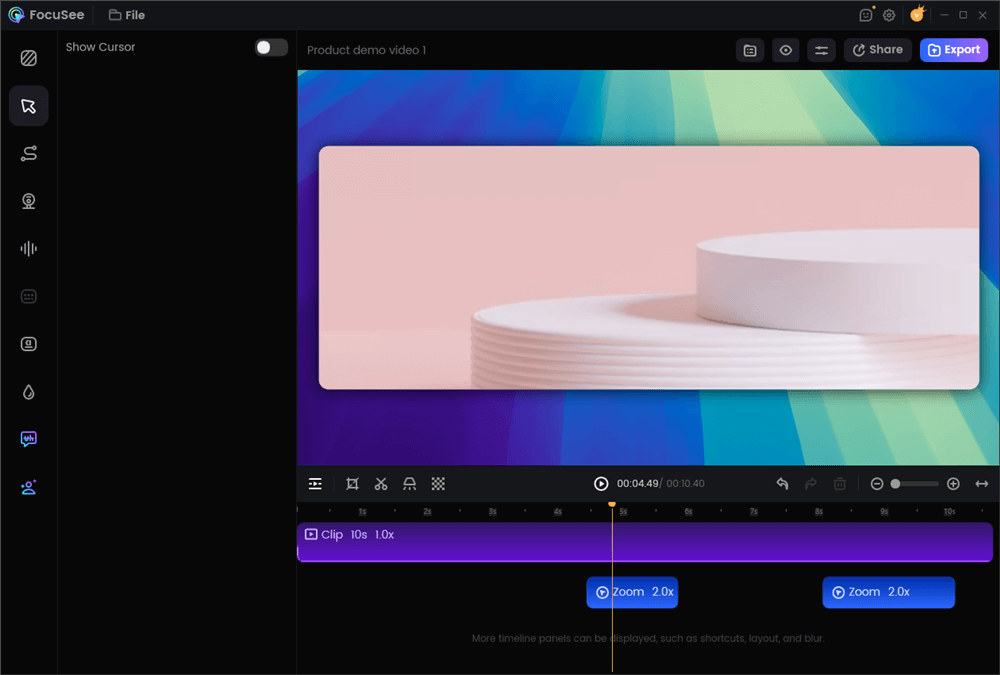
Hide the Mouse Cursor
While OBS is powerful, it demands perfection during the recording. Tools like FocuSee offer a safety net, ensuring that whether you need the cursor hidden or highlighted, you can make that choice after the fact.
Troubleshooting: When the Cursor Won’t Hide
Sometimes, unchecking the “Capture Cursor” box isn’t enough. You might encounter a scenario where the logic fails, and the pointer remains visible. This is often due to operating system overrides or permission conflicts.
Windows Troubleshooting: The “Capture Method” Recap
As mentioned in the Window Capture section, this is the #1 fix for Windows users. If you skipped here:
- Open Source Properties.
- Change Capture Method to Windows 10 (1903 and up).
- This bypasses the older rendering method that frequently ignores the “hide” command.
macOS Troubleshooting: The Privacy Loop
On macOS (especially Sonoma, Ventura, and M1/M2 systems), permission conflicts are the primary culprit. If the hide cursor feature stops working, or if the screen goes black, it is likely a security setting issue.
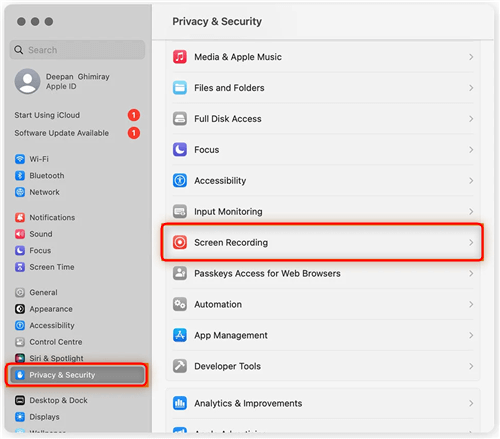
macOS Screen Recording Menu
- Close OBS Studio completely.
- Go to System Settings > Privacy & Security.
- Find Screen Recording in the list.
- Locate OBS in the application list.
- Toggle the permission switch OFF. Wait a few seconds.
- Toggle it back ON.
- Restart OBS.
Why helps: macOS sometimes caches permission states. Resetting this forces the OS to re-acknowledge OBS’s request to control the screen buffer, which includes the data layer responsible for cursor visibility.
Frequently Asked Questions About OBS Cursor Settings
How do I hide the mouse cursor in OBS?
To hide the mouse cursor, you must right-click the specific source (Display, Window, or Game Capture) in your ‘Sources’ dock, select Properties, and uncheck the box labeled Capture Cursor. This is a per-source setting, not a global one.
Why does my cursor show up in Display Capture but not Game Capture?
This happens because Game Capture hooks directly into the game’s code (rendering before the cursor is drawn), while Display Capture records your final monitor output. If your system is lagging, the Display Capture might fail to mask the cursor layer, whereas Game Capture ignores it entirely.
Can I hide the cursor in OBS without changing system settings?
Yes. The method described in this guide only affects the recording or stream output. It does not make your mouse invisible on your actual physical monitor, allowing you to continue using your computer normally while recording.
Is it possible to hide the cursor only in certain scenes?
Absolutely. Because settings are modular, you can create two separate scenes: one with a “Clean” Display Capture (cursor hidden) and one with an “Instructional” Display Capture (cursor visible). You can then switch between these scenes during your broadcast to show the pointer only when necessary.
Does OBS handle cursor visibility differently on Mac and Windows?
Yes. On Windows, the “Capture Method” (BitBlt vs. Windows 10) dictates reliability. On macOS, cursor visibility is heavily tied to “Screen Recording” permissions in System Settings. If permissions are corrupted, OBS loses the ability to hide the cursor.
Conclusion
Finding the right way to manage cursor visibility is essential for professional video production. Whether you are battling a drifting pointer in a software demo or trying to capture immersive gameplay, remember that the solution isn’t a global switch—it is a specific setting within your Source Properties.
By understanding the difference between Display Capture and Window Capture—and specifically applying the Windows 10 Capture Method fix—you can stop asking “Why does my cursor keep showing up?” and start producing clean, distraction-free content.
For live streaming, mastering these OBS source settings is mandatory. However, if you are recording tutorials and find the manual management of sources to be a bottleneck, consider a workflow that separates your cursor data, like FocuSee, to give yourself total control in post-production.