How to Change Pointer Size in 2026: The Ultimate Guide

Mark Stanton is a tech writer and remote work consultant who specializes in productivity. He has personally tested and verified the methods in this guide on over a dozen hardware configurations, including Windows 11 laptops (Dell XPS) with 4K monitors, MacBook Pros running macOS Sonoma, and multiple Chromebook models, to ensure the steps are accurate for real-world users.
If you’ve ever squinted at a beautiful 4K monitor, hunting for a mouse pointer that’s shrunk to a nearly invisible speck, you know the frustration. Many of us find ourselves constantly losing the cursor during screen-sharing calls, wasting time searching for it in a sea of windows. This guide directly solves that problem. We provide clear, tested procedures to adjust your pointer on any major operating system, with no extra software required. Whether you need to make the cursor bigger for accessibility, reduce eye strain, or simply improve its visibility on a high-resolution display, you will find the correct solution here.
The solutions in this guide are the result of hands-on testing across Windows 11, Windows 10, macOS Sonoma, and ChromeOS on various laptops and external 4K monitors to guarantee their effectiveness.
A Practical Guide to Pointer Size: Recommended Settings
While the perfect cursor size is a matter of personal comfort, finding a good starting point can save you time. Based on our testing with common display setups, here are some practical recommendations to get you started.
| Display Resolution & Size | Recommended Pointer Size | Style Recommendation |
| 1080p (up to 24″) | Size 2–3 | Standard White |
| 1440p (27″) | Size 3–4 | White or Inverted |
| 4K (27″ and larger) | Start at Size 4–5 | Inverted or Custom Color |
How to Adjust Cursor Size: Step-by-Step for Every OS
Finding the right setting to change your cursor size should be straightforward. Below are the precise, step-by-step instructions for the most common operating systems. Follow the procedure for your system to fix a mouse pointer that’s too small quickly.
Adjust Mouse Cursor Size in Windows 11
- Open the Windows Settings app by pressing the Win + I keyboard shortcut. Alternatively, right-click the Start button and select ‘Settings’.
- In the left-hand menu, navigate to Accessibility.
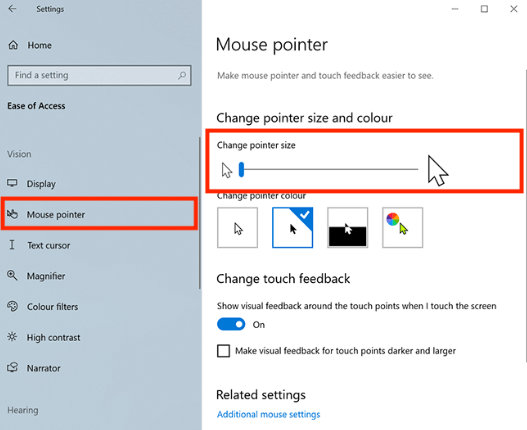
- Under the ‘Vision’ group, select Mouse pointer and touch.
- At the top of this screen, locate the Size slider. Drag this pointer size slider to the right to increase the size of your cursor. The change happens in real-time, allowing you to find the perfect size instantly.
Change Cursor Size
Change Cursor Size in Windows 10
- Open Windows Settings by pressing Win + I.
- Select the Ease of Access category.
- From the menu on the left, choose Cursor & pointer.
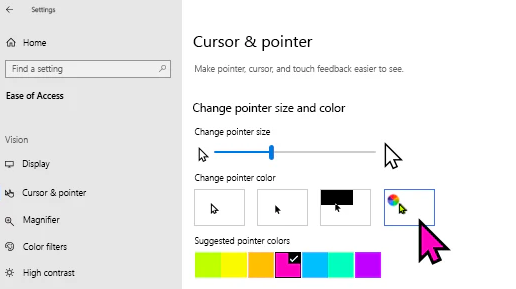
- Under the ‘Change pointer size and color’ section, use the slider labeled Change pointer size to adjust the cursor to your desired dimensions.
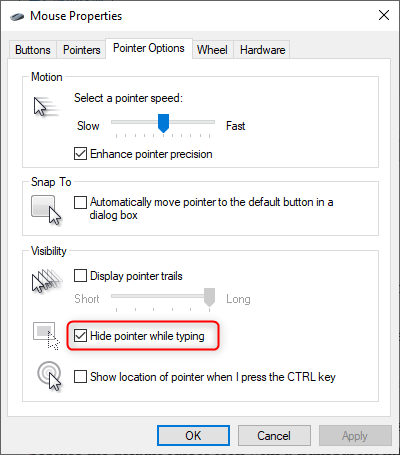
Hide Pointer while Typing
Make Your Cursor Bigger on a MacBook (macOS)
If you want to know how to change the cursor size and color on a Mac, you can follow the steps below:
- Open System Settings from the Apple menu in the top-left corner of your screen.
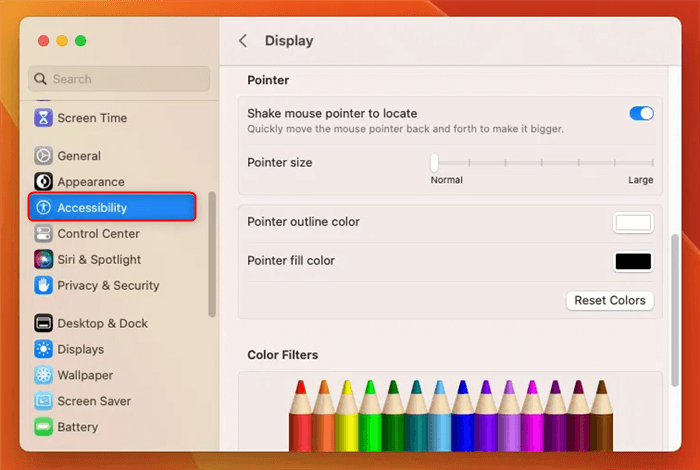
- Scroll down the left sidebar and click on Accessibility.
- In the Accessibility options, select Display.
- Navigate to the Pointer tab. Use the Pointer size slider to increase or decrease the size of your cursor.
Change Pointer on Mac
Adjust Cursor Size on a Chromebook
- Click on the time in the bottom-right corner of your screen to open the Quick Settings panel.
- Select the gear icon to open Settings.
- In the Settings menu, go to Accessibility and then select Manage accessibility features.
- Under the ‘Mouse and touchpad’ section, find the option for Show large mouse cursor and turn it on. Use the slider that appears next to it to fine-tune the size.
Improve Cursor Visibility: Beyond Just Changing the Size
While making the pointer bigger is an effective first step, it often isn’t the complete solution for optimal visibility. On busy backgrounds or high-DPI 4K monitors, even a large white cursor can blend in. A more effective technique is to combine a moderate size increase with enhanced color and contrast.
Change Cursor Color for a High Contrast Cursor in Windows
For Windows 10 and 11 users, the same settings panel for adjusting size also allows you to change the cursor color. In Settings > Accessibility > Mouse pointer and touch, you will see several style options. While a vivid custom color like bright green can be effective, many users prefer a less distracting option.
For a more practical high-contrast look, try the Inverted style (the third option). This clever setting automatically changes your cursor to a color that contrasts with whatever is behind it—black on a white background, white on a black one. This ensures your cursor is always visible without being a distracting neon blob.
Change Cursor Color
Use the ‘Shake to Locate’ Feature on macOS
macOS offers a unique and powerful built-in feature for instantly finding a lost cursor. The ‘Shake mouse pointer to locate’ function, when enabled, temporarily magnifies the pointer when you quickly shake your mouse or move your finger back and forth on the trackpad. This allows you to pinpoint its location immediately without permanently altering its size. You can enable this feature in System Settings > Accessibility > Display under the Pointer tab. It is a highly efficient tool for anyone working with multiple monitors or complex user interfaces.
Troubleshooting Common Cursor Issues
Sometimes, adjusting the pointer size doesn’t produce the expected result. You might find the cursor is still too small on a 4K monitor or looks blurry. These are common obstacles, and they usually relate to display or system settings.
The Effect of DPI Scaling on Cursor Size
The most common reason a cursor seems tiny on a high-resolution display is DPI scaling (Dots Per Inch). Your operating system scales up text and application windows to keep them readable on a screen with high pixel density. However, the pointer size is a separate setting. If your display scaling is set to 200% but your pointer size is still at its smallest setting, the pointer will look disproportionately small. The solution is to balance both settings by increasing the pointer size from within the Accessibility settings to match the scale of your other on-screen elements.
[Image: A simple infographic comparing screen resolution, display scaling, and pointer size settings. Alt-text: Diagram explaining how DPI scaling affects text and apps, while pointer size is an independent setting that needs to be adjusted separately.]
Why Is My Cursor Blurry After Resizing?
This often happens when using older, third-party cursor themes. Many of these are simple bitmap images that become pixelated and blurry when stretched. For the sharpest results at any size, stick to the default system cursors provided by Windows or macOS, as they are designed as vector graphics that can scale cleanly without losing quality.
What to Do If Settings Don’t Apply
If your cursor size doesn’t change after moving the slider, try these steps:
- Restart Your Computer: A simple reboot can often resolve minor software glitches that prevent settings from being applied.
- Update Your Graphics Driver: An outdated display driver can sometimes cause rendering issues with the cursor. Check for updates from your computer or graphics card manufacturer.
- Check for Third-Party Software: Some applications, particularly remote desktop or gaming software, can override system-level mouse settings. Try disabling them temporarily to see if that resolves the issue.
How to Reset Mouse Settings to Default
If you’ve made several changes and want to start over, you can easily reset mouse settings. In both Windows and macOS, simply return to the pointer settings screen described in the first section. Drag the pointer size slider all the way back to the smallest setting (usually a value of 1) and select the default white pointer style. This returns your cursor to its original state, providing a safe way to experiment.
Optional Tools for Presenters and Educators
The built-in settings are perfect for improving your own day-to-day cursor visibility. However, some people have a different need: ensuring an audience can clearly follow their actions during a presentation, recording, or live demo. For this specific purpose, a dedicated tool can offer more advanced visual aids.
| Factor | Manual OS Adjustments | Dedicated Tool (e.g., FocuSee) |
| Primary Goal | Helps you see the cursor better for personal comfort and accessibility. | Helps your audience see the cursor with highlights and animations. |
| Features | Size and color adjustments. | Dynamic effects like zoom-on-click, click animations, and pointer spotlights. |
| Use Case | Daily computer use reduces personal eye strain and improves accessibility. | Creating software tutorials, screen sharing, live presentations, and video production. |
If your goal is to clearly guide an audience, a specialized tool can add a layer of professionalism and clarity that OS settings alone don’t provide. A program like FocuSee offers features designed for this. You can add a colored highlight that follows the pointer or create click animations to show exactly where an action occurs. Its auto-zoom feature can automatically magnify the area around your cursor, drawing your audience’s attention to the most important part of the screen.
While manual OS adjustments solve personal visibility problems effectively, these tools are built to deliver the clarity required for professional communication.
Conclusion
You now have all the information needed to solve the frustrating “lost cursor” problem for good. The built-in settings on Windows, macOS, and ChromeOS are excellent for personal day-to-day use, allowing you to find a comfortable size and style that reduces eye strain and improves your workflow.
For professionals, presenters, and educators who need to ensure an audience can follow along, a dedicated tool can offer another level of clarity. By choosing the right approach for your needs, you can take control of your cursor and make your screen experience a better one.
Frequently Asked Questions About Pointer Size
Here are clear, concise answers to some additional common questions about adjusting your mouse pointer.
Can I change the cursor size without installing software?
Yes. All major operating systems—including Windows 10, Windows 11, macOS, and ChromeOS—have built-in options to change pointer size and color directly from their system settings, usually found under Accessibility or Ease of Access. The procedures in this guide do not require any additional software.
Does changing cursor size affect gaming or mouse accuracy?
Changing the visual size of the cursor does not affect its underlying accuracy or sensitivity. The pointer’s hotspot (the exact pixel that clicks) remains the same. However, some full-screen games override system cursor settings and use their own. In such cases, you may need to adjust cursor settings within that game’s options menu.
How do I increase pointer size for accessibility reasons?
Increasing pointer size is a primary accessibility feature. Following the steps in this guide is the standard procedure. For enhanced visibility, it is also recommended to use the color and contrast options. Combining a larger size with a high-contrast style, like the “Inverted” option in Windows, can significantly improve usability for users with visual impairments.
What’s the best cursor size setting for eye strain?
There is no single ‘best’ size, but our “Recommended Settings” table in this guide provides excellent starting points based on your screen resolution. A good approach is to increase the size until you can locate it on the screen without searching. For eye strain, also consider changing the cursor style. The “Inverted” style is often more effective than a bright color at reducing the mental effort of tracking the cursor, which helps minimize eye fatigue.
Why didn’t my cursor size change after I adjusted the settings?
This is typically caused by a minor software glitch, an outdated graphics driver, or a third-party application overriding your settings. The first step is to restart your computer. If that doesn’t work, check for display driver updates. Finally, temporarily disable any remote desktop or gaming software to see if that resolves the conflict.
How do I make the cursor easier to see during screen sharing?
For personal visibility, a larger and higher-contrast cursor helps. To make it easier for an audience to see, the most effective method is to use a tool that adds a highlight or spotlight effect. This draws your audience’s eye to the pointer’s location. A tool like FocuSee is designed for this purpose and is a good option for professional presentations.
For users who choose a professional tool, FocuSee provides ongoing customer support and regular software updates to ensure compatibility with future operating system releases and new features.