How to Screen Record on iPhone 17 (iOS 26 Settings)

You have just unboxed your new device, but when you urgently need to document a banking app error for support or capture a quick social clip, the tool you need isn’t where you expect it to be. Facing a locked device or missing features when you need them most is a significant obstacle.
If you are struggling with how to screen record on iPhone 17, missing audio, or black screens in streaming apps, you are not alone. In iOS 26, Apple has subtly reorganized the settings, which can lead to silent recordings or lost footage if not configured correctly. This guide provides a verified procedure to configure your iPhone 17 screen recording settings, ensure your audio is captured, and help you edit your clips for sharing.
Tested on the iPhone 17 Pro and iPhone 17E running iOS 26.0.1. Desktop mirroring workflows verified on macOS Tahoe 26 and Windows 11 (24H2).
How to Add Screen Recording to Control Center on iPhone 17 (Quick Start)
The first obstacle most users face is that the recording tool is hidden by default. Apple requires you to manually add the control to your quick-access menu.
The Setup Procedure
To fix the “missing button” issue, follow these steps:
- Open Settings: Launch the Settings app on your iPhone 17.
- Locate Control Center: Scroll down and select Control Center.
- Find the Tool: Scroll to the “More Controls” section (indicated by green plus icons). Look for Screen Recording.
- Activate: Tap the green + icon next to it. You will see it move up to the “Included Controls” list.
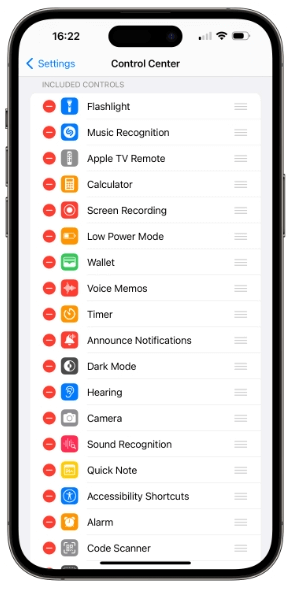
Control Center Settings
How to Start Recording
Once enabled, the process is immediate:
- Swipe Down: Swipe down from the top-right corner of your screen (where the battery icon is) to open the Control Center.
- Tap the Icon: Locate the circular icon with a solid dot inside.
- The Countdown: Tap it once. You will see a “3, 2, 1” countdown inside the Dynamic Island or the icon itself. This delay gives you time to swipe the Control Center away and open the app you intend to record.
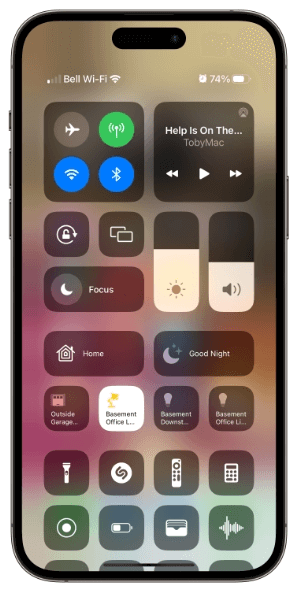
Add Screen Recording to Control Center
How to Screen Record on iPhone 17 with Sound
After enabling the button, the most common failure pattern for new users is silence. You might record a full tutorial, only to realize later that your voice commentary is missing.
When you ask how to screen record on iPhone 17 with sound, you must distinguish between two audio sources:
- Internal Audio: The sounds the app makes (game music, video sound).
- Microphone Audio: Your voice or ambient room noise.
By default, the microphone is turned OFF. To control your audio sources, do not just tap the record button. Long-press (press and hold) the Screen Recording icon in the Control Center. This reveals a hidden menu containing a microphone toggle. If you skip this step, your voice will not be recorded.
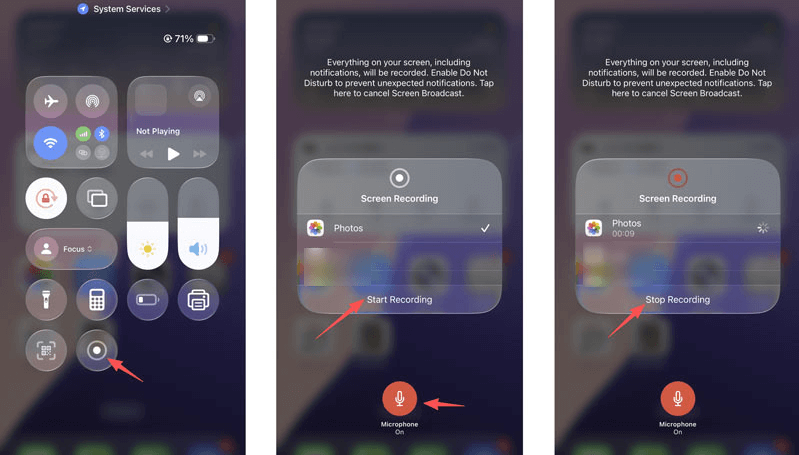
Record Internal Audio on iPhone
Pro Tip: Always perform a five-second test recording in a non-protected app, like the Camera roll or a browser, to verify your levels before committing to a long take.
Method Comparison: Native Recording vs. Professional Desktop Tools
While the built-in iOS tool is excellent for quick captures while you are mobile, it has distinct limitations when you need professional results. For a simple text to a friend, the native tool is fine. But for a formal bug report or a public social media post, the native tool can feel clumsy due to the lack of precision editing.
If you are debating between a quick phone capture or a polished production, consider this comparison:
| Native iPhone 17 Recording | Desktop Mirroring (via FocuSee) | |
| Setup Time | Instant (2 seconds) | Fast (requires connection) |
| Storage Location | Photos App (uses phone storage) | Computer hard drive |
| Visual Polish | Messy status bars & swipes | Clean, auto-zoom, cursor highlights |
| Privacy | High risk (notifications visible) | Privacy blur & area selection |
| Editing | Basic trim/crop only | Automated professional polish |
For users who find themselves constantly re-recording because of a wayward notification or a messy ending, shifting the workflow to a desktop environment often yields a higher-quality product with less frustration.
When to Use Desktop Mirroring: Creating Tutorials with FocuSee
If you are out and about, the native iPhone recorder is your only option. However, if you are sitting at your desk and need to produce a polished tutorial without spending hours editing on a small touchscreen, mirroring your iPhone 17 to a computer and recording with FocuSee is a superior strategy.
Record iPhone Screen
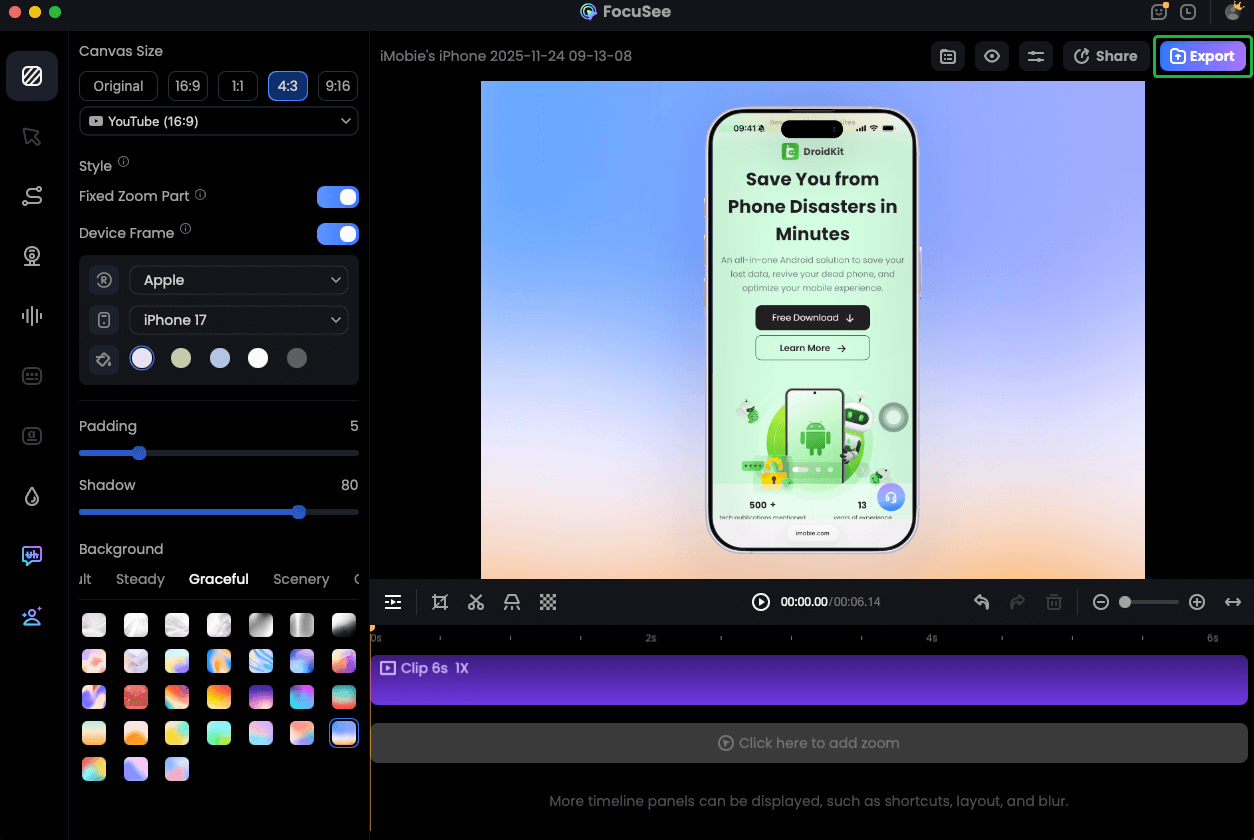
To use this method, simply mirror your iPhone screen to your Mac (via AirPlay or cable) or Windows PC, then launch FocuSee to handle the capture. This setup unlocks features that solve specific recording pain points that the mobile app cannot address:
1. Auto-Zoom for Clarity
If you are frustrated by viewers missing which button you tapped, FocuSee’s Smart Focus automatically zooms in on click actions. This ensures your audience sees exactly what is happening—a massive upgrade over static mobile screenshots where the text is too small to read.
2. Privacy Protection
Users often hesitate to record banking apps due to visible account numbers. FocuSee’s Privacy Blur allows you to mask sensitive areas instantly. You can share bug reports or demos without leaking personal data like 2FA codes or passwords.
3. Professional Presentation
Instead of a silent screen, you can use the AI Virtual Avatar or built-in webcam overlay to add personality to your video without setting up a full camera rig.
By offloading the recording to FocuSee when you are at your desk, you transform a raw phone capture into a share-ready video with automated zooms and clean audio, saving significant time in post-production.
Quick Edits & Sharing: Trimming, Cropping, and Exporting
If you stick with the native iOS tools, knowing how to clean up your footage is crucial. A perfect take can be ruined by a text message notification popping up mid-recording. To ensure your clip is clean, secure, and ready for platforms like TikTok or Instagram, follow this workflow.
How to Stop Screen Recording on iPhone 17
When you are finished, you do not need to open the Control Center again. On the iPhone 17, simply tap the Dynamic Island (the pill shape at the top of the screen) or the red clock indicator in the status bar. A prompt will appear; tap Stop. The video will automatically save to your Photos app.
The Privacy Checklist (Before You Record)
Enable Do Not Disturb: Go to Settings > Focus > Do Not Disturb. This prevents banners from appearing on screen.

Do Not Disturb Mode
Check Notification Previews: Ensure sensitive apps (like Messages or Mail) have previews set to “When Unlocked” or “Never” to avoid accidental data leaks.
Quick Edits in Photos
Open the video in the Photos app and tap Edit.
- Trim: Drag the yellow timeline handles to remove the awkward start (opening Control Center) and end (closing the recording).
- Crop: Tap the Crop icon to cut out the top status bar. This removes the red recording indicator and battery icon for a cleaner look.
Exporting for Social Media (TikTok & Instagram)
When sharing to social platforms, keep the aspect ratio in mind. The iPhone 17 screen is tall (approx. 19.5:9 ratio).
- Avoid UI Clutter: If you upload the full screen recording to TikTok, the app’s interface (like the Like and Comment buttons) may cover the bottom of your video.
- The Fix: In the Photos app Edit menu, use the Crop tool to slightly bring up the bottom edge of your video. This ensures the important content isn’t hidden behind social media buttons.
Troubleshooting: Black Screens, DRM, and Restrictions
Sometimes, you may follow every step perfectly, yet the resulting video is a black screen or the recording button is entirely disabled. These are not typically hardware failures; they are intentional software restrictions.
Why is my Screen Recording Black?
If you try to screen record on iPhone 17 while using apps like Netflix, Disney+, or Apple TV, the video will appear black while the audio might still play. This is due to DRM (Digital Rights Management) protection. Content providers block screen recording to prevent piracy. There is no native setting to bypass this. Similarly, many banking apps will black out the screen when you enter password fields to protect your identity.
Why is the Button Greyed Out?
If the Screen Recording icon in your Control Center is grey and unresponsive, or if you cannot add it at all, Content & Privacy Restrictions are likely active. This is common on devices managed by schools or employers.
Solution:
- Go to Settings > Screen Time.
- Tap Content & Privacy Restrictions.
- Select Content Restrictions and ensure Screen Recording is set to “Allow.”
If you cannot access this menu, the restriction is enforced by a corporate profile, and you will not be able to record natively.
iPhone 17 Screen Recording FAQs
Can I screen record FaceTime calls on iPhone 17?
Yes, you can screen record FaceTime calls to capture the video and audio of the conversation. However, for the audio to be recorded clearly, you must ensure the microphone is enabled (via the long-press menu) if you want to capture your own voice as well. Be aware that in many jurisdictions, recording a call without the other party’s consent may be illegal. Always inform the other person before you start recording.
How do I reduce the file size of my iPhone 17 screen recording?
Screen recordings on the iPhone 17 Pro capture the full resolution of your display, resulting in large files. Changing the Camera settings in iOS does not affect screen recording resolution. To reduce file size:
- Use a Shortcut: Download a “Compress Video” shortcut from the Apple Shortcuts Gallery.
- Use a Third-Party App: Apps like “Video Compress” can lower the resolution from 4K to 1080p before you share.
- Trim Aggressively: Use the Photos app to cut out any unnecessary seconds from the clip.
Can I screen record my iPhone 17 using a Mac or PC instead?
Yes. You can use QuickTime Player on Mac or third-party tools on Windows to view your iPhone screen on your desktop. This is often the preferred method for creators because it keeps the iPhone 17 storage free and allows for immediate editing on a larger screen.
Where do my screen recordings save on iPhone 17?
All native screen recordings are automatically saved to the Photos app. You can find them in your “Recents” album or under the “Media Types” section in a folder labeled “Screen Recordings.”
Conclusion
Mastering how to screen record on iPhone 17 allows you to do far more than just save a funny clip—it empowers you to troubleshoot technical issues, share knowledge, and create content efficiently. By setting up your Control Center correctly in iOS 26 and understanding the critical “Long-Press” gesture for audio, you can avoid the frustration of silent videos and missed moments.
However, for times when you need more than a quick capture—such as creating professional tutorials or secure bug reports from your desk—consider upgrading your workflow. FocuSee offers the automated zooming, privacy blurring, and editing polish that the iPhone’s native tool lacks. Regain control over your content creation today by downloading FocuSee and turning your raw screen captures into engaging, professional videos in minutes.