How to Screen Record on Samsung Tablet: A Step-by-Step Guide for Galaxy Tab S & A Series

For users like Marcus, a student using a Galaxy Tab S8, screen recording is an essential daily tool. He recently needed to submit a video assignment showing how to navigate a learning app. He found the Screen Recorder button easily enough, but his first attempt was a failure: the video had no sound, and a private text message popped up in the middle of his presentation.
If you are struggling with how to screen record on Samsung tablet devices, you are likely facing the same hurdles: missing icons, silent videos, or confusing workarounds on budget models.
This guide provides the verified solution to these problems. Whether you own a high-end Galaxy Tab S9 or a budget-friendly Tab A, we will walk you through the settings to capture internal audio, manage your privacy, and turn raw footage into professional content.
The Native Solution: Using the Built-in Screen Recorder with Sound
The most efficient way to capture your display is using the native One UI tool located in your Quick Panel. This built-in feature creates high-quality video without requiring third-party installations. However, simply tapping the button isn’t enough if you need specific audio configurations.
Just follow the step-by-step recording procedure to record your Samsung tablet screen:
Step 1. Access Quick Settings: Swipe down twice from the top of your screen. The first swipe opens notifications; the second fully expands the Quick Panel grid.
Step 2. Locate the Icon: Find the Screen Recorder icon (represented by a video camera symbol).
Find the Screen Recorder Icon on Samsung Tablet
Step 3. Select Sound Settings (Crucial Step):
- If a pop-up appears: Simply select your sound preference.
- If the countdown starts immediately: Tap the “Stop” button. Then, long-press the “Screen Recorder” icon (or tap the text label under the icon) to open the full settings menu. This is a common stumbling block; if you tap too quickly, the tablet often defaults to your last used setting without asking.
Choosing the Right Audio Mode
Here is where users like Marcus often hit a wall. If you are wondering how to screen record on a Samsung tablet with voice, you must deliberately select the correct mode. If you choose the wrong one, your voiceover will be lost.
| What It Captures | Best Used For | |
| None | Video only. Total silence. | Creating GIFs, showing UI bugs where sound doesn’t matter, or recording in a noisy environment. |
| Media sounds | Internal audio only. (App sounds, game music, YouTube videos). Your mic is muted. | Recording gameplay highlights, saving a clip from a streaming service, or capturing high-fidelity system audio. |
| Media sounds and mic | System audio + Your Voice. Captures app sounds and your external commentary simultaneously. | Tutorials, reaction videos, Zoom calls, or walking someone through a complex app setting. |
Once you select the correct mode and tap “Start recording,” a 3-second countdown will begin. A floating toolbar will then appear in the top corner, allowing you to pause recording, draw on the screen with the S Pen, or enable a selfie video overlay.
Troubleshooting: Where is the Screen Recorder on My Samsung Tablet?
A frequent frustration for users is swiping down and realizing the Screen Recorder icon is missing entirely. If you are asking, “Where is screen recorder on Samsung tablet?” do not panic—it is usually just hidden, not absent.
Restoring the Missing Icon
In many cases, the button simply hasn’t been added to your active Quick Settings grid yet.
- Open the Quick Panel (swipe down twice).
- Tap the three-dot menu (or Pencil icon) in the top right corner.
- Select “Edit buttons” or “Button order.”
- Look for the Screen Recorder icon in the top “Available buttons” section (the grey area).
- Tap and hold the icon, then drag it down into your active panel (the white area).
- Tap “Done.”
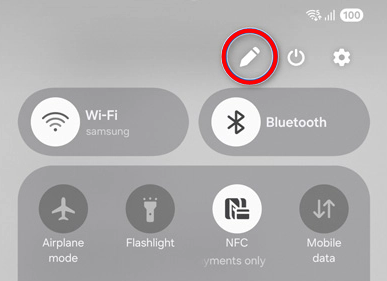
Edit buttons
The Tab A “Game Launcher” Workaround
It is important to note a hardware distinction. While the Samsung Galaxy Tab S series (S6, S7, S8, S9) supports the full native recorder, some budget Samsung Tab A models running “Core” versions of One UI may lack this feature entirely.
If you have a Tab A and cannot find the tool, use this workaround:
You can trick the tablet into recording by using the Game Launcher, even for non-game apps like Zoom or Chrome.
- Open the Game Launcher app (pre-installed on most Samsungs).
- Tap on “My Games” or the library section.
- Tap the three vertical dots (or the “Add” / “+” button) in the top corner.
- Select “Add apps.”
- Choose the non-game app you want to record (e.g., your banking app or browser) and confirm.
- Launch the app from inside the Game Launcher.
- Swipe up from the bottom (navigation bar) or look for the floating “Game Booster” icon to find the Record button.
This serves as a functional workaround for how to screen record on Samsung Tab A when the main system recorder is unavailable.
Comparison: Built-in Recorder vs. Professional Desktop Editing
While the native screen capture tool is excellent for quick clips, it has limitations when you need to produce professional-grade tutorials. Understanding when to use the tablet’s built-in tool versus a dedicated desktop editing tool is key to managing your workflow efficiently.
The Samsung native editor (in the Gallery app) is surprisingly capable—it allows you to trim clips, add background music, and even apply stickers. However, if you are creating instructional content, you might find the touchscreen interface “imprecise.” Features like zooming in on a tiny button or automatically generating subtitles are missing from the native tool.
If your goal is simply to show a friend a setting, the native tool works perfectly. But if you need to create a polished guide—where the viewer’s attention is guided to specific buttons—you may want to consider transferring your footage to a desktop environment.
Level Up: Creating Professional Tutorials with FocuSee
For users like Marcus, capturing footage is only half the battle. The real challenge is turning raw mobile screen recordings into clear, professional tutorials that are easy to follow for a boss, a professor, or an online audience.
This is where FocuSee stands out. FocuSee is a professional screen recording and video creation tool that works across Windows, macOS, Android, and iOS. Using FocuSee’s device recording mode, you can mirror your Android phone/tablet or iPhone/iPad to your computer and record it in real time — giving you the flexibility of mobile capture with the power of desktop editing.
Why Recording via Mirroring Is a Pro Workflow:
Recording mobile screens on a computer — rather than directly on the device — provides advantages that mobile-only recorders can’t match:
- Live Screen Mirroring & Recording: FocuSee mirrors your phone or tablet screen to your PC/Mac and records it in real time, capturing every tap, swipe, and animation in high resolution.
- Professional Editing Features: Smart Focus & Zoom-in and out effects: You can manually add zoom-in effects on key actions during the editing process, making your footage more engaging and easier to follow.
- Automatic Subtitles: Generate accurate captions in 50+ languages, eliminating the need for manual captioning.
- Silence Removal: Automatically trim pauses and filler words to keep your narration tight and professional.
A Professional Mobile Workflow:
Step 1. Record (Mirror Your Device): Connect your Android device or iPhone to your computer. FocuSee will mirror the screen in real time so you can capture it directly in the app.
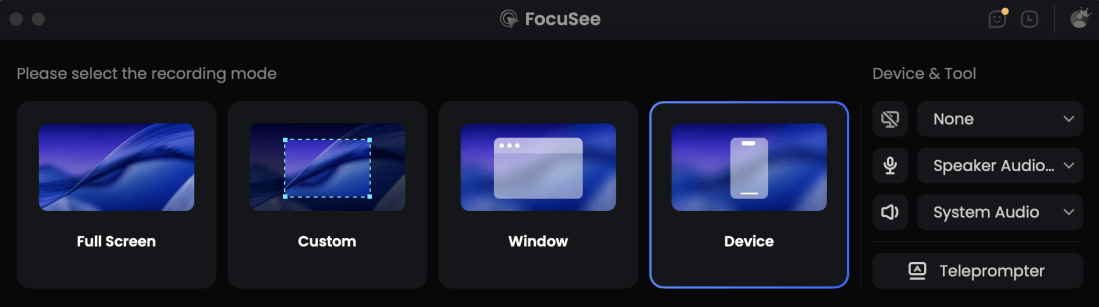
Choose the Device Recording Model
Step 2. Enhance: After recording, you can apply smart zoom (if recorded via mirroring), add subtitles, and remove silence — turning raw footage into a polished, professional tutorial.
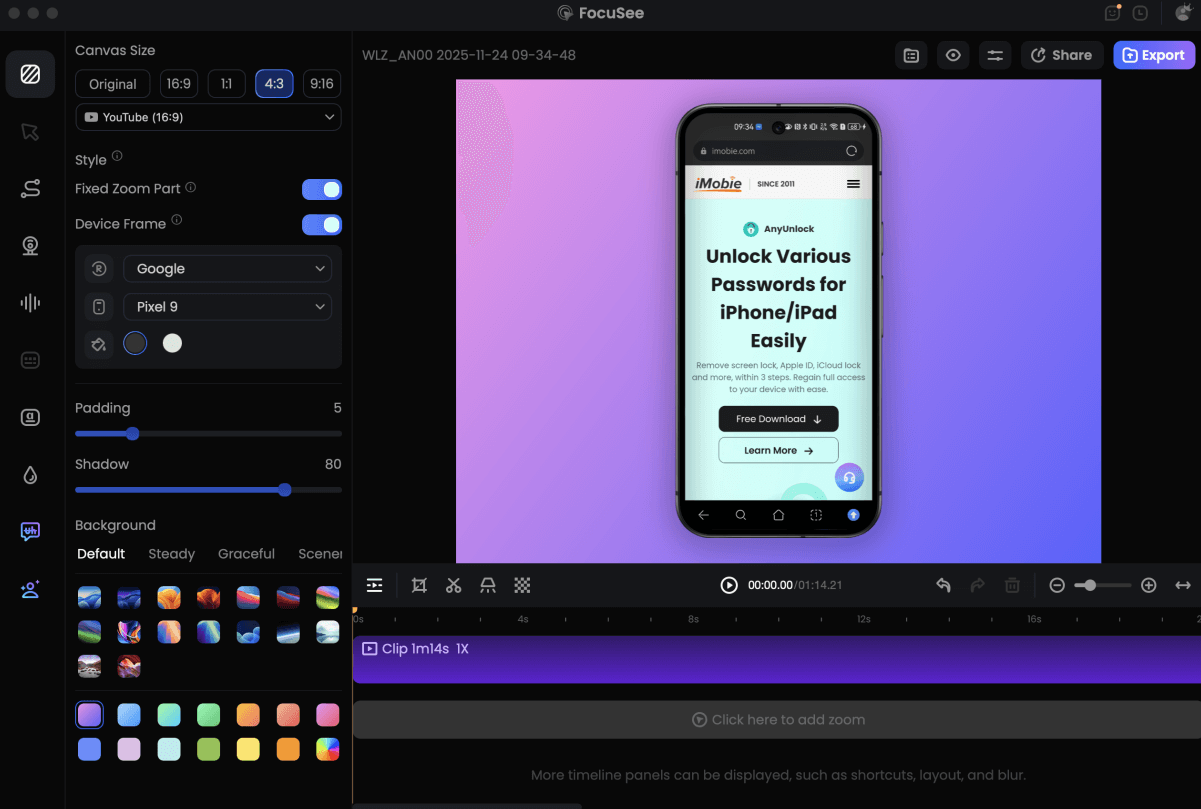
Record Android Phone Screen
By bridging the gap between mobile capture and desktop production, you transform a basic screen record into a professional presentation.
Best Practices for Clean Recordings: Notifications, Storage, and Privacy
To ensure your final video is usable and professional, you must manage your tablet’s environment before you hit record. In our user story, Marcus’s first attempt was ruined by a pop-up message. To avoid this, always enable Do Not Disturb from the Quick Panel. This suppresses notifications, ensuring that personal info remains private and your recording stays clean.
Managing Storage and Files
High-resolution video files can consume significant space. If your tablet says storage is full, the recording will stop abruptly.
- Check Space First: Before a long recording, go to Settings > Battery and device care > Storage.
- Locate Files: Recordings are saved in the Gallery app or My Files > Internal Storage > DCIM > Screen recordings.
- Clear the Clutter: Delete failed takes immediately or move large files to an SD card (if your Tab model supports it) or cloud storage like Google Drive.
Visual Clarity Tips
For clearer tutorials, enable “Show taps and touches” in the Advanced features menu.
- Go to: Settings > Advanced features > Screenshots and screen recorder.
- Toggle On: “Show taps and touches.”
If you have an S Pen, use it. The hover cursor makes it easier for viewers to follow your movements compared to invisible finger taps. After learning to pick the right audio mode (Media + mic) and enabling Do Not Disturb, Marcus was able to record a clean 60-second walkthrough and share it with his classmates, free of distractions.
Frequently Asked Questions (FAQ)
Why does screen recording show a black screen in some apps?
This is a common security feature, not a bug. Banking apps, password managers, and streaming services (like Netflix or Disney+) use DRM (Digital Rights Management) or security policies to block screen capture. When these apps detect a recorder, they automatically black out the content to protect sensitive data or copyrighted material.
How do I stop screen recording on my Samsung tablet?
To stop recording, look for the floating toolbar on your screen. Tap the “Square” (Stop) icon. If the toolbar is hidden (which happens if you swiped it away), swipe down from the top of the screen to open the notification panel and tap “Stop” on the persistent Screen Recorder notification.
How do I screen record on a Samsung tablet with my voice?
Ensure you select “Media sounds and mic” in the sound settings pop-up before the recording starts. If you select “Media sounds,” the microphone will remain muted, and only the internal audio from the app or game will be captured.
What if my model doesn’t have the Screen Recorder button?
If you have an older Galaxy Tab A or a device with One UI Core, the feature might be stripped out. Try the Game Launcher workaround described above by adding your app to the Game Launcher library. If that fails, reputable third-party apps like “Screen Recorder – XRecorder” from the Play Store are good alternatives.
Conclusion
Mastering how to screen record on Samsung tablet devices gives you the power to share knowledge, save gameplay, and troubleshoot issues remotely. By uncovering the hidden settings in the Quick Panel and carefully selecting “Media sounds and mic,” you can avoid the frustration of silent recordings.
While the native Samsung tools are powerful for day-to-day use, if you find yourself needing to create high-end tutorials with zooms and subtitles, don’t be afraid to transfer your files to a PC.
Take control of your content today. Whether you stick to the native editor for quick clips or try FocuSee for polished, professional videos, the right workflow is the one that helps you communicate clearly.