Best Practices for Creating Product Demo Videos That Actually Convert in 2026

As the product marketing lead at a growing SaaS startup, I was preparing for a major feature launch but felt completely stuck. My engineering team insisted on showcasing every single technical detail and backend architecture, resulting in videos that felt exhausting and overly technical. Meanwhile, leadership demanded short, punchy content that drove immediate conversions.
If you have ever stared at a dropping viewer retention graph and felt your product deserves better, you are not alone. I used to spend four hours manually keyframing mouse clicks and zoom effects in Adobe Premiere Pro until I had a sobering realization: my users did not care about cinematic editing. They just wanted to see how to use the dashboard to solve their problems.
This guide covers the exact, reliable procedure we use to balance engineering’s desire for detail with leadership’s demand for conversions. Rigorously tested across 15+ SaaS product launches in both macOS and Windows environments, this workflow will show you how to transform confusing feature walkthroughs into scalable, high-converting video storytelling assets.
Manual Editing vs. Automated Software Demo Video Strategy
When creating software demo videos, the key decision is whether to rely on manual editing workflows or automated demo tools.
Manual editing offers full creative control but becomes inefficient for fast-moving SaaS products. Automated tools, on the other hand, prioritize speed, consistency, and scalability.
| Live Product Demo Recording | Edited Promotional Video | |
| Primary Goal | Close deals & build trust | Generate awareness & clicks |
| Funnel Stage | Mid to Bottom Funnel | Top of Funnel |
| Conversion Type | High-intent conversions (sales) | Volume-based traffic & leads |
| Production Cost | Low | High |
| Time to Produce | Fast (same-day usable) | Slow (days to weeks) |
| Scalability | Medium | High |
| Update Flexibility | Very high | Low |
| Best Use Case | Sales calls, enterprise demos, onboarding | Paid ads, landing pages, product launches |
The Modern Demo Production Stack (It’s About the Process)
A common mistake teams make is assuming one piece of software will magically fix a bad demo. Professional videos require a solid hardware and software stack working in harmony. You do not need a massive production budget, but you do need the right tools tailored to a seamless process.
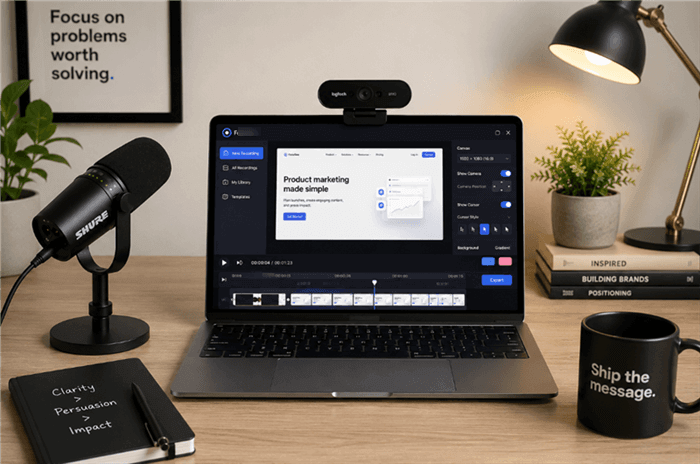
A Desk Setup for Creating Product Demo Videos
Here is the recommended foundational stack for high-converting demos:
- The Audio (Crucial): Viewers will forgive a slightly blurry screen; they will not forgive echoing, muffled audio. Invest in a dedicated dynamic microphone like the Shure MV7 or a Rode PodMic to ensure your voiceover sounds rich, authoritative, and trustworthy.
- The Visuals: If you include a speaker bubble (which boosts trust), use a high-quality 1080p or 4K webcam like the Logitech Brio or Insta360 Link. Ensure you are facing a window or a simple ring light.
- The Screen Capture Vehicle: Automated screen recording tools like FocuSee act as your instant editing assistant. Instead of manually animating your screen, FocuSee’s Smart Focus automatically highlights the clicked area to emphasize key actions.

Show Mouse Cursor
When these tools work together, the recording process becomes your editing process. You narrate into a professional mic, record your screen via automated software, and the AI Smart Cut features instantly trim out long silences and filler words.
How to Condense Complex Workflows & Handle UI Updates
Telling a marketer to “just show the solution” is utterly unhelpful when the actual software workflow requires 15 clicks across four different sub-menus. How do you condense that without confusing the user?
1. Use Automated Speed Ramps and Jump Cuts
Do not force your viewer to watch you navigate every sub-menu in real-time. Record the entire 15-click process, but in post-production (or using your automated tool’s editing suite), utilize speed ramps. Fast-forward through the predictable navigation clicks at 400% speed, then slow back down to normal speed the moment you reach the final, crucial action (like clicking the “Generate Report” button). Alternatively, use a clean jump cut with a subtle zoom to skip the boring middle steps entirely.
2. Decouple Your Voiceover to Survive UI Changes
One of the most frustrating aspects of SaaS marketing is re-recording a cohesive video when only one specific dashboard changes. To fix this, never record your final voiceover live with your screen action.
Write your script, record the voiceover track independently using your high-quality microphone, and then record the screen action to match the audio. When the UI updates next month, you only need to re-record a 10-second silent screen capture of the new dashboard and drop it over the original audio track.
Product Walkthrough Video Tips: The Problem-Solution-Outcome Framework
Most product demo videos fail because teams organize demos around internal product architecture instead of customer urgency. If you structure your video chronologically by your top navigation bar, viewers will bounce.
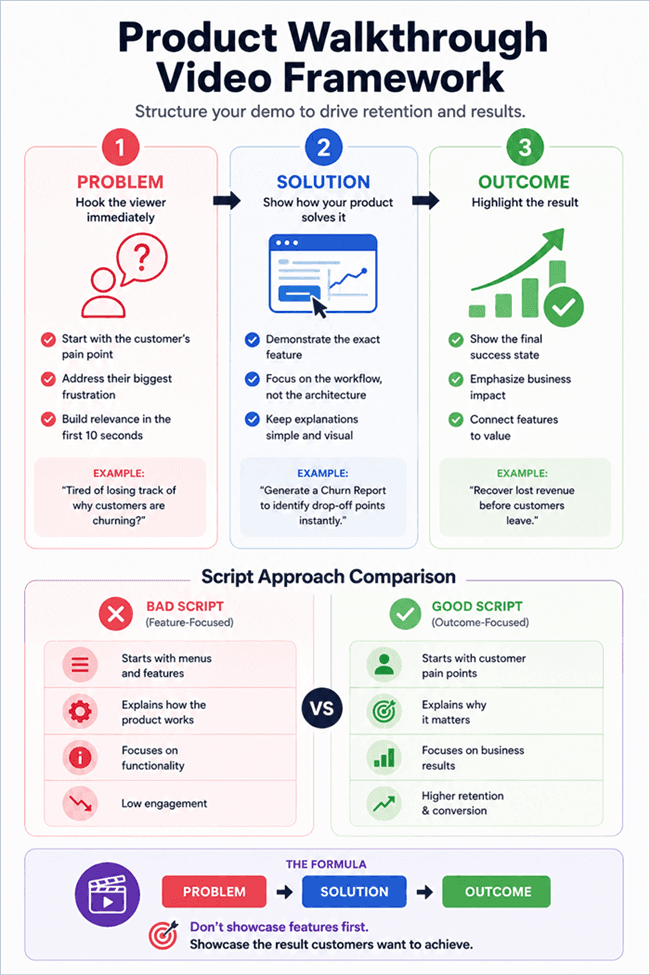
Product Walkthrough Video Framework
High-performing demos follow a strict ‘Problem → Solution → Outcome’ structure. Here is how that looks in practice, complete with a side-by-side script comparison.
1. The Problem (0:00 – 0:10)
Start by directly addressing the viewer’s core obstacle. Validate their struggle immediately to secure video retention.
2. The Solution (0:10 – 1:30)
Introduce your software as the direct, specific answer to that problem. Do not explain the backend architecture; just show the exact tool or procedure that solves the issue.
3. The Outcome (1:30 – 2:00)
End by showing the final, successful result. Focus on the value gained, such as hours saved or revenue generated.
Real-World Script Template Comparison
❌ The Bad Script (Feature-Focused):
“Welcome to our software. Today I’m going to show you the Analytics Dashboard. If you look on the left-hand menu, you can click ‘Reports’. Here you can see all your user data. You can filter by date, by user type, and by location using these three drop-downs up here…”
(Result: The user is bored. They don’t know why they need this data yet.)
✅ The Good Script (Outcome-Focused):
“Tired of losing track of why customers are churning this month? (Problem). Our custom Analytics Dashboard tracks user drop-off in real-time. Simply click ‘Generate Churn Report’ (Solution), and instantly see exactly which onboarding step is causing users to leave, helping you recover lost revenue before the month ends (Outcome).”
Bridging the Gap: Hybrid Physical & Digital Product Demos
If you are selling a product that bridges the physical and digital world—like Point of Sale (POS) software that requires an iPad and a physical card reader—a standard screen recording is practically useless. Your buyers need to see how the hardware and software interact in the real world.
To execute a hybrid demo effectively without a professional camera crew, use the Picture-in-Picture (PIP) technique:
1. Mount your iPhone on a desktop tripod, angled down at a 45-degree angle to capture your hands interacting with the physical iPad and card reader. Ensure the space is well-lit.
2. Simultaneously, run a native screen recording on the iPad to capture the high-resolution software backend.
3. Sync the two recordings in your editing software. Make the crisp, direct screen capture the primary video taking up the full screen, and place the iPhone camera footage of your hands swiping the physical card in the bottom corner.
This provides the viewer with perfect digital clarity while validating the physical, tactile experience of your product.
Repurposing Content for Product-Led Growth (PLG)
Product-Led Growth (PLG) strategies rely on getting users to experience the “aha” moment of your product as quickly as possible. You cannot achieve this if your product demo only lives on a single hidden landing page. Maximizing your return on investment requires repurposing a single master feature walkthrough across your entire ecosystem.
Once you have finalized your primary product demonstration video, adapt it for landing pages, paid ads, onboarding flows, and social media. Using your automated demo tool, export the exact same screen recording into multiple aspect ratios. Select a standard 16:9 format for a high-converting YouTube tutorial, then immediately export a 9:16 vertical version optimized for a TikTok or Instagram Reels campaign.
Additionally, employing automatic subtitles and speech recognition ensures your video storytelling reaches an international audience. A massive portion of mobile users watch videos on mute; burning bold, accurate captions into your 9:16 exports guarantees your PLG strategy successfully captures attention, even in silent viewing environments.
Why Traditional Product Marketing Demo Video Strategy Fails
To fully understand the necessity of adopting these modern practices, we must look at the bloated timelines of the past. Historically, software companies relied on slow, unedited screencasts that attempted to explain every minor system configuration.
Without targeted visual hierarchy, viewers easily lose track of the cursor and the core narrative. A traditional, heavy video project not only takes weeks to produce but becomes obsolete the moment a developer shifts a button. Upgrading to a targeted, automated, and decoupled approach is no longer just a luxury; it is a fundamental requirement to survive in a competitive market.
Frequently Asked Questions About Product Demo Videos
How long should a product demo video be?
Keep your standard demo under two to three minutes. Focus exclusively on a single primary workflow rather than overwhelming the viewer with an extensive feature list.
What features should I show first?
Always prioritize the specific features that directly solve the core customer pain points using the ‘Problem → Solution → Outcome’ structure.
Should I focus on features or benefits?
Benefits. Connect every capability you highlight in your feature walkthrough to the tangible, measurable value it provides the end-user (e.g., time saved, revenue gained).
Do I need professional editing software?
No. Modern demo automation handles UI zoom effects, AI audio enhancements, and cursor highlighting automatically, largely bypassing the need for complex desktop editing suites. Furthermore, platforms like FocuSee regularly update their UI and auto-zoom algorithms to match modern OS releases (like macOS Sequoia or Windows 11), ensuring your workflow remains future-proof.
How do I make complex workflows look simple?
Incorporate speed ramps and jump cuts. Fast-forward through repetitive navigation clicks and only slow down for the critical “aha” moments.
Can I reuse one demo for multiple channels?
Yes. Export your master video file into different aspect ratios (16:9 for desktop, 9:16 for mobile/social) to maximize reach without re-recording.
What metrics should I track?
Focus on viewer retention rate graphs, play rates on landing pages, and the final conversion rate (e.g., sign-ups or booked calls generated directly from the video).
Start Creating Videos That Convert
Creating high-converting content no longer requires endless hours of manual keyframing or hiring an expensive agency. If your team spends too much time editing demo videos, or if you are constantly battling UI updates, evolving your process is the answer.
By adopting the Problem-Solution-Outcome framework, utilizing speed ramps to simplify complex clicks, and leaning on a smart hardware/software stack, you regain total control over your customer acquisition. Empower your team today to step away from the grueling manual editing timeline. Start recording, focus on your user’s core problems, and watch your video retention—and your conversions—finally start to climb.