How to Use 3D Camera in After Effects: The Cinematic Guide 2026

You have likely reached a frustrating crossroad. You visualized those polished, cinematic moves seen in professional work—sweeping pans and dynamic zooms. You followed the menu steps to create a camera layer, hit the keys to move it, and then… nothing happened. Your layers remained stubbornly flat, and the camera seemed broken.
This guide addresses that exact moment of frustration. We are going to demystify the toolset, from enabling Z-axis depth to mastering depth of field. Unlike standard tutorials that skip the basics, we will focus on the practical “how-to” needed to get your timeline moving. By the end, you will understand why your camera wasn’t working and how to achieve professional results without the headache.
Step 1: Enabling 3D Space (Why Your Camera Isn’t Working)
If you are searching for how to create a 3D camera in After Effects and finding that your camera movement does not affect your scene, you have likely missed a critical toggle. By default, After Effects layers are 2D—they only exist on the X (horizontal) and Y (vertical) axes.
A camera in After Effects moves through 3D space; it cannot “see” or affect 2D layers differently than a flat view.
The 3D Layer Switch
To fix this, you must enable the 3D layers switch for every element you want the camera to interact with.
- Look at your timeline panel.
- Locate the “cube” icon column (right next to the motion blur switch).
- Click the empty box for your text, image, or shape layers to make the cube icon appear.
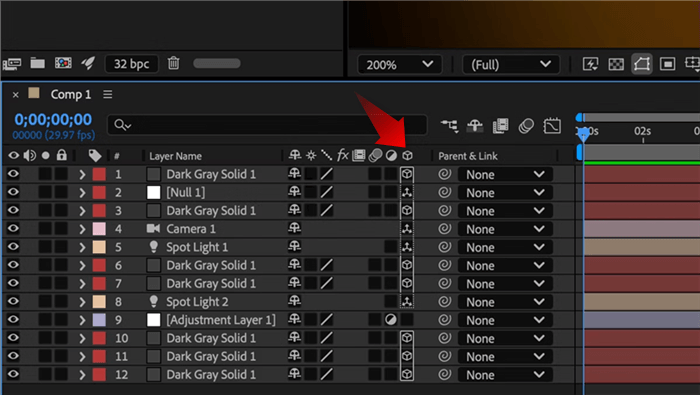
Click the cube Icon
Once activated, your layer gains a third dimension: Z-axis depth. You can now push objects away from or toward the camera. This is the foundation of the parallax effect, where closer objects move faster than distant ones during a camera pan. Without this switch, the camera tool is functionally invisible.
Step 2: visualising 3D Space (Views and Tools)
Now that your layers are 3D, you might still feel like you are working blind. A common struggle for beginners is trying to understand 3D depth while looking at a flat 2D monitor. If you try to move the camera while only looking at the “Active Camera” view, you will likely lose track of where your objects are.
Changing Your View Layout
To build a strong mental model of your scene, you need to see it from above.
- At the bottom of the Composition window, locate the dropdown menu that says “1 View”.
- Change this to “2 Views – Horizontal”.
- Set the left view to “Top” and the right view to “Active Camera”.
Now, you can see a “cone” representing your camera and lines representing your layers. This allows you to position elements precisely in Z-space without guessing.
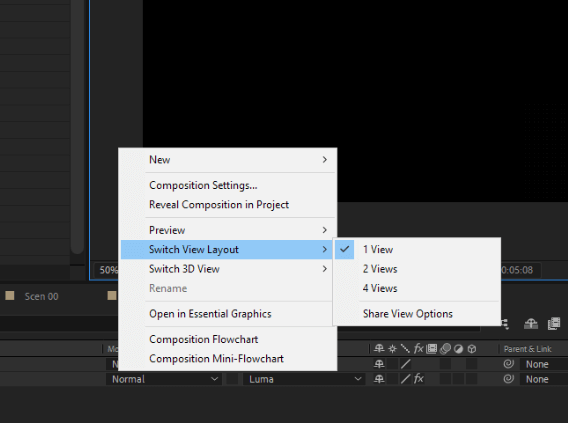
2 Views – Horizontal
Choosing the Right Camera
When you select Layer > New > Camera, After Effects asks you to choose between a One-Node Camera and a Two-Node Camera.
- One-Node Camera: Acts like a handheld camera or drone. It has no fixed target. Best for fly-throughs where you need to look around freely.
- Two-Node Camera: Includes a “Point of Interest” (target). The camera is always locked onto this specific point. Best for orbiting around a product or logo.
Navigation Hotkey
Don’t get stuck hunting through menus to move your view. Press C on your keyboard to cycle through the camera tools:
- Unified Camera Tool: Left-click to orbit, right-click to move Z (dolly), middle-click to pan.
- Orbit: Rotates around the object.
- Dolly: Pushes in and out.
Step 3: Pro Workflow for Smooth Movement (Null Object Control)
Here is a critical tip that most after effects 3d camera beginner guides miss, and it is something most experts learn only after struggling with jerky, uncontrollable animations: Do not animate the camera directly.
A common mistake beginners make is adding keyframes to the camera’s Position and Point of Interest. This often results in weird arc motions and difficult adjustments. The professional standard for after effects 3d camera movement is null object camera control.
The Null Object Workflow
- Go to Layer > New > Null Object.
- Crucial: Turn the Null Object into a 3D layer (click the cube icon).
- Use the “Pick Whip” (the spiral icon) on your Camera layer and drag it to the Null Object. This “parents” the camera to the Null.
Now, you act as the camera operator by moving the Null, not the camera itself. This is like putting your camera on a tripod or a crane.
How to Animate the Null (Step-by-Step)
- Select your Null Layer.
- Press P on your keyboard to reveal the Position property. (Or press R to reveal Rotation).
- Click the stopwatch icon to set your first keyframe.
- Move your timeline playhead forward (e.g., to 2 seconds).
- Change the numbers in the Position property (X, Y, or Z). After Effects will automatically create a new keyframe.
Fixing “Flat” Animation (The Easy Ease Secret)
If your movement feels robotic or mechanical, it is because the speed is linear—it starts and stops abruptly. To make it feel cinematic:
- Click and drag to select both keyframes you just created.
- Press F9 on your keyboard (or right-click > Keyframe Assistant > Easy Ease).
This smooths the acceleration and deceleration, making the camera move feel like it has weight and momentum.
Step 4: Adding Cinematic Polish (Depth of Field)
Once your movement is dialed in, the difference between a “digital” look and a “cinematic” look often comes down to one setting: depth of field. In the physical world, cameras cannot keep everything in perfect focus simultaneously. Replicating this optical limitation is what makes after effects camera depth of field so effective at directing viewer attention.
Configuring Camera Optics
To enable this, double-click your Camera layer (or go to Camera Options in the timeline).
- Enable Depth of Field: Turn this strictly “On.”
- Focus Distance: This determines exactly which plane of Z-space is sharp. You can link this to a layer’s position or adjust it manually until your subject is crisp.
- Aperture: This controls the intensity of the blur. A higher Aperture value (pixels) creates a shallower depth of field (more blur in the background/foreground).
Pro Tip: Be careful not to overdo the Aperture, or your scene may look like a miniature toy set. Used correctly, however, this technique adds realism and separates your foreground elements from the background.
Decision Guide: Manual 3D Camera vs. Automated Smart Focus
If you’ve tried managing Nulls, Graph Editors, and Z-space in After Effects, you know it can feel like overkill—especially if your goal is simply to record a software demo, website walkthrough, or tutorial with smooth cinematic movement. After Effects gives limitless control, but at the cost of time and a steep learning curve.
For practical use cases—showcasing an interface, highlighting features, or producing a polished presentation—manual keyframing is often inefficient. That’s where FocuSee’s automated 3D motion tools come in.
Comparing the Workflows
If your goal is to showcase a website or software interface with “cinematic” movement, here is how the manual approach compares to an automated solution:
| Feature | Manual 3D Camera (After Effects) | Automated Smart Focus & Motionicon (FocuSee) |
| Setup Time | High (Lights, Layers, Keyframes) | Instant (One-click auto-detection of cursor movement) |
| Control | Infinite creative freedom | Optimized for screen recording: tilt, perspective, and smooth zooms are applied automatically |
| Learning Curve | Steep (Graph Editor, Nulls, Z-space) | Low (Drag-and-drop; no 3D expertise needed) |
| Best For | Fantasy worlds, Kinetic Typography | Software Demos, Tutorials, Presentations |
The Shortcut: Automating Cinematic Camera Moves
FocuSee takes the hassle out of producing professional-looking demos. Its Smart Focus automatically tracks cursor movement and applies smooth dolly-like zooms, while the 3D Motionicon adds tilt and perspective to create cinematic depth—all in one click.
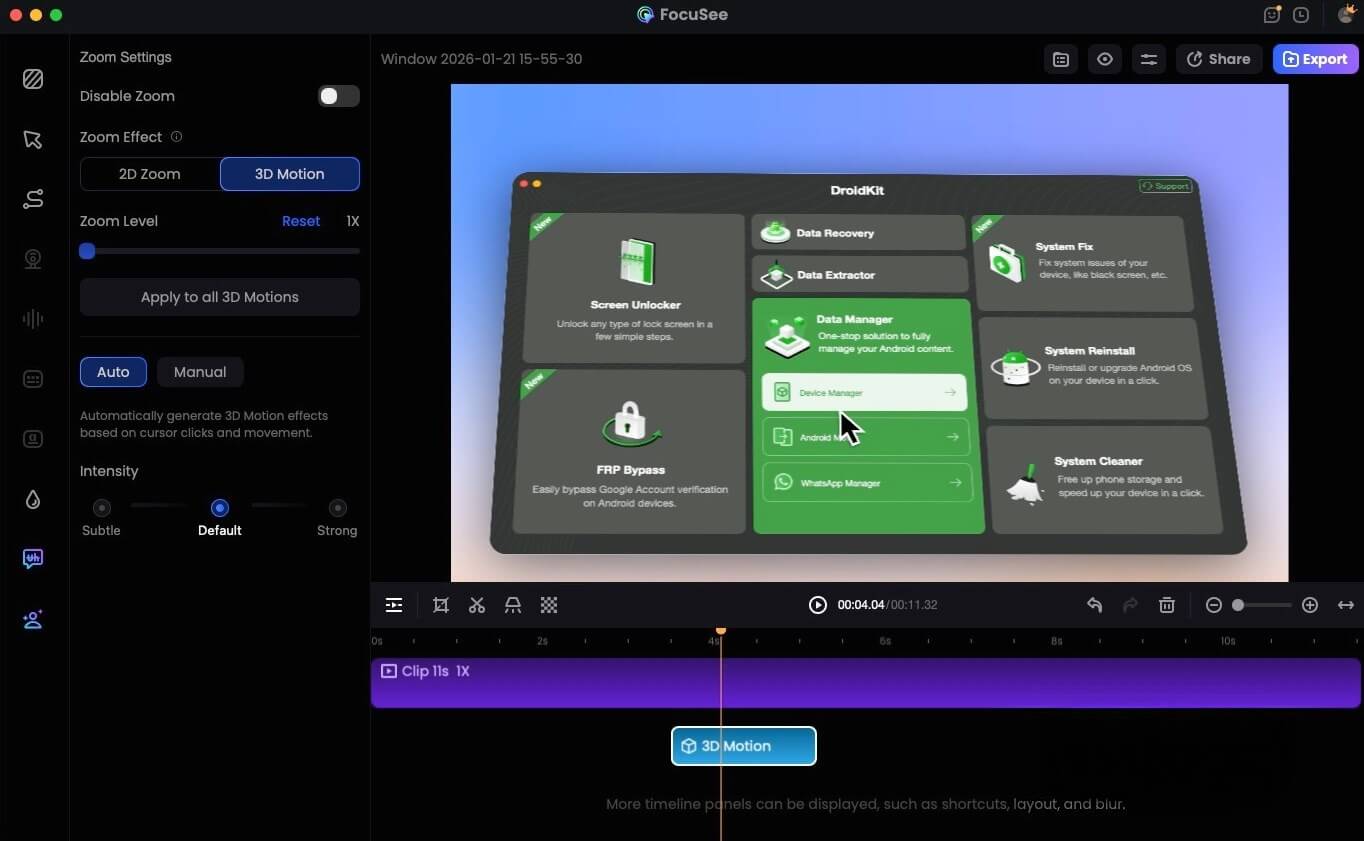
FocuSee 3D Motion
No more struggling with overcomplicated 3D layers or worrying that your animation looks shaky. Whether you want a subtle focus shift or dramatic cinematic movement, FocuSee delivers instant visual impact without the hours of setup After Effects demands.
Conclusion
Mastering the After Effects 3D camera tool transforms your work from flat graphics into immersive experiences. By understanding the difference between one-node and two-node cameras, utilizing null object control, and applying depth of field, you can finally solve the frustration of “flat” animations.
Remember, the key to professional movement isn’t just the camera tool itself—it is the combination of proper viewing angles (Top View), parenting to Null objects for control, and smoothing your keyframes with Easy Ease (F9). Stick to this workflow, and your 3D compositions will become second nature.
Common 3D Camera FAQs & Troubleshooting
Even with a solid workflow, you may encounter technical snags. Here are solutions to the most frequent issues users face.
Why is my After Effects 3D camera not working?
If your camera moves but the layers stay still, double-check that the “3D Layer” switch (cube icon) is toggled on for every layer you want to be affected. The camera ignores 2D layers.
Why is my playback extremely slow?
High depth of field and motion blur settings tax your processor heavily. To speed up your workflow while editing, turn off the Depth of Field switch or lower the composition resolution to “Half” or “Third” until you are ready to render.
How do I move objects forward and backward in 3D space?
Once a layer is 3D, it gains a third value in the Position property (X, Y, Z). Changing the third number (Z-axis) moves the layer closer (negative value) or further (positive value) from the camera.
Do I need to turn layers into 3D for the camera to work?
Yes. The camera exists in 3D space. If a layer is 2D, it exists on a flat plane stuck to the “screen” and will not react to camera movement.