Fix: 3D Camera Tracker After Effects Not Working (2026)

Facing a locked timeline when you need it most creates a specific kind of panic. A client deadline is looming, the creative brief requires 3D text in a live-action shot, but the 3D camera tracker in After Effects is not working, which has brought production to a halt. It is not just a technical glitch; it is a roadblock threatening your professional credibility.
Whether you are staring at an endless “Analysis Failed” banner, dealing with tracking points that drift into nowhere, or finding the effect entirely greyed out, this is a solvable problem. You do not need to restart your computer or reinstall the software yet. This guide provides a tested, step-by-step troubleshooting procedure to get your VFX compositing back on schedule immediately.
Why the 3D Camera Tracker in After Effects Is Not Working
If After Effects displays “Analysis Failed” or simply hangs, stop the current process. Most failures stem from four specific mismatches rather than deep software bugs. Run this immediate diagnostic checklist to identify the culprit.
3D Camera Tracker in After Effects
1. Check Resolution vs. Composition
A frequent cause of the After Effects 3D camera tracking problem is a mismatch between layer resolution and composition settings. Dropping 4K footage into a 1080p timeline and scaling it down (checking “Scale to Frame Size”) before tracking creates a conflict. The tracker attempts to analyze the raw pixel data while the composition view renders a scaled version.
Always track the source footage in its native resolution before placing it into a different composition. Right-click your footage in the project panel > New Comp from Selection. Run the tracker there. Once solved, you can nest this composition into your main timeline.
2. The “Shot Type” Mismatch (Crucial Fix)
This is the most overlooked setting that leads to immediate failure on dynamic shots. By default, After Effects assumes your lens focal length remains constant (“Fixed Angle of View”). If you zoomed in or out even slightly during the shot, the math breaks, and the solve fails.
In the 3D Camera Tracker effect settings, look for Shot Type. Change it from “Fixed Angle of View” to “Variable Zoom”. This tells the solver to calculate the focal length changes frame-by-frame. This single switch fixes approximately 90% of failures on handheld or documentary-style footage.
3. Purge the Memory Cache
Corrupt cache files often cause the solver to freeze, especially on long clips where previous failed analysis data lingers.
Navigate to Edit > Purge > All Memory & Disk Cache. This forces After Effects to re-calculate the tracking points from scratch, ensuring no “ghost” data interferes with the new solve.
4. Verify Frame Rate Consistency
A mismatch between your clip’s frame rate (e.g., 23.976 fps) and the composition’s frame rate (e.g., 24 fps or 30 fps) will prevent a successful solve camera operation.
Interpret your footage manually. Go to File > Interpret Footage > Main and ensure the assumed frame rate matches your composition settings exactly.
Hardware Check: GPU and RAM Allocation
Before diving deeper into workflow fixes, briefly verify that your hardware isn’t bottling the analysis. The 3D Camera Tracker is resource-intensive, and simple driver issues can cause the “Analysis Failed” error instantly.
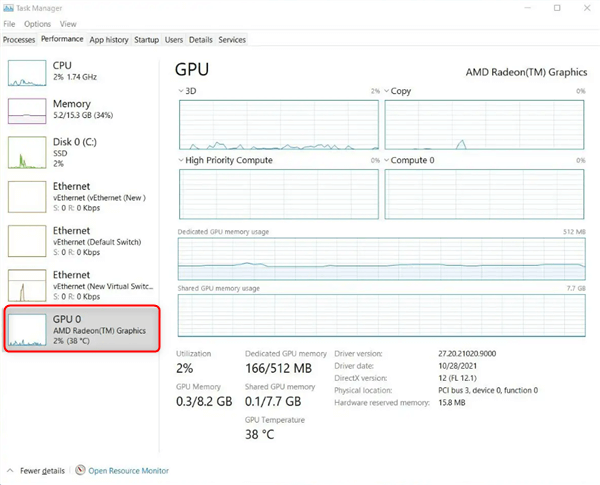
Check GPU
- GPU Drivers: If you use an NVIDIA card, ensure you are using the Studio Driver, not the Game Ready Driver. Studio Drivers are optimized for Adobe Creative Cloud stability.
- RAM Allocation: Go to Preferences > Memory & Performance. Ensure you have reserved enough RAM for other applications (usually 3-6GB), but maximize the RAM available for After Effects. If your system is starving for memory, the background analysis process will terminate unexpectedly.
The Silent Killer: Insufficient Parallax
Sometimes the 3D camera tracker solve failed message appears because the physics of the shot simply do not support 3D tracking. The tracker relies on parallax—the visual shift of objects relative to each other—to calculate scene depth.
- Nodal Pans: If your camera creates a simple “pan” (rotating on a tripod) rather than physically moving through space (dolly, truck, or walking), the 3D solver cannot calculate depth effectively.
- Zooming vs. Dollying: Zooming in on a lens changes the focal length but does not create parallax. Without specific tracking markers, the software often cannot distinguish a zoom from a forward dolly move.
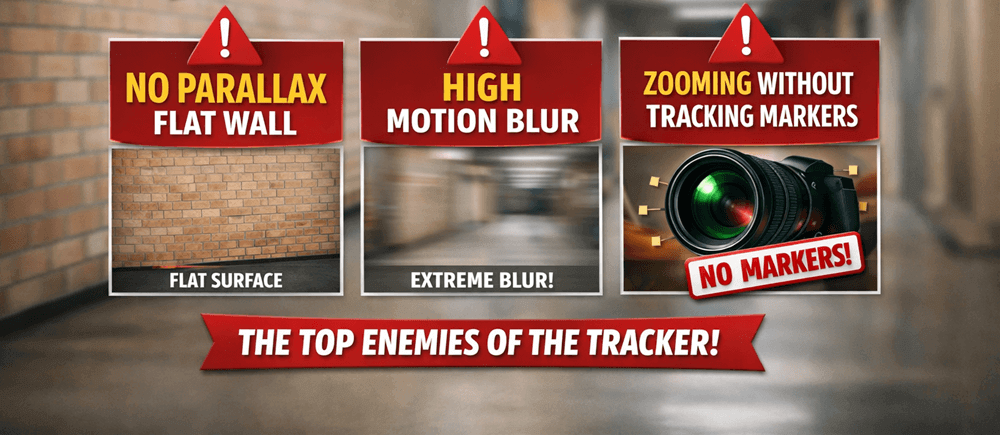
Lack of Parallax and Motion Blur
Solving Specific Error Messages & Greyed Out Options
When troubleshooting an After Effects camera tracker error, identifying the specific notification or interface behavior is the first step toward a solution.
1. The “3D Camera Tracker Greyed Out” Issue
If you find the 3D camera tracker greyed out in the After Effects menu, it typically indicates a context error.
- Active Selection: The tracker requires an active, selected layer containing actual pixel data. Do NOT apply the tracker to Null Objects, Text layers, or Adjustment Layers.
- Renderer Conflict: Check your composition settings (Composition > Composition Settings > 3D Renderer). While the tracker usually works in “Cinema 4D” mode, switching back to “Classic 3D” for the tracking process can sometimes resolve interface glitches.
- Panel Focus: Verify that the Composition Panel or Timeline Panel is the active window (outlined in blue).
2. “Unable to Solve Camera For This Scene”
This generic error typically indicates format conflicts or a lack of texture.
- Codec Issues: Highly compressed formats like H.264 (MP4) often contain compression artifacts that confuse the analysis.
- The Solution: Transcode your footage to an intermediate codec like ProRes 422 or DNxHR. These formats provide “cleaner” pixel data for the tracker to latch onto.
The “Bullseye” Problem: Why You Can’t Create a Camera
A common frustration occurs when the solve completes, and you see multicolored tracking points, but you cannot create a camera or the “Target” (the red bullseye) won’t align with the floor.
- Select the Effect: Ensure the 3D Camera Tracker effect is highlighted in the Effect Controls panel. You must be in “Selection Tool” mode (V) to see the points.
- Triangulation: You need to select at least three points to define a plane. Click and drag a marquee box around three points on the floor.
- Target Size: If the points are visible but the Target Bullseye is tiny or invisible, increase the Target Size in the effect settings (under the “Render Track Points” checkbox). This doesn’t change the track; it simply makes the UI tool visible so you can click it.
- Define the Ground: Once you have a target that looks flat on the floor, right-click it and select “Set Ground Plane and Origin.” This is essential. It tells After Effects, “This is the floor (0,0,0).” Without this, your 3D text will float at arbitrary angles.
Footage Hygiene: Pre-Composing and Stabilization
Experienced VFX artists know that shot stabilization and prep work are often required before you even click “Track Camera.” If your footage contains heavy rolling shutter (jello effect) or jitter, the software receives distorted geometric data, leading to tracking points that float or slide.
Fixing Rolling Shutter
CMOS sensors (found in most DSLRs and Mirrorless cameras) record images line-by-line. Fast camera movement causes vertical lines to slant.
- Apply the Warp Stabilizer VFX effect.
- Crucial Step: Change the method from “Subspace Warp” to “Rolling Shutter Ripple” only. You do not want to smooth the camera motion yet; you only want to correct the sensor distortion.
- Once applied, Pre-compose this layer and select “Move all attributes into the new composition.” This “bakes in” the correction so the 3D Camera Tracker analyzes a geometrically correct image.
Decision Guide: 3D Tracker vs. Mocha AE vs. Manual
Avoid the sunk cost fallacy. If the 3D tracker fails repeatedly, use this decision framework to choose the right motion tracking tool for your specific shot.
| Feature | Native 3D Camera Tracker | Mocha AE (Planar Tracking) | Manual Point Tracking |
| Best For | Integrating 3D objects, text, or particles into a moving scene. | Screen replacements, logo removal, surface tracking. | Simple stabilization or attaching 2D graphics to one point. |
| Camera Movement | Requires physical movement (Dolly, Drone, Crane). | Works on both moving shots and tripod pans/zooms. | Works on any shot with a distinct high-contrast point. |
| Key Requirement | True scene depth and parallax. | A flat, textured surface (wall, screen, ground). | High contrast feature (e.g., a light bulb, eye). |
| Why Switch? | If 3D camera tracker fails due to lack of depth. | If you only need to stick a poster on a wall. | If you only need to stabilize a shaky shot. |
Advanced Workarounds for “Impossible” Shots
Sometimes, you have no choice but to make the 3D tracker work on a difficult shot. Here are the advanced techniques to force a solve on clips containing moving objects or low contrast.
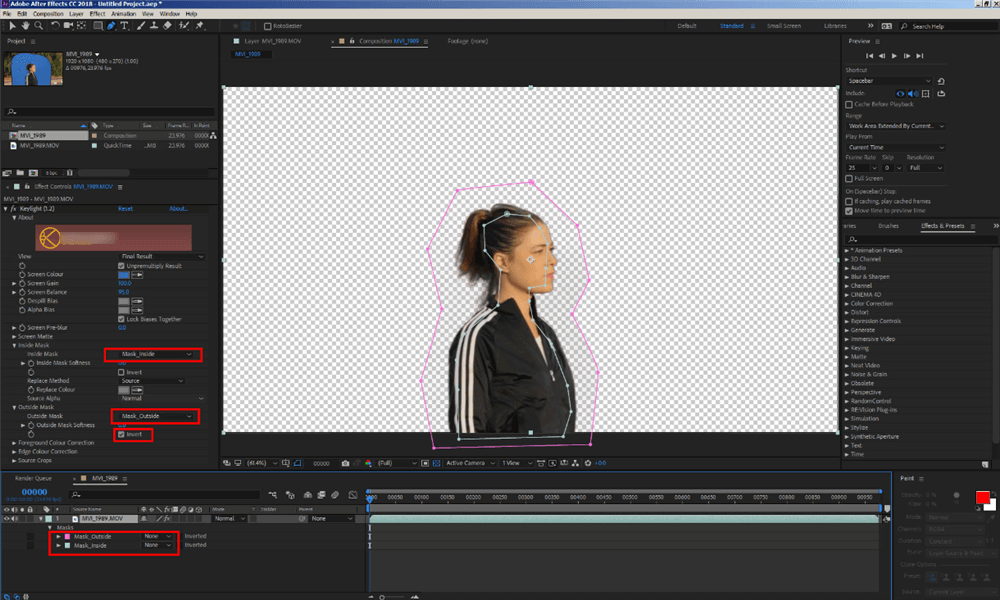
Masking Moving Objects (Garbage Matting)
Moving elements like cars, people, or blowing trees confuse the solver because their motion conflicts with the camera’s movement. You must tell After Effects to ignore them.
- Draw a Mask: On your footage layer, draw a rough mask around the moving subject (e.g., a person walking across the frame).
- Set to Subtract: Change the mask mode to “Subtract.” This creates a “hole” in your footage.
- Why This Works: The 3D Camera Tracker ignores transparent pixels (alpha channel) during its analysis. It will now only calculate tracks based on the static background.
- Refinement: After the camera is solved and created, you can simply delete the mask to bring your footage back to normal. The camera data remains.
Note: If you prefer pre-composing, you can paint a black solid over the moving object inside the pre-comp. The tracker struggles to find contrast points in flat black areas, effectively ignoring them.
Enhancing Contrast for Analysis
Garbage Matte
The tracker relies on contrast to identify features. If your footage is flat (Log-encoded) or dark, the software creates fewer points.
- The Trick: Add a Curves or Levels effect before the 3D Camera Tracker. Crank up the contrast drastically to make edges distinct.
- Execution: Let the tracker run the analysis. Once the camera is solved and created, you can delete or turn off the Curves effect. The tracking data remains, but your footage returns to its original look.
Frequently Asked Questions About Camera Tracking
Why is the 3D Camera Tracker not working in After Effects?
The most common cause is a mismatch between the footage and composition settings, or footage that lacks sufficient parallax (depth movement). Ensure your layer resolution matches the composition and check that you are tracking the source layer, not a collapsed pre-comp.
Why does After Effects say “Solve Failed”?
“Solve Failed” occurs when the software cannot mathematically reconcile the movement of pixels into a coherent 3D camera path. This happens frequently with clips containing zoom changes (fixable by selecting “Variable Zoom”), heavy motion blur, or conflicting motion (like a large moving object obscuring the background).
Why can’t I create a camera from tracking points?
If you see points but cannot select them, ensure you have defined a plane by selecting three points. If the points are too small, increase the “Track Point Size” in the effect settings. If the “Target Bullseye” is not visible, increase the “Target Size” parameter.
Does motion blur or rolling shutter affect camera tracking?
Yes. Motion blur streaks pixels, destroying the distinct edges needed for tracking. Rolling shutter warps vertical lines during pans. Both create inaccurate data. Use a faster shutter speed when shooting, or use the Rolling Shutter Repair effect before tracking.
How do I fix inaccurate or floating tracking points?
First, ensure you have deleted tracking points that attached to moving objects (cars, people). Second, verify your shot was stabilized for rolling shutter. Finally, strictly define your “Ground Plane” and Origin point to help After Effects understand the orientation of the world.
Conclusion
Resolving the 3D camera tracker After Effects not working error usually comes down to methodical preparation rather than brute force. By checking your resolution, switching your Shot Type to “Variable Zoom,” and masking out moving objects, you can turn a “Solve Failed” message into a perfect track. You now have the checklist to diagnose the issue and the techniques to fix it, allowing you to regain control of your timeline.
Once you have successfully navigated this complex workflow, you will likely want to remember exactly how you did it for the next project—or explain it to a junior editor without repeating yourself. FocuSee is an excellent tool for documenting these technical fixes. It streamlines screen recording by automatically handling zooms and cursor highlights, allowing you to create a polished “workflow archive” video for your team in minutes, ensuring that the next time a deadline looms, the solution is just a click away.
Further Reading: How to Make Tutorial Videos on PC >