How to Edit Tutorial Videos for Beginners in 2026

Editing tutorial videos should not feel harder than making them.
But many beginners record a simple screen tutorial, open a traditional editor, and immediately get stuck with confusing timelines, keyframes, and export settings.
A 5-minute tutorial can easily turn into hours of editing.
Most people searching “how to edit tutorial videos” are not trying to become professional editors. They just want a fast way to: cut mistakes, add zoom effects and captions, make tutorials look professional and publish videos faster.
The good news is that modern AI-powered editors can automate most of this process.
In this guide, you’ll learn a simple workflow to edit tutorial videos faster without the steep learning curve of traditional editing software.
Manual vs. AI Tools: Which Is Easier for Beginners?
Many beginners think they need professional editing software to make tutorial videos. In reality, most tutorial creators only need a fast workflow — not a complex editing suite.
Here’s the biggest difference between manual editing and modern AI-powered tools:
| Traditional Editors | AI-Powered Editors | |
| Editing Time | Manual cutting & trimming | Auto-removes pauses & mistakes |
| Learning Curve | Requires timeline & keyframe skills | Beginner-friendly workflow |
| Zoom & Effects | Added manually | Generated automatically |
| Captions | Manual setup | One-click auto captions |
| Workflow Speed | Slow for beginners | Faster publishing |
For simple tutorial videos and screen recordings, automated editors can save hours of manual editing while making the workflow much easier to manage.
The Easiest Way to Edit Tutorial Videos for Beginners – FocuSee
If you want simple workflows, you need a purpose-built solution that automates post-production. While traditional tools require you to manually build every effect, tools like FocuSee handle the heavy lifting for you. Here is exactly how to navigate its core features to speed up your workflow:
- Trimming the Fat: Instead of using a manual razor tool, FocuSee includes an AI Smart Cut feature. You simply click the “Smart Cut” button located above your timeline. The software instantly scans your audio waveforms and highlights “uh,” “um,” filler words, and dead air, allowing you to delete them all with a single click.
- Guiding the Eye: If you struggle with keeping your audience’s attention, the Smart Focus (Auto-Zoom) feature is a game-changer. You don’t have to set manual keyframes to zoom in. The software automatically applies a smooth zoom effect to whatever area of the screen your mouse clicks, keeping viewers oriented.
- Tracking the Click: FocuSee offers Smart & Customizable Cursor Highlights. In the right-hand settings panel, you can toggle the cursor to auto-hide when not moving, and apply a yellow highlight ring so viewers never lose track of your mouse.
- Adding Subtitles: Click the “Captions” tab to generate Automatic Subtitles. The software transcribes your voiceover with over 98% accuracy and places perfectly timed text across the bottom of your screen.
How to Edit Screen Recording Tutorials: A Practical 5-Step Procedure
Screen recording editing requires a specific, retention-focused procedure. Generic vlogging tips will not help you teach someone how to use a software dashboard. Here is a fast, reliable, click-by-click workflow to polish your training content.
1. Video Trimming and Fixing Jump Cuts
Your first pass should remove any dead air, throat-clearing, or software loading screens.
Manual Method: If you are using traditional software like Premiere Pro or DaVinci Resolve, select the Razor Tool (usually shortcut ‘C’ or ‘B’). Click the timeline at the start of your mistake, and click again at the end. Switch to the Selection Tool (‘V’), click the bad clip, press Delete, and use a “Ripple Delete” to snap the remaining clips together.
AI Method: If using a tool like FocuSee or Descript, simply run the AI filler word removal. Use simple jump cuts to stitch the good takes together. A jump cut naturally pushes the tutorial pacing forward, keeping the viewer engaged.
2. Applying Targeted Zoom Effects
Viewers often watch YouTube tutorials on mobile devices with small screens. Because of this, you must apply zoom effects to specific UI elements, text boxes, or dropdown menus.
How to do it: If manually editing, use the “Scale” and “Position” keyframes in your effects control panel to push in on the screen over a 1-second duration. If using an auto-editor, toggle the “Auto-Zoom on Click” feature. Ensure the zoom is smooth so it does not disorient the audience.
3. Adding Cursor Highlights and Annotation Tools
In a screen recording, your mouse is your digital pointer. Add cursor highlights to make clicks highly visible. Next, use annotation tools to explicitly direct the viewer’s gaze.
How to do it: Navigate to your software’s “Shapes” or “Graphics” panel. Draw a red bounding box with a thick stroke (no fill) around the exact button the viewer needs to click. You can also drag and drop bold arrows pointing directly to the action area. This dramatically reduces viewer confusion.
4. Generating Captions and Voiceover Mixing
Many users watch online course production videos without sound, making captions mandatory. Use a speech-to-text transcription tool to quickly add accurate captions across the bottom of the screen. Just as importantly, you must mix your audio correctly. Beginners often leave background music too loud.
The Golden Audio Metrics: In your audio mixer panel, adjust your main voiceover track so the audio peaks between -6dB and -12dB. If you add background music, use the volume slider to drop it significantly to between -25dB and -30dB. The music should be a subconscious pulse, never competing with your instructions.
5. Managing Video Compression and Export Settings
Exporting your video can feel like a guessing game if you aren’t familiar with rendering settings. Choosing the wrong setup is exactly what causes hours-long upload times.
Do not leave your bitrate on “Automatic” or “High Quality,” as this often results in massive, gigabyte-sized files that take hours to upload to YouTube or your LMS.
The Ideal Export Settings: In your export menu, choose the H.264 codec (this creates a highly compatible MP4 file). Set your resolution to 1080p (1920×1080) and your frame rate to 30 fps. Finally, look for the “Bitrate Settings” and set your Target Bitrate to 10 to 12 Mbps. This provides excellent clarity without creating massive files.
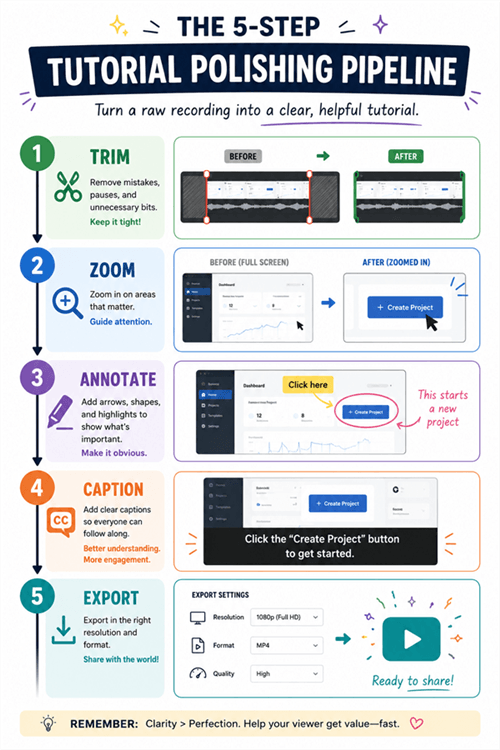
5-step Tutorial Polishing Pipeline
How to Make Tutorial Videos Look Professional: An Expert Technique
If you feel your videos look unprofessional, the solution might be to do less.
GOLDEN RULE: Clarity over Creativity
Beginners often over-edit tutorial videos by adding unnecessary sliding transitions, complex animations, and flashy text effects. These actually distract the viewer from learning the software. The highest-performing educational videos prioritize faster pacing, strict mistake removal, clean zoom-ins, legible captions, and clear visual guidance.
This concept completely changed how Kevin approached his project. In Kevin’s case, the moment of frustration hit when he spent four hours manually keyframing sliding graphics for a simple five-minute Excel walkthrough. Furthermore, he was exporting his screen recordings in massive 4K ProRes formats, meaning his 5-minute tutorials were taking 3 hours just to upload to YouTube.
We shifted his workflow. He switched his export settings to H.264 MP4 at 10Mbps, cutting his upload time down to 5 minutes. He stopped trying to make his videos look like Hollywood trailers and started using an auto-editor that focused strictly on auto-zooms and clean jump cuts.
By simplifying his edits, he immediately improved his SaaS onboarding metrics. His users could actually follow the instructions without visual distraction. To make tutorials more engaging, respect your viewer’s time. Keep the pacing brisk, remove the fluff, and let the educational material take center stage.
A Time-Saving Workflow Specifically for SaaS Onboarding
When creating SaaS onboarding tutorials, your goal is to get the user to their “Aha!” moment as quickly as possible. Elaborate intros and complex editing get in the way of that goal.
If you have tried to edit a how-to video in the past and quit, it is likely because you were using a workflow meant for cinematic vlogs, not software tutorials. A dedicated SaaS workflow looks like this:
- Record the entire process in one take. Do not stop recording if you make a mistake; just pause, take a breath, and repeat the action.
- Drop the footage into your editor and immediately run the silence-removal tool to cut out those pauses.
- Add red bounding boxes strictly around the areas where a user must click to advance to the next step.
- Export using the 1080p / 10Mbps MP4 settings mentioned above.
By standardizing this exact workflow, you can produce a 3-minute feature update video in under 15 minutes of post-production, completely bypassing the technical hurdles that lead to creator burnout.
Frequently Asked Questions: Tutorial Video Editing Tips for Beginners
What is the easiest way to edit tutorial videos?
The easiest method is using an AI-powered editor that automates repetitive tasks. By letting software handle zoom effects, cursor tracking, and silence removal, you eliminate the need for manual timeline slicing and keyframing.
What software should beginners use?
Beginners should look for software that offers a drag-and-drop interface and automated features. Tools that specifically target screen recording editing—rather than generic cinematic software—are highly recommended.
How do I cut mistakes quickly?
If editing manually, memorize the shortcut keys for your Razor tool (usually ‘C’) and Ripple Delete. For a faster method, use software with AI Smart Cut capabilities that scans your audio waveform and automatically deletes long pauses in seconds.
How do I make tutorials more engaging?
Keep your tutorial pacing fast. Remove all unnecessary fluff, apply targeted zoom effects to keep the viewer focused, and ensure your voiceover is energetic and clear.
What are the best audio levels for a tutorial?
Mix your main voiceover to peak between -6dB and -12dB. Keep background music very low, ideally between -25dB and -30dB, so it doesn’t overpower your instructions.
How long should tutorial videos be?
A tutorial should only be as long as necessary to teach the core concept. For most basic software features, aim for 3 to 7 minutes. Respect the viewer’s time by getting straight to the point.
How do I edit screen recordings differently than camera footage?
Screen recordings require visual guidance. Emphasize cursor highlights, use annotation tools (like red boxes) to point out buttons, and zoom in on specific menus to prevent mobile viewers from squinting.
What export settings should I use?
For YouTube and most online platforms, export your video as an MP4 file (H.264 codec) at 1080p resolution and 30 frames per second. Set your target bitrate to 10-12 Mbps to balance high quality with a manageable file size.
Conclusion
Learning how to edit tutorial videos as a beginner shouldn’t mean spending endless hours staring at complex timelines. If you are struggling because professional editing software feels overwhelming, switching your workflow makes all the difference. You no longer need to manually keyframe every zoom effect, guess at your audio decibel levels, or render massive files that take hours to upload.
By adopting a strict, step-by-step procedure—and leveraging automated solutions to handle the heavy lifting—you can solve the editing bottleneck in minutes. Stop letting a steep learning curve hold back your online course production. Transform your messy screen recordings into polished, professional content, regain control of your time, and start publishing with confidence today.